
Table of Contents Menu Lists Index
GB
Click
Digital Recording Binoculars
Handbook
DEV-3/5/5K
2011 Sony Corporation 4-410-129-12(1)

2
Table of Contents Menu Lists Index
GB
Read this first
Using this product
Do not hold this product by the following parts,
and also do not hold this product by the jack
covers.
Viewfinder
Do not put this product with the viewfinder
facing down.
This product is not dustproofed, dripproofed
or waterproofed. See “About handling of this
p
roduct” (p. 89).
Menu items, viewfinder, and lens
A menu item that is grayed out is not available
under the current recording or playback
conditions.
The viewfinder is manufactured using
extremely high-precision technology, so over
99.99% of the pixels are operational for effective
use. However, there may be some tiny black
points and/or bright points (white, red, blue,
or green in color) that appear constantly in the
viewfinder. These points are normal results of
the manufacturing process and do not affect the
recording in any way.
Exposing the viewfinder or the lens to direct
sunlight for long periods of time may cause
malfunctions.
Do not aim at the sun. Doing so might cause
this product to malfunction. Take images of the
sun only in low light conditions, such as at dusk.
About language setting
The on-screen displays in each local language
are used for illustrating the operating
procedures. Change the screen language before
u
sing this product if necessary (p. 18).
On recording
To ensure stable operation of the memory
card, it is recommended to format the memory
card with this product before the first use
(p
. 65). Formatting the memory card will erase
all the data stored on it and the data will be
irrecoverable. Save your important data on your
PC etc.
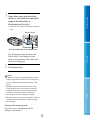
Before starting to record, test the recording
function to make sure the image and sound are
recorded without any problems.
Compensation for the contents of recordings
cannot be provided, even if recording or
playback is not possible due to a malfunction of
this product, memory card, etc.
TV color systems differ depending on the
country/region. To view your recordings on a
TV, set [60i/50i Sel] to the setting required in
y
our country/region before recording (p. 16).
Television programs, films, video tapes,
and other materials may be copyrighted.
Unauthorized recording of such materials may
be contrary to the copyright laws.
Because of the way that the image device
(CMOS sensor) reads out image signals, the
following phenomena may occur.
The subjects passing by the frame rapidly
might appear crooked depending on the
recording conditions. (This phenomenon may
be notable in displays having high motion
resolution.)
Horizontal lines appear on the screen during
recording under fluorescent lights. The
phenomena can be reduced by adjusting the
s
hutter speed (p. 58).

3
Table of Contents Menu Lists Index
GB
Images on the screen look horizontally
divided when a subject is lighted with a flash.
The phenomena can be reduced by using a
slower shutter speed.
Use this product in accordance with local
regulations.
See page 18 for the memory card you can use
with this product.
Notes on playing back
You may not be able to play back normally
images recorded on this product with other
devices. Also, you may not be able to play back
images recorded on other devices with this
product.
DVD media recorded with high
definition image quality
DVD media recorded with high definition
image quality can be played back with devices
that are compatible with the AVCHD standard.
You cannot play discs recorded with high
definition image quality with DVD players/
recorders as they are not compatible with the
AVCHD format. If you insert a disc recorded
with the AVCHD format (high definition image
quality) into a DVD player/recorder, you may
not be able to eject the disc.
Save all your recorded image data
To prevent your image data from being lost,
save all your recorded images on external media
periodically. To save images on your computer,
see page 37, and to save images on external
devices, see page 43.
The type of discs or media on which the images
can be saved depend on the [
REC Mode]
selected when the images were recorded.
Movies recorded with [60p Quality
] ([50p
Quality
]) or [Highest Quality ] can be
saved on external media devices or on Blu-ray
di
scs (p. 45).
Notes on battery pack/AC Adaptor
Be sure to remove the battery pack or the AC
Adaptor after turning off this product.
Disconnect the AC Adaptor from this product,
holding both this product and the DC plug.
Note on the binoculars/battery pack
temperature
When the temperature of this product or
battery pack becomes extremely high or
extremely low, you may not be able to record or
play back on this product, due to the protection
features of this product being activated in such
situations. In this case, an indicator appears on
t
he screen (p. 78).
When this product is connected to a
computer or accessories
Do not try to format the memory card of this
product using a computer. If you do so, this
product may not operate correctly.
When connecting this product to another
device with communication cables, be sure to
insert the connector plug in the correct way.
Pushing the plug forcibly into the terminal
will damage the terminal and may result in a
malfunction of this product.
If you cannot record/play back images,
perform [Format]
If you repeat recording/deleting images for
a long time, fragmentation of data occurs on
the memory card. Images cannot be saved or
recorded. In such a case, save your images on
some type of external media first, and then
perform [Format] by selecting
(MENU)
[Setup] [
( Media Settings)]
[Format]
.
Notes on optional accessories
We recommend using genuine Sony accessories.
Genuine Sony accessories may not be available
in some countries/regions.

4
Table of Contents Menu Lists Index
GB
About this manual, illustrations and
on-screen displays
The example images used in this manual for
illustration purposes are captured using a digital
still camera, and therefore may appear different
from images and screen indicators that actually
appear on this product. And, the illustrations
of this product and its screen indication are
exaggerated or simplified for understandability.
In this manual, the DVD disc recorded with
high definition image quality is called AVCHD
recording disc.
Design and specifications of this product and
accessories are subject to change without notice.
Viewing 3D video images
Some people may experience discomfort (such
as eye strain, fatigue, or nausea) while watching
3D video images.
Sony recommends that all viewers take regular
breaks while watching 3D video images. The
length and frequency of necessary breaks will
vary from person to person. You must decide
what works best.
If you experience any discomfort, you should
stop watching the 3D video images until the
discomfort ends; consult a doctor if you believe
necessary.
You should also review the instruction manual
of any other device or media used with this
product.
The vision of young children (especially those
under six years old) is still under development.
Consult your doctor (such as a pediatrician or
eye doctor) before allowing young children to
watch 3D video images.
Adults should supervise young children to
ensure they follow the recommendations listed
above.
Notes on use
Be careful of your surroundings when using
this product. Especially, do not use this product
while walking. Doing so may cause accidents
or injury.
Do not do any of the following. Otherwise,
the memory card may be damaged, recorded
images may be impossible to play back or may
be lost, or other malfunctions could occur.
ejecting the memory card when the access
l
amp (p. 19) is lit or flashing
removing the battery pack or AC Adaptor
from this product, or applying mechanical
shock or vibration to this product when the
(Movie)/ (Photo) lamps (p. 22) or the
access lamp (p. 19) are lit or flashing
When using the neck strap, do not carry this
product on your back. Doing so may cause
injury. And do not allow this product to knock
against another object.
About manuals for this product
Two manuals have been prepared for this
product, the “Operating Guide” and the
“Digital Recording Binoculars Handbook
(PDF).” The “Operating Guide” introduces
basic operations and the “Digital Recording
Binoculars Handbook (PDF)” explains
details of functions.
Operating Guide
This manual introduces the basic
operations of this product, such as
recording and playback.
Digital Recording Binoculars Handbook
(PDF)
This manual explains various operations,
such as how to use the setting menu and
how to save images on other devices.

5
Table of Contents Menu Lists Index
GB
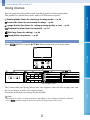
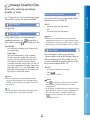
How to read Digital Recording
Binoculars Handbook (PDF)
Install the “Digital Recording Binoculars
Handbook” on your computer from the
supplied CD-ROM.
For a Windows computer
When the installation screen appears, click
[Handbook] the desired language and
the model name [Install], and follow the
on-screen instructions to install the Handbook.
The short-cut icon is created on the computer
screen.
For a Mac
Open the [Handbook] - [GB] folder on the
CD-ROM, then copy [Handbook.pdf] to your
computer.
You need Adobe Reader to read the “Digital
Recording Binoculars Handbook.” If it is not
installed on your computer, you can download
it from the Adobe Systems web page.
http://www.adobe.com/

6
Table of Contents Menu Lists Index
GB
Table of contents
Read this first . . . . . . . . . . . . . . . . . . . . . . . . . . . . . . . . . . . . . . . . . . . . . . . . . . . . . . . . . . . . . . . . . . . . . . . . . . . . . . . . . . . . . . . 2
Viewing 3D video images . . . . . . . . . . . . . . . . . . . . . . . . . . . . . . . . . . . . . . . . . . . . . . . . . . . . . . . . . . . . . . . 4
Notes on use . . . . . . . . . . . . . . . . . . . . . . . . . . . . . . . . . . . . . . . . . . . . . . . . . . . . . . . . . . . . . . . . . . . . . . . . . . . . . . . 4
About manuals for this product . . . . . . . . . . . . . . . . . . . . . . . . . . . . . . . . . . . . . . . . . . . . . . . . . . . . . . . 4
Getting started
Step 1: Checking the supplied items . . . . . . . . . . . . . . . . . . . . . . . . . . . . . . . . . . . . . . . . . . . . . . . . . . . . . . . . . . . 9
Attaching the supplied items . . . . . . . . . . . . . . . . . . . . . . . . . . . . . . . . . . . . . . . . . . . . . . . . . . . . . . . . 10
Step 2: Charging the battery pack . . . . . . . . . . . . . . . . . . . . . . . . . . . . . . . . . . . . . . . . . . . . . . . . . . . . . . . . . . . . 11
Charging the battery pack installed into this product . . . . . . . . . . . . . . . . . . . . . . . . . . 11
Charging the battery pack using the AC Adaptor/Charger (DEV-5K) . . . . . . . . . 13
Step 3: Turning the power on, and setting up this product . . . . . . . . . . . . . . . . . . . . . . . . . . . . . 15
Changing the language setting . . . . . . . . . . . . . . . . . . . . . . . . . . . . . . . . . . . . . . . . . . . . . . . . . . . . . . 18
Step 4: Inserting a memory card . . . . . . . . . . . . . . . . . . . . . . . . . . . . . . . . . . . . . . . . . . . . . . . . . . . . . . . . . . . . . . 18
Binoculars/Recording/Playback
Using this product as binoculars . . . . . . . . . . . . . . . . . . . . . . . . . . . . . . . . . . . . . . . . . . . . . . . . . . . . . . . . . . . . . . 20
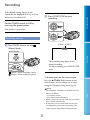
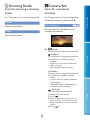
Recording . . . . . . . . . . . . . . . . . . . . . . . . . . . . . . . . . . . . . . . . . . . . . . . . . . . . . . . . . . . . . . . . . . . . . . . . . . . . . . . . . . . . . . . . . . 22
Recording movies . . . . . . . . . . . . . . . . . . . . . . . . . . . . . . . . . . . . . . . . . . . . . . . . . . . . . . . . . . . . . . . . . . . . . . 22
Shooting photos . . . . . . . . . . . . . . . . . . . . . . . . . . . . . . . . . . . . . . . . . . . . . . . . . . . . . . . . . . . . . . . . . . . . . . . . 23
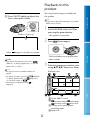
Playback on this product . . . . . . . . . . . . . . . . . . . . . . . . . . . . . . . . . . . . . . . . . . . . . . . . . . . . . . . . . . . . . . . . . . . . . . . 24
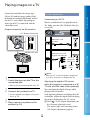
Playing images on a TV . . . . . . . . . . . . . . . . . . . . . . . . . . . . . . . . . . . . . . . . . . . . . . . . . . . . . . . . . . . . . . . . . . . . . . . . . 26
List of connection . . . . . . . . . . . . . . . . . . . . . . . . . . . . . . . . . . . . . . . . . . . . . . . . . . . . . . . . . . . . . . . . . . . . . . . 26
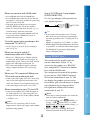
Using “BRAVIA” Sync . . . . . . . . . . . . . . . . . . . . . . . . . . . . . . . . . . . . . . . . . . . . . . . . . . . . . . . . . . . . . . . . . . . . 28
Advanced operations
Useful functions for recording movies and photos . . . . . . . . . . . . . . . . . . . . . . . . . . . . . . . . . . . . . . . 30
Recording better images automatically (Intelligent Auto) . . . . . . . . . . . . . . . . . . . . . 30
Selecting the recording mode . . . . . . . . . . . . . . . . . . . . . . . . . . . . . . . . . . . . . . . . . . . . . . . . . . . . . . . 30
Recording information on your location (GPS) (DEV-5/5K) . . . . . . . . . . . . . . . . . . . . . 31
Controlling the image settings manually with the MANUAL dial . . . . . . . . . . . . . 32
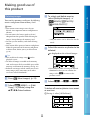
Making good use of this product . . . . . . . . . . . . . . . . . . . . . . . . . . . . . . . . . . . . . . . . . . . . . . . . . . . . . . . . . . . . . 34
Deleting images . . . . . . . . . . . . . . . . . . . . . . . . . . . . . . . . . . . . . . . . . . . . . . . . . . . . . . . . . . . . . . . . . . . . . . . . 34
Protecting recorded movies and photos (Protect) . . . . . . . . . . . . . . . . . . . . . . . . . . . . . . . 35
Dividing a movie . . . . . . . . . . . . . . . . . . . . . . . . . . . . . . . . . . . . . . . . . . . . . . . . . . . . . . . . . . . . . . . . . . . . . . . . 36

7
Table of Contents Menu Lists Index
GB
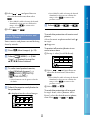
Saving movies and photos with a computer
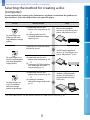
Selecting the method for creating a disc (computer) . . . . . . . . . . . . . . . . . . . . . . . . . . . . . . . . . . . . . 37
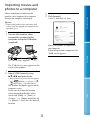
Importing movies and photos to a computer . . . . . . . . . . . . . . . . . . . . . . . . . . . . . . . . . . . . . . . . . . . . . . 39
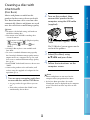
Creating a disc with one touch (Disc Burn) . . . . . . . . . . . . . . . . . . . . . . . . . . . . . . . . . . . . . . . . . . . . . . . . . 40
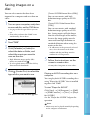
Saving images on a disc . . . . . . . . . . . . . . . . . . . . . . . . . . . . . . . . . . . . . . . . . . . . . . . . . . . . . . . . . . . . . . . . . . . . . . . . 41
Saving images with an external device
Selecting a method for saving images with an external device . . . . . . . . . . . . . . . . . . . . . . . . 43
The devices on which the created disc can be played back . . . . . . . . . . . . . . . . . . . . 44
Saving images on an external media device . . . . . . . . . . . . . . . . . . . . . . . . . . . . . . . . . . . . . . . . . . . . . . . 45
Saving desired movies and photos . . . . . . . . . . . . . . . . . . . . . . . . . . . . . . . . . . . . . . . . . . . . . . . . . 47
Playing back images in the external media device on this product . . . . . . . . . . 47
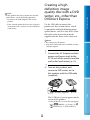
Creating a high definition image quality disc with a DVD writer, etc., other than
DVDirect Express . . . . . . . . . . . . . . . . . . . . . . . . . . . . . . . . . . . . . . . . . . . . . . . . . . . . . . . . . . . . . . . . . . . . . . . . . . . . . . . . . 48
Creating a standard definition image quality disc with a recorder, etc. . . . . . . . . . . . . . . . 49
Customizing this product
Using menus . . . . . . . . . . . . . . . . . . . . . . . . . . . . . . . . . . . . . . . . . . . . . . . . . . . . . . . . . . . . . . . . . . . . . . . . . . . . . . . . . . . . . . 52
Operating menus . . . . . . . . . . . . . . . . . . . . . . . . . . . . . . . . . . . . . . . . . . . . . . . . . . . . . . . . . . . . . . . . . . . . . . . 52
Menu lists . . . . . . . . . . . . . . . . . . . . . . . . . . . . . . . . . . . . . . . . . . . . . . . . . . . . . . . . . . . . . . . . . . . . . . . . . . . . . . . . . . . . . . . . . . 53
Shooting Mode (Items for selecting a shooting mode) . . . . . . . . . . . . . . . . . . . . . . . . . . . . . . . 56
Camera/Mic (Items for customized shooting) . . . . . . . . . . . . . . . . . . . . . . . . . . . . . . . . . . . . . . . . . . 56
Image Quality/Size (Items for setting up image quality or size) . . . . . . . . . . . . . . . . . . 63
Edit/Copy (Items for editing) . . . . . . . . . . . . . . . . . . . . . . . . . . . . . . . . . . . . . . . . . . . . . . . . . . . . . . . . . . . . . . 64
Setup (Other setup items) . . . . . . . . . . . . . . . . . . . . . . . . . . . . . . . . . . . . . . . . . . . . . . . . . . . . . . . . . . . . . . . 65
Additional information
Troubleshooting . . . . . . . . . . . . . . . . . . . . . . . . . . . . . . . . . . . . . . . . . . . . . . . . . . . . . . . . . . . . . . . . . . . . . . . . . . . . . . 72
Self-diagnosis display/Warning indicators . . . . . . . . . . . . . . . . . . . . . . . . . . . . . . . . . . . . . . . . . . . . . . . . . . 78
Recording time of movies/number of recordable photos . . . . . . . . . . . . . . . . . . . . . . . . . . . . . . . 81
Expected operating time with each battery pack . . . . . . . . . . . . . . . . . . . . . . . . . . . . . . . . 81
Expected recording time of movies . . . . . . . . . . . . . . . . . . . . . . . . . . . . . . . . . . . . . . . . . . . . . . . . . 82
Expected number of recordable photos . . . . . . . . . . . . . . . . . . . . . . . . . . . . . . . . . . . . . . . . . . . 82
Using this product abroad . . . . . . . . . . . . . . . . . . . . . . . . . . . . . . . . . . . . . . . . . . . . . . . . . . . . . . . . . . . . . . . . . . . . . 83
Watching the recorded movies on a TV . . . . . . . . . . . . . . . . . . . . . . . . . . . . . . . . . . . . . . . . . . . . 84

8
Table of Contents Menu Lists Index
GB
Maintenance and precautions. . . . . . . . . . . . . . . . . . . . . . . . . . . . . . . . . . . . . . . . . . . . . . . . . . . . . . . . . . . . . . . . . 85
About the AVCHD format . . . . . . . . . . . . . . . . . . . . . . . . . . . . . . . . . . . . . . . . . . . . . . . . . . . . . . . . . . . . . 85
About GPS (DEV-5/5K) . . . . . . . . . . . . . . . . . . . . . . . . . . . . . . . . . . . . . . . . . . . . . . . . . . . . . . . . . . . . . . . . . 86
About the memory card . . . . . . . . . . . . . . . . . . . . . . . . . . . . . . . . . . . . . . . . . . . . . . . . . . . . . . . . . . . . . . . 87
About the “InfoLITHIUM” battery pack . . . . . . . . . . . . . . . . . . . . . . . . . . . . . . . . . . . . . . . . . . . . . 88
About x.v.Color . . . . . . . . . . . . . . . . . . . . . . . . . . . . . . . . . . . . . . . . . . . . . . . . . . . . . . . . . . . . . . . . . . . . . . . . . . 89
About handling of this product . . . . . . . . . . . . . . . . . . . . . . . . . . . . . . . . . . . . . . . . . . . . . . . . . . . . . . 89
Quick reference
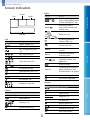
Screen indicators . . . . . . . . . . . . . . . . . . . . . . . . . . . . . . . . . . . . . . . . . . . . . . . . . . . . . . . . . . . . . . . . . . . . . . . . . . . . . . . . . 93
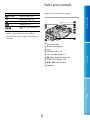
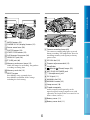
Parts and controls . . . . . . . . . . . . . . . . . . . . . . . . . . . . . . . . . . . . . . . . . . . . . . . . . . . . . . . . . . . . . . . . . . . . . . . . . . . . . . . . 94
Index . . . . . . . . . . . . . . . . . . . . . . . . . . . . . . . . . . . . . . . . . . . . . . . . . . . . . . . . . . . . . . . . . . . . . . . . . . . . . . . . . . . . . . . . . . . . . . . . 96

9
Table of Contents Menu Lists Index
GB
Getting started
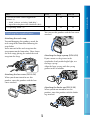
Step 1: Checking the supplied items
When opening the box for the first time, make sure that all of the supplied items listed below
are included. The numbers in ( ) are the supplied quantity.
Items DEV-3 DEV-5 DEV-5K
Digital Recording Binoculars (1)
Carrying case (1)
Neck strap (1)
Lens cover (1)
Finder cap (1)
Large eyecup (2)
AC Adaptor/Battery charger (AC-VQV10) (1)
Connecting cord (DK-225) (1)
AC Adaptor (AC-L200) (1)
Power cord (Mains lead) (1)
Rechargeable battery pack (1)
NP-FV70 NP-FV70 NP-FV100
A/V connecting cable (1)
Component A/V cable (1)
USB cable (1)
USB Adaptor Cable (1)

10
Table of Contents Menu Lists Index
GB
Items DEV-3 DEV-5 DEV-5K
CD-ROM Video Camera Application
Software (1)
“PMB” (software, including “PMB Help”)
Digital Recording Binoculars Handbook (PDF)
“Operating Guide” (1)
Attaching the supplied items
Attaching the neck strap
To avoid dropping this product, attach the
neck strap to the binoculars following the
steps below.
Insert one end of the neck strap into the
strap mount on the binoculars. Then, fasten
the neck strap, placing the end of the neck
strap into the clasp.
Attaching the lens cover (DEV-5/5K)
When you do not intend to use this
product, store this product with the lens
cover attached.
You can use this product with the lens cover
attached.
Attaching the large eyecup (DEV-5/5K)
If you cannot see the picture in the
viewfinder clearly under bright light, use
the large eyecup.
Align the large eyecup with the eyecup
groove in the viewfinder.
Attaching the finder cap (DEV-5/5K)
When you do not intend to use this
product, store this product with the finder
cap attached.

11
Table of Contents Menu Lists Index
GB
You can attach the finder cap to the neck
strap as illustrated when it is not being
used.
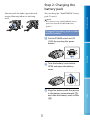
Step 2: Charging the
battery pack
You can charge the “InfoLITHIUM” battery
pack (V series).
Notes
You cannot use any “InfoLITHIUM” battery
pack other than NP-FV70/FV100 to this
product.
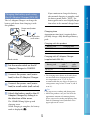
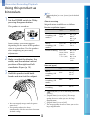
Charging the battery pack installed
into this product
S
et the POWER switch to OFF
(CHG) by pressing the green
button.
Turn the battery cover lock to
OPEN and open the battery
cover.
Align the battery with the groove
in the battery compartment (),
and slide the battery until it clicks
().

12
Table of Contents Menu Lists Index
GB
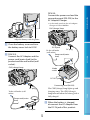
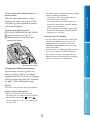
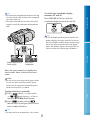
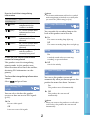
Close the battery cover and turn
the battery cover lock to LOCK.
DEV-3/5:
Connect the AC Adaptor and the
power cord (mains lead) to this
product and the wall outlet (wall
socket).
DEV-5K:
Connect the power cord and the
connecting cord (DK-225) to the
AC Adaptor/Charger.
Set the mode switch on the AC Adaptor/
Charger to VCR/CAMERA.
The CHG (charge) lamp lights up and
charging starts. The CHG (charge)
lamp turns off when the battery pack is
fully charged.
When the battery is charged,
disconnect the AC Adaptor from
the DC IN jack of this product.
DC IN jack
DC plug
To the wall outlet
(wall socket)
Power cord (mains
lead)
Mode
switch
DC OUT jack
Connecting cord (DK-225)
CHG (charge) lamp
DC IN jack
DC plug
AC Adaptor
Power cord (mains
lead)
To the wall outlet (wall
socket)
CHG (charge) lamp
Align the battery with the groove.

13
Table of Contents Menu Lists Index
GB
Charging the battery pack using
the AC Adaptor/Charger (DEV-5K)
The AC Adaptor/Charger can charge the
battery pack faster than charging it with
this product.
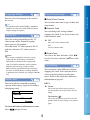
Set the mode switch on the AC
Adaptor/Charger to CHARGE.
Connect the power cord (mains
lead) to the AC Adaptor/Charger.
Connect the power cord (mains
lead) to a wall outlet (wall socket).
Attach the battery pack to the AC
Adaptor/Charger by sliding it in
the direction of the arrow.
The CHARGE lamp lights up and
charging starts.
When charging is complete, the battery
mark is displayed (
).
If you continue to charge the battery
after normal charging is complete until
the battery mark shows “FULL,” the
battery pack can be used slightly longer
than when in the normal charged state.
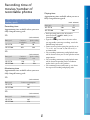
Charging time
Approximate time (min.) required when
you fully charge a fully discharged battery
pack.
Charging with this product
Battery pack Charging time
NP-FV70 195
NP-FV100 390
Charging with AC Adaptor/Charger
(supplied with DEV-5K)
Battery pack
Charging
time
(NORMAL)
Charging
time
(FULL)
NP-FV70 70 130
NP-FV100 125 185
The charging times shown in the table above
are measured when charging this product
at a temperature of 25
C (77 °F). It is
recommended that you charge the battery in
a temperature range of 10
C to 30 C (50 °F
to 86 °F).
Tips
See page 81 on recording and playing time.
When this product is on, you can check the
approximate amount of remaining battery
power (expected recording and playing time)
with the remaining battery indicator at the
upper right on the screen.
To the wall outlet
(wall socket)
Power cord (mains
lead)
Mode switch
CHARGE lamp

14
Table of Contents Menu Lists Index
GB
To use a wall outlet (wall socket) as a
power source
Make the same connections as “Step 2:
Charging the battery pack” (p
. 11). Even
if the battery pack is installed, the battery
pack is not discharged.
To remove the battery pack
Set the POWER switch to OFF (CHG).
O
pen the battery cover (p. 11).
S
lide the battery release lever and
remove the battery.
Charging the battery pack abroad
You can charge the battery pack in any
countries/regions using the AC Adaptor
(supplied with DEV-3/5) or the AC Adaptor/
Charger (supplied with DEV-5K) within the
A
C 100 V - 240 V, 50 Hz/60 Hz range.
Notes
Do not use an electronic voltage transformer.
Notes on the battery pack
When you remove the battery pack or
disconnect the AC Adaptor, turn this product
off and make sure that the
(Movie)/
(Photo) lamps (p. 22), t
he access lamp (p. 19)
are turned off.
The CHG (charge) lamp flashes during charging
under the following conditions:
The battery pack is not installed correctly.
The battery pack is damaged.
The temperature of the battery pack is low.
Remove the battery pack from this product
and put it in a warm place.
The temperature of the battery pack is high.
Remove the battery pack from this product
and put it in a cool place.
Notes on the AC Adaptor
Use the nearby wall outlet (wall socket) when
using the AC Adaptor. Disconnect the AC
Adaptor from the wall outlet (wall socket)
immediately if any malfunction occurs while
using this product.
Do not use the AC Adaptor placed in a narrow
space, such as between a wall and furniture.
Do not short-circuit the DC plug of the AC
Adaptor or battery terminal with any metallic
objects. This may cause a malfunction.
Battery release lever

15
Table of Contents Menu Lists Index
GB
Step 3: Turning the
power on, and setting
up this product
Notes
Do not turn the power on with the USB cable
connected.
Do not connect the USB cable until the
following procedure is completed.
1
Set the POWER switch to ON by
pressing the green button.
This product is turned on.
2
Adjust the diopter until you
can see a clear image with each
eye by turning the diopter
adjustment dial.
If this product is used by more than one
person, adjust the diopter each time the
user changes.
Adjust the diopter for each eye separately.
3
Pull out the IPD ADJ dial.
4
Adjust the width between the left
and right viewfinder to fit your
eyes using the IPD ADJ dial.
Adjust the width so that left and right
images overlap.
Make sure that the image in the viewfinder
does not look like it has a double image.
If this product is used by more than one
person, adjust the width each time the user
changes.
5
Push the IPD ADJ dial back into
this product.
6
Set the language, area, summer
time, date & time format, and
date & time using the ////
Enter button, then confirm each
setting.
When each setting have been
completed, select [Next] and press
Enter.
Enter button

16
Table of Contents Menu Lists Index
GB
To set the date and time again, select
(MENU) [Setup] [
(
Clock Settings)] [Date & Time
Setting] [Date & Time]. When [Date
& Time] is not on the screen, press
/
until the item appears.
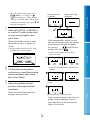
7
Select [60i (NTSC)] or [50i (PAL)]
to suit the TV color system used
in your country/region, then
press Enter.
When the 60i/50i selection is made,
this product restarts to update the
system.
See page 84 for details on the TV color
system in your country/region.
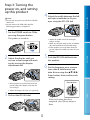
8
Confirm the warning about
continuous use and the warning
about viewfinder adjustment,
then select [Next].
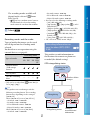
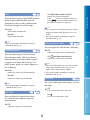
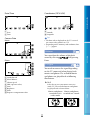
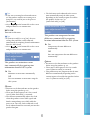
9
Adjust the relative vertical
position of the right and left
viewfinder.
Make sure that the horizontal line
overlaps the vertical lines.
If the horizontal line and the vertical
lines do not overlap, adjust the position
of the image in the right viewfinder
by selecting
/ until the lines
overlap, then select
.
If you see the image below, the device
works correctly.
If you see the image below, stop using this
product.
If you cannot see images correctly, this
product may be damaged. Contact
your Sony dealer or local authorized
Sony service facility.
The horizontal line is extremely tilted.
The horizontal line and the vertical lines do not
overlap.
Image in the left
viewfinder
Image in the right
viewfinder
Image viewed by both eyes

17
Table of Contents Menu Lists Index
GB
10
Select [Run].
If you select [Run Later], the recording
mode screen appears. When you turn on
this product next time, the [Auto 3D Lens
Adjust] screen will appear.
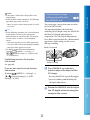
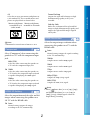
11
Adjust the 3D lens.
Aim this product at a subject to display
it on the screen.
Be sure that the subject produces a scale
higher than the
mark.
12
Select
.
Do not change the subject until the
adjustment is completed.
Notes
If this product failed [Auto 3D Lens Adjust],
select [Run Again].
Type of subjects that should be
displayed on the screen for [Auto 3D
Lens Adjust]
The scale indicated varies depending on the
subject displayed on the screen.
Subjects that indicate a higher scale:
Bright subjects, such as objects outdoors in
daylight
Subjects with various colors and shapes
Subjects that indicate a lower scale and
result in adjustment failure:
Dark subjects, such as objects viewed at night
Subjects within 2 m (6 ft. 6 3/4 in.) away from
this product
Plain, non-colorful subjects
Subjects that repeat the same pattern, such as
rows of windows on buildings
Moving subjects
Notes
You may see primary colors, red, blue, or green,
shimmering in the viewfinder when you move
your line of sight. This is not a malfunction.
The shimmering colors will not be recorded on
the memory card.
The date and time does not appear during
recording, but they are automatically recorded
on the memory card, and can be displayed
during playback. To display the date and time,
select
(MENU) [Setup] [
(
Playback Settings)] [Data Code]
[Date/Time]
.
Scale

18
Table of Contents Menu Lists Index
GB
To turn off the power
Set the POWER switch to OFF (CHG).
The
(Movie) lamp flashes for a few
seconds and this product is turned off.
Changing the language setting
You can change the on-screen displays to
show messages in a specified language.
Select
(MENU) [Setup]
[
( General Settings)] [Language
Setting] a desired language
.
Step 4: Inserting a
memory card
Types of memory card you can use with
this product
“Memory Stick
PRO Duo” media
(Mark2)
“Memory Stick
PRO-HG Duo”
media
SD memory card*
SDHC memory
card
*
SDXC memory
card
*
Described in this
manual, “Memory
Stick PRO Duo”
media
Described in this
manual, SD card
* SD Speed Class 4 or faster is required.
Operation with all memory cards is not assured.
“Memory Stick PRO Duo” media, half the size
of “Memory Stick”, or standard size SD cards
can be used for this product.
Do not attach a label or the like on memory
card or memory card adaptor. Doing so may
cause a malfunction.
“Memory Stick PRO Duo” media of up to 32 GB
and SD cards of up to 64 GB have been verified
to operate with this product.
Notes
A MultiMediaCard cannot be used with this
product.
Movies recorded on SDXC memory cards
cannot be imported to or played back on
computers or AV devices not supporting the
exFAT* file system by connecting this product
to these devices with the USB cable. Confirm
in advance that the connecting equipment is
supporting the exFAT system. If you connect
an equipment not supporting the exFAT system
and the format screen appears, do not perform
the format. All the data recorded will be lost.
* The exFAT is a file system that is used for
SDXC memory cards.

19
Table of Contents Menu Lists Index
GB
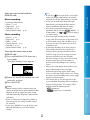
1
Open the cover, and insert the
memory card with the nothched
edge in the direction as
illustrated until it clicks.
Close the cover after inserting the memory
card.
The [Preparing image database file.
Please wait.] screen appears if you
insert a new memory card. Wait until
the screen disappears.
2
Close the cover.
Notes
If [Failed to create a new Image Database File.
It may be possible that there is not enough free
space.] is displayed, format the memory card
(p
. 65).
Confirm the direction of the memory card.
If you forcibly insert the memory card in the
wrong direction, the memory card, memory
card slot, or image data may be damaged.
Do not open the cover during recording.
When inserting or ejecting the memory card, be
careful so that the memory card does not pop
out and drop.
To eject the memory card
Open the cover and lightly push the
memory card in once.
Access lamp
Note the direction of notched corner.

20
Table of Contents Menu Lists Index
GB
Binoculars/Recording/Playback
Using this product as
binoculars
1
Set the POWER switch to ON by
pressing the green button.
This product is turned on.
Some settings screen may appear
depending on the status of this product
when it is turned on. Use this product
after completing any necessory
adjustments.
2
Make sure that the diopter, the
width, and the relative vertical
position of the right and left
viewfinder fit you (p. 15).
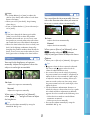
3
Hold this product with both
hands and aim it at the subject.
You can magnify images with the power
zoom lever.
This product adjusts the focus
automatically with the auto-focus function
(default setting).
Tips
[
SteadyShot] is set to [Active] in the default
setting.
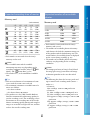
About zooming
Magnifications available are as follows.
Binoculars magnification (approx.)
DEV-3 DEV-5/5K
Movie
recording (2D
mode)
*
1
0.8 to
10
0.8 to
20
*
2
0.8 to
10
*
3
Movie
recording (3D
mode)
*
1
0.5 to
5.4
0.5 to
5.4
Photo recording
0.5 to
10 (16:9)
0.3 to
7.5 (4:3)
0.5 to
20
*
4
(16:9)
0.3 to
15
*
4
(4:3)
Zoom ratio (approx.)
DEV-3 DEV-5/5K
Movie
recording (2D
mode)
12 24
*
2
12 *
3
Movie
recording (3D
mode)
10 10
Photo
recording
22 44
*
4
*
1
[ SteadyShot] is set to something other than
[Active]
*
2
[Digital Zoom] is set to [On] (The image
quality decreases when you use the large
magnification)
*
3
[Digital Zoom] is set to [Off]
*
4
The image quality decreases when you use the
large magnification
Page is loading ...
Page is loading ...
Page is loading ...
Page is loading ...
Page is loading ...
Page is loading ...
Page is loading ...
Page is loading ...
Page is loading ...
Page is loading ...
Page is loading ...
Page is loading ...
Page is loading ...
Page is loading ...
Page is loading ...
Page is loading ...
Page is loading ...
Page is loading ...
Page is loading ...
Page is loading ...
Page is loading ...
Page is loading ...
Page is loading ...
Page is loading ...
Page is loading ...
Page is loading ...
Page is loading ...
Page is loading ...
Page is loading ...
Page is loading ...
Page is loading ...
Page is loading ...
Page is loading ...
Page is loading ...
Page is loading ...
Page is loading ...
Page is loading ...
Page is loading ...
Page is loading ...
Page is loading ...
Page is loading ...
Page is loading ...
Page is loading ...
Page is loading ...
Page is loading ...
Page is loading ...
Page is loading ...
Page is loading ...
Page is loading ...
Page is loading ...
Page is loading ...
Page is loading ...
Page is loading ...
Page is loading ...
Page is loading ...
Page is loading ...
Page is loading ...
Page is loading ...
Page is loading ...
Page is loading ...
Page is loading ...
Page is loading ...
Page is loading ...
Page is loading ...
Page is loading ...
Page is loading ...
Page is loading ...
Page is loading ...
Page is loading ...
Page is loading ...
Page is loading ...
Page is loading ...
Page is loading ...
Page is loading ...
Page is loading ...
Page is loading ...
Page is loading ...
Page is loading ...
-
 1
1
-
 2
2
-
 3
3
-
 4
4
-
 5
5
-
 6
6
-
 7
7
-
 8
8
-
 9
9
-
 10
10
-
 11
11
-
 12
12
-
 13
13
-
 14
14
-
 15
15
-
 16
16
-
 17
17
-
 18
18
-
 19
19
-
 20
20
-
 21
21
-
 22
22
-
 23
23
-
 24
24
-
 25
25
-
 26
26
-
 27
27
-
 28
28
-
 29
29
-
 30
30
-
 31
31
-
 32
32
-
 33
33
-
 34
34
-
 35
35
-
 36
36
-
 37
37
-
 38
38
-
 39
39
-
 40
40
-
 41
41
-
 42
42
-
 43
43
-
 44
44
-
 45
45
-
 46
46
-
 47
47
-
 48
48
-
 49
49
-
 50
50
-
 51
51
-
 52
52
-
 53
53
-
 54
54
-
 55
55
-
 56
56
-
 57
57
-
 58
58
-
 59
59
-
 60
60
-
 61
61
-
 62
62
-
 63
63
-
 64
64
-
 65
65
-
 66
66
-
 67
67
-
 68
68
-
 69
69
-
 70
70
-
 71
71
-
 72
72
-
 73
73
-
 74
74
-
 75
75
-
 76
76
-
 77
77
-
 78
78
-
 79
79
-
 80
80
-
 81
81
-
 82
82
-
 83
83
-
 84
84
-
 85
85
-
 86
86
-
 87
87
-
 88
88
-
 89
89
-
 90
90
-
 91
91
-
 92
92
-
 93
93
-
 94
94
-
 95
95
-
 96
96
-
 97
97
-
 98
98


Sony DEV-3 User manual
- Category
- DVD players
- Type
- User manual
Ask a question and I''ll find the answer in the document
Finding information in a document is now easier with AI
Related papers
-
Sony DEV-3 Operating instructions
-
Sony DEV-50V Operating instructions
-
-
Sony NEX-VG900E Operating instructions
-
Sony NEX-VG30E Operating instructions
-
Sony NEX-VG20EH Owner's manual
-
Sony NEX-VG20H User manual
-
Sony HDR-CX690E User manual
-
-
Other documents
-
Rollei DigitalBino da20 Owner's manual
-
Barska Deep Sea 7x50 Owner's manual
-
Sharper Image True Night-Vision Binoculars User manual
-
 Creative XP GlassOwl Night Vision Binoculars User manual
-
 Videsur-electronic VSDTCK33M Instructions For Use Manual
-
Hike Crew HIKNVB200 User guide
-
Sharper Image 12X Zoom Digital Camera Binoculars User manual
-
MicroBoards Technology NX1-1000 User manual
-
-
 Pulsar Nightvision Wärmbildgerät Binokular Accolade XQ38 Owner's manual


