Klipsch FLOORSTANDING LOUDSPEAKERS User manual

Category
Loudspeakers
Type
User manual
REFERENCE SERIES
IMPORTANT SAFETY INSTRUCTIONS
1. READ these instructions.
2. KEEP these instructions.
3. HEED all warnings.
4. FOLLOW all instructions.
5. DO NOT use this apparatus near water.
6. CLEAN ONLY with dry cloth.
7. DO NOT block any ventilation openings.Install in accordance with the manufacturer's
instructions.
8. DO NOT install near any heat sources such as radiators,heat registers,stoves,or other
apparatus (including amplifiers) that produce heat.
9 . DO NOT defeat the safety purpose of the polarized or grounding type plug.A polarized plug has
two blades with one wider than the other.A grounding type plug has two blades and a third
grounding prong.The wider blade or the third prong are provided for your safety. If the provided
plug does not fit into your outlet, consult an electrician for replacement of the obsolete outlet.
10. PROTECT the power cord from being walked on or pinched,particularly at plugs,conve-
nience receptacles,and the point where they exit from the apparatus.
11. ONLY USE attachments/accessories specified by the manufacturer.
12. USE only with a cart,stand,tripod,bracket,or table specified by the manufacturer, or sold
with the apparatus.When a cart is used,use caution when moving the cart/apparatus
combination to avoid injury from tip-over.
13. UNPLUG this apparatus during lightning storms or when unused for long periods of time.
14. REFER all servicing to qualified service personnel.Servicing is required when the apparatus
has been damaged in any way,such as power-supply cord or plug is damaged,liquid has
been spilled or objects have fallen into the apparatus,the apparatus has been exposed to
rain or moisture,does not operate normally,or has been dropped.
This symbol indicates that there are important operating and maintenance instructions
in the literature accompanying this unit.
This symbol indicates that dangerous voltage constituting a risk of electric shock is
present within this unit.
WARNING: To reduce the risk of fire or electrical shock,do not expose this apparatus
to rain or moisture.
WARNING: Voltages in this equipment are hazardous to life.No user-serviceable parts inside.
Refer all servicing to qualified service personnel.
CAUTION: Changes or modifications not expressly approved by the manufacturer could void the
user’s authority to operate this device.
ABOUT YOUR KLIPSCH PURCHASE
Thank you for your purchase of Klipsch floorstanding loudspeakers.After reading this manual
and connecting your system,you will hear the result of over 55 years of stringent engineering
and class-leading research and development.Like all Klipsch products,your floorstanding
loudspeakers feature Klipsch Tractrix
®
Horn-loaded Technology—the guiding design for the first
Klipschorn
®
developed in 1946 and for every product that has followed.Horn-loading allows
your speakers to deliver high sensitivity, low distortion, flat frequency response and wide
dispersion,which translates to unequaled power,detail and dynamics,the hallmarks of “The
Klipsch Sound.”Please be sure to fill out the warranty card at the back of this manual or online
at www.klipsch.com so we are better able to serve you.Again,thank you for choosing Klipsch
and we hope that your speakers bring life to your music and movies for many years.
UNPACKING AND ASSEMBLING THE SPEAKER
NOTE: Although this loudspeaker can be unpacked and set up by a single person,a helper will
make the job easier,not to mention safer, for speaker and owner alike.
The easiest way to remove the speaker from its carton is to turn the open end of the box down
so that it is resting on the floor, with the flaps spread out and away.Then pull the box straight up
and off.Remove any packing material from the speaker and grille,place it back in the carton,
and store in case you ever need to ship the loudspeaker. Locate the speaker’s four stabilizing
feet and retaining screws,which are needed for the next step.
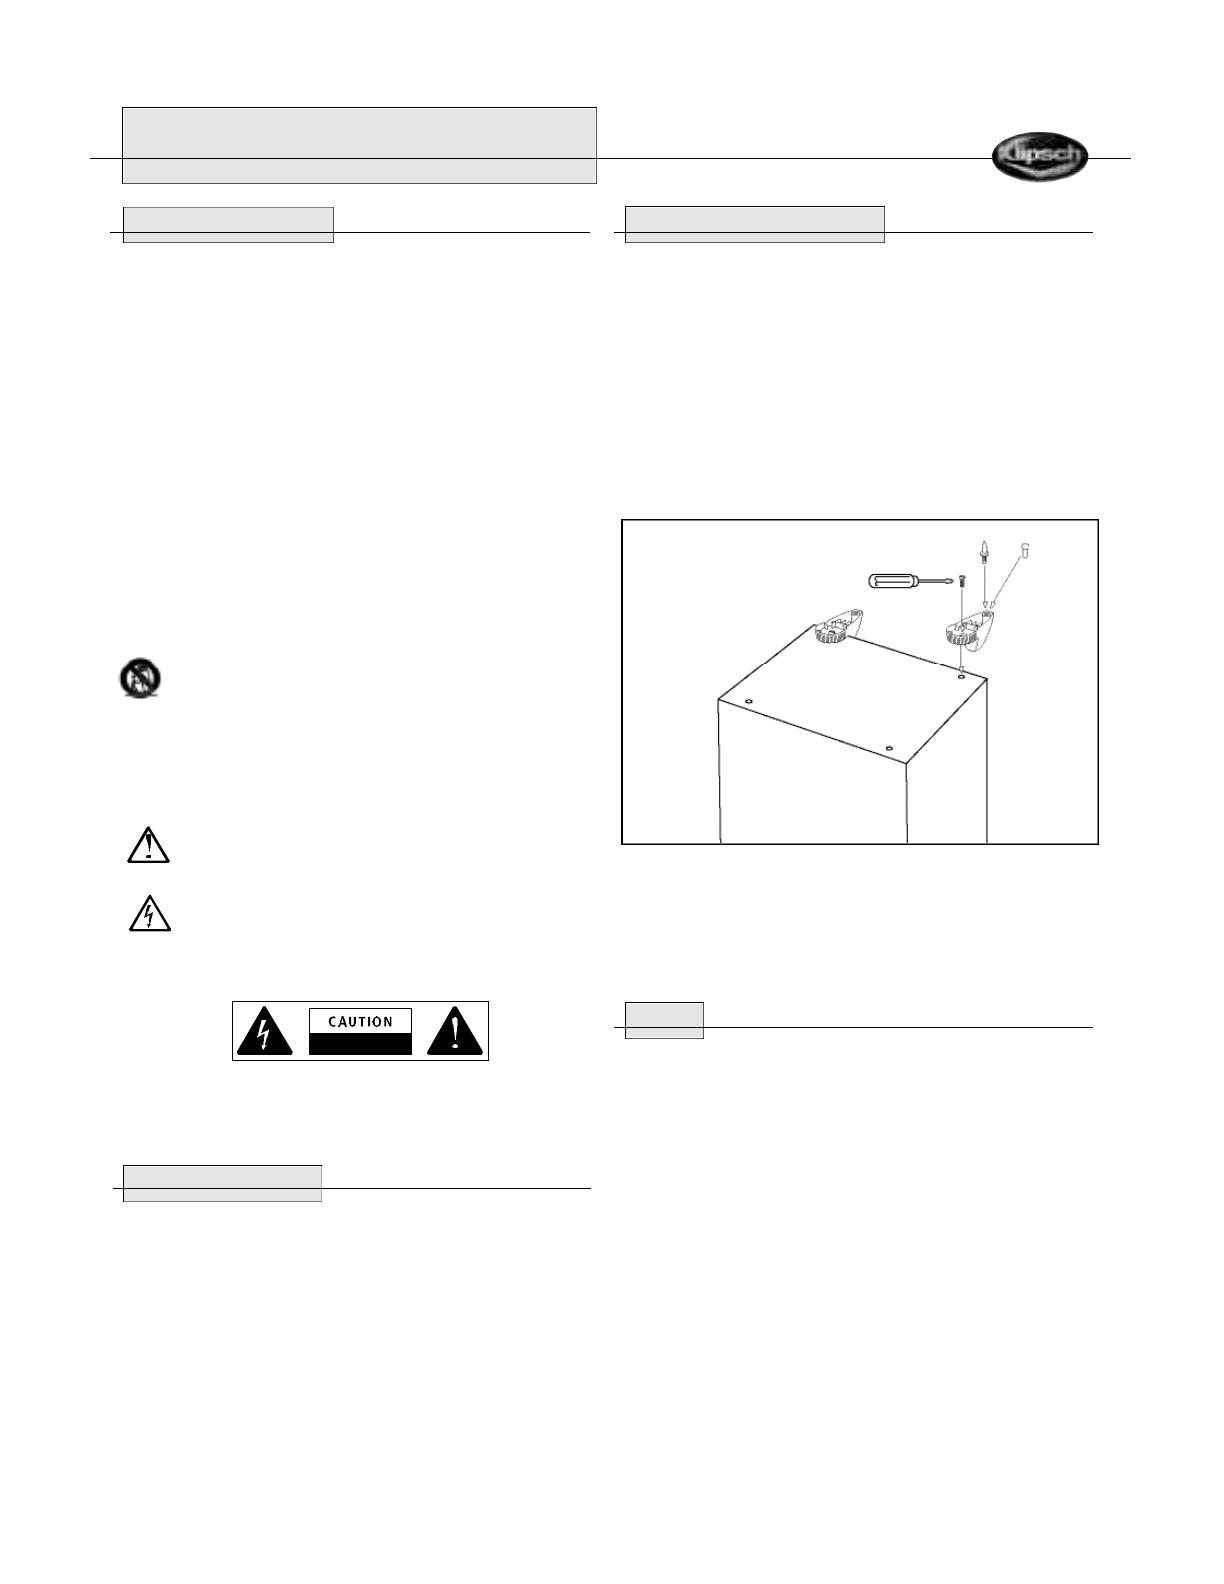
If the speaker is not already standing on its head,carefully turn it over so that the bottom is fac-
ing up.Near the corners are threaded inserts for attaching the feet.For each one,take one of
the supplied feet and align it so that its screw hole is over the insert.Thread one of the supplied
screws through and tighten it firmly with a phillips-head screwdriver. (See Figure 1.)
Once the feet are attached,install either a carpet spike or a rubber tipped bolt into the threaded
insert in each foot.The best sonic performance on carpeted surfaces will be achieved by using
the supplied spikes.Then,carefully turn the speaker right side up.Once installed,the speaker
must be lifted when moved to avoid carpet damage.The spikes are sharp; keep your feet clear!
Align the magnetic posts on the inside of the grille with the screws on the front of the speaker,
and it will snap into place.
PLACEMENT
Although your Reference Series speakers will perform well in a wide variety of locations,you will
get the most out of them by following some simple guidelines:
The speakers require a few inches of clearance behind them to allow their ports to breat h e ,a n d
t h ey will sound best when they are at least two feet (60 centimeters) from any nearby walls.
• If possible,arrange both speakers so that they are equal distances from the floor and the wall
behind them.It can also help to have the left and right speakers at different distances from
their nearest side walls.This sort of staggering helps smooth the bass range.
A ny speaker’s bass output and response is strongly influenced by its distance from room
b o u n d a r i e s , such as walls and the fl o o r. Moving a speaker closer to a room boundary will
increase its bass output,while moving it aw ay will reduce the bass. Following the sugg e s t i o n s
above will typically yield good results with Klipsch Reference Series floorstanding speakers,
but you may find that you can “ f i n e - t u n e ”the sound by moving them slightly from side to side
or front to back until music recordings with strong bass content sound just right to you.Don’t be
afraid to experiment.
Two-Channel Stereo System - Figure 2 shows a typical speaker arrangement for a two-channel
stereo system.A good starting point is to create an equilateral triangle with the speakers and your
listening position.Depending on the size of the room and the furniture arrangement,you may find
Figure 1
RISKOFELECTRICSHOCK
DONOTOPEN
it convenient to make the distance from the listening position to the line between the speakers
s o m e w h at larger or smaller, but try to keep it centered, so that you are at ap p r o x i m at e ly the same
distance from each speaker.T h at will yield the best stereo imag e .Angling widely spread speakers
in slightly toward the listening position can help maintain a good stereo imag e .
Stereo Setup for Wide Coverage - If you are primarily interested in being able to hear the sound
well from any position in the room rather than from a particular seating area,you may prefer to
move the speakers far apart along adjoining walls,creating a big “L.”This will not provide a very
good stereo image,but it will give spacious,well-balanced sound with good coverage.
Home Theater System - Figure 3 shows a typical home theater speaker setup,with a pair of
floorstanding speakers at the front left and right,a horizontal center-channel speaker between
them,and a pair of surround speakers on the side walls.The basic strategy for placing the front
left and right speakers is similar to the one described above for a two-channel stereo system,
but anchored by the video screen.Ideally, the front left and right speakers should be approxi-
mately in line with the screen and equidistant from it.Unless your video screen is very large,you
may prefer less spread between the left and right speakers than in a dedicated stereo music
system.This may better associate the size of the sonic image with the video image.
CONNECTIONS
Note: Proper connection of your speakers to your amplifier or receiver is vital to obtaining good
sound quality. Please follow these directions carefully. Sloppy connections can cause amplifier
malfunction or damage.
Klipsch Reference Series speakers are wired internally with Bandwidth Balanced
Monster
®
Cable.Bandwidth Balanced technology employs multiple gauges of high-purity copper wire,
carefully selected and wound to ensure optimum signal transfer at all frequencies.You will
obtain best performance from your speakers if you connect them to your amplifier or receiver
with Monster Cable or similar quality wire available from your dealer. We recommend that you
use 16-gauge or heavier stranded copper wire.Use a lower gauge (heavier) wire for longer runs
to reduce the amount of amplifier power lost due to the wire’s resistance.
On the back of each speaker are two sets of binding posts, one feeding the tweeter and the other
the woofers. For conventional wiring, these sets are connected together with gold-plated metal
s t r ap s , which must be removed for bi-wiring or biamping.We will explain ordinary single-wiring
first and then the alternat i v e s .All the info r m ation regarding single-wiring also applies to bi-wiring.
BUT FIRST: TYPES OF CONNECTORS
Bare wire. Pull the two conductors apart for about an inch and strip approximately 1/4-inch of
insulation from the end of each.(A wire stripper will simplify this,but you can use an ordinary
pocket knife to cut around and through the insulation down to the wire.) Twist the strands of
wire on each individual conductor tightly together. Loosen the nuts on a pair of binding posts
until the holes through the metal posts are exposed,then insert the bare wire through the holes.
Screw the nuts down finger-tight on the wire. Make sure that no strands of wire are touching
from one binding post to the other or to any strands from the other conductor. Failure to observe
this precaution at either end of the connection can result in amplifier malfunction or damage.
P i n s . M a ny pre-made speaker cables are terminated with metal pins.Loosen the nuts on a pair of
binding posts until the holes through the metal posts are exposed, then insert the pins through
the holes.Screw the nuts down finger-tight on the pins — do not overtighten. Make sure that
there is no metal-to-metal contact between the two pins or binding posts. Failure to observe this
precaution at either end of the connection can result in amplifier malfunction or damage.
Spade lugs. Some speaker cables are terminated with U-shaped connectors called spade lugs.
Loosen the nuts on a pair of binding posts and slip the spade lugs around the metal posts. Screw the
nuts down finger-tight on the lugs and inspect to ensure they have remained firmly in place. M a k e
sure that there is no metal-to-metal contact between the two lugs or binding posts. Failure to observe
this precaution at either end of the connection can result in amplifier malfunction or damage.
OTHER TYPES OF SPECIALTY CONNECTORS ARE AVAILABLE TO FACILITATE HOOKING UP YOUR
SPEAKERS. PLEASE CONSULT YOUR AUTHORIZED KLIPSCH DEALER FOR SUGGESTIONS AND
FURTHER DETAILS.
SPEAKERS TO AMPLIFIER:KEEPING IT STRAIGHT
One of the most important things about hooking up your speakers is keeping them in the same
polarity, or phase.If they are connected out of phase,bass and sound imaging will be degraded.
The easiest way to ensure that your speakers are wired in phase is to always connect the
positive and negative output terminals on your amplifier or receiver to the matching input termi-
nals on your speakers:positive (“+”,color-coded red) to positive and negative (“–”,color-coded
black) to negative.(See Figure 4.)
Figure 2
Figure 3
Figure 4
X=Y=Z
Most pre-terminated speaker cables have color-coded connectors that make it easy to match
output and inputs correctly.If yours do not,or if you are making your own out of paired,two-
conductor wire,look for identifying marks on the insulation of the two conductors.Normally
there will be printing,a stripe or a molded ridge along one of the conductors.
Bi-wiring - In bi-wiring,separate cables are connected from the amplifier or receiver output ter-
minals to the speaker input terminals for the tweeter and woofers.(See Figure 5.) This results in
lower electrical resistance between the amplifier and speaker than single-wiring with the same
gauge cable.In some cases bi-wiring may be preferable to single-wiring with lower-gauge
cable,which will be thicker and probably less flexible.
To bi-wire your Reference Series speakers,loosen the nuts on the binding posts and remove the
metal straps linking the woofer and tweeter terminals.Observing proper polarity, connect one
cable to the tweeter binding posts (upper) and another to the woofer binding posts (lower).Run
both cables back to your amplifier or receiver and attach them to the same channel.(Do not,for
example, attach one to an A speaker output and the other to a B speaker output on an amplifier
or receiver with A/B speaker switching.) Amplifiers may be severely damaged if straps are
not removed.
Biamping - In biamplificat i o n , the tweeter and woofers are driven by separate amplifiers fed from
the same preamplifier output.We do not recommend biamplifying any of our speakers, since in
general it will produce no benefit that could not be obtained simply by using a single larger ampli-
fier and may cause severe sound degr a d ation if not done properly. If you do biamplify, use the
same model amplifier for the tweeter and woofer sections (to prevent frequency-response errors
caused by different amplifier gains) and be sure to remove the straps linking the two sets of input
terminals on the speaker. Amplifiers may be severely damaged if straps are not removed.
BASS MANAGEMENT SETTINGS
Surround-sound receivers and processors use what is known as bass management to ensure
that low frequencies in the various channels are sent to speakers that can handle them well and
away from small speakers that cannot.All Klipsch Reference Series floorstanding models are
full-range loudspeakers that can be set to Large in your receiver or processor’s speaker setup
menu.If your system includes a good powered subwoofer, however, you may get better overall
performance by setting all speakers to Small, which will route all low bass to the subwoofer.
Experiment to see what works best in your system.
CARE AND CLEANING
The only thing you should ever need to do to your speakers is dust them occasionally. Never
apply any abrasive or solvent-based cleaner or any harsh detergent.You can clean the grilles
with the brush attachment of a vacuum cleaner.
WARRANTY— U.S.AND CANADA ONLY
The Warranty below is valid only for sales to consumers in the United States or Canada.
KLIPSCH,L.L.C.("KLIPSCH") warrants this product to be free from defects in materials and
workmanship (subject to the terms set forth below) for a period of five (5) years from the date of
purchase.During the Warranty period,KLIPSCH will repair or replace (at KLIPSCH’s option) this
product or any defective parts (excluding electronics and amplifiers).For products that have
electronics or amplifiers,the Warranty on those parts is for a period of two (2) years from the
date of purchase.
To obtain Warranty serv i c e , please contact the KLIPSCH authorized dealer from which you pur-
chased this product.If your dealer is not equipped to perform the repair of your KLIPSCH product,i t
can be returned,freight paid,to KLIPSCH for repair. Please call KLIPSCH at 1-800-KLIPSCH fo r
i n s t r u c t i o n s .You will need to ship this product in either its original packaging or packaging affo r d i n g
an equal degree of protection.
Proof of purchase in the form of a bill of sale or receipted invoice,which is evidence that this
product is within the Warranty period,must be presented or included to obtain Warranty serv i c e .
This Warranty is invalid if (a) the factory - applied serial number has been altered or removed from
this product or (b) this product was not purchased from a KLIPSCH authorized dealer.You may call
1-800-KLIPSCH to confirm that you have an unaltered serial number and/or you purchased from a
KLIPSCH authorized dealer.
This Warranty is only valid for the original purchaser and will automatically terminate prior to
expiration if this product is sold or otherwise transferred to another party.
This Warranty does not cover cosmetic damage or damage due to misuse, abuse,negligence,
acts of God,accident,commercial use or modification of,or to any part of,the product.
This Warranty does not cover damage due to improper operation,maintenance or installation,or
attempted repair by anyone other than KLIPSCH or a KLIPSCH dealer which is authorized to do
KLIPSCH warranty work.Any unauthorized repairs will void this Warranty. This Warranty does not
cover product sold AS IS or WITH ALL FAULTS.
REPAIRS OR REPLACEMENTS AS PROVIDED UNDER THIS WARRANTY ARE THE EXCLUSIVE
REMEDY OF THE CONSUMER.KLIPSCH SHALL NOT BE LIABLE FOR ANY INCIDENTAL OR
CONSEQUENTIAL DAMAGES FOR BREACH OF ANY EXPRESS OR IMPLIED WARRANTY ON
THIS PRODUCT. EXCEPT TO THE EXTENT PROHIBITED BY LAW, THIS WARRANTY IS EXCLUSIVE
AND IN LIEU OF ALL OTHER EXPRESS AND IMPLIED WARRANTIES WHATSOEVER,INCLUDING
BUT NOT LIMITED TO,THE WARRANTY OF MERCHANTABILITY AND FITNESS FOR A PRACTICAL
PURPOSE.
Some states do not allow the exclusion or limitation of incidental or consequential damages or
implied warranties so the above exclusions may not apply to you.This Warranty gives you
specific legal rights,and you may have other rights,which vary from state to state.
WARRANTY OUTSIDE THE UNITED STATES AND CANADA
The warranty on this product if it is sold to a consumer outside of the United States or Canada
shall comply with applicable law and shall be the sole responsibility of the distributor that
supplied this product. To obtain any applicable warranty service,please contact the dealer from
which you purchased this product,or the distributor that supplied this product.
Figure 5
REFERENCE SERIES
Cut along dotted line and mail.
For multiple speaker purchases, please fill out only one warranty card.
Name:
Street Address:
City/State/Zip:
Home Phone:
Work Phone:
E-mail Address:
Would you like to receive the latest product updates and news via e-mail?
Yes
No
Product Purchase
Model and serial number must be included to honor your warranty card. For multiple speaker
purchases,please fill out only one warranty card.
Model Serial Number
Model Serial Number
Model Serial Number
Model Serial Number
Model Serial Number
What store did you purchase your Klipsch products from?
Store Name: State:
How did you hear about Klipsch?
Audio/Home Theater Magazine
Other Magazine
TV
Radio
Newspaper
Trade Show
Friend
Retail Dealer
Direct Mail
Have you purchased Klipsch products before?
Yes
No
If yes,what products?
Product Name(s):
When do you hope to purchase additional loudspeakers?
6 mos.– 1 yr.
1–2 yrs.
How likely are you to consider Klipsch products for your upcoming purchases?
Very likely
Somewhat likely
Doubtful
If doubtful,why?
Don’t carry product I’m looking for
Too expensive
Klipsch dealer too far away
Other
Please tell us about you!
Married
Single
Student
Male
Female
Age:
15-17
18-24
25-35
36-45
46-55
55-64
65+
Annual Household Income:
Under $25,000
$25-35,000
$35-50,000
$50-75,000
$75-100,000
$100,000+
Register your new Klipsch product now at www.klipsch.com!
Make sure you return your warranty
card so that we may keep you
up-to-date on new Klipsch products
and promotions. If you have any
questions, contact your local
authorized Klipsch dealer.
15M0303
193131
For your records:
Model:
Date Purchased:
3502 Woodview Trace, Suite 200
Indianapolis, Indiana 46268 USA
1
.
800
.
KLIPSCH
www.klipsch.com
  • Page 1 1
  • Page 2 2
  • Page 3 3
  • Page 4 4
  • Page 5 5
  • Page 6 6
  • Page 7 7
  • Page 8 8
  • Page 9 9
  • Page 10 10
  • Page 11 11
  • Page 12 12
  • Page 13 13
  • Page 14 14
  • Page 15 15
  • Page 16 16
  • Page 17 17
  • Page 18 18
  • Page 19 19
  • Page 20 20
  • Page 21 21
  • Page 22 22
  • Page 23 23
  • Page 24 24

Klipsch FLOORSTANDING LOUDSPEAKERS User manual

Category
Loudspeakers
Type
User manual

Ask a question and I''ll find the answer in the document

Finding information in a document is now easier with AI