AEG LP 10.0 Owner's manual
- Category
- Battery chargers
- Type
- Owner's manual
This manual is also suitable for

97100
LADEGERÄT
MIKROPROZESSOR
LP 10.0
D LADEGERÄT BEDIENUNGSANLEITUNG 02
GB BATTERY CHARGER OPERATING INSTRUCTIONS 18
F CHARGEUR DE BATTERIE NOTICE D'UTILISATION 34
I CARICABATTERIE ISTRUZIONI PER L'USO 50
SK NABÍJACKA BATERIÍ NÁVOD NA POUŽITIE 66
CZ NABÍJECKA BATÉRIÍ NÁVOD K POUŽITÍ 82
0
5
25
75
95
100
97100_Ladegert _LP_10.0 Manual _09_12_2011_print
Freitag, 9. Dezember 2011 11:11:21
Page is loading ...
Page is loading ...
Page is loading ...
Page is loading ...
Page is loading ...
Page is loading ...
Page is loading ...
Page is loading ...
Page is loading ...
Page is loading ...
Page is loading ...
Page is loading ...
Page is loading ...
Page is loading ...
Page is loading ...
Page is loading ...

18
19
19
19
20
20
20
21
22
23
23
24
24
24
26
28
31
32
32
33
33
8.0 WARRANTY AND SERVICE
7.0 DISPOSAL
6.0 TECHNICAL SPECIFICATIONS
5.1 Cleaning, maintenance and storage
5.0 MAINTENANCE AND CARE
4.1 Start charging
4.2 Troubleshooting
4.0 OPERATION
3.1 Contents
3.2 Product overview
3.3 LED display and symbols
3.4 What are the various LED display symbols?
3.5 Diagram 6-setting charging mode for 6, 12 and 24 V batteries
3.0 PRODUCT DESCRIPTION
2.1 General safety notices
2.2 LP 10.0 charger safety notices
2.3 Safety notices for charging vehicles and boats
2.4 Storage battery / battery safety notices
2.0 SAFETY NOTICES
1.1 What do these symbols mean?
1.2 Charger functionality
1.3 Intended use
1.4 Connecting and disconnecting the LP 10.0 charger
1.5 LP 10.0 features
1.0 PREFACE
TABLE OF CONTENTS
0
5
25
75
95
100
97100_Ladegert _LP_10.0 Manual _09_12_2011_print
Freitag, 9. Dezember 2011 11:11:27

19
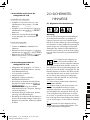
The LP10.0 charger is intended solely for
charging and trickle charging 6, 12 and 24 V
(Volt) lead acid storage batteries.
This device may be used to charge the following
types of lead acid storage batteries:
▪ Lead acid storage batteries (open systems, wet)
▪ Maintenance free lead acid storage batteries
▪ VRLA storage batteries (valve-regulated lead
acid storage batteries)
▪ Lead-gel storage batteries
(gelatinous electrolyte)
▪ Mat / AGM storage batteries
(absorption glass mat)
Do not charge battery types not specified above!
Any other use or modification of the LP 10.0
charger is not as intended and may result in
life-threatening hazards! The charger is intended
for private use only.
1.3 Intended use
The LP 10.0 microprocessor controlled charger
with smart 6-setting charging mode allows lead
batteries / storage batteries to automatically
be charged quickly and gently.
Once the specific battery type has been
determined the LED display will show the lead
storage battery's current charging status. The
additional activation program will reactivate
deep discharged storage batteries. Gentle
charging process may extend the battery's life.
1.2 Charger functionality
See page 32 for additional information about
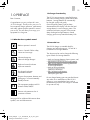
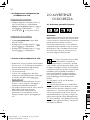
symbols, units and abbreviations.
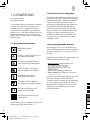
Devices with protective class II
protective insulation
This equipment complies with EU
directive 2004/108/EC
Dispose of equipment, batteries and
packaging in an environmentally
friendly manner!
Fire hazard! Indicates
flammable materials!
Explosion hazard! Indicates
explosive materials!
Indicates dangerous
electrical voltage! Danger!
Caution - hazard! Follow safety
notices and warnings!
Refer to operator's manual!
1.1 What do these symbols mean?
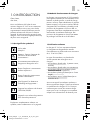
Dear Customer,
Congratulations on your purchase of a new
„LP 10.0 charger“. Thank you for your trust. To
ensure optimal charger operation, performance
and safety, please read the operator's manual
prior to use. This will allow you to enjoy your
equipment for a long time.
1.0 PREFACE
GB
0
5
25
75
95
100
97100_Ladegert _LP_10.0 Manual _09_12_2011_print
Freitag, 9. Dezember 2011 11:11:27

20
2.1.4 Do not use the charger to power electrical
equipment, vehicles or other external devices.
2.1.3 This device is not intended to be used by
persons (including children) with limited
physical, sensory or mental capacities or
lacking experience and / or knowledge unless
supervised by a person responsible for their safety
or instructed by such on how to use the
equipment.
2.1.2 Keep these instructions throughout the
product's life.
2.1.1 Keep charger away from
children! Children do not understand or
recognize the potential risks associated
with hand-ling electrical equipment. Never allow
the charger to end in the hands of children and
store out of the reach of children. Children may
swallow or choke on small parts. Children may be
injured when using the charger. Keep packaging
away from children.
Warning!
Read all instructions! Failure to follow safety
instructions may result in property damage,
personal injury or death! Keep these instructions
for reference. Keep this operator's manual for
future reference and include when passing on the
equipment to others. Make these instructions
accessible to third parties. The operator's manual
is a part of the equipment.
2.1 General safety notices
2.0 SAFETY
NOTICES
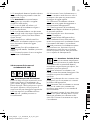
▪ Charger for all popular 6, 12 and 24 V
automotive batteries (AutoSelect function /
automatic battery recognition)
▪ Max. charging current 10 A
▪ Microprocessor
▪ Smart 6-setting charging mode
(IOIUOUOIUOa curve)
▪ No battery removal required (please refer to
Item 2.3 on page 22 and 23!)
▪ Automatic charging level adjustment.
Fully automatic charging, diagnostic, rescue
and maintenance function
▪ With display (charging status, battery voltage
and error messages)
▪ Battery charging status displayed as percentage
and as a bar graph. Holder for clamps and
practical cable storage compartment
1.5 LP 10.0 charger features
Connecting the charger
▪ First connect the positive (+) red
clamp to the positive (+) battery terminal.
▪ Now connect the negative (-) black
clamp to the negative (-) battery terminal.
▪ Only now plug the power plug into a
suitable 230 V alternating current outlet.
Disconnecting the charger
▪ First unplug the power cable from the mains.
▪ Then disconnect the negative (-) black
clamp from the negative (-) battery terminal.
▪ Then disconnect the positive (+) red clamp from
the positive (+) battery terminal.
1.4 Connecting and disconnecting the
LP 10.0 charger
5
0
5
25
75
95
100
97100_Ladegert _LP_10.0 Manual _09_12_2011_print
Freitag, 9. Dezember 2011 11:11:28

21
2.2.13 Always ensure ample clearance around
the charger during operation to ensure proper
ventilation. Never cover the charger with any
objects during charging!
2.2.12 Be sure the charger and clamps contain
no moisture. Never connect the battery clamps to
the battery with wet hands and / or both hands
simultaneously!
2.2.11 Never use other cables or accessories.
Never extend the battery charging cables with
the clamps!
2.2.10 Never operate the charger if it has been
dropped or otherwise damaged. Have it
examined or repaired by a qualified electrician!
2.2.9 Attention - danger!
Avoid any type of open fire and sparks
during charging! Charging releases
explosive gasses in the vicinity of the battery /
storage battery which could explode.
2.2.8 Always ensure a safe footing when putting
down the charger. Position the supply cable to
prevent any interference. Never lay the cable
across hot surfaces during charging!
2.2.7 The work area must be well ventilated
when starting the charger indoors. Never place
the charger atop the battery / storage battery
whilst charging!
2.2.6 Never disassemble, repair, or modify
(alter) the equipment.
2.2.5 Any repairs to the charger must be per-
formed by a qualified electrician / qualified
professional.
2.2.4 Never operate the charger if damaged
or malfunctioning!
2.2.3 Position the supply cable and the terminal
cable to avoid tripping or damage to the cable,
e.g. due to objects with sharp edges!
2.2.2 Never expose the charger to direct
sunlight - doing so may result in overheating!
2.2.1 Attention - risk of injury!
Always ensure the equipment is stored
in a safe location. Never expose the equipment to
oil, grease, moisture, rain or other wet ambient
conditions. Avoid water or other liquids from
spilling or dripping onto the equipment.
Incoming water will cause an electrical short
circuit and may damage the equipment.
2.2 LP 10.0 charger safety notices
2.1.11 Routinely monitor the charger throughout
the charging process!
2.1.10 Never wear metallic body jewellery when
using the charger and battery. Doing so could
result in burns!
2.1.9 The device will heat up during operation.
Always place the charger in a safe, well
ventilated location away from flammable objects.
2.1.8 Never place the electrical charger in a
wet location. Never expose the equipment to
precipitation, dust, direct sunlight or splash water.
2.1.7 If you are unsure about the use or
functionality of the charger, please consult
a qualified professional.
2.1.6 Warning! Never charge damaged,
non-rechargeable or frozen batteries / storage
batteries or dry cell batteries!
2.1.5 Always use protective eyewear, protective
gloves and closed clothing to cover the entire
body when handling lead storage batteries.
2.2.14 Avoid the skin coming in contact with
battery terminals, battery clamps or ring
connectors whilst the equipment is connected
to alternating current!
GB
0
5
25
75
95
100
97100_Ladegert _LP_10.0 Manual _09_12_2011_print
Freitag, 9. Dezember 2011 11:11:28

2.3.11 If the battery must be removed from the
vehicle for charging, be sure to following the
notices in the vehicle manufacturer's operator's
manual!
2.3.10 Short circuit hazard! Never join
the two battery clamps of the charger!
2.3.9 Avoid vibration, pressure loads and other
mechanical stressors which may impact the
charger!
2.3.8 Only operate the charger in a safe environ-
ment! Keep clothing, hair, limbs and the charger
away from moving and hot engine and vehicle
parts!
2.3.7 Always follow the vehicle manufacturer's
safety instructions and operator's manual.
2.3.6 Caution! Risk of electrical
current near the vehicle's ignition coils,
distributor cap, ignition cables, spark
plugs and electrical components!
2.3.5 Never permanently mount the charger in
vehicles!
2.3.4 Always follow safety instructions when the
vehicle is jacked up, hoisted or similar!
2.3.3 When charging marine batteries always
remove the battery!
2.3.2 Never operate or start vehicles in the same
space whilst charging!
6
6
22
2.3.1 Before charging secure the vehicle to
prevent it from rolling away.
Attention - Risk of injury and property
damage! Always engage the handbrake
and put into gear! For automatic trans-
missions put the vehicle into “Park” and
engage the handbrake!
2.3 Safety notices for charging
vehicles and boats
2.2.23 Emergency mode! The charger operating
mode can be manually interrupted
using the button .
2.2.22 Only charge lead acid batteries!
Never use the LP 10.0 charger for non-
rechargeable or other battery types.
2.2.21 Never turn and hold lead acid batteries
above your head! Risk of chemical burns!
2.2.20 Attention! Explosion hazard when gas
odours are present! Immediately ensure effective
ventilation! Do not switch off the equipment and
do not disconnect the terminals from the battery!
2.2.19 Never charge defective batteries!
The following indicate a defective battery:
▪ Thermal or mechanical distortion
of the battery housing or attachments
▪ Insufficient fluid levels inside the cells
▪ Fluids leaking from the battery
▪ Smell of gas, particularly near the battery
2.2.18 Never allow liquids to enter the equip-
ment! Never immerse the equipment in fluids!
Only operate the charger when dry.
2.2.17 The charger requires an input voltage of
230 V / AC for operation.
2.2.16 Never use the cable to carry the charger
or pull on it. Always disconnect the equipment
from the power supply by the plug, never the
cable!
2.2.15 Always disconnect battery clamps and
charger from the vehicle before starting the
vehicle! After using the charger always
disconnect from alternating current!
0
5
25
75
95
100
97100_Ladegert _LP_10.0 Manual _09_12_2011_print
Freitag, 9. Dezember 2011 11:11:28

23
Illustration may slightly differ from product.
Subject to change for the purpose of technical
advances. Decorations not included.
After unpacking immediately check all parts
are included and inspect all parts for damage!
Do not use the charger if damaged or if the
operator's manual is missing!
1 Charger LP 10.0
1 Operator's Manual
3.1 Contents
3.0 PRODUCT
DESCRIPTION
2.4.7 The charging time for the respective
battery / storage battery depends on the
capacity.
2.4.6 Clean battery terminals before charging!
Caution - risk of electrical shock!
2.4.5 Before charging inspect the
battery for damage! Never charge
defective batteries! On lead acid
batteries with vent caps always first
check the level of battery fluids. If the
fluid level is low, add distilled water to
the battery cells up to the level
recommended by the battery
manufacturer. Attention - always wear
protective clothing!
2.4.4 Follow the battery manufacturer's
operating and safety instructions!
2.4.3 If the battery must be removed from the
vehicle for charging, be sure the ignition and
any loads in the vehicle are powered off! First
remove the negative terminal (black cable) from
the battery. Follow the operator's manual and the
vehicle manufacturer's safety instructions!
2.4.2 Avoid any contact with caustic
battery acid! If your body comes into
direct contact with battery acid,
immediately thoroughly flush the affected area
with water and seek medical advice! In the event
battery acid comes into contact with the eyes,
immediately flush with running clear water for
several minutes. In this case also seek immediate
medical attention or a hospital emergency room!
2.4.1 Always wear protective eyewear, protective
gloves and closed clothing to cover the entire
body when handling lead storage batteries!
2.4 Storage battery / battery safety
notices
2.3.14 Never add fluids to the battery during
charging!
2.3.13 When not in use always unplug the
device from the 230 V alternating current mains
source!
2.3.12 In the event of malfunction and damage to
the charger or battery during operation,
immediately disconnect the equipment from the
230 V alternating current mains source!
GB
0
5
25
75
95
100
97100_Ladegert _LP_10.0 Manual _09_12_2011_print
Freitag, 9. Dezember 2011 11:11:28

1
2
3
4
5
6
7
9
12 13
10
11
8
8
9
10
11
12
13
B
B
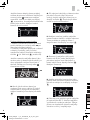
A
24
C
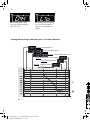
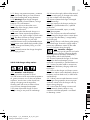
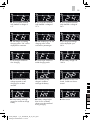
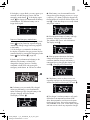
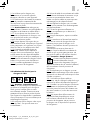
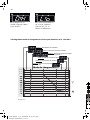
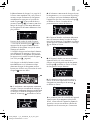
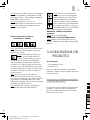
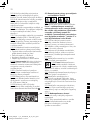
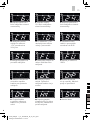
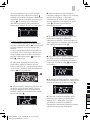
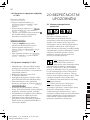
Figure 2
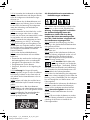
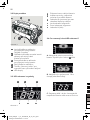
C. The segments are turning. Automatic battery
detection may take up to 5 minutes.
B. Charger is ready for use. The two bars
in the display will flash.
A.
Positive / negative symbol will flash.
Incorrect battery clamp polarity.
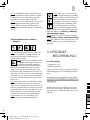
3.4 What are the various LED display
symbols?
Battery charge indicator
Error message, incorrect battery clamp
polarity
Unit % (percent) indicating battery charge
level achieved
Left segment display
Right segment display
Unit V (Volt)
3.3 LED display and symbols
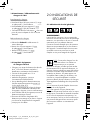
Left compartment with battery clamp
fixture
Handle
Storage shelf at the back of the equipment
for power cable and terminal cable.
Right compartment with battery clamp
fixture
Power cable with power plug
“Emergency Mode” button to manually
start and interrupt the charging process
LED Display
3.2 Product overview
9
3
4
2
1
5
6
7
Figure 1
0
5
25
75
95
100
97100_Ladegert _LP_10.0 Manual _09_12_2011_print
Freitag, 9. Dezember 2011 11:11:29

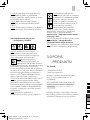
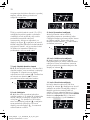
D
E
F
G
H
I
J
K
L
M
N
O
P
Q
R
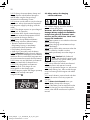
25
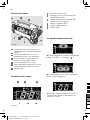
R. Short circuit.
Q. Battery voltage higher
than 29.4 V or battery
clamps were disconnected
during charging.
P. Faulty battery with high
resistance. Unable to charge
battery.
O. The electric circuit is not
closed. Cables are discon-
nected.
N. The battery is fully
charged. Unable to
recharge the battery.
M. The minimum battery
voltage required to start
charging has not been
reached.
L. The battery charge is at
100 %.
K. The charger switches to
trickle charging mode.
J. The charger switches to
slow charging.
I. The charge percentage
will be displayed up to
90 %.
H. After displaying “CH” the
charging status will be
indicated in percentages.
G. The charger is initiating
charging mode. “CH” will be
displayed for some time.
F. The equipment automati-
cally detected a voltage of
24 V.
E. The equipment automati-
cally detected a voltage of
12 V.
D. The equipment automati-
cally detected a voltage of
6 V.
GB
0
5
25
75
95
100
97100_Ladegert _LP_10.0 Manual _09_12_2011_print
Freitag, 9. Dezember 2011 11:11:29

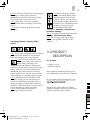
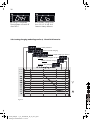
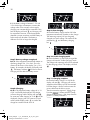
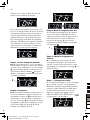
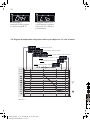
6 V
6,5 V
7,1 V
6,7 V
6,7 V
2,7 A
2,5 A
10,0 A
2,5 A
2,0 A
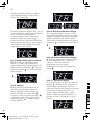
S
T
10.00
11.00
12.00
26
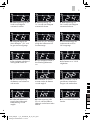
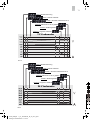
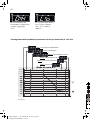
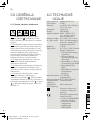
Figure 3
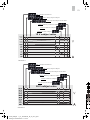
6 V charging mode
Phase 4: Slow charging
Phase 5: Trickle charging
Phase 6: Battery charge is at 100 %
Phase 3: Rapid charging up to 90 %
Phase 2: Gentle charging
Phase 1: Battery detection
3.5 6-setting charging mode diagram for 6, 12 and 24 V batteries
T. The battery voltage is less
than 3.5 V in 12 and 24 V
batteries. Battery defective.
S. Charger is overheated.
The equipment will switch off
above 85 C.
°
0
5
25
75
95
100
97100_Ladegert _LP_10.0 Manual _09_12_2011_print
Freitag, 9. Dezember 2011 11:11:30

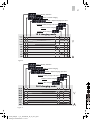
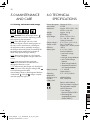
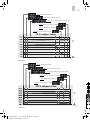
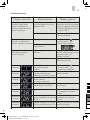
2,5 A
2,7 A
10,0 A
12 V
12 V
14,1 V
13,3 V
13,3 V
2,5 A
2,0 A
2,5 A
6,0 A
2,5 A
1,0 A
24 V
24 V
29,3 V
26 V
27 V
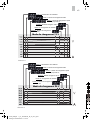
27
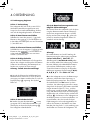
Figure 5
24 V charging mode
Phase 4: Slow charging
Phase 5: Trickle charging
Phase 6: Battery charge is at 100 %
Phase 3: Rapid charging up to 90 %
Phase 2: Gentle charging
Phase 1: Battery detection
Figure 4
12 V charging mode
Phase 4: Slow charging
Phase 5: Trickle charging
Phase 6: Battery charge is at 100 %
Phase 2: Gentle charging
Phase 3: Rapid charging up to 90 %
Phase 1: Battery detection
GB
0
5
25
75
95
100
97100_Ladegert _LP_10.0 Manual _09_12_2011_print
Freitag, 9. Dezember 2011 11:11:31

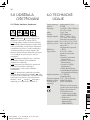
28
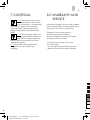
BB
A
C
C
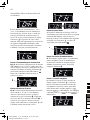
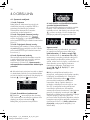
M. If the charger is connected to the battery
but unable to detect a voltage the display will be
blank. You may then try manually starting the
charging process by pressing the emergency
mode button . If the battery voltage then rises
to above 3.5 V within a few minutes, charging
will continue normally. If the voltage remains
below this level charging will be suspended and
the display will read . You may now discon-
nect the charger from the battery and reconnect it
to rule out the error being caused by the
equipment being incorrectly connected to the
battery (also refer to Item 1.4 “Quick guide for
connecting and disconnecting the charger“ on
page 20!)
Attention!
If the battery is intact charging will start
once the battery voltage has been detected.
(go to step 7, page 30!).
Figures C - L on pages 24 and 25 indicate the
normal charging process!
If the battery is defective or deep discharged
or other errors occur the display will show the
following depending on the battery state:
Display M, N, O, P, Q, R, S, T - see pages
28 - 30!
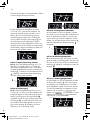
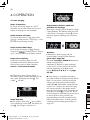
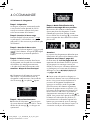
Step 6: Battery detection mode and
possible error messages
C. During this charging phase the battery voltage
is being detected. This detection mode may take
a few minutes. The display will read and one
individual segment of the digits 00 will also be
turning.
Step 5: Stand by
B. Now plug the mains plug into a suitable
230 V alternating current outlet. The display will
read . The charger is ready for use.
A. If the polarity of the charging clamps is
reversed the supply current to the battery will be
inter-rupted. The display will read . The
symbol will flash.
Step 4: Correct polarity
Verify the two charging clamps are well
connected with the correct battery terminals.
Clean off any residue on battery terminals.
Caution - risk of electrical shock!
Step 3: Connect black clamp
Now connect the negative (-) black charging
clamp to the negative (-) battery terminal. A minus
sign (-) must be visible near the battery terminal.
Step 2: Connect red clamp
First connect the positive (+) red clamp to the
positive (+) battery terminal. A plus sign (+) must
be visible near the battery terminal.
Step 1: Preparation
Do not yet connect the charger to a 230 V
alternating current outlet! Ensure the room and
battery surroundings are well ventilated!
4.1 Start charging
4.0 OPERATION
9
C
A
M
5
6
B
0
5
25
75
95
100
97100_Ladegert _LP_10.0 Manual _09_12_2011_print
Freitag, 9. Dezember 2011 11:11:31

O. If the battery was disconnected from the
charger during the charging process or a circuit
is open (e.g. if a battery clamp has slipped off)
the equipment will switch off and the display will
read . Check the clamps are correctly seated
with proper contact!
S. The charger's overheat protection will switch
off the device at temperatures above 85 C.
Allow the equipment to cool down and repeat
the charging process. Be sure the equipment is
well ventilated, never cover. Avoid direct sunlight
and heat sources which may impact the charger.
R. If the battery causes a short circuit or it is
caused by improper use, the charging process
will be interrupted and the display will read .
Q. If the equipment determines the battery
voltage to be higher than 29.4 V or the
connection between charger and battery is
interrupted during charging the display will
read . Charging will not be started.
P. If the equipment detects a battery with high
resistance, charging will not be started.
This problem often occurs with old batteries.
The display reads .
N. If a battery was just recently fully charged
recharging the battery is not recommended.
When connecting a fully charged battery to the
charger, charging will not be started.
The display will read .
Features of the Emergency Mode button:
1. During normal operation the emergency mode
button may be pressed to suspend charging,
immediately ending energy from being supplied
to the battery.
2. If the charger is connected to the battery but
the display is blank the charging process may be
started manually by pressing the emergency mode
button (also see Item , page 28).
If the charger has determined a battery to be
defective or the battery is already fully
charged the charging process is already
completed in both cases and pressing the
emergency mode button will have no effect!
If the display is again blank, you may again try to
manually start the charging process with the
emergency mode button . If the display again
reads the charger has determined the battery
to be defective. The defective battery can no
longer be charged!
M
M
6
N
P
P
N
O
6
6
6
M
6
R
R
Q
Q
O
29GB
0
5
25
75
95
100
97100_Ladegert _LP_10.0 Manual _09_12_2011_print
Freitag, 9. Dezember 2011 11:11:32

30
Step 11: Charging complete
L. Once the battery charge is at 100 % the
display will read . Charging will now be
stopped and the battery can be disconnected
from the charger. Always first disconnect the
power cable from the mains current.
Then disconnect the negative (-) black clamp
from the negative (-) battery terminal. Finally,
disconnect the positive (+) red clamp from the
positive (+) battery terminal.
Step 10: Trickle charging mode
K. Once the battery is almost fully charged the
charger will activate “Trickle Charging“ mode.
The voltage and amperage will now be adjusted
for the charging process. The display will read
.
Step 9: Slow charging
J. Once the battery charge reaches 90 % the
equipment automatically switches to slow charge.
The remaining capacity will now be gently
charged at a lower voltage. This mode will be
indicated by and the battery charging
bar .
Step 8: Charging
G, H, I. The respective battery voltage of 6, 12
or 24 V will briefly be displayed. The charger
will start charging and the display will read
for some time. After charging to 10 % will be
displayed, charging will now continue in rapid
mode until the display reads to confirm the
charge has reached a level of 90 %.
Step 7: Battery voltage recognised
D, E, F. If the equipment automatically detects an
operating voltage of 6, 12 or 24 V, this infor-
mation will be shown in the display. For a 12 V
battery, for example, the display will briefly read
. The battery condition will also be shown.
Charging will start after this battery review.
T. If the battery voltage is between 1.5 V and
3.5 V the charger will attempt to increase the
voltage within a few minutes so that regular
charging can automatically be continued. If this
fails the display will read and charging will
be suspended. However, since the equipment
detected a proper connection with the battery no
further steps may be taken. The battery is
defective and can no longer be charged!
S
E
8
G
H
I
8
J
J
8
E
8
K
G
H
I
K
L
L
T
T
0
5
25
75
95
100
97100_Ladegert _LP_10.0 Manual _09_12_2011_print
Freitag, 9. Dezember 2011 11:11:32

6
M
O
P
Q
R
S
T
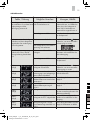
31
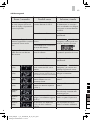
Unable to charge battery.
Battery defective!
The voltage of a 12 or 24 V
battery is below 3.5 V.
Display
read-out
Allow the charger to cool off and
repeat the process.
Overheat protection has switched
off the charger at 85 C or
higher.
Display
read-out
Check the battery. Please note the
instructions for use inside the
operator's manual.
Short circuit.
Display
read-out
Unable to charge battery.
The charger has detected a
battery voltage above 29.4 V.
Display
read-out
Unable to charge battery.
The charger has detected a
defective battery with high
resistance.
Display
read-out
Check for proper contact and
correctly seated clamps.
The battery was disconnected
from the charger during charging:
open circuit
Display
read-out
Press the "Emergency Mode“
button to start charging
manually.
The charger is unable to detect
the battery voltage.
Display
read-out
Please consult a qualified
professional.
Disconnect the charger from the
mains and repeat the charging
process.
Charger defective.
This could be a software error.
The LED shows symbols not
listed in the operator's manual.
Press the "Emergency mode”
button to start charging
manually.
The charger is unable to detect
the battery voltage.
The battery is deep discharged.
The battery is connected to the
charger and the charger is
switched on. Not charging.
Please consult a qualified
professional.
Charger defective.
Check the fuses of the mains
connection and ensure the
charger is connected to a 230 V
alternating current power supply.
Not connected to 230 V
alternating current.
The charger is connected to
power. The display is blank,
not charging.
Solutions, corrective action
Possible causesError / Failure
4.2 Troubleshooting
6
6
°
GB
0
5
25
75
95
100
97100_Ladegert _LP_10.0 Manual _09_12_2011_print
Freitag, 9. Dezember 2011 11:11:33

5.1.5 When storing the charger only loosely fold
cables and store in the charger's storage shelf
to avoid damage to the cable.
Secure battery clamps to the designated brackets
inside the left and right charger compart-
ment (see page 24, figure 1).
32
3
4
1
°°
~
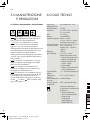
Device description: Charger LP 10.0
Item number: 97100
Dimensions: approx. 270 x 150 x 190
mm (l x w x h mm)
Weight: approx. 2.3 kg
Display: LED display
Input voltage: 230 V 50 Hz / 2 A
(V = Volt, Hz = Hertz,
cycles per second)
Output voltage / 6 V / 10 A, 12 V / 10 A,
Output current: 24 V / 6 A DC (A =
ampere, DC = direct current)
Efficiency: > 80 %
Battery types: 6 V / 12 V / 24 V
Lead acid batteries:
▪ Lead acid storage
batteries
▪ Lead gel storage batteries
▪ Mat / AGM storage
batteries
▪ VRLA storage batteries
▪ Maintenance free lead
acid storage batteries
Battery capacity: 1.2 - 225 Ah
(ampere-hours)
Operating 0 C - 50 C (Celsius)
temperature:
Charging curve: IOIUOUOIUOa
IP Class IP65, waterproof
(safety class):
Devices with Protective
Class II protective insulation
This equipment complies
with EU directives
▪ Low Voltage
Directive (2006/95/EC)
▪ Electromagnetic
compatibility directive
(2004/108/EC)
6.0 TECHNICAL
SPECIFICATIONS
5.1.4 Never expose charger to extreme
temperature fluctuations! Condensation can
damage the electronic circuit!
5.1.3 Always store charger in a dry location!
Moisture could damage the charger's electronic
circuit!
5.1.2 Clean the charger with a dry cloth.
Do not use liquids or harsh cleaning agents as
this may result in discoloration or damage to
the equipment surface, potentially damaging
the charger! Prevent any fluids from entering the
equipment! Never immerse the equipment in
fluids! Only operate charger when dry.
5.1.1 Caution! Power off charger (button )
and disconnect from 230 V alternating current
before cleaning the equipment!
5.1 Cleaning, maintenance and storage
5.0 MAINTENANCE
AND CARE
6
0
5
25
75
95
100
97100_Ladegert _LP_10.0 Manual _09_12_2011_print
Freitag, 9. Dezember 2011 11:11:33

33
Pb
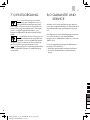
In the event of damage, repairs or other problems
with this product please consult the retailer where
the purchase was made or a professional.
The general warranty terms pertain to
manufacturing and material defects.
Please return defective products to the retailer
where the purchase was made.
To ensure quick processing of your claim
you will also need:
▪ A copy of the receipt with date of purchase.
▪ Reason for the claim (description of defect).
8.0 WARRANTY AND
SERVICE
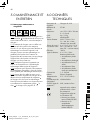
7.1.3 Please follow the applicable waste
management laws when disposing of
packaging.
7.1.2 When disposing of lead acid
batteries please follow manufacturer
specifications and legal regulations!
Please consult your municipality or a waste
management company.
7.1.1 Always dispose and recycle
according to the law. Please consult
your municipality or a waste manage-
ment company. Dispose of this equipment
according to the EU Waste electrical and
electronic equipment directive 2002/96/EC-
WEEE.
7.0 DISPOSAL
GB
0
5
25
75
95
100
97100_Ladegert _LP_10.0 Manual _09_12_2011_print
Freitag, 9. Dezember 2011 11:11:33
Page is loading ...
Page is loading ...
Page is loading ...
Page is loading ...
Page is loading ...
Page is loading ...
Page is loading ...
Page is loading ...
Page is loading ...
Page is loading ...
Page is loading ...
Page is loading ...
Page is loading ...
Page is loading ...
Page is loading ...
Page is loading ...
Page is loading ...
Page is loading ...
Page is loading ...
Page is loading ...
Page is loading ...
Page is loading ...
Page is loading ...
Page is loading ...
Page is loading ...
Page is loading ...
Page is loading ...
Page is loading ...
Page is loading ...
Page is loading ...
Page is loading ...
Page is loading ...
Page is loading ...
Page is loading ...
Page is loading ...
Page is loading ...
Page is loading ...
Page is loading ...
Page is loading ...
Page is loading ...
Page is loading ...
Page is loading ...
Page is loading ...
Page is loading ...
Page is loading ...
Page is loading ...
Page is loading ...
Page is loading ...
Page is loading ...
Page is loading ...
Page is loading ...
Page is loading ...
Page is loading ...
Page is loading ...
Page is loading ...
Page is loading ...
Page is loading ...
Page is loading ...
Page is loading ...
Page is loading ...
Page is loading ...
Page is loading ...
Page is loading ...
Page is loading ...

SystemPartnerAutoteile GmbH & Co. KG
Benzstraße 1 ▪ D-76185 Karlsruhe
SystemPartnerAutoteile GmbH & Co.
Industriestr. 31 ▪ CH-8112 Otelfingen
SPA Systems s.r.o.
Pod Višňovkou 1661 / 37 140 00 Praha 4-Krč ▪ Česká republika
www.aeg-automotive.com
AEG is a registered trademark used under license from AB Electrolux (publ)
Stand der Information: 10/2011
EAN-Nr.: 4038373971005
▪
0
5
25
75
95
100
97100_Ladegert _LP_10.0 Manual _09_12_2011_print
Freitag, 9. Dezember 2011 11:11:53
-
 1
1
-
 2
2
-
 3
3
-
 4
4
-
 5
5
-
 6
6
-
 7
7
-
 8
8
-
 9
9
-
 10
10
-
 11
11
-
 12
12
-
 13
13
-
 14
14
-
 15
15
-
 16
16
-
 17
17
-
 18
18
-
 19
19
-
 20
20
-
 21
21
-
 22
22
-
 23
23
-
 24
24
-
 25
25
-
 26
26
-
 27
27
-
 28
28
-
 29
29
-
 30
30
-
 31
31
-
 32
32
-
 33
33
-
 34
34
-
 35
35
-
 36
36
-
 37
37
-
 38
38
-
 39
39
-
 40
40
-
 41
41
-
 42
42
-
 43
43
-
 44
44
-
 45
45
-
 46
46
-
 47
47
-
 48
48
-
 49
49
-
 50
50
-
 51
51
-
 52
52
-
 53
53
-
 54
54
-
 55
55
-
 56
56
-
 57
57
-
 58
58
-
 59
59
-
 60
60
-
 61
61
-
 62
62
-
 63
63
-
 64
64
-
 65
65
-
 66
66
-
 67
67
-
 68
68
-
 69
69
-
 70
70
-
 71
71
-
 72
72
-
 73
73
-
 74
74
-
 75
75
-
 76
76
-
 77
77
-
 78
78
-
 79
79
-
 80
80
-
 81
81
-
 82
82
-
 83
83
-
 84
84
-
 85
85
-
 86
86
-
 87
87
-
 88
88
-
 89
89
-
 90
90
-
 91
91
-
 92
92
-
 93
93
-
 94
94
-
 95
95
-
 96
96
-
 97
97
-
 98
98


AEG LP 10.0 Owner's manual
- Category
- Battery chargers
- Type
- Owner's manual
- This manual is also suitable for
Ask a question and I''ll find the answer in the document
Finding information in a document is now easier with AI
in other languages
- italiano: AEG LP 10.0 Manuale del proprietario
- français: AEG LP 10.0 Le manuel du propriétaire
- Deutsch: AEG LP 10.0 Bedienungsanleitung
- slovenčina: AEG LP 10.0 Návod na obsluhu
- čeština: AEG LP 10.0 Návod k obsluze
Related papers
Other documents
-
 ZOJE ZJ1900DSS SERIES User manual
-
Telwin TEL014 User manual
-
MTD K 17 Original Operating Instructions
-
ULTIMATE SPEED ULG 3.8 B1 Operating Instructions Manual
-
Wolf Garten ABC 36-03 Original Operating Instructions
-
-
Battery Tender 022-0165-DL-WH User manual
-
-
-
Compass 07145 Operating instructions
