
Schnurlostelefon
Téléphone sans fil
Telefono senza fili
Cordless telephone
Bedienungsanleitung
Mode d’emploi
Istruzioni per l’uso
Operating Instructions
DE104

2
DE104
Bedienungsanleitung 3. . . . . . . . . . . . . . . . . . . .
Mode d’emploi 27. . . . . . . . . . . . . . . . . . . . . . . . . . .
Istruzioni per l’uso 51. . . . . . . . . . . . . . . . . . . . .
Operating Instructions 76. . . . . . . . . . . . . . . . .
Declaration of Conformity 100. . . . . . . . . . . .
Page is loading ...
Page is loading ...
Page is loading ...
Page is loading ...
Page is loading ...
Page is loading ...
Page is loading ...
Page is loading ...
Page is loading ...
Page is loading ...

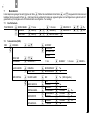
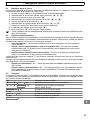
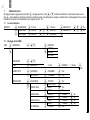
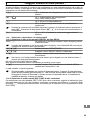
− Menüstruktur −
13
7.3 Einstellung
EINSTELLUNG BASIS−LAUTST LAUTSTAERKE 1
LAUTSTAERKE 2
LAUTSTAERKE 3
LAUTSTAERKE 4
LAUTSTAERKE 5
TON AUS
BASIS−MELODY MELODIE 1
MELODIE 2
MELODIE 3
MELODIE 4
MELODIE 5
MT ABMELDEN PIN?* PIN Nummer Mobilteil
PIN CODE*
PIN? PIN alt PIN NEU PIN neu WIEDERH. PIN PIN neu
MFV−IWV MFV
IWV
FLASH ZEIT FLASH 1
FLASH 2
WERKSEINST.** PIN? PIN BESTAETIGEN?
* Werksseitig sind alle PIN auf 0000 eingestellt. Wenn Sie die Taste für zwei Sekunden drücken, dann brechen Sie die Programmierung ab.
** Vorsicht: Es werden alle
Einstellungen auf Werkseinstellung zurückgesetzt! Alle Listeneinträge werden gelöscht!
Page is loading ...
Page is loading ...
Page is loading ...
Page is loading ...
Page is loading ...
Page is loading ...
Page is loading ...
Page is loading ...
Page is loading ...
Page is loading ...
Page is loading ...
Page is loading ...
Page is loading ...
Page is loading ...
Page is loading ...
Page is loading ...
Page is loading ...
Page is loading ...
Page is loading ...
Page is loading ...
Page is loading ...
Page is loading ...
Page is loading ...
Page is loading ...

F
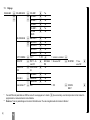
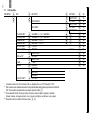
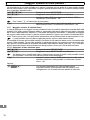
− Structure du menu −
38
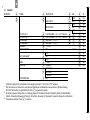
7.4 Combiné
COMBINE BIPS BIP TOUCHE ACTIVE
DESACTIVE
BATT FAIBLE ACTIVE
DESACTIVE
HORS PORTEE ACTIVE
DESACTIVE
VOL SON INT VOLUME 1, 2, 3, 4, 5, VOLUME COUPE
VOL SON EXT VOLUME 1, 2, 3, 4, 5, VOLUME COUPE
MELODIE INT MELODIE 1, 2, 3, 4, 5
MELODIE EXT MELODIE 1, 2, 3, 4, 5
REG HEURE* hh−mm
ALARME* ACTIVE hh−mm
DESACTIVE
RESPONSE AUTO** ACTIVE
DESACTIVE
NOM ABC
LANGUE*** ENGLISH
FRANCAIS
DEUTSCH
ITALIANO
VERR CLAVIER ACTIVE****
* Entrer les heures à 4 chiffres et en format de 24 heures. Exemple : Entrer 17:53 heures comme 1753".
** ACTIVÉ : Vous prenez une communication en retirant le combiné de sa base (réglage usine).
DÉSACTIVÉ : Vous ne pouvez prendre une communication qu’avec la touche .
*** 16 langues sont disponibles : anglais, français, italien, allemand, italien, espagnol, néerlandais,
danois, suédois, norvégien, polonais, tchèque, slovénien, portugais, hongrois, russe et grec.
**** Supprimer le verrouillage du clavier : Touche Appuyer 2x dessus.

F
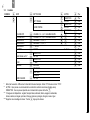
− Structure du menu −
39
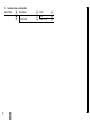
7.5 Déclarer la base et des combinés
DECLARER CHOIX BASE BASE 1
AUTO
DECL. BASE BASE 1 2 3 4
Page is loading ...
Page is loading ...
Page is loading ...
Page is loading ...
Page is loading ...
Page is loading ...
Page is loading ...
Page is loading ...
Page is loading ...
Page is loading ...
Page is loading ...
Page is loading ...
Page is loading ...
Page is loading ...
Page is loading ...
Page is loading ...
Page is loading ...
Page is loading ...
Page is loading ...
Page is loading ...
Page is loading ...
Page is loading ...
Page is loading ...
Page is loading ...
Page is loading ...
Page is loading ...
Page is loading ...
Page is loading ...
Page is loading ...
Page is loading ...
Page is loading ...
Page is loading ...
Page is loading ...
Page is loading ...
Page is loading ...
Page is loading ...

4
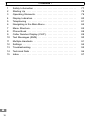
− Contents −
76
1 Safety Information 77. . . . . . . . . . . . . . . . . . . . . . . . . . . . . . . . . .
2 Starting Up 78. . . . . . . . . . . . . . . . . . . . . . . . . . . . . . . . . . . . . . . .
3 Operating Elements 79. . . . . . . . . . . . . . . . . . . . . . . . . . . . . . . . .
4 Display Indicators 80. . . . . . . . . . . . . . . . . . . . . . . . . . . . . . . . . .
5 Telephoning 81. . . . . . . . . . . . . . . . . . . . . . . . . . . . . . . . . . . . . . .
6 Navigating in the Main Menu 84. . . . . . . . . . . . . . . . . . . . . . . . .
7 Menu Structure 85. . . . . . . . . . . . . . . . . . . . . . . . . . . . . . . . . . . . .
8 Phone Book 88. . . . . . . . . . . . . . . . . . . . . . . . . . . . . . . . . . . . . . .
9 Caller Number Display (CLIP) 89. . . . . . . . . . . . . . . . . . . . . . . .
10 Text Messages (SMS) 90. . . . . . . . . . . . . . . . . . . . . . . . . . . . . . .
11 Multiple Handsets 91. . . . . . . . . . . . . . . . . . . . . . . . . . . . . . . . . .
12 Settings 94. . . . . . . . . . . . . . . . . . . . . . . . . . . . . . . . . . . . . . . . . . .
13 Troubleshooting 95. . . . . . . . . . . . . . . . . . . . . . . . . . . . . . . . . . . .
14 Technical Data 96. . . . . . . . . . . . . . . . . . . . . . . . . . . . . . . . . . . . .
15 Index 97. . . . . . . . . . . . . . . . . . . . . . . . . . . . . . . . . . . . . . . . . . . . .

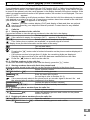
− Safety Information −
77
1 Safety Information
Please read this operating instruction manual thoroughly.
1.1 Intended use
The telephone is suitable for telephoning within a public telephone network system. Any other use
is considered unintended use. Unauthorised modification or reconstruction is not permitted. Un-
der no circumstances open the device or complete any repair work yourself.
1.2 Installation location
The telephone is designed for use indoors in rooms with a temperature range from 10 °C to
30 °C. The base station should not be used in rooms exposed to moisture, such as bathrooms
or laundries. Prevent excessive exposure to smoke, dust, vibration, chemicals, moisture, heat
and direct sunlight. Position the base station with a distance of 1 m to other electronic devices or
there is a risk of mutual disturbance.
Do not use the handset in potentially explosive areas.
1.3 Power supply
Only use the power adapter plug supplied because other power supplies could damage the tele-
phone. Ensure access to the power adapter plug is not obstructed by furniture or such.
1.4 Telephone connection cable
If the telephone connection cable supplied needs to be replaced, ensure the pin assignment is
identical on the new one.
1.5 Rechargeable batteries
Do not throw batteries into a fire or immerse them in water.
1.6 Power failure
The telephone cannot be used to make calls in the event of a power failure. Always keep a cord
connected telephone which operates without an external power supply available in case of emer-
gency situations.
1.7 Private branch exchanges
The telephone can be connected to a private branch exchange. There is no guarantee that the
telephone will work on every private branch exchange.
1.8 Notes on medical equipment
Never use the telephone in the vicinity of medical equipment. It cannot be fully ruled out that they
will not affect heart pacemakers. DECT telephones can cause an unpleasant humming sound in
hearing aids.
1.9 Cleaning and upkeep
Clean the housing surfaces with a soft, fluff−free cloth. Never use cleaning agents or aggressive
solvents. The rubber footpads on the base station are not resistant to all cleaning agents.
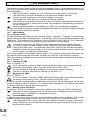
1.10 Disposal
The implementation of European law in national laws and directives obliges you to dispose
of consumable goods appropriately. The adjacent symbol on the telephone indicates that
electrical and electronic apparatus and batteries no longer required must be
disposed of separate from domestic waste.
Electrical and electronic devices must be disposed of at a suitable collection point
provided by the public waste authorities.
Batteries must be disposed of at the point of sale or at the appropriate collection
points provided by the public waste authorities.
Packaging materials must be disposed of according to local regulations.

− Starting Up −
78
2 Starting Up
2.1 Safety information
Caution: It is essential to read the Safety Information in Chapter 1 before starting up.
2.2 Checking the contents of the package
The package contains:
a base station with power adapter plug
a telephone connection cable
four handsets eight rechargeable batteries
three charging stations with three power
adapter plugs
an operating manual
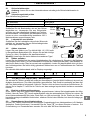
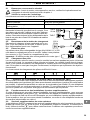
2.3 Connecting the base station
Connect the base station as illustrated in the dia-
gram. For reasons of safety, only use the power
adapter plug and telephone connection cable sup-
plied. The power adapter plug from the base station
must always be connected to a properly installed
230 V mains power outlet.
2.4 Connecting the charging station
Connect the charging station as illustrated in the dia-
gram. For reasons of safety, only use the power
adapter plug supplied.
2.5 Inserting the batteries
Insert two batteries of the type AAA Ni−MH 1.2 V 550 mAh in the bat-
tery compartment after opening it. Pay attention to correct polarity
(refer to Fig.). Close the battery compartment cover.
Important: Do not use any other type of batteries.
2.6 Charging the batteries
When preparing to use the handset for the first time, place it in the base station (display facing up-
wards) for at least 14 hours. The charging control lamp on the base station lights up. The handset
warms up during the charging process. This is normal and does not represent a risk. Do not
charge the handset with charging units from other manufacturers. Failure to charge the batteries
properly can lead to telephone malfunction.
The current battery charge status is indicated in the display:
Full Half empty Low Empty
2.7 Tone or Pulse dialling mode
The telephone can be connected to both analogue connections (pulse dialling) and digital con-
nections (tone dialling). The equipment is set to Tone dialling mode at the factory. If the telephone
does not work on your telephone connection, refer to Chapter 7.3 to learn how to switch the tele-
phone to analogue, pulse dialling mode.
2.8 Operating on private branch exchanges
If your telephone is connected to a private branch exchange, use the R button to implement
the transfer calls or automatic callback functions. When used on a private branch exchange, a Re-
call time of 90 ms must be set. The sales outlet where you purchased the telephone can tell you
whether it will work on your private branch exchange.
2.9 Supplementary services from your telephone network provider
The SWITEL telephone supports all major supplementary services offered by the telephone net-
work provider (e.g. brokering, call waiting, three−way conferencing, etc.). Press the R button
to use these services. Please contact the telephone network provider with regard to enabling the
supplementary services.
TAE−F
230 V
50 Hz
230 V
50 Hz

− Operating Elements −
79
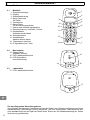
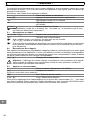
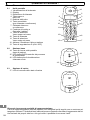
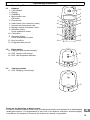
3 Operating Elements
3.1 Handset
1 Call indicator
2 Display
3 Redialling
4 Menu button and
OK button
5 Phone book
6 Hash button (for conference calls)
7 Internal and conference calls
8 Muting function and delete / back
9 Selection button:
Scroll upwards in menu
10 Call button
11 Selection button:
Scroll downwards in menu
12 Key lock off/on
13 R−signal button (on/off)
3.2 Base station
14 Paging button (locate handset)
15 LED, charge control lamp
16 LED, call and power indicator
3.3 Charging station
17 LED, charging control lamp
Notes on the depiction of button icons:
In order to read the manual more easily, the telephone buttons are depicted in a standardised
rectangular contour. The appearance of the icons in the buttons, therefore, deviates slightly
from that on the telephone. However, the buttons are clearly recognisable.
// /
1
2
3
4
5
6
7
8
9
11
10
12
13
14
15
16
17

− Display Indicators −
80
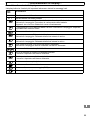
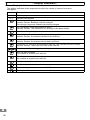
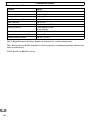
4 Display Indicators
The display indicates all the important functions by means of various icons and
messages.
Icon
Description
Time display
Handset identification
Constantly on: Displays battery capacity.
Indicator flashes: Batteries must be charged.
Run−through segments: Batteries are being charged.
The connection to the base station is good.
Indicator flashes: The handset is out of range of the base station.
A call is currently being made.
Constantly on: An external call is currently being made.
Indicator flashes: An external call has been received.
Constantly on: An internal call is currently being made.
Indicator flashes: An internal call has been received.
Constantly on: You have accessed the calls list. The call has not been viewed.
Indicator flashes: There are new calls in the calls list.
The phone number is longer than 12 digits.
This call was not taken.
The number is stored in the calls list.
This call was taken.
The number is stored in the calls list.
You have opened the main menu.
You have opened the phone book.
A new message has been received (SMS).
The key lock is activated.

− Telephoning −
81
5 Telephoning
The way in which the telephone is operated is subsequently described by means of text and sym-
bols: If a button is depicted, it means that the respective button must be pressed.
In addition, the following symbols appear:
Enter digits or letters
2 sec Press the button depicted for 2 seconds
Acoustic signal on the handset
Acoustic signal on the base station
40
Text or icon in the display
The ringing signals on the handset and base station only function when they
have not been deactivated beforehand!
5.1 Taking a call
and , Take the call
End the call
When the handset is ringing, press the or button to adjust the
ringing volume.
If the ringing tone has been deactivated on the handset, incoming calls are only indica-
ted by the base station (as long as the base ringer has not been deactivated).
5.2 Taking two calls
You will hear acoustic signals (call waiting) if a second call is received while you are talking on the
telephone. The number of the second caller appears in the display. Press the buttons below in
the sequence described to switch between the two callers, the connection to the other caller is
put on hold.
, Switch to other caller
Caution: The functions for phone number display, holding calls and call waiting are
supplementary services offered by your telephone network provider. Contact your net-
work provider for further information.
5.3 Making a call
Enter the phone number (max. 32 digits)
Dial the phone number
If you enter a wrong digit:
Press briefly: Deletes the last entry
2 sec Press longer: Deletes the entire phone number
It is also possible to press the Call button first to obtain the dialling tone for an outside line.
Then enter the required telephone number. It is not possible to correct wrong digits individually
using this dialling procedure.
5.4 Dialling pause
In the case of private branch exchanges, it is necessary to dial a specific number (e.g. 9" or 0")
in order to obtain the dialling tone for an outside line. When using some older private branch ex-
changes, it takes a little time before the dialling tone becomes audible. Particularly in the case of
such private branch exchanges, it is useful to insert an automatic pause after the number for the
outside line so that the number can be dialled in a continuous process without having to wait for
the dialling tone.
Between pressing the number for an outside line and the phone number required, press the
button once. P" appears in the display. After dialling the number for the outside line, the telephone
then waits 3 seconds before dialling the actual phone number.
The pause can also be entered with the phone number in the phone book.
5.5 Redialling
The telephone stores the last ten numbers dialled in a redialling list.
Open the redialling list (the last phone number
dialled appears in the display)
or , Select an entry and dial the number
If a phone number has been stored in the phone book, the name associated with it ap-
pears in the display.

− Telephoning −
82
5.5.1 Deleting all the numbers from the redialling list
Open the redialling list
2 sec , Delete the entire list
5.5.2 Deleting a number from the redialling list
, or Select the entry to be deleted
, Delete the individual entry
5.6 Calling back missed calls
The telephone stores the last ten calls in a calls log.
or Open and scroll through the entries stored
Dial the number
5.7 Dialling phone numbers stored in the phone book
Phone numbers stored in the phone book (refer to Section 8.1) can be dialled quickly and
easily.
, or Open the phone book and select the phone book entry
Dial the number
Phone book entries can be selected directly by opening the phone book and entering
the first letters of the entry required. Example: To access the number for Peter", for ex-
ample, press once and use the or buttons, if necessary, to select the
stored entry.
5.8 Adjusting the receiver volume
The volume can be adjusted to one of five settings during a call.
or Press the button during the call
5.9 Muting the microphone in the handset
Switch the function on/off
The handset microphone can be switched on and off during a telephone call. This enables you
to confer with a third party, for example, without the caller being able to hear you. The handset
loudspeaker, however, remains on; i.e. you can still hear the caller.
5.10 Talk time display
A few seconds after a call has been taken, the phone number dialled or that of the caller disap-
pears from the display and is replaced by the duration of call (hh−mm−ss).
5.11 Key lock
3 sec Activate the key lock function
Deactivate the key lock function
Incoming calls can still be taken as normal even when the key lock is activated (also refer to Sec-
tion 7.4). The key lock function remains active after the call has been ended.
5.12 Temporary tone dialling
If you only operate the telephone using the Pulse dialling method, you can still make use of the
advantages of the Tone dialling method (e.g.: remote access of the answering machine).
4 sec Switch to Tone dialling
(for the duration of the call)
When the call is ended, the telephone automatically switches back to Pulse dialling.
5.13 Notes on range
The handset has a range of approx. 50 meters in closed rooms and approx. 300 meters outdoors.
In the case of a good connection to the base station, the h icon lights up continuously in the dis-
play.
If the handset is moved too far from the base station, the h icon flashes and acoustic
warning signals are issued. Move towards the base station, otherwise the call will be di-
sconnected.
If the connection to the handset has been lost, the message BASE 1" appears in the
display.

− Telephoning −
83
5.14 Searching for the handset (Paging)
If you have misplaced the handset, it can be located easily. Press the Paging button on the base
station; the handset rings for 30 seconds. To terminate the ringing function before the 30 seconds
has elapsed, simply press the Paging button again or the Call button on the handset.
All the handsets registered on the base station ring.
or Ends paging prematurely.
5.15 Switching the handset on /off
3 sec Switch on/off

− Navigating in the Main Menu −
84
6 Navigating in the Main Menu
6.1 Navigating in the menu
All the functions can be accessed via the various menus. Refer to the menu structure in Chapter
7 to find how to access the respective functions.
1. Open the required menu or phone book using the relevant button.
2. Press or to select the required submenu.
3. Press the button to open the submenu.
4. Press or to select the required function.
5. Press the button to open the function.
6. Press or to select the setting required.
7. Enter digits or letters using the relevant digit keys.
8. Press the button to confirm the input.
9. Press the button to move one menu level back.
Every process is automatically cancelled if there is no input within 20 seconds.
6.2 Acoustic signals
To simplify operating the telephone, it issues various confirmation, notification, warning and other
acoustic signals. Some of them can be activated or deactivated as required. These include:
S Key beep: A short tone is issued each time a button on the handset is pressed.
S Low battery" warning signal: If the battery capacity is too low, a warning signal is
issued to remind you to charge the handset.
S Range warning signal: This acoustic warning signal is issued when the handset is
moved too far from the base station.
The way to switch the signals on and off is described in the menu structure in
Section 7.4.
Other acoustic signals simplify navigating in the menu. They cannot be deactivated. The most im-
portant of these are:
S Confirmation signal : Two short, ascending acoustic signals are
issued when input is completed successfully.
S Notification signal : A longer, higher acoustic signal is issued on
reaching the end of a menu after scrolling up or down, indicating there are
no further selection options.
6.3 Example
Using the example of Writing an SMS", this section explains how to navigate in the main menu
and submenus to complete entries. Proceed as in this example for all the settings.
Open the main menu
or
, Select the SMS submenu and confirm
or
=!3
, Select the required function and confirm
(Menu: SMS / WRITE)
0"
, Confirm the request to enter text
, Enter a message and confirm
, Confirm the request to enter a phone number
, Enter a phone number and confirm
Send process is started

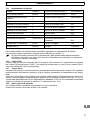
− Menu Structure −
85
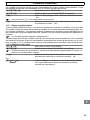
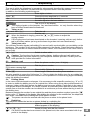
7 Menu Structure
Access the Main Menu by pressing the button. Then use the and buttons to select the required submenu and confirm your selection by pressing
the button. Or, type in the required information (individual entries are subsequently printed in italics and identified by ). Your entry is normally confirmed
by an acoustic signal .
7.1 Phone book
PHONE BOOK ADD ENTRY Name Number MELODY 1−5
MODIFY ENTRY Name xy Number xy MELODY 1−5
DELETE ENTRY Name xy CONFIRM ?
7.2 Text messages (SMS)
SMS INBOX REPLY
DELETE
FORWARD
DETAILS
PERSONAL SMS
WRITE MESSAGE ? Text NUMBER ? Number SENDING...
DELETE ALL INBOX CONFIRM ?
PERSONAL SMS CONFIRM ?
SMS SETTINGS MSG ALERT ON
OFF
SEND SERVICE SEND 1
SEND 2
RCV CENTRE RECEIVE 1 Number
RECEIVE 2 Number
SEND CENTRE SEND 1 Number
SEND 2 Number
TERMINAL NO Number

− Menu Structure −
86
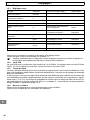
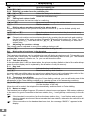
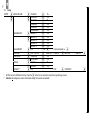
7.3 Setup
SETUP BASE VOLUME VOLUME 1
VOLUME 2
VOLUME 3
VOLUME 4
VOLUME 5
VOLUME OFF
BASE MELODY MELODY 1
MELODY 2
MELODY 3
MELODY 4
MELODY 5
DEL HANDSET PIN?* PIN internal Handset no.
PIN CODE*
PIN? old PIN NEW PIN new PIN NEW PIN new PIN
DIAL MODE TONE DIAL
PULSE DIAL
RECALL RECALL1
RECALL2
DEFAULT** PIN? PIN CONFIRM ?
* All PINs are set to 0000 at the factory. Press the button for two seconds to cancel the programming process.
** Attention: All
settings are reset to their default setting! All list entries are deleted!

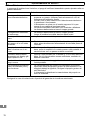
− Menu Structure −
87
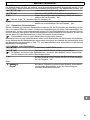
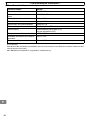
7.4 Handset
HANDSET BEEP KEY TONE ON
OFF
LOW BATTERY ON
OFF
OUT RANGE ON
OFF
INT RING VOL VOLUME 1, 2, 3, 4, 5, VOLUME OFF
EXT RING VOL VOLUME 1, 2, 3, 4, 5, VOLUME OFF
INT MELODY MELODY 1, 2, 3, 4, 5
EXT MELODY MELODY 1, 2, 3, 4, 5
CLOCK SET* hh−mm
ALARM SET* ON hh−mm
OFF
AUTO ANSWER** ON
OFF
NAME ABC
LANGUAGE ENGLISH
FRANCAIS
GERMAN
ITALIANO
KEY LOCK ? ON***
* Enter the time as four digits in 24−hour clock format. Example: Enter 5:53 p.m. as 1753".
** ON: An incoming call is taken by removing the handset from the base station (default setting).
OFF: An incoming call can only be taken by pressing the button.
*** Deactivate key lock: Press the button twice.
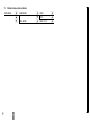
7.5 Registering base station and handsets
REGISTER SELECT BASE BASE 1
AUTO
REG BASE BASE 1 2 3 4

− Phone Book −
88
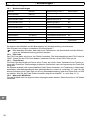
8 Phone Book
The phone book can store 50 phone numbers, each with the associated name. Each phone num-
ber can comprise a maximum of 20 digits and each name a maximum of 12 letters.
8.1 Entering phone numbers in the phone book
Refer to. Section 7.1
If the name already exists in the phone book, an acoustic signal is issued and Add"
appears in the display again. You have to enter another name.
The corresponding melody rings when a call is received from the caller entered. This
assignment only functions when your telephone connection and that of the caller imple-
ment the caller number display function (CLIP).
8.1.1 Notes on storing
Always enter the area access code with the phone numbers so that the telephone can
also assign incoming local calls to a phone book entry.
If the memory capacity of 50 phone numbers is reached, the mes-
sage
!> <2
appears in the display. Phone book entries will then have to be de-
leted in order create space.
8.1.2 Entering text
The digit keys are also labelled with letters. Pressing the respective key the necessary number
of times enables capital letters and digits to be entered.
Example: To enter the name "Peter":
Press 1 x button , 2 x button , 1 x button , 2 x button and
3 x button .
Further notes on entering text:
To enter the same letter twice, press the relevant button until the letter appears then wait till the
cursor automatically skips one position forward.
Press Press once: Space
Press twice: Hyphen
Deletes the last entry
Move the cursor
8.2 Changing phone book entries
Refer to. Section 7.1
To select an entry directly, press the corresponding button to enter the first letter of the
name required. To select the name Peter" directly, for example, press once.
8.3 Deleting phone book entries
Refer to. Section 7.1
The deletion process is cancelled by pressing the button.
8.4 Dialling a phone number from the phone book
Refer to. Section 5.7

− Caller Display (CLIP Function) −
89
9 Caller Number Display (CLIP)
If your telephone system is equipped with the CLIP function (CLIP = Calling Line Identification Pre-
sentation), the number of the caller appears in the display when they ring. If the caller’s number
is stored in the phone book, the name appears in the display instead of the phone number. If the
caller has suppressed the transfer of his phone number, the number is not displayed. The mes-
sage
=3:
appears.
The calls list can contain up to 40 phone numbers. When the list is full, the oldest entry is automati-
cally deleted on receipt of a new call. If new phone numbers have been stored in the calls list in
your absence, the
icon appears in the display.
Caution: The caller number display (CLIP) and display of date and time are optional
services offered by your telephone network provider. Contact them for any detailed
information.
9.1 Calls list
9.1.1 Viewing numbers in the calls list
Proceed as follows to view the phone numbers in the calls list in the display:
The last number received appears in the display
If the calls list is empty, the message
3>
appears in the display.
Select other phone numbers from the calls list
If no further phone numbers are available, an acoustic signal is issued.
Two display icons provide information on the status of the entry:
The call was taken
The call was not taken
Pressing the button calls in further information on the phone number displayed, if
required:
S If the phone number is longer than 12 digits, the remaining digits are displayed.
S Displays the date and time of the call if this data was transferred from the caller.
Press the button to exit from the calls list.
9.1.2 Dialling numbers in the calls list
To call back a number displayed in the calls list directly, press the button.
9.1.3 Storing numbers from calls list in the phone book
A phone number stored in the calls list can be transferred directly to the phone book.
Select a phone number
0:: 3!>
Initiate the storing process
0 Enter the name and confirm
(for text input, refer to Section 8.1.2)
If the name already exists in the phone book, an acoustic signal is issued and
the selected phone number reappears in the display.
'()*+,-
Confirm the phone number selected
:> Select the required melody and confirm
9.1.4 Deleting a phone number from the calls list
Select a phone number
'()*+,-
Initiate the deleting process and confirm for the phone
number selected
9.1.5 Deleting all phone numbers from the calls list
or Open the calls list
3 sec
:3 0
Initiate the deleting process and confirm

− Text Messages (SMS) −
90
10 Text Messages (SMS)
The telephone can be used to transfer short text messages (SMS = Short Message Service) con-
taining up to 160 characters via the conventional telephone network provided the following condi-
tions are fulfilled:
S The CLIP function is enabled for your telephone connection (refer to Section 9)
S The SMS facility has been activated by your telephone network provider.
Please note that sending text messages is subject to charges.
The charges are made by via your telephone network operator.
If an SMS is sent to another connection in the conventional telephone network which is
has no SMS service or cannot receive texts, the message is automatically provided as
a voice message.
Sending SMS messages is not available for Call−by−Call connections at present.
Contact your telephone network provider for detailed information on transferring SMS messages
via the conventional telephone network.
10.1 SMS settings
10.1.1 Service centre
All SMS messages are distributed via a Service Centre. Swisscom", Cablecom" and other tele-
phone network providers offer this service. Your SWITEL telephone is prepared for operation with
Swisscom". The number of the Swisscom" Service Centre is 0622 100 000. The Swisscom"
SMS functionality is already enabled. No further registrations are necessary.
In order to use the services offered by other telephone network providers, however,
you must program new call numbers for the SMS receiving centre and SMS sending
centre in the main menu. The registration procedure varies for the individual providers.
Therefore, please ask the provider of your choice for the necessary phone number and
the procedure for enabling the SMS service.
Two memory locations are available (refer to Section 7.2) in which to enter each of the service cen-
tre numbers. Switch between these two variations by using the Send Service" submenu.
The way in which to program the phone numbers for the receiving and sending centres is descri-
bed in Chapter 7.2.
10.2 Sending an SMS
Refer to. Section 7.2
If it is not possible to send an SMS, delete the last two digits of the programmed call
numbers in the sending centre. The call number is then 0622 100 0.
It is not possible to send SMS messages from a private branch exchange.
The way in which to enter texts is described in Section 8.1.2.
10.3 Receiving an SMS
Refer to. Section 7.2
If it is not possible to receive an SMS, delete the last two digits of the programmed call
numbers in the receiving centre. The call number is then 0622 100 0.
A specific, acoustic signal indicates an SMS has been received. This acoustic signal can be deac-
tivated, if necessary (refer to Section 7.2). In addition, the Envelope icon in the display also indica-
tes that an SMS text message has been received.
10.4 Managing text messages
A maximum of 15 text messages can be stored (jointly in the Inbox and Outbox directories).
When all the memory locations are full, the oldest entry is deleted from the respective
directory when a new SMS text message is received.
10.5 Personal SMS mailbox
In addition to the basic Inbox directory, a personal SMS mailbox is also available. This function
enables SMS text messages, to which only you have access, to be received and sent.
The SMS mailbox can only be used when the telephone network provider supports the
facility. Therefore, ask your telephone network provider with respect to setting up your
personal SMS mailbox.
Page is loading ...
Page is loading ...
Page is loading ...
Page is loading ...
Page is loading ...
Page is loading ...
Page is loading ...
Page is loading ...
Page is loading ...
Page is loading ...
-
 1
1
-
 2
2
-
 3
3
-
 4
4
-
 5
5
-
 6
6
-
 7
7
-
 8
8
-
 9
9
-
 10
10
-
 11
11
-
 12
12
-
 13
13
-
 14
14
-
 15
15
-
 16
16
-
 17
17
-
 18
18
-
 19
19
-
 20
20
-
 21
21
-
 22
22
-
 23
23
-
 24
24
-
 25
25
-
 26
26
-
 27
27
-
 28
28
-
 29
29
-
 30
30
-
 31
31
-
 32
32
-
 33
33
-
 34
34
-
 35
35
-
 36
36
-
 37
37
-
 38
38
-
 39
39
-
 40
40
-
 41
41
-
 42
42
-
 43
43
-
 44
44
-
 45
45
-
 46
46
-
 47
47
-
 48
48
-
 49
49
-
 50
50
-
 51
51
-
 52
52
-
 53
53
-
 54
54
-
 55
55
-
 56
56
-
 57
57
-
 58
58
-
 59
59
-
 60
60
-
 61
61
-
 62
62
-
 63
63
-
 64
64
-
 65
65
-
 66
66
-
 67
67
-
 68
68
-
 69
69
-
 70
70
-
 71
71
-
 72
72
-
 73
73
-
 74
74
-
 75
75
-
 76
76
-
 77
77
-
 78
78
-
 79
79
-
 80
80
-
 81
81
-
 82
82
-
 83
83
-
 84
84
-
 85
85
-
 86
86
-
 87
87
-
 88
88
-
 89
89
-
 90
90
-
 91
91
-
 92
92
-
 93
93
-
 94
94
-
 95
95
-
 96
96
-
 97
97
-
 98
98
-
 99
99
-
 100
100


Ask a question and I''ll find the answer in the document
Finding information in a document is now easier with AI
in other languages
- italiano: SWITEL DE104 Manuale del proprietario
- français: SWITEL DE104 Le manuel du propriétaire
- Deutsch: SWITEL DE104 Bedienungsanleitung
Related papers
Other documents
-
AUDIOLINE STUDIO 80-QUADRO Operating instructions
-
AUDIOLINE Oslo 880 Owner's manual
-
AUDIOLINE OSLO 502 Owner's manual
-
-
-
-
-
-
-