EN 3
Fig. 1
Remove all wrapping/packaging present inside the appliance and clean
with water and baking soda or neutral soap.
After the installation, wait 2 - 3 hours to allow time for the refrigerator/
freezer to stabilize at normal working temperature, before placing fresh
or frozen foods inside.
If the power cord becomes disconnected, wait at least five minutes
before restarting the refrigerator/ freezer. At this point, the appliance is
ready for use.
Press the button for setting the temperature until you reach the level you
want where level 1 is the warmest and level 4 is the coldest. Under
normal operating conditions, we recommend using an intermediate
setting (level 2)
If you do not press the button (2) for more than 5 seconds, the settings
will be saved.
The temperature levels in advanced settings are set from warmest to
coldest e.g. 2/2.1/2.3/2.4 which means there are 4 sub-levels for every
main level.
Door open alarm
If the door is left open for longer than 90 seconds, an alarm is sounded. To
1 2 3 4
Press button (2) for less than 2 seconds to change the temperature level.
1 2 3 4
Advanced settings menu:
Use this menu to set an intermediate level.
1 2 3 4
Press button (2) for more than 2 seconds. When you release it, LED
2 will flash
1 2 3 4
The next time you press button (2) for less than 2 seconds, the
intermediate level will be set. This operation works in cycles every time
you press the button.
1 2 3 4
1 2 3 4
By placing the mark on this product, we are confirming compliance to
all relevant European safety, health and environmental requirements which
are applicable in legislation for this product.
Scrapping old appliance
Conformity
Appliance start-up
Turning On/Off with internal User Interface
Setting the temperature
OPERATION
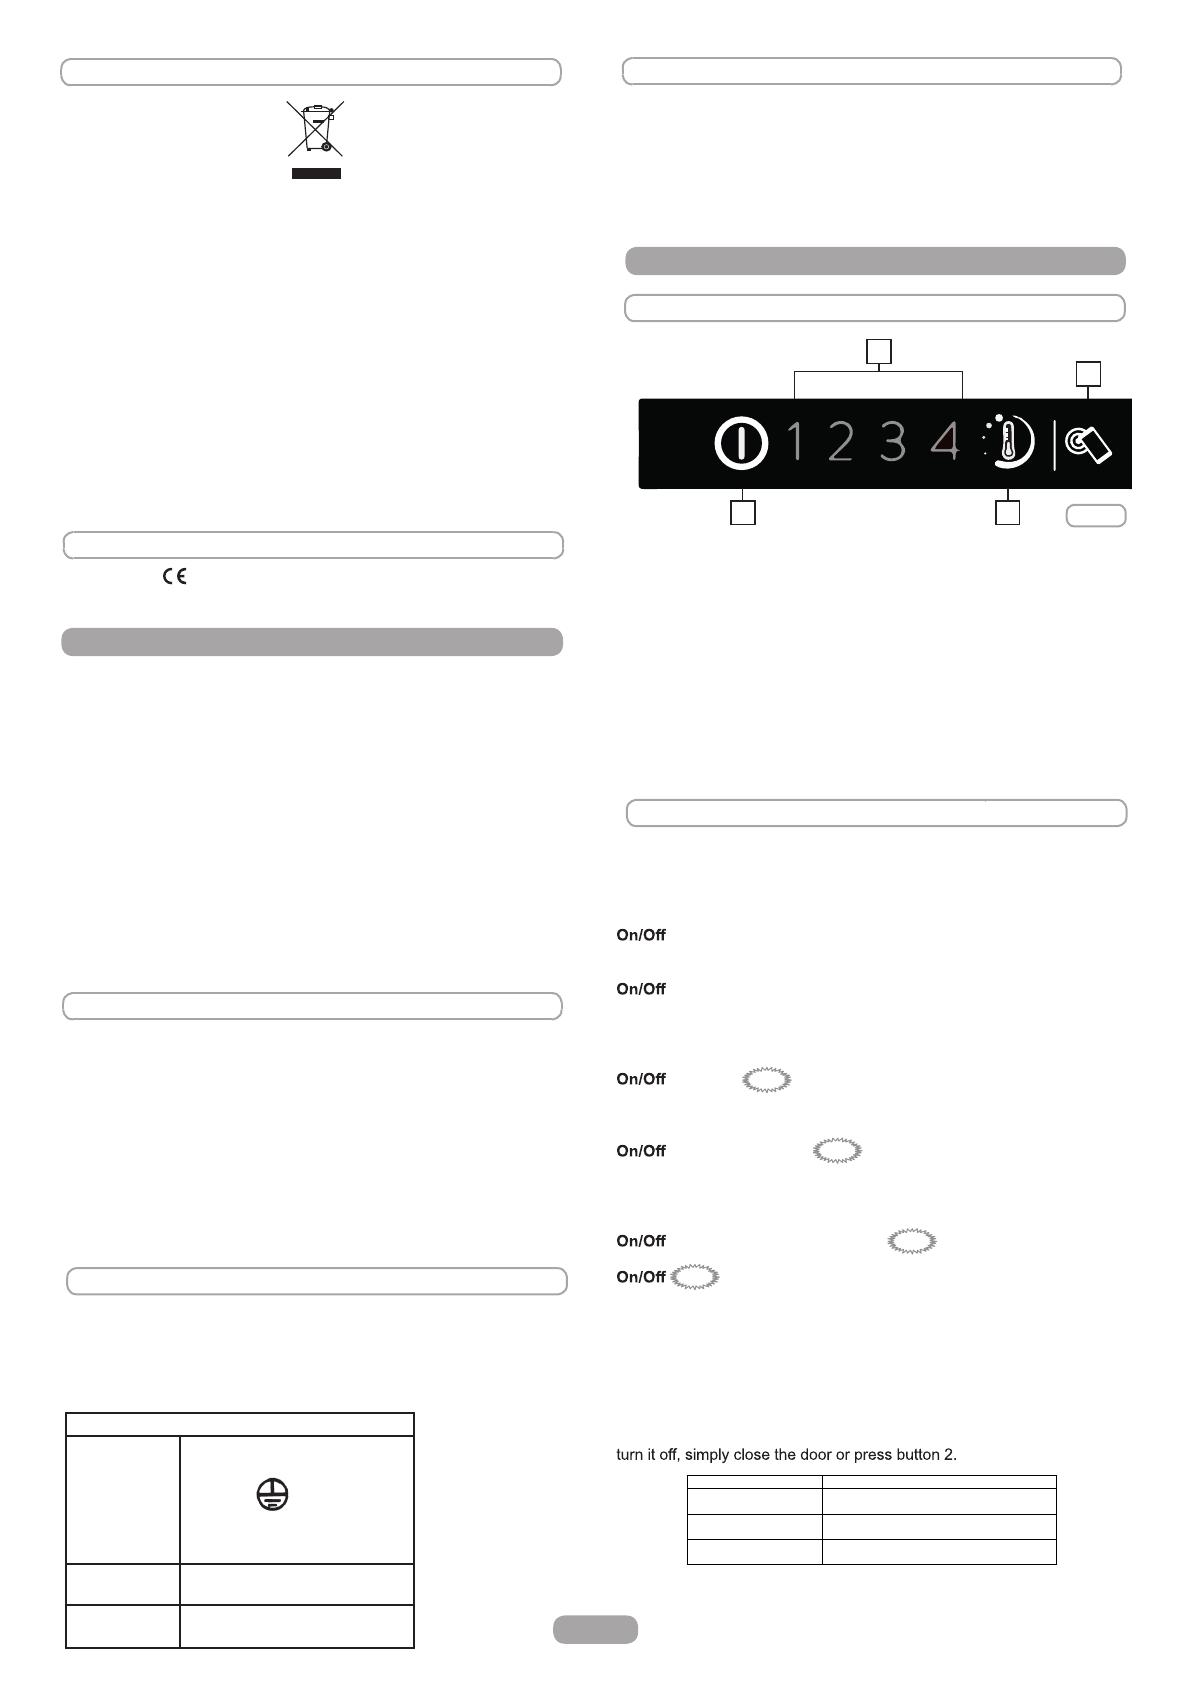
Control panel
1. Temperature indicator LED
2. Temperature control
3. ON/OFF button
4. Smart Touch button
Turning the appliance ON:
Plug the appliance in, if all the temperature indicators LEDs are off, press
ON/OFF (3) for 1 second. When you release the ON/OFF button (3) a
temperature light will come on and the appliance will beep.
Tur
ning the appliance OFF:
Press the ON/OFF button (3) for 1 second, when you release it, the
temperature light will go out and the appliance will beep. In the event of a
power failure, when the power comes back on, the appliance will run
using the last saved setting.
23
1
WARNINGS:
• Do not install the appliance in a damp or wet location as this could
compromise the insulation and result in leakage.
Furthermore, on the exterior of the same, condensate could accumulate
• Do not place the appliance in locations outside or near sources of heat
or exposed to direct sunlight.
The appliance operates properly within the range of environmental
temperatures indicated:
+10 +32’C for the climatic class SN
+16 +32’C for the climatic class N
+16 +38’C for the climatic class ST
+16 +43’C for the climatic class T
(See the nameplate of the product)
• Do not place containers with liquids on top of the appliance.
• Wait at least 3 hours after final placement before placing the appliance
in operation.
After shipping, place the appliance vertically and wait at least 2 - 3 hours
before connecting it to the electrical system. Before inserting the plug
into the electrical socket, make sure that:
• The socket is earthed and in compliance with the law.
• The socket can withstand the maximum power load of the appliance, as
indicated on the nameplate of the refrigerator.
• The power supply voltage is within the amounts indicated on the
nameplate of the refrigerator.
• The cord must not be folded or compressed.
• The cord must be checked regularly and replaced solely by authorized
technicians.
• The manufacturer declines any liability whenever these safety
measures are not respected.
Electrical connection
INSTALLATION
This appliance is marked according to the European directive
2012/19/EU on Waste Electrical and Electronic Equipment (WEEE).
WEEE contains both polluting substances (which can cause negative
consequences for the environment) and basic components (which
can be re-used). It is important to have WEEE subjected to specific
treatments, in order to remove and dispose properly all pollutants,
and recover and recycle all materials.
Individuals can play an important role in ensuring that WEEE does
not become an environmental issue; it is essential to follow some
basic rules:
- WEEE should not be treated as household waste;
- WEEE should be handed over to the relevant collection points
managed by the municipality or by registered companies. In
many countries, for large WEEE, home collection could be
present.
In many countries, when you buy a new appliance, the old one may
be returned to the retailer who has to collect it free of charge on a
one-to-one basis, as long as the equipment is of equivalent type and
has the same functions as the supplied equipment.
4
Plug your appliance into the power socket.
If the plug we supply does not fit :
CUT IT OFF AND DESTROY IT!
You can't use it on other appliances, and the exposed wires could be
dangerous if anyone plugged it in.
Fit a suitable plug, as follows:
Electrical connection (for U.K. only)
Green and
yellow wire
Marked with the letter E,
OR marked with the Earth
symbol,
OR coloured green,
OR coloured green and
yellow.
Blue wire
Brown wire
Marked N,
OR coloured black.
Marked L,
OR coloured red.
Connect to the terminal in the plug
•
•
Position Conditions
1-2 Summer or ambient temperature between
25-35 °C
2-3 Spring, autumn or ambient temperature
between 15-25 °C
3-4 Winter, or ambient temperature between
5-15 °C


