
Rea®Clematis®
enManualwheelchairpassive
UserManual
ThismanualMUSTbegiventotheuseroftheproduct.
BEFOREusingthisproduct,readthismanualandsaveforfuture
reference.

©2017Invacare®Corporation
Allrightsreserved.Republication,duplicationormodicationinwholeorinpartisprohibitedwithoutpriorwritten
permissionfromInvacare.Trademarksareidentiedby™and®.AlltrademarksareownedbyorlicensedtoInvacare
Corporationoritssubsidiariesunlessotherwisenoted.

Contents
1General.........................................4
1.1Introduction..................................4
1.2Symbolsinthismanual..........................4
1.3Warranty.....................................4
1.4Limitationofliability............................4
1.5Customerservice...............................4
1.6Accidents/Nearaccidents.......................4
1.7Intendeduse..................................4
1.8Compliance...................................5
1.9Servicelife...................................5
2Safety..........................................6
2.1Specicrisks..................................6
2.2Labels.......................................6
2.3Locationoftheidenticationlabel..................7
2.4Symbols.....................................7
3Setup...........................................8
3.1Deliverycheck.................................8
3.2Assembly....................................8
3.2.1Unfoldingthebackrest........................8
3.2.2Fittingthearmrests..........................8
3.2.3Fittingtherearwheels........................8
3.2.4Angleadjustablelegrests......................9
3.2.5Fixedlegrests...............................9
4Components......................................10
4.1Wheelchairoverview............................10
4.2Backrest.....................................10
4.2.1Adjustingthebackrestplate....................10
4.2.2Adjustingthe“Laguna”tensionadjustable
backrest..................................10
4.2.3Adjustingthebackrestangle...................10
4.2.4Tiltingseatandbackrest......................11
4.3Adjustingthepushhandles.......................11
4.3.1Backrestplate..............................11
4.3.2Backresttensionadjustable“Laguna”.............12
4.4Seat........................................12
4.4.1Adjustingtheseatdepth......................12
4.4.2Seatadjustments............................12
4.5Angleadjustablelegrest.........................12
4.5.1Angleadjustment............................12
4.5.2Adjustingthelegrestheight....................13
4.6Fixedlegrest..................................13
4.6.1Adjustingthelegrestheight....................13
4.7Adjustingtheheightofthecalfpad.................13
4.8Footrests.....................................13
4.8.1Adjustingtheangleadjustablefootplates.........13
4.9Tires........................................13
4.10Adjustingtheanti-tipdevice.....................14
5Accessories......................................15
5.1Adjustingthedripstand.........................15
5.2Adjustingthepommel...........................15
5.3Halftray.....................................15
5.3.1Mountingthehalftray........................15
5.3.2Adjustingthehalftray........................16
5.3.3Addahalftraycushion.......................16
5.4Headrest/Neckrest............................16
5.4.1Heightadjustment...........................16
5.4.2Depth/angleadjustment.....................16
5.5Trunksupport“swing-away”......................16
5.6Trunksupport—xedarm.......................17
5.7Lateralpositioningpads(foradjustablebackrestcover
only).......................................17
5.7.1Usinglateralpositioningpads...................18
5.7.2Usingwedgeswithlateralpositioningpad.........18
5.8Posturebelt..................................18
6Usage..........................................20
6.1GeneralwarningsUsage.........................20
6.2Operatingthewheelchair........................20
6.2.1Liftingthewheelchair........................20
6.2.2Moveto/fromthewheelchair..................20
6.2.3Usingthetilt/reclinefunction.................20
6.2.4Usingtheuseroperatedbrake..................21
6.2.5Stretchingandleaning........................21
6.2.6Propellingupaslope.........................21
6.2.7Propellingdownaslope.......................21
6.2.8Climbingakerb.............................22
6.2.9Kerbs—alternativemethod....................22
6.2.10Escalatorsandstairs.........................22
7Transport........................................24
7.1Safetyinformation..............................24
7.2Transportingoccupied/unoccupiedwheelchairsin
vehicles....................................24
7.2.1Backrestandseatangles......................24
7.2.2Posturebelt................................25
7.2.3Rampsandslopes...........................25
7.3Disassemblyfortransport........................25
7.3.1Armrest...................................26
7.3.2Foldingthebackrest..........................26
7.3.3Removethelegrestangleadjustable.............26
7.3.4Removethefootrestxed.....................26
7.3.5Rearwheels................................26
8Maintenance.....................................27
8.1Dailyperformancecheck.........................27
8.2Safetyinformation..............................27
8.3Cleaning.....................................27
8.4Washinganddisinfection.........................27
8.5Maintenanceschedule...........................27
8.6Flattire......................................28
9AfterUse........................................29
9.1Recycling.....................................29
9.2Wastedisposal................................29
9.3Reuse.......................................29
10TechnicalData...................................30
10.1Dimensionsandweights........................30
10.1.1Maximumweightofremovableparts............31
10.2Material....................................31
10.3Environmentalconditions........................31

Rea®Clematis®
1General
1.1Introduction
TheReaClematis®’sseatframe,pushhandlesandcertain
othercomponentssubjectedtostrainaremadeofsteel.
Legrestsaremadeofhighqualityaluminium.
Castorsuspensionandthejointedpartsoftheframeare
madeofpolyamidereinforcedwithberglass.Thebackrest
plateisalsomadeofpolyamidereinforcedwithberglass.
Plasticdetailsaremarkedforrecycling.Seatandbackrest
cushionsaremadeoffoamrubberandtheupholsteryis
madeofwashableplushorelasticpolyurethanecloth.
TheReaClematis®isacarer-operatedwheelchairwithan
angle-adjustableseatunit.Theangleofthebackrestunitcan
beadjustedindependentlyoftheseat.Thecontrolsforthe
seatandbackrestangleadjustmentareincludedonthepush
handles.TheReaClematis®isavailableinthreeseatwidths.
Thearmrestheightofeachchaircanbeadjusted.
Thewheelscanbepneumaticorsemisolid.
Theseatandbackrestpadshavebeenergonomically
designedfortheuser.Theyaretoprovideasmuch
stabilityandcomfortaspossible,aswellasgoodpressure
distribution.
1.2Symbolsinthismanual
InthisUserManualwarningsareindicatedbysymbols.The
warningsymbolsareaccompaniedbyaheadingthatindicates
theseverityofthedanger.
WARNING
Indicatesahazardoussituationthatcouldresult
inseriousinjuryordeathifitisnotavoided.
CAUTION
Indicatesahazardoussituationthatcouldresult
inminororslightinjuryifitisnotavoided.
IMPORTANT
Indicatesahazardoussituationthatcouldresult
indamagetopropertyifitisnotavoided.
TipsandRecommendations
Givesusefultips,recommendationsand
informationforefcient,trouble-freeuse.
ThisproductcomplieswithDirective93/42/EEC
concerningmedicaldevices.Thelaunchdate
ofthisproductisstatedintheCEdeclaration
ofconformity.
1.3Warranty
Weprovideatwo-yearwarrantyfromthedeliverydate.
Damageduetowearandtearonupholstery,tires,(rubber)
tubes,handrimsandcastorsetc.,isnotcoveredbythe
warranty.Damagethathasbeencausedthroughphysical
violenceorabnormaluseisnotcovered.Damagecausedby
userswhoweighmorethanthemaximumuserweightstated
foreachwheelchairmodelisnotcovered.Thewarrantywill
onlyapplyifthemaintenanceinstructionsarefollowed.
1.4Limitationofliability
InvacareReaABacceptsnoliabilityfordamagearisingfrom:
•Non-compliancewiththeUserManual
•Incorrectuse
•Naturalwearandtear
•Incorrectassemblyorset-upbythepurchaserorathird
party
•Technicalmodications
•Theusageofanunapproved3rdpartybackrestinstead
ofatestedandapprovedInvacarebackrest.
•Unauthorisedmodicationsand/oruseofunsuitable
spareparts
ThewrittenauthorisationofInvacareReaABmustbe
obtainedbeforeinstallingadditionaladaptationsona
InvacareReawheelchair.Otherwisenoliabilityclaimscan
bemade.
1.5Customerservice
Forcontactdetailstowhereyoucanndinformationabout
forexampleproductsafetynoticesandproductrecalls,
pleaserefertothelastpageofthispublicationwhereyou
willndaddressestotheEuropeansalescompanies.
ThisUserManualcontainsimportantinformationabout
usingthewheelchair.Inordertoensuresafetywhenusing
yourwheelchair,readtheUserManualcarefullyandfollow
thesafetyinformation.
Ifyourvisionisimpaired,youcanviewtheusermanualas
aPDFleontheInternetatwww.invacare.xx(xx=local
countrycode)andenlargeiton-screenasrequired.Ifyou
cannotenlargethetextsandgraphicssufciently,please
contacttheinvacare®distributorforyourcountry;
→addressesonthereverseofthisdocument.Ifnecessary,
wewillprovideyouwithahighresolutionPDFleof
theusermanual.Moreover,youcanhavethePDFle
readouttoyouwiththeaidofsuitableprogramsusing
speciallanguagefunctionsonyourcomputer(e.g.in
Adobe®Reader®X:Shift+Ctrl+Y).
1.6Accidents/Nearaccidents
PleaseinformyourInvacareofceimmediatelyofany
accidentsornear-accidentsthathavebeencausedby
thiswheelchairandthathaveledto,orcouldhaveled
to,personalinjury.Therelevantauthoritymustalsobe
contactedandreportedto.
1.7Intendeduse
Thewheelchairisintendedforapersonwhoneedsposture
supporttoattainanup-rightsittingposition.Thebackrest
canbereclinedandtheseatcanbetiltedwhenneededto
keeptheheadinanup-rightposition.Whenthebackrest
isreclined,or/andtheseatistilted,thebackrestmustbe
equippedwithaheadrestoraneckrest.Thewheelchairalso
givesgoodsupporttothehead,thearmsandthelegs.
Thewheelchairisdesignedbothforself-propellingand
assistantmaneuveredpropelling,dependingontherear
wheelsize.Thewheelchaircanbeusedasaseatwhen
transportingtheuserinavehicle,presumingthatthexation
isinaccordancewiththeapprovedcrashtest.
Thewheelchairmustbeusedwithaseatandabackrest
system.
Thewheelchairisintendedforusebothindoorandoutdoor
use(dependingonthechosensizeofcastors).
Themaximumuserweightisstatedinthetechnicaldata.
4
1439960-D

General
Indications
Thewheelchairisintendedfordisabledpersonswithnoor
reducedwalkingabilityandwhenasteadyuprightseating
positionisnotpossibleduetothedisability.
Contraindications
Aseattiltisnotintendedforuserswhoaresensitivefor
increasedbloodpressureintheupperpartofthebody.
1.8Compliance
TheproducthasbeentestedandapprovedbyTÜVand
isincompliancewiththeEuropeanDirective93/42/EEC
concerningmedicaldevices.
Thisproducthasbeentestedandconformstothestandards
ISO7176–8andISO7176–16orISO1021–2.
Invacare®iscontinuouslyworkingtowardsensuringthatthe
company’simpactontheenvironment,locallyandglobally,
isreducedtoaminimum.ItisInvacare‘sgoaltocomply
withthecurrentenvironmentallegislation(e.g.REACHand
RoHSdirectives).
1.9Servicelife
WeestimatethattheInvacare®wheelchairhasaservicelife
spanofveyears.Itisdifculttostatetheexactlengthof
theservicelifeofourproductsandthelengthstatedisan
estimatedaveragelifespanbasedonnormaluse.Thelife
spanmaybeconsiderablylongerifthewheelchairisused
toalimitedextentandifitisusedwithcare,maintained
andhandledproperly.Thelifespanmaybeshorterifthe
wheelchairissubjectedtoextremeuse.
1439960-D5

Rea®Clematis®
2Safety
2.1Specicrisks
Belowyouwillndanumberofpointsaffectingyour
personalsafety.Readthemcarefully!Contactyourlocal
InvacareofceorHealthCareproviderincaseyouneed
assistance.
Invacareisonlyresponsibleforproductchangescarriedout
bycompetentpersonnel.Wereservetherighttomake
anychangestoequipmentandspecicationswithoutprior
notice.
Failuretocomplywithinstructionsgivenmayresultin
personalinjuryand/orproductdamage.
Thewheelchairmustalwaysbeequippedwith
legrests,footrests,seatcushionandarmrests!
Forexceptionregardingthelegrestsseesection:Pelvicbelt
WARNING!
Riskofinjury
–Thewheelchairmustalwaysbeprescribedby
anauthorisedpersonneloracompetentperson
withknowledgeaboutseating/positioningand
othersrelatedtousingawheelchair.
WARNING!
Riskoffalling
–Checkthatallpartsareattachedsecurelyto
theframe.
–Checkthatallwheels,knobs,screwsandnuts
areproperlytightened.
–Checkthatallbrakesandanti-tipdevices
functioncorrectly.
–Alwaysapplythebrakebeforegettingintoor
outofthechair.
–Neverstandonthefootplateswhengetting
intooroutofthechair,becauseoftheriskof
tipping.
–Changingtheseatanglecanmeananincreased
riskoftippingover.
–Thewheelchairmustalwaysbeequippedwith
anti-tipdevices.
–Rememberthattheeffectivenessofthe
carer-operatedbrakeisreducedinwetand
slipperyconditions,aswellaswhenonaslope.
–Becarefultoensurethattherearwheelsare
securelyattached.
WARNING!
Riskoftipping/fallingwhenusingvelcro®
backrest
–Thereisariskoftippingandinjuryifthe
velcro®strapsonthebackrestbecometoo
slack.Alwayscheckthetension.Alsocheck
thattherearwheelsareadjustedtoensure
thatthereisnoriskoftipping.
WARNING!
Riskofinjury
–Neverliftthewheelchairbythedetachable
armrests,footrests,backbraceorbythe
adjustablepushhandles.Seesection“usage”
formoreinformation.
–Thehandrimsmaybecomehotduetofriction,
whichmaycauseinjurytoyourhands.
–Whenmountingaccessoriesetc.becarefulnot
totrapyourngers.
–Thereisalwaysanincreasedriskoftrapping
partsofyourbodywhentiltingthewheelchair’s
backandseat.
–Thewidthoftheseatmustnotbereducedtoo
much,asthiswouldincreasethepressurefrom
thearmreststothesideofthepelvis.
CAUTION!
Riskofburning
Thewheelchaircomponentscanheatupwhen
exposedtoexternalsourcesofheat.
–Donotexposethewheelchairtostrongsunlight
beforeuse.
–Surfacesofthewheelchairlikeframepartsor
upholsterycan,afterlongexposuretothesun,
reachtemperaturesover41°C.
–Beforeusage,checkallcomponentsthat
comeintocontactwithyourskinfortheir
temperature.
WARNING!
Riskofpressuresoresandcontractedposture
–Theusermustnotbeseatedinatiltedposition
foralongtime.Theseatingpositionsneedsto
bevariedtoavoidpressuresores.
CAUTION!
Riskofgettingngerscaught
Thereisalwaysariskofgetting,e.g.ngers
orarms,caughtinthemovingpartsofthe
wheelchair.
–Makesurewhenactivatingthefoldingor
insertionmechanismsofmovingparts,suchas
theremovableaxleoftherearwheel,folding
backrestorantitipper,thatnothingbecomes
caught.
2.2Labels
A
B
C
D
SN
E
F
G
EAN
A
Manufacturer
B
Manufacturingdate
61439960-D

Safety
C
SerialNo.
D
Maxuserweight
E
Model
F
Modelinformationsuchasseatdepthandseatheight
G
EANnumber
2.3Locationoftheidenticationlabel
A
A
Locationoftheidenticationlabel
2.4Symbols
Symbols
Refertotheusermanual.
ThisproductcomplieswithDirective93/42/EEC
concerningmedicaldevices.Thelaunchdateof
thisproductisstatedintheCEdeclarationof
conformity.
Manufacturingdate
Manufacturer
1439960-D
7

Rea®Clematis®
3Setup
3.1Deliverycheck
Anytransportdamagemustbereportedimmediatelyto
thetransportcompany.Remembertokeepthepackaging
untilthetransportcompanyhascheckedthegoodsanda
settlementhasbeenreached.
3.2Assembly
Whenyoureceiveyourwheelchair,youmusttthebackrest
intoplaceandttheneckrest,armrestsandlegrestsonthe
chair.Theassemblyissimpleanddoesnotrequireanytools.
3.2.1Unfoldingthebackrest
1.
Unfoldthebackrestintoanuprightposition.
2.
B
D
D
B
WhenfasteningthesafetypinB,tiltthebackrestslightly
forwardwhilesupportingthegaspistonmanually.
3.Whentheholesarealigned,thesafetypinBcanbe
attached.
4.SecurethepistonwiththesafetypinB.
5.Lockthepinusingthelockshackle/loopC.
6.SecurethebackrestcushionusingtheVelcrostrips.
WARNING!
Safetyrisk
Thewheelchairmaycollapse
–Remembertoalwaysreinsertandfastenthe
safetypinwhenithasbeenremoved.
–Checkthatthelockshackle/loopissecurely
locked.
3.2.2Fittingthearmrests
A
B
1.FitthearmrestAinthearmrestattachmentB.
Makesurethatthearmrestissecurelylocked
intoposition.
CAUTION!
Riskofpinchingngers
–Becarefulnottopinchyourngersbetween
theframeandthesideguardwhenmounting
thearmrest.
3.2.3Fittingtherearwheels
B
A
C
1.Pressandholdinthequick-releasebuttonBinthe
centerofthehub.
2.PuttherearwheelandtherearwheelaxleCinthe
rearwheelattachmentAandreleasethebuttonB.
3.Pullthewheelsoutwardstocheckthatthewheelis
securelylockedinitsposition.
WARNING!
Riskofinjury
–Checkthattherearwheelissecurelylocked
initsposition!Itshouldnotbepossibleto
removethewheelswhenthequick-release
buttonisinactivated.
81439960-D

Setup
3.2.4Angleadjustablelegrests
1.
Pushthelegrestsdownintothetubesofthelegrest
attachment.
Youmustanglethelegrestoutwardswhen
insertingitintothelegrestattachment.
2.
Turnthelegrestinwardstolockitintoposition.
Thelegrestsareautomaticallylocked,thereisno
riskofthemcomingoffthewheelchair.
3.2.5Fixedlegrests
1.
Pushthefootrestdownintothetubesofthelegrest
attachment.
Youmustanglethefootrestoutwardswhen
insertingitintothelegrestattachment.
2.
Turnthefootrestinwardstolockitintoposition.
Thefootrestsareautomaticallylocked,thereis
noriskofthemcomingoffthewheelchair.
1439960-D9

Rea®Clematis®
4Components
4.1Wheelchairoverview
A
B
C
D
E
F
G
H
I
J
A
Frame,lowersection
B
Seatframe
C
Backrest
D
Pushhandles
E
Seat
F
Rearwheel
G
Castors
H
Steptube/Anti-tipdevice
I
Armrests
J
Legrests
4.2Backrest
4.2.1Adjustingthebackrestplate
A
B
C
1.LoosenthefourscrewsA.
2.AdjustthebackrestBtothedesiredheight.
3.Re-tightenthescrewsrmly.
ThebracketsforthebackrestCshouldbeplaced
ashighaspossible.
5mmallenkey
4.2.2Adjustingthe“Laguna”tensionadjustablebackrest
WARNING!
Riskofinjury
Thepositionoftheheadcouldcauseneckand/or
breathingproblemsfortheuserifthevelcro®
strapscomelooseatthetopofthebackrest.
–Makesurethatthevelcro®onlyhasaminimum
of6cmoverlapdistance.Pressthevelcro®
strapsrmlytogetherandmakesurethatthey
stayxated.
WARNING!
Riskoftippingbackwards
Whenusingatensionadjustablebackrest,the
centerofgravityismovedbackwards.
–Alwaysuseanti-tipdevicesandmakesurethat
thebalanceofthechairisstable.
WARNING!
Riskofpressuresores
Whenthebackrestisinthemostreclined
position,thereisariskofpressuresores.
–Makesurethattherearenopressureareas
andmonitortheuserandmakeadjustmentsin
ordertoavoidpressuresores.
WARNING!
Riskofinjury
Toomuchslackonthevelcro®whenusingcover
Lateralandneckrestbow/polecancausepressure
sores.
–Makesurethatthereisaspacebetweenthe
backrestandtheneckrestbow/poleinorderto
avoidpressuresores.
A
1.Adjusttheshapeofthe“Laguna”tensionadjustable
backrestwiththevelcro®strapsA.
4.2.3Adjustingthebackrestangle
A
B
101439960-D

Components
1.UsetheyellowleverAmarkedwiththeyellowsymbol
Bonthelefthandsidetoanglethebackrest.
2.Pressupwardswhileyouanglethebackresttothe
desiredposition.
3.Releasethelever .
4.2.4Tiltingseatandbackrest
WARNING!
Riskoffatalinjury
Increasedbloodpressureagainsttheupperpart
ofthebody.
–Allcombinationsofsettings(likeopenedknee
angle+fulltiltandrecline)wherethelower
extremity'sarepositionedhigherthantheheart,
havetobeevaluatedfromamedicalpointof
view.Thepositioncanbecontraindicatedfor
userswhoaresensitiveforincreasedblood
pressureintheupperpartofthebody.
WARNING!
Riskofchoking/breathingproblems
Theusermightchokefromeatingordrinking
whenseatedinatilted/reclinedposition
–Theusermustbeseatedinaraisedposition
beforeeatingordrinking
WARNING!
Riskofinjury
Usermayslideoutofthewheelchairina
tilted/reclinedposition
–Neverleavetheuserataatofnegativetilt
anglewithoutsupervision.Usethepelvicbelt
forpositioning.
CAUTION!
Riskoftrappingngers
–Becarefulwhenadjustingtheangleofthe
backrestsothattheassistantoruserdonot
trapngersbetweenthebackrestandthe
armrest.
Carer-operatedtiltadjustment
B
A
1.UsethegreenleverAwiththegreensymbolBonthe
righthandsidetotilttheseatunit(seatandbackrest).
2.Pressupwardswhileyoutilttheseatunittothedesired
position.
3.Releasethelever .
Lockingthetiltand/orbackrestangleadjustment
A
B
ThelockingdeviceAallowsyoutosetthetiltingoftheseat
unitand/ortheanglingofthebackresttoaxedposition.
1.Tiltand/orangletheseatandbackresttothedesired
position.
2.InsertthelockingdeviceA.
Thepositionisnowsetandcannotbechanged.
Toremovethelockingdevice,pressontheplasticpegB
withasmallobjectandpulloutwards.
4.3Adjustingthepushhandles
4.3.1Backrestplate
E
D
1.LoosenthehandwheelsD.Adjustthepushhandles
tooneofthefourpositions,thenretightenthehandle
wheels(B).Afteradjustingthepushhandles,always
makesurethatthehandlewheelsareproperlyretighten.
2.Adjustthepushhandlestothedesiredposition.
Therearefourpossibleheightpositions,max
heightadjustabilityis90mm.
3.RetightenthehandwheelsD.
Makesurethatthehandwheelsareproperly
tightened.
4.Adjusttheheightofthepushhandles(90mm)by
looseningthehandlewheels(B).Adjustthepushhandles
tooneofthefourpositions,thenretightenthehandle
wheels(B).Afteradjustingthepushhandles,always
makesurethatthehandlewheelsareproperlyretighten.
1439960-D
11

Rea®Clematis®
4.3.2Backresttensionadjustable“Laguna”
1.
A
RemovethebackrestcoverA.
2.
B
B
LoosenthehandwheelsBandadjusttothedesired
height.
3.Re-tightenthehandwheelsB.
4.Re-mountthebackrestcoverA.
Thepushhandlesmayonlybeadjusted5cmwhen
using“Lateral”coverandtheextrasupportstrap.
4.4Seat
4.4.1Adjustingtheseatdepth
A
B
C
1.RemovetheseatcushionA.
2.LoosenthescrewsB.
3.PushorpulltheseatplateCbackwardsorforwardsto
thedesiredposition.
Theseatcanbeadjusted30mmforwardsor
30mmbackwards.
4.Re-tightenthescrewsB.
5mmallenkey
4.4.2Seatadjustments
A
B
Theseatdepthofthechaircaneasilybeadjustedtoprovide
goodsupport.Thewidthbetweenthelegrestsandarmrests
andtheheightofthearmrestscanalsobeadjusted.
TheseatcushionAissecuredwithVelcro®strips
Bontheseatplate.
4.5Angleadjustablelegrest
Angleadjustablelegrestssupportthelegsandreduces
pressure.Thelegrestsmustalwaysbettedwithcalfpads,
footplatesandheelstraps.Itisimportanttoadjustthe
heightandangleofthelegreststoobtainagoodseating
position.
4.5.1Angleadjustment
WARNING!
Riskofdamage
Damageonthemechanism
–Donotplaceanythingheavy,orletchildrensit
onthelegrest.Itmaycausedamagetothe
mechanism.
–Donotputanypressureonthelegrestwhile
theangleisbeingadjusted.Thelevermustbe
fullyopened.
A
B
12
1439960-D

Components
1.PulltheleverAwithonehandwhilesupportingthe
legrestwithyourotherhand.
2.Whenasuitableangleisobtained,letgoofthelever
andthelegrestwilllockintooneofsevenpreset
positionsB.
FortheAzaleaMaxfourdifferentpositionsare
available,seesectionforlegrestsAzaleaMax.
Thedistancebetweenthelowestpartofthefootrest
andthegroundmustbeatleast40mm.
4.5.2Adjustingthelegrestheight
A
1.LoosenscrewAwithanallenkey.
Tools:5mmallenkey
2.Adjustthelegresttoasuitableheightandthescrewis
caughtbyoneoftherecessesonthelegresttube.
3.Re-tightenthescrewwith8Nm.
4.6Fixedlegrest
4.6.1Adjustingthelegrestheight
A
B
1.LoosenscrewAwithanallenkey.
Don'ttouchtheupperscrewB.
2.Adjustthelegresttoasuitableheightandthescrewis
caughtbyoneoftherecessesonthelegresttube.
3.Re-tightenthescrewwith8Nm.
Thedistancebetweenthelowestpartofthefootrest
andthegroundmustbeatleast40mm.
4.7Adjustingtheheightofthecalfpad
B
1.LoosentheknobB.
2.Adjustthecalfpadtothedesiredheight.
3.Re-tightentheknobB.
4.8Footrests
4.8.1Adjustingtheangleadjustablefootplates
Thefootplatescanbeadjustedbothindepthandangle,
andcanalsobefolded-up.
A
1.Adjusttheangleandthedepthbylooseningthescrew
Aatthefootplateattachment.
Tools:5mmAllenkey
2.Adjustthefootplatetothecorrectposition.
3.Re-tightenthescrewwith10Nm.
Donotplaceanythingonthefootplatewhenthe
screwisloose.
4.9Tires
Theidealpressuredependsonthetiretype:
Thetablebelowisanindication.Incasethetirediffersfrom
thelistbelow,checkthesideofthetire,themaximum
pressureislistedthere.
Tire
Max.pressure
Pneumatic24x1
3/8x11/4
4,5bar
65psi
Pneumatic24x1
3/8
4,5bar
65psi
Pneumaticlow
prole
7,5bar
110psi
LowprolePKT
(24x1)
——
1439960-D13

Rea®Clematis®
Pneumaticblock
patternpuncture
proof
——
Solid
——
Thecompatibilityofthetireslistedabovedependson
thecongurationand/ormodelofyourwheelchair .
Incaseofatirepunctureconsultasuitableworkshop
(e.g.bikerepairshop,bicycledealer...)tohavethe
tubereplacedbyaskilledperson.
4.10Adjustingtheanti-tipdevice
Theanti-tipdevicescanalsoactassteptubes.
Theanti-tipdevicesareheight-adjustableandcan
easilybesetinsixdifferentpositions.
A
B
1.Pressthespring-loadedbuttonA.
2.Raiseorlowertheanti-tipdevicestotherequired
position.
3.Releasethespring-loadedbuttonA.
WARNING!
Riskoftipping
–Ensurethatbothanti-tipdevicesareadjusted
equallyandthatthespring-loadedbuttonspop
backintoplaceintheirnewposition.
14
1439960-D

Accessories
5Accessories
5.1Adjustingthedripstand
Therodofthedripstandmustalwaysbeplacedin
averticalposition,i.eina90degreeangletothe
ground,nomatterthepositionofthebackrestor
thewheelchair.
90°
90°
Height
A
1.LoosentheleverA.
2.Adjustthedripstandtothedesiredheight.
3.Re-tightentheleverA.
Angle
A
1.LoosentheleverA.
2.Adjusttothedesiredangle.
3.Re-tightentheleverA.
5.2Adjustingthepommel
A
B
1.LoosenthehandwheelB.
2.AdjustthepommelAtothedesiredheight.
3.Re-tightenthehandwheelB.
5.3Halftray
WARNING!
Riskoffalling/injury
–Thehalftraymustneverbeusedasa
replacementfortheposturebelt.
WARNING!
Riskoftipping/injury
–Maxloadonthetipofthewidestpartofthe
halftray:1.5kg
CAUTION!
Riskofdiscomfort/minorbruises
–Makesurethattheelbowoftheuserisplaced
onthehalftraywhenpropellingthewheelchair.
Iftheelbowprotrudesfromthewheelchair
whilepropellingthewheelchair,thereisarisk
ofdiscomfortorminorbruises.
CAUTION!
Riskofpinchingngers
Thereisamechanismbelowthehalftraywhere
youcouldtrapyourngers.
–Becarefulwhenadjustingthetrayorwhen
usingtheswing-awayfunction.
CAUTION!
Riskofpinchingorminorcuts
–Donottransferfromthewheelchairwhenthe
halftrayisinhorizontalposition.
Thehalftraycanbeadjustedinwidthandswung
away.
5.3.1Mountingthehalftray
Mountingthehalftray
A
B
1439960-D15

Rea®Clematis®
1.InsertthetubeofthehalftrayAintotheattachment
Bunderthearmpad.
D
C
2.PushonthepushpinCandinserttheringDonthe
tubeA.
3.ReleasethepushpinC.
5.3.2Adjustingthehalftray
A
1.SlidethehalftrayAforwardsorbackwardstoadjustto
therequireddepth.
CAUTION!
Riskofdiscomfort
–Whenadjustingthedepthofthehalftray,
makesurenottosqueezethestomachof
theuser.
5.3.3Addahalftraycushion
Acushionforthehalftraycanbeplacedonthehalftrayin
ordertohaveasoftersurfaceforthearmsandelbows.
A
B
1.PlacethecushionforthehalftrayAonthetray.
2.PlacetheattachmentstrapsBintotheplasticbuckle
andaroundthehalftrayA.
5.4Headrest/Neckrest
5.4.1Heightadjustment
A
B
A
B
Theheightandtheremovalareoperatedbythe
handwheel.Thebarisequippedwithanadjustable
stopblock.
1.LoosenthescrewinthestopblockB.
2.LoosenthehandwheelA.
3.Adjusttheheadresttothedesiredposition.
4.Re-tightenthehandwheelA.
5.SlidethestopblockBdowntothetopoftheheadrest
attachment.
6.Re-tightenthescrew.
Itisnowpossibletoremovetheheadrestand
reinsertitinthedesiredpositionwithoutfurther
adjustments.
5.4.2Depth/angleadjustment
C
D
C
D
1.LoosenthehandleD.
2.LoosenthescrewsC.
3.Adjustthedepthandangleoftheheadrest.
4.Re-tightenthehandleandthescrews.
5.5Trunksupport“swing-away”
A
C
B
161439960-D

Accessories
Theholderforthe"swing-away"trunksupportis
placedintheattachmentAonthebackrest
1.LoosentheknobB.
2.PlacethetrunksupportholderC.
3.Re-tightentheknob.
E
D
Tools:5mmAllenkey/13mmxedspanner.
1.TheanglecanbeadjustedbylooseningthescrewsE
andboltsDonthetrunksupportarm.
2.HoldwiththeAllenkeyandtightenwiththexed
spanner.
3.Remembertore-tightenthescrewsandboltswhenthe
requiredpositionisachieved.
The"swing-away"trunksupportcanbeturned
sidewardsinordertobeoutofthewaywhenthe
userismovingintooroutofthewheelchair.
CAUTION!
Riskofpinching
–Thecoveronthetrunksupportarmmust
alwaysbeonwhenthechairisinuse.
5.6Trunksupport—xedarm
Heightadjustment
A
B
1.Youadjusttheheightbyrstlooseningthescrew/screws
A.
2.MovetheattachmentBupwardsordownwardstothe
desiredposition.
3.Re-tightenthescrew/screws.
Tools:5mmAllenkey
CD
Sidewaysadjustment
1.LoosentheknobD.
2.MovethetrunksupportCsidewaystotherequired
position.
3.Re-tightentheknobD.
Depthadjustment—xedcushion
E
1.LoosenthescrewsE.
2.Movethetrunksupportforwardsorbackwardstothe
desiredposition.
3.Re-tightenthescrews.
Tools:5mmAllenkey
5.7Lateralpositioningpads(foradjustable
backrestcoveronly)
WARNING!
Riskoftrapping
–Becarefulnottotrapyourtrunkbetweenthe
twolateralpositioningpadsduringfrontor
lateraltransfers;whentheuserismovingin
thewheelchair.
1439960-D
17

Rea®Clematis®
CAUTION!
Riskofuncomfortableposture
Insufcientspacebetweenthelateralpositioning
padscanbeuncomfortableforcertainusers.
–Thisadjustmentmustbeperformedbya
qualiedtechnicianuponagreementbya
prescribingphysician.
–Consultwithyourdealer.
Thelateralpositioningpadscanbeadjustedinheight
andsideways.
5.7.1Usinglateralpositioningpads
A
B
C
1.RemovethebackrestcoverA.
2.AdjustthelateralpositioningpadsBinheightand
sidewaystotherequiredpositionwiththeVelcro®of
thebackrestcoverC.
3.EnsurethatthetwoVelcro®surfaces(padsandback
cover)aresetcorrectly.
A
4.PutthebackrestcoverAbackinplace.
5.7.2Usingwedgeswithlateralpositioningpad
A
1.Attachthewedgesonthevelcro®padA.
2.Assemblethelateralpositioningpadsonthebackrest.
Seesection:“Usinglateralpositioningpads”.
5.8Posturebelt
Thewheelchaircanbeequippedwithaposturebelt.It
preventstheuserfromslidingdownwardinthewheelchair
orfromfallingoutofthewheelchair.Theposturebeltis
notapositioningdevice.
WARNING!
Riskofseriousinjury/strangulation
Aloosebeltcanallowtheusertoslipdownand
createariskofstrangulation.
–Theposturebeltshouldbemountedby
aqualiedtechnicianandttedbythe
responsibleprescriber.
–Alwaysmakesurethattheposturebeltis
tightlyttedacrossthelowerpelvis.
–Eachtimetheposturebeltisused,checkifit
tsproperly.Changingtheseatand/orbackrest
angle,thecushionandevenyourclothes
inuencethetofthebelt.
WARNING!
Riskofseriousinjuryduringtransport
Inavehicle,auserinhiswheelchairmustbe
securedbyasafetybelt(3-pointbelt).Aposture
beltonlyisnotsufcientasapersonalrestraint
device.
–Usetheposturebeltasacomplement,butnot
asasubstitutetothe3-pointsafetybelt,when
transportingthewheelchairuserinavehicle.
Closingandopeningtheposturebelt
Ensurethatyouaresittingfullybackintheseatandthatthe
pelvisisasuprightandsymmetricalaspossible.
1.Toclose,pushthecatchAintothebuckleclaspB.
2.Toopen,pushthePRESSbuttonCandpullthecatchA
outofthebuckleclaspB.
Adjustingthelength
Theposturebelthasthegoodlength,whenthere’s
justsufcientspaceforaathandbetweenbody
andbelt.
181439960-D

Accessories
1.ShortenorextendtheloopDasrequired.
2.ThreadloopDthroughcatchAandplasticbuckleE
untiltheloopisat.
Ifthisadjustmentisnotsufcient,itmightberequiredto
re-ttheposturebeltatthexations.
Fittingtheposturebeltatthexations
CAUTION!
–Threadthebeltloopthroughbothplastic
bucklestoavoidthebeltfromloosening.
–Dotheadjustmentsonbothsidesequally,
sothatthebuckleclaspremainsinacentral
position.
–Makesurethatthebeltsdonotgetcaughtin
thespokesofarearwheel.
1.ThreadtheloopFthroughthexationonthechairG
andthenthroughBOTHplasticbucklesH.
1439960-D19

Rea®Clematis®
6Usage
6.1GeneralwarningsUsage
CAUTION!
Riskofsliding
–Theseatmustbepositionedatortilted
backwardsiftheuserisleftaloneunattended.
CAUTION!
Riskofsliding
–Ifyouhaveaverylowseatheightand/or
useyourfeettomaneuverthewheelchair,the
legrestscanberemoved.Ifso,beawareofthe
slidingrisk!
6.2Operatingthewheelchair
Werecommendthatyouhavethechairtestedbythe
qualiedpersonwhohasprescribedthewheelchair,after
heorshehasmadetheadjustmentsthatyourequest,
takingyourbuildandneedsintoaccount.Wehopethat
youhavealsoreceivedhelpinlearninghowbesttousethe
wheelchair.Startbypractisingcarefullyuntilyouarefamiliar
withthewheelchair’spossibilitiesandlimitations.
6.2.1Liftingthewheelchair
1.Alwaysliftthewheelchairbygrabbingtheframeatthe
pointsshowninthepicture.
2.Ensurethatthebackrestandpushhandlesaresecurely
inplace.
3.ReadthechapterSafetyinstructions/Propelling
techniques.
6.2.2Moveto/fromthewheelchair
WARNING!
Riskoftippingforwards
Thewheelchaircouldtipforwardsifyouusethe
footplatesassupport.
–Donotsupportyourselfonthefootplateswhen
movingto/fromthewheelchair.
1.Propelthewheelchairasnearaspossibletotheseat
thatyouwanttomoveto.
2.Applythebrake.
3.Removethearmrestsormovethemupwardsoutof
theway.
4.Detachthelegrestsorswingthemoutwards.
6.2.3Usingthetilt/reclinefunction
Toensureagoodpositioning,followthesestepswhenusing
boththetiltandthereclinefunction.Seesections“Manual
tiltandbackrestangleadjustment”and“Electrictiltand
backrestangleadjustment”forinstructionabouthowto
operatethetiltand/orthereclinefunction.
Tilting/recliningfromanuprightposition
A
Neutralposition
Step1
B
Step2Step3
1.Tiltthechair.
•Thisenablestheusertoslidetotherearand
supportsaneutralpelvispositionA.
2.Reclinethebackrest
•Theweightwillnowshifttothebackandenable
agoodposture,asthebottomhasslidintoarear
positionB.
3.Anglethelegrests.
CAUTION!
Discomfortfortheuser
Thepelviswillbestrainedandtheusercan
slidedownwardsinthechair.
–Ensurethatthebacksideofthethighs
(hamstrings)areinarelaxedneutral
positionwhenanglingthelegrests.
Risingfromatilted/reclinedposition
A
Step1Step2
201439960-D
Page is loading ...
Page is loading ...
Page is loading ...
Page is loading ...
Page is loading ...
Page is loading ...
Page is loading ...
Page is loading ...
Page is loading ...
Page is loading ...
Page is loading ...
Page is loading ...
-
 1
1
-
 2
2
-
 3
3
-
 4
4
-
 5
5
-
 6
6
-
 7
7
-
 8
8
-
 9
9
-
 10
10
-
 11
11
-
 12
12
-
 13
13
-
 14
14
-
 15
15
-
 16
16
-
 17
17
-
 18
18
-
 19
19
-
 20
20
-
 21
21
-
 22
22
-
 23
23
-
 24
24
-
 25
25
-
 26
26
-
 27
27
-
 28
28
-
 29
29
-
 30
30
-
 31
31
-
 32
32


Ask a question and I''ll find the answer in the document
Finding information in a document is now easier with AI
Related papers
-
Invacare Alu Lite User manual
-
-
-
-
-
-
-
-
-
Other documents
-
Boss Office Products B6106 Operating instructions
-
-
 Flash Furniture GO2286MBKRSGLD User manual
-
 Flash Furniture GO-2240-PK-GG User guide
-
Boss Office Products B686 Operating instructions
-
Boss Office Products B6416-CG Operating instructions
-
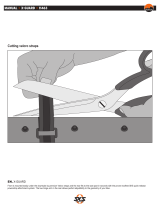 Mountain 11463 Cutting Velcro Straps User manual
-
PEAK Neptune User manual
-
ProLounger RCL76-HRN87-LT Operating instructions
-
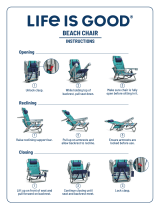 Life is good HLIGBC-B-1PK Installation guide


