Page is loading ...

Caution: Be sure to read this manual before servicing. To ensure safety from fire, electric shock, injury, harmful
radiation and materials, various measures are provided in this LCD TV. Be sure to read cautionary items described
in the manual before servicing. These servicing instructions are for use by qualified service personnel only. To
reduce the risk of electric shock, do not perform any servicing other than that described in the operating instructions
unless you are qualified to do so.
L26-H03B/ L26-H03W L32-H03B/ L32-H03W
1. Summary
VHF1ch ~ 12ch, UHF13ch ~ 62ch, CATV (C13 ~ C63), Digital BS 110 degree CS digital and terrestrial digital (CATV
support pass-through, except for one-segment broadcasting)
LCD TV 2009-3
L26-H03B
L26-H03W
L32-H03B
L32-H03W
HITACHI
9. Block Diagram.....……………..………….………......27
10. Connection Diagram……….………….……..……..28
11. Wiring Diagram.………..………………....…….......29
12. PCB Layout……………………………....……….....31
13. Exploded View…………………..……….................38
14. Service Parts List…...............................................40
15. Different Parts List.………………..……………......48
1. Summary………..........……..........................……….........1
2. Features…….………..........................................……......4
3. Dimensions……..……………………………………………5
4. General Specification................................…………........6
5. Service points…………….…………….……………..........7
6. Adjustment……………..………..…….………..….…….....8
7. Troubleshooting………...……………………….…….......17
8. Self Diagnosis Function…..……………...……….....26
Table of Contents
HITACHI

L26-H03B/ L26-H03W/ L32-H03B/ L32-H03W
2
Caution for Safety
Please read this page before repair the TV.
The following safety precautions are designed to help you stay safe and prevent accidents during the repair work.

L26-H03B/ L26-H03W/ L32-H03B/ L32-H03W
3

L26-H03B/ L26-H03W/ L32-H03B/ L32-H03W
4
2. Features
● Enhanced definition LCD display panel
L26-H03B/L26-H03W
This specification applies to the 26.0 inch Color TFT-LCD Module T260XW02 VQ. This LCD module has a TFT
active matrix type liquid crystal panel 1366x768 pixels, and diagonal size of 26.0 inch. This module supports
1366x768 XGA-WIDE mode (Non-interlace).
Each pixel is divided into Red, Green and Blue sub-pixels or dots which are arranged in vertical stripes. Gray scale
or the brightness of the sub-pixel color is determined with a 8-bit gray scale signal for each dot.
The T260XW02 VQ has been designed to apply the 8-bit 1 channel LVDS interface method. It is intended to support
displays where high brightness, wide viewing angle, high color saturation, and high color depth are very important.
The T260XW02 VQ model is RoHS verified which can be distinguished on panel label.
L32-H03B/L32-H03W
This specification applies to the 31.51 inch Color TFT-LCD Module T315XW02 VS. This LCD module has a TFT
active matrix type liquid crystal panel 1366x768 pixels, and diagonal size of 31.51 inch. This module supports
1366x768 XGA-WIDE mode (Non-interlace).
Each pixel is divided into Red, Green and Blue sub-pixels or dots which are arranged in vertical stripes. Gray scale
or the brightness of the sub-pixel color is determined with a 8-bit gray scale signal for each dot.
The T315XW02 VS has been designed to apply the 8-bit 1 channel LVDS interface method. It is intended to support
displays where high brightness, wide viewing angle, high color saturation, and high color depth are very important.
The T315XW02 VS model is RoHS verified which can be distinguished on panel label.
● Easy-to-use remote control and on-screen display system
The included remote control operates all TV functions. Furthermore, the on-screen display system shows the status
of the control settings in an easy-to-view fashion.
● Power saving system
When connected to a VESA DPMS-compliant PC, the TV cuts its power consumption while idle.

L26-H03B/ L26-H03W/ L32-H03B/ L32-H03W
5
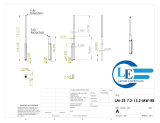
3. Dimensions

L26-H03B/ L26-H03W/ L32-H03B/ L32-H03W
6
4. General Specification

L26-H03B/ L26-H03W/ L32-H03B/ L32-H03W
7
5. Service points
Lead-free solder
This product uses lead-free solder (unleaded) to help protect the environment. Please read these instructions
before attempting any soldering work.
1) Lead-free solder indicator
Printed circuit boards using lead-free solder are engraved with an
label.
2) Properties of lead-free solder
The melting point of lead-free solder is 40-50 ℃ higher than leaded solder.
3) Servicing solder
Solder with an alloy composition of Sn-3.0Ag-0.5Cu or Sn-0.7Cu is recommended. Although servicing with
leaded solder is possible, there are a few precautions that have to be taken. (Not taking these precautions
may cause the solder to not harden properly, and lead to consequent malfunctions.)
Precautions when using leaded solder
● Remove all lead-free solder from soldered joints when replacing components.
● If leaded solder should be added to existing lead free joints, mix in the leaded solder thoroughly after the
lead-free solder has been completely melted (do not apply the soldering iron without solder).
4) Servicing soldering iron
A soldering iron with a temperature setting capability (temperature control function) is recommended.
The melting point of lead-free solder is higher than leaded solder. Use a soldering iron that maintains a high
stable temperature (large heat capacity), and that allows temperature adjustment according to the part being
serviced, to avoid poor servicing performance.
Recommended soldering iron:
● Soldering iron with temperature control function (temperature range: 320-450℃)

L26-H03B/ L26-H03W/ L32-H03B/ L32-H03W
8
6. Adjustment
6.1 White Balance Adjustment
Approximately 2 hours should be allowed for warm up before proceeding white balance adjustment.
Before White balance adjustment, you must set the color analyzer CA210.
6.1.1 Calibration
1. Receive XGA 60Hz 100% white signal by PC input.
2. Select PC input by R/C Input Select button.
3. Enter FACTORY MODE by R/C [べんり][青][9][1][1][1] (as picture 1, picture 2)
Picture 1 Remote Controller Picture 2 FACTORY MODE Menu
4. Choose "OPTION" by R/C [上/下] button.
Then press R/C [決定] button. -> Enter to OPTION menu. (as picture 3)
Picture 3 OPTION Menu
5. Choose "PC CALIBRATE" by R/C [上/下] button.
Then press R/C [右] button. -> Value changes 0 to 1 (red letter).
Then press R/C [決定]. -> PC CALIBRATE executed, and value returns to 0.
6. Press R/C [もどる] -> Return to FACTORY MODE menu.
6.1.2 Color Temperature Adjustment
1. Set picture mode "スーパー" by Menu.
1.1 Exit FATORY MODE by [メニュー] button.
1.2 Enter the "トップメニュー" by R/C [メニュー] button. Then forward to "映像設定" - "画質設定". ("画質設定"
menu indicated.)
1.3 Confirm that "対象コンテンツ" is set to "共通".
1.4 Set "映像モード" to "スーパー". Then exit "トップメニュー" by [メニュー] button.
1.5 Re-enter FACTORY MODE. (see 6.1.1 item 3.)

L26-H03B/ L26-H03W/ L32-H03B/ L32-H03W
9
2. Choose "PQCOFF" by R/C [上/下] button. Then choose value "1" by R/C [左/右] button, then press [決定].
3. Choose "SAVE" by R/C [上/下] button. Then choose value "1" by R/C [左/右] button, then press [決定]. (After
this, value returns to "0" automatically.)
4. Return to "FACTORY MODE" by R/C [もどる] button. Then choose "COLOR TEMP" by R/C [上/下] button.
(Enter COLOR TEMP menu.)
Picture 4 COLOR TEMP Menu
5. Color Temp. adjustment (HI)
5.1 Choose "TEMP" by R/C [上/下] button. Then choose value "HI" by R/C [左/右] button, then press [決定].
5.2 Input signal from specified terminal as shown below.
Table 1 Signal setting for adjustment of Color temperature
5.3 Choose "SOURCE" by R/C [上/下] button. Then choose the input from
the Input names (see below) in "SOURCE" by R/C [左/右] button.
Input names: PC (to adjust PC input)
D (to adjust Component input)
HDMI1 (to adjust HDMI input)
CVBS1 (to adjust Video input)
Input names indicated by red letters.
Then press R/C [決定] button. -> Change to selected input.
5.4 Adjust Color temperature of HI.
Do not change B GAIN (keep the value 1024), change R GAIN and G GAIN, to meet the specified x and y value:
x = 0.266 +/-0.005, y = 0.270 +/-0.005.
5.5 After adjusting, write down the R GAIN, G GAIN, B GAIN value to paper as memo. Then calculate Gb and Bb as
shown below
Rb = [R GAIN] / [R/GAIN] * 1024 = 1024 (Always)
Gb = [G GAIN] / [R/GAIN] * 1024 = ____ (Calculated)

L26-H03B/ L26-H03W/ L32-H03B/ L32-H03W
10
Bb = [B GAIN] / [R/GAIN] * 1024 = ____ (Calculated)
5.6 Change R GAIN value to Rb, G GAIN value to Gb, B GAIN value to Bb.
5.7 To adjust color temp of another input, change input name and input signal, then repeat 5.1 to 5.6.
6. Set picture mode "スタンダード" by Menu.
6.1 Exit FATORY MODE by [メニュー] button.
6.2 Enter the "トップメニュー" by R/C [メニュー] button. Then forward to "映像設定" - "画質設定". ("画質設定"
menu indicated.)
6.3 Confirm that "対象コンテンツ" is set to "共通".
6.4 Set "映像モード" to "スタンダード". Then exit "トップメニュー" by [メニュー] button.
6.5 Re-enter FACTORY MODE. (see 6.1.1 item 3.)
7. Color Temp. adjustment (MID)
7.1 Choose "TEMP" by R/C [上/下] button. Then choose value "MID" by R/C [左/右] button, then press [決定].
7.2 Input signal from specified terminal as shown in 5.2.
7.3 Choose "SOURCE" by R/C [上/下] button. Then choose the input from the input names in "SOURCE" by R/C
[左/右] button. Then press R/C [決定] button. -> Change to selected input.
7.4 Adjust Color temperature of MID.
Do not change R GAIN (keep the value 1024), change G GAIN and B GAIN, to meet the specified x and y value:
x = 0.285 +/-0.005, y = 0.293 +/-0.005.
7.5 To adjust color temp of another input, change input name and input signal, then repeat 7.1 to 7.4.
8. Color Temp. adjustment (LOW)
8.1 Choose "TEMP" by R/C [上/下] button. Then choose value "LOW" by R/C [左/右] button, then press [決定].
8.2 Input signal from specified terminal as shown in 5.2.
8.3 Choose "SOURCE" by R/C [上/下] button. Then choose the input from the input names in "SOURCE" by R/C
[左/右] button. Then press R/C [決定] button. -> Change to selected input.
8.4 Adjust Color temperature of LOW.
Do not change R GAIN (keep the value 1024), change G GAIN and B GAIN, to meet the specified x and y value:
x = 0.314 +/-0.005, y = 0.316 +/-0.005.
8.5 To adjust color temp of another input, change input name and input signal, then repeat 8.1 to 8.3.
9. Choose "SAVE" by R/C [上/下] button. Then choose value "1" by R/C [左/右] button, then press [決定].
(After this, value returns to "0" automatically.)
10. Choose "PQCOFF" by R/C [上/下] button. Then choose value "0" by R/C [左/右] button, then press [決定].

L26-H03B/ L26-H03W/ L32-H03B/ L32-H03W
11
6.2 Firmware update
1. Preparation (as picture 5)
1) Connect to 1 port of Hub from Ethernet port of PC with Ethernet cable(straight type).
2) Connect to another port of Hub from LAN connector of L22/26/32-H03 with Ethernet cable (straight type).
Caution: Do not connect other PC.
Picture 5 How to Setup (example)
2. Settings
1) If the update tool "Boisclair updater window" is not installed, install it. ( Please see Page17)
2) Open the "Control Panel" - "Network" - "Local Area Network", and open its Property. (as picture 6)
Picture 6 Open Property
3) Choose "Internet Protocol" and open its Property as shown below.
Picture 7 Property
4) Set IP address and Subnet mask as below;
IP address: 192.168.0.1
Subnet mask: 255.255.255.0

L26-H03B/ L26-H03W/ L32-H03B/ L32-H03W
12
Picture 8 Internet protocol (TCP/IP) setting
5) Put "updatefile.zip"(datas for FW update) into "FirmUpdateTool_XXX\httpd\data". (as picture 9)
Picture 9
Note: To avoid the data damage of "updatefile.zip" file, it is recommended that once delete the previous
"updatefile.zip" file, then put new "updatefile.zip" file.
6) Other PC setting
① Disable "system standby" and "HardDisk power off".
② Disable "screen saver".

L26-H03B/ L26-H03W/ L32-H03B/ L32-H03W
13
3. Execute FW Update
1) Start PC.
2) Turn on TV
3) Execute FirmUpdateTool.exe
When Windows firewall is valid, the dialog is displayer at the first start, click in "Unblock", then "boisclair updater
window" is displayed.
Picture 10 FirmUpdateTool.exe Icon and Update Tool Image
In case that "boisclair updater window isn't displayed, Please confirm as shown below.
- Please confirm that Hub is turned on, and Link indicator of Hub blinks.
- Please confirm that PC network setting is correct.
- Please confirm that the Hub is connected to PC and TV correctly and firmly.
- Please confirm that "updatefile.zip" exists in the folder "FirmUpdateTool_XXX\httpd\data".
- Please confirm that other network applications (ex. Skype, MSN, etc) aren't working.
- If not improved, please use other PCs and try again.
4) Enter FACTORY MODE by R/C [べんり][青][1][1][1][9]
Picture 11 Remote Controller Picture 12 FACTORY MODE Menu
5) Choose "OPTION" by R/C [上/下] button.
Then press R/C [決定] button. -> Enter to OPTION menu.

L26-H03B/ L26-H03W/ L32-H03B/ L32-H03W
14
Picture 13 OPTION Menu
6) Choose "F/W UPDATE" by R/C [上/下] button.
Then press R/C [右] button. -> Value changes 0 to 1 (red letter).
Then press R/C [決定]. -> F/W UPDATE started.
7) "Start update" message displayed on boisclair updater window.
Picture 14 "start update"
In case that "start update" comment not displayed.
- Please confirm that the Hub controller is connected to Main Board with Ethernet cable correctly and firmly.
- Please confirm that PC network setting is correct.
8) After a few minutes, "complete file system update" message displayed.
Picture 15 "complete file system update"
9) After "complete update" message displayed, please turn main power switch off TV, and close "boisclair updater
window". -> FW update has finished.
Picture 16 "complete update"

L26-H03B/ L26-H03W/ L32-H03B/ L32-H03W
15
In case that after 10 minutes "complete file system update" or "complete update" message not displayed.
- Please confirm that Hub is turned on, and Link indicator of Hub blinks. If not, please close "boisclair updater
window" and repeat from Item 3.
10) Disconnect the Ethernet cable from TV, then turn Main power switch off.
In case that "failed file system update" message displayed.
- There is some possibility that updatefile.zip is broken. Close "boisclair updater window", and repeat from Item 5.
4. Confirm F/W Version
1) Just after F/W updated, after turn Main power switch on, "はじめて設定" is displayed. Follow the steps to exit "は
じめて設定" as shown below.
(1) "STEP 1 はじめて設定を行います" is indicated. Confirm "次へ" is high light, then press [決定] button.
(2) "STEP 2 お住まいの地方/都道府県域の選択" is indicated. Press R/C [右] button, confirm [次へ] is high light,
then press [決定] button.
(3) "STEP 3 チャンネル設定方法の選択(地上アナログ放送)" is indicated. Press R/C [上/下] button, confirm "自
動設定" is high light, then press R/C [決定] button.
(4) "STEP 5 リモコンボタン割り当て(地上アナログ放送)" is indicated. Press R/C [右] Confirm "次へ" is high light,
then press R/C [決定] button.
(5) "STEP 6 地上デジタル放送の設定" is indicated. Press R/C [上/下] button, confirm "いいえ" is high light, then
press R/C [決定] button.
(6) "地上デジタル放送を視聴する場合は、各種設定から地上デジタル 放送の設定を行ってください" is indicated.
Confirm "次へ" is high light, then press R/C [決定] button.
(7) "STEP 10 BS/CSデジタル放送のコンバーター電源を設定します" is indicated. Press R/C [右] Confirm "次へ"
is high light, then press R/C [決定] button.
(8) "STEP 11 郵便番号の設定" is indicated. Press R/C [下] Confirm"次へ" is high light, then press R/C [決定] button.
(9) "STEP 12 電話回線テスト" is indicated. Press R/C [上/下] button, confirm "いいえ" is high light, then press R/C
[決定] button.
(10) "STEP 13 はじめて設定完了" is indicated. Confirm "設定完了" is high light, then press R/C [決定] button.
(11) TV starts in Terrestrial Analog TV mode.
2) Confirm F/W version by following as shown below.
(1) Press R/C "メニュー" button, then "トップメニュー" is displayed. Forward [その他機器設定] - [機器情報表示].
Then confirm the F/W version indicated near [ソフトウェアバージョン] indication.
(2) Press R/C "メニューボタン", then exit F/W version confirmation.

L26-H03B/ L26-H03W/ L32-H03B/ L32-H03W
16
5. Execute All Reset.
1) Enter FACTORY MODE by R/C [べんり][青][1][1][1][9]
2) Choose "OPTION" by R/C [上/下] button. Then press R/C [決定] button. -> Enter to OPTION menu.
3) Choose "ALL RESET" by R/C [上/下] button. Then press R/C [右] button. -> Value changes 0 to 1 (red letter).
Then press R/C [決定]. -> ALL RESET executed, then TV re-starts and "はじめて設定" is displayed.
4) Turn R/C power off, then turn Main power switch off.
* How to install firmware update tool.
1. Put the "FirmUpdateTool_xxx.zip" into the optional folder. (The name and root pass of this folder don't include
Chinese characters or Japanese characters, named with only alphabet.)
2. Decompress "FirmUpdateTool_xxx.zip" into the optional folder. "FirmUpdateTool_xxx" folder is created.
3. Confirm the folders and file are exist in the "FirmUpdateTool_xxx" folder
Folders: dhcpd, httpd, log
File: FirmUpdateController.exe

L26-H03B/ L26-H03W/ L32-H03B/ L32-H03W
17
7. Troubleshooting
1). No Picture, No Sound
First, confirm the status of Stand-by / On lamp (LED), then survey by following the flowchart as shown below.

L26-H03B/ L26-H03W/ L32-H03B/ L32-H03W
18

L26-H03B/ L26-H03W/ L32-H03B/ L32-H03W
19
2). No Picture, Picture failed (Color failed, Dark picture, Beat noise, etc.)
First, confirm the connection of all connectors between PCB's, then survey by following the flowchart as shown
below.

L26-H03B/ L26-H03W/ L32-H03B/ L32-H03W
20
3). No Sound, Sound failed (Loading interrupt, Noise, etc.)
First, confirm the connection of all connectors between PCB's and speakers, then survey by following the flowchart
as shown below.
/