Frigidaire FGR331AS0 Owner's manual
- Category
- Tumble dryers
- Type
- Owner's manual
This manual is also suitable for

of better
performance
P/N131883500 (9907)

For your safety, the information in this manual must be followed to minimize the risk of
fire or explosion or to prevent property damage, personal injury or loss of life.
Do not store or use gasoline or other flammable vapors and liquids in the vicinity of this or any other
appliance.
WHAT TO DO IF YOU SMELL GAS:
• Do not try to light any appliance.
• Do not touch any electrical switch; do not use any phone in your building.
• Clear the room, building or area of all occupants.
• Immediately call your gas supplier from a neighbor's phone. Follow the gas supplier's
instructions.
• If you cannot reach your gas supplier, call the fire department.
Installation and service must be performed by a qualified installer, service agency or the gas supplier.
Versiin en espafml
Sideseaobtener una copiaen espa_olde
este Manual del Usuario,sirvaseescribir a
ladirecciOnque seincluyeacontinuaciOn.
Solicite la PIN131878600.
Spanish Owner's Guides
Frigidaire Home Products
P.O. Box 212378
Augusta, GA 30917
Prcduct P istraticm
Thankycu for c]x_singthis dryer.
This owner's guide will explain proper
operation and care.
Recoz_ Your Model and Serial
Numbers
Record below the model and serial
numbers found on the dryer serial plate
located on the left side of the door
opening. Keep these numbers for future
reference.
Model Number
Serial Number
Date of Purchase
Register Your Product
The self-addressed PRODUCT
REGISTRATION CARD should be filled
in completely, signed and returned.
1999 White Consolidated Industries, Inc.
All rights reserved.
Inl0ortantSafetyInstrtmticns
all _-_zu__cr, s ]:efc_ using this c]r2_r.
To reduce the risk of fire, electrical shock, or injury to persons when
using this dryer, comply with the basic warnings listed below.
[]Failure to comply with these warnings could result in serious personal injuries.
Do not dry items that have been previously cleaned in, soaked in, or
spotted with gasoline, cleaning solvents, kerosene, waxes, etc. Do not store these
items on or near the dryer. These substances give off vapors that could ignite or
explode.
To prevent fire, do not use heat to dry items containing plastic, foam
rubber or similarly textured rubber-like materials, or items containing feathers or
down. UseAir Fluff (No Heat) only.
Clean the lint screen before or after each load. The interior of the
dryer, lint screen housing and exhaust duct should be cleaned approximately every
18 months by qualified service personnel. An excessiveamount of lint build-up in
these areas could result in inefficient drying and possible fire. See Care and
Cl_, page 6.
Do not operate the dryer if the lint screen is blocked, damaged or
missing. Firehazard, overheating and damage to fabrics can occur. Ifyour dryer has
a drying rack, always replace the lint screen when finished using the drying rack.
_Keep area around the exhaust opening and surrounding areasfree
from the accumulation of lint, dust and dirt.
Do not obstruct the flow of ventilating air. Do not stack or place
laundry or throw rugs against the front or back of the dryer.
Do not spray any type of aerosol into, on or near dryer at any time.
_Do not use fabric softeners or products to eliminate static unless
recommended by the manufacturer of the fabric softener or product.
Do not place items exposed to cooking oils in your dryer. Items
contaminated with cooking oils may contribute to a chemical reaction that could
cause a load to catch fire.
[ Failureto complywith these warnings could result infire, explosion, seriousbodily
injury and/or damage to the rubber or plastic parts of the dryer,
2 Printedin U.S.A.

ThisOwner'sGuideprovidesgeneral
operatinginstructionsforyourdryer,It
alsocontainsinformationaboutfeatures
forseveralothermodels.Yourdryer
maynothaveeveryfeatureincluded,
Usethedryeronlyasinstructedinthis
Owner'sGuideandthe Operating
Zz'm:m,_Am_card included with your
dryer.
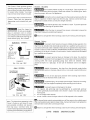
Avoid fire hazard or
electrical shock. Donot usean adaptor
plug or extension cord or remove
grounding prong from electrical power
cord. Failureto follow this warning can
cause serious injury, fire or death.
ELECTRIC DRYERS :
14-30R
FUSED30 AMP _ _
120/240 V OR
120/208 V
WALL DRYER
RECEPTACLE SERVICECORD
CORRECT
Use this way _Y
GAS DRYERS:
Grounding type
wall receptacle
Do not under
any circumstances |
cut, remove,
_or bypass /
/ _ the grounding prong
this plug. J
grounding plug
CORRECT
Use this way ONLY
Note:The instructions appearing in this
Owner's Guide are not meant to cover
every possible condition and situation
that may occur. Common sense and
caution mustbe practicedwhen installing,
operating and maintaining anyappliance.
Protect Gh£1clm_
Do not allow children to play on or in the dryer, Close supervision of
children isnecessary when the dryer isused near children, As children grow, teach
them the proper, safe use of all appliances.
Destroy the carton, plastic bag and other packing materials after the
dryer is unpacked, Children might use them for play, Cartons covered with rugs,
bedspreads or plastic sheets can become airtight chambers.
Keep laundry products out of children's reach. To prevent personal
injury, observe all warnings on product labels.
_ Before the dryer isremoved from service or discarded, remove the
dryer door to prevent accidental entrapment,
[]Failure to comply with these warnings could result in serious personal injuries,
mmev t Znju
To prevent shock hazard and assure stability during operation, the
dryer must be installed and electrically grounded by a qualified service person in
accordance with local codes. Installation instructions are packed in the dryer for the
installer's reference, Refer to INSTALLATIONINSTRUCTIONSfor detailed grounding
procedures. If the dryer ismoved to a new location, have it checked and reinstalled
by a qualified service person,
To prevent personal injury or damage to the dryer, the electrical
power cord of a gas dryer must be plugged into a properly grounded and polarized
3-prong outlet, The third gz_l]Pz_ pz_ l_t never }me rerr_. Never
groundthe dryerto a gas pipe.Do not use an extensiancordor an adaptor
plug.
ALr_'Aysc_scor_'_ect the dryer from the electrical supply before
attempting any service or cleaning. Failure to do so can result in electrical shock or
injury,
Do not use any type spray cleanser when cleaning dryer interior.
Hazardous fumes or electrical shock could occur,
To prevent injury, do not reach into the dryer if the drum ismoving.
Wait until the dryer hasstopped completely before reaching into the drum,
To prevent injury and damage to the dryer:
• ALl _ and s_c:Jz_j m_t be __lzfOmlled by an aut#lori_e_:l _c:Er
unless specifically recommended in this Owner's Guide. Use only authorized
factory parts.
• Do not tamper with controls.
• Do not install or store the dryer where it will be exposed to the weather.
[] A thermal limiter switch automatically turns off the motor in the unlikely event
of anoverheated situation (electricdryers only). A servicetech nician must replacethe
thermal limiter switch after correcting the fault,
]Failure to comply with these warnings could result in serious personal injuries,
SAVE THESE INSTRUCTIONS

Dryirg ocedur
• Follow the guidelines below for preparing the load for drying.
• Readthe q:ezmtlrrj _structicns card for operating your specific model.
• Alwaysread and follo_fabriccare labelsand laundryproNm_ labels.
Follow fabric care label instructions.
Place small items in a mesh bag.
Fill dryer drum 1/3 to 1/2 full•
[I _i'A'/:_lt_ll#[_'lTo reduce the risk of fire, electrical shock, or injury to persons, read
_poztant Safety Znst:_ct±cms, pages 2-3, before operating this dryer.
1 Prepare items for dryir_.
• Dry items of similar fabric, weight and construction in the same load.
• Separate dark items from light-colored items. Separate items that shed lint
from those that attract lint. If an item sheds lint, turn it inside out,
• Besurebuckles, buttons andtrim are heatproofand won't damagethe drum
finish. Closezippers,fasten hooksand Velcro®-like fasteners. Tiestringsand
sashesto prevent snagging and tangling.
• If possible, turn pockets inside out for even drying,
• Check for stainswhich may not have been removed in washing, Dryer heat
may permanently set some stains. Repeat stain removal process before
drying.
• Placesmall items in a mesh bag to prevent tangling and for easy removal.
Z <hack that lint screenis clean and in place.
A
5
Lcad the dr_r.
Theaverage load will fill the drum 1/3 to 1/2full. Items need room totumble
freely for even drying and less wrinkling. Do not overload dryer.
When drying large items, dry only 2 or 3 at atime, Filloutthe load with small
and medium sized items.
Fordelicate or very small loads, add 2 lint-free towels for better drying, less
wrinkling, and to prevent grease stains caused by fabric softener sheets.
Donot overdry items, Overdrying cancausewrinkling, shrinkage, harshness,
and a build-up of static electricity, which can produce more lint,
If desired, add a dryer fabric softener sheet.
Close the dryer chor and set dryer ccntrols (some models).
See Operating Instructionscard for your specific model controls.
T_m cycle selectcrclcckwiseto the desiredsetting.
6
PushStart Button for 2secondsorturn the STARTknob clockwise to ON,hold
for 1-2 seconds and release.
Toadd or remove items when the dryer isrunning, open the door, Thedryer
will always stop when the door is opened, Allow the drum to come to a
complete stop before reaching inside,
To restart dryer, close the door then push the Start Button for 2 seconds or
turn the STARTknob clockwise to ON, hold for 1-2 seconds and release.
The dryer will not start if the cycle selector is in the OFFposition,
7. When the cycle ends, remove items imrediately and hang
ac fold. If load is removed before the cycle ends, turn cycle selector to OFF.
4

Features Cycle Sicjn:_l Ctmtrol (sc_re models)
When the Cycle Signal Control isON, a signal will sound at the end of each cycle
and during the PressSaver setting (some models). The volume is adjustable on
some models.
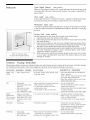
Place the front bar under
the lip of the lint screen opening.
DrL_ Light (sa_e _mdels)
A drum light will come on whenever the door is opened to illuminate the dryer
drum during loading and unloading. Closing the door turns off the light.
Reversible Dryer Door
Your dryer isequipped with a reversible door. The door can be hinged on the right
or left side. Refer to the INSTALLATIONINSTRUCTIONSfor directions on changing
the door.
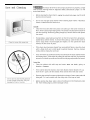
Drying Rack (some models)
Use the drying rack to dry items which should not be tumble dried.
1. Open the dryer door and remove the lint screen.
2. Insert drying rack into the dryer drum. Placethe front bar under the lip of the
lint screen opening.
3. Place items to be dried on top of the rack. Weight should not exceed 10 Ibs.
Leavespace between items, but do not let items hang over the sidesor through
the grids. Do not tumble other items when using the drying rack.
4. Select atimed dry setting best suited for items being dried. Useonly the Air Fluff
(no heat) temperature setting for items containing plastic, foam rubber,
rubber-like materials, feathers or down.
5. When items are dry, remove the rack and replace the lint screen. If lint screen
is not in place, tumbling items could enter the exhaust system and cause
damage to the dryer.
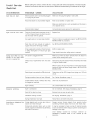
Common Dryir Problems
Many drying problems involve poor cleaning results, poor soil and stain removal, residues of lint and scum, and fabric damage.
For satisfactory drying results, follow these suggestions provided by The Soap and Detergent Association.
PROBLEM
_, oily
stai_
Lint
(Fibersbreak
off, ball up and
cling to fabric.)
Shrinking
Wrinkling
POSSIBLE CAUSES SOLUTIONS
PREVENTIVE MEASURES
• Fabric softener sheet.
• Rub fabric softener stains with bar soap.
Rinse and rewash.
• Add a few bath towels to small loads for
proper tumbling.
• Some "silk-like" fabrics should be air dried.
• Use proper d_ying temperature.
• Place fabric softener sheet on top of load
before stating the dryer.
• Overloading.
• Overdrying causes static
electricity.
• Lint screen not clean
when cycle began.
• Lint is attached to "pills."
• Reduce load size and rewash using liquid
fabric softener in the final rinse.
• Or, add a fabric softener sheet and
tumble without heat.
• Use lint brush or roller to remove lint.
• Do not overload dryer.
• Use fabric softener in washer or dryer to
reduce static electricity.
• Remove items when they are slightly damp
to avoid overdrying.
• Check that lint screen is clean and in place.
Pilling is normal with
synthetic and permanent
press fabrics. This is due
to abrasion from normal
• Use a lint brush or shaver to remove pills.
• Use fabric softener to lubricate fibers.
• When ironing, use spray starch or fabric
finish on collars and cuffs.
• Turn items inside out to reduce abrasion.
wear.
Overdrying.
• Irreversible condition. • Follow fabric care label directions.
• If shrinking is a concern, check load often.
• Remove items while slightly damp and
hang or lay flat to complete drying.
• Block knits into shape.
• Overloading.
• Leaving items in dryer
after cycle ends.
• Reduce load size and tumble at medium • Do not overload dryer.
or low heat for 5-10 minutes. • Remove items as soon as cycle ends.
• Remove items immediately. Hang or fold.

Care and Cleaning
Clean lint screen after every load.
Do not store or place laundry products
on top of dryer at any time. They can
damage the finish or controls.
Toreduce risk of fire or serious injury to persons or property, comply
with the basic warnings listed in _:oztant Safety Znstructicms, pages 2-3, and
those listed below,
Before cleaning the dryer interior, ur[olug the electricsl pswer cord to avoid
electrical shock hazards.
Do not use any type spray cleanser when cleaning dryer interior, Hazardous
fumes or electrical shock could occur,
Inside
Clean the lint screen after every load. Lint build-up in the screen restricts air
flow, which causeslonger drying times, The screen islocated at the bottom of
the door opening. Remove by pulling straight up, Remove the lint and replace
the screen,
Occasionally a waxy build-up may form on the lint screen from using dryer-
added fabric softener sheets. To remove this build-up, wash the lint screen in
warm, soapy water. Dry thoroughly and replace. Do not operate the dryer
without the lint screen in place,
If the dryer drum becomes stained from noncolorfast fabrics, clean the drum
with a damp cloth and a mild liquid household cleanser. Remove cleanser
residue before drying the next load.
Every 18 months an authorized servicer should clean the dryer cabinet interior
and exhaust duct. These areascan collect lint and dust over time. An excessive
amount of lint build-up could result in inefficient drying and possible fire hazard.
Outside
Clean the cabinet with mild soap and water. Never use harsh, gritty c87
abrasive cleansers.
If the cabinet becomes stained, clean with diluted chlorine bleach [1/2 cup
(120 ml) in 1 quart (.95 liter) water], Rinse several times with clear water,
Remove glue residue from tape or labels with a mixture of warm water and mild
detergent, Or, touch residue with the sticky side of the tape or label,
Before movingr the dryer, place a strip of cardboard or thin fiberboard under
the front leveling legs to prevent damage to floor,
6

Avoid Service
ChecJilist
Before calling for service, review this list. It may save both time and expense. The list includes
common occurrences that are not the result of defective workmanship or materials in this dryer.
OCCURRENCE POSSIBLE CAUSE SOLUTION
l:_ze_-does _ stazt Electrical power cord is not securely plugged Make sure the plug fits tightly in wall outlet.
in or plug may be loose.
House fuse blown or circuit breaker tripped. Reset circuit breaker or replace fuse.
Make sure electrical line is not overloaded and the dryer is
on a separate circuit.
Thermal Iimiter tripped. Call authorized service person for replacement.
Dryer runs hut _:_'t heat. Thereare2housefusesinthedryerdrcuitlf Replace fuse.
1of the 2 fuses isblown, the drum may turn
but the heater will not operate.
Gas supply valve is not open (gas models). Checkto make suresupplyvalve isopen. SeeINSTALLATION
INSTRUCTIONSfor procedure.
Dryer does not have enough air supply to See INSTALLATION INSTRUCTIONS.
support the burner flame (gas models).
LPgas supply tank isempty or there has been Refill or replace tank.
a utility interruption of natural gas (gas
models). Dryer should heat when utility service is restored.
cycle _ too lcr_j, Lint screen isclogged with lint. Make sure all lint has been removed from the Oyer lint
outside of the dzl/e_" feels screen before starting each cycle.
too h3t or sn_lls h3t.
Exhaust duct requirements have not bee[] Exhaust duct must be at least 4 inches in diameter and made
met. of rigid or flexible metal.
When in place, the duct must have no more than two 90°
bends and must not exceed length listed in INSTALLATION
INSTRUCTIONS.
Electricd_yerisconnectedtoa2Oavoltcircuit. Drying time will be 20% longer than drying on a 240 volt
circuit.
Drying procedures have not been followed. See DqfL_g Pz-cceA_P.s,page 4.
Outside exhaust hood or exhaust duct may Clean out any obstruction.
be clogged or restricted.
High humidity. Use a dehumidifier near the dryer.
_¢:essive _¢=#_4LJ_j. Dryer is overloaded. Do not overload. See DzyLng _P.s, page 4.
Items left in dryer too long. Remove items as soon as cycle ends.
Insufficient sorting of items. See DqzL_g Pz<cecbz_s, page 4.
Drying temperature too high. Follow fabric care label instructions.
Foreign objects such as coins, pins, clips or Always remove foreign objects from pockets before
buttons are inside the dryer, laundering. Remove objects from drum and restart dryer.
Permanently attached items such as belt It may be necessary to baste a scrap of material securely
buckles, zippers and fasteners may be hitting around ornaments before drying to prevent scratching and
the inside of the drum. damage to the Oyer.
Drum damage caused by foreign objects or
permanentlyattached ite@s is not covered by the
w_ty.
Scratchir_orchippin_oftk_
drumfinish.

FRIGIDAIRE DRYER WARRANTY
Your Frigidaire product is protected by this warranty
FULL ONE-YEAR
WARRANTY
LIMITED WARRANTy
(Applicable to the
State of Alaska)
WARRANTY
PERIOD
One year from original
_rchasedate.
Ti_eperiodlistedabove.
FRIGIDAIRE, THROUGH ITS AUTHORIZED
SERVICERS, WILL:
Pay all costs for repairing or replacing any parts of this
appliance which prove to be defective in materials or
workmanship.
All of the provisions of the full warranty above and the
e_clusionslistedbelcmapply.
THE CONSITMER WILL BE
RESPONSIBLE FOR:
Costs of service calls that are listed under
IMPORTANT RESPONSIBILITIES OF THE
CONSUMER.*
CostsoftPe technician_s traveltotke _i_ a_idany
costs for pick up and delivery of the applia_ice
requiredbecauseofservice.
Yourappliance iswarranted by Frigidaire Home Products,a division of White Consolidated Industries, Inc. We authorize no person to change
or add to any of our obligationsunder thiswarranty. Our obligations for service and parts underthis warranty must be performed by Frigidaire
oran authorizedFrigidaireservicer.
*IMPORTANT
RESPONSIBILITIES
OF THE CONSUMER
EXCLUSIONS
IF YOU NEED
SERVICE
This warranty applies only to products in ordinary household use, and the consumer is responsible for the
items listed below:
l Properuse of the appliance in accordance with instructions provided with the product.
2 Proper installationby an autberized servicer in accordance with instructionsprovided with the appliance and in
accordancewithali localplumbing,electricaland/orgas codes.
3. Proper connectiontoagroundedpower supplyof sufficient voltage, replacement of blown fuses, repairof loose
connections or defects in beusewiring.
Expenses for_king the applianceaccessibleforservicing,suchas removalof trim,cupboards,shelves,etc.,which
are not a part of the appliance when it was shipped from the factory.
5 Damagestofinishafterinstallation.
6. Replacement of lightbulbs and/or fluorescent tubes (onm_delswiththese features) .
This warranty does not cover the following :
l CONSEQUENTIAL OR INCIDENTAL DAMAGES SUCH AS PROPERTY DAMAGE AND INCIDENTAL EXPENSES RESULTING
FROM ANY BREACH OF THIS WRITTEN OR ANY IMPLIED WANRANTY.
Note: Son_statesder_t allow theexclusic_lorlimltation ofincidentalorconsequentialdamages,so thislimitation
or exclusion may not apply toyou.
2 Servicecallswhichdo not involverealfunctionordefectsinworkmanshipor material,or forappliancesnot inordinary
householduse. The consumer shalipay for suchservice calls.
3. Damagescausedby servicesperformedby servicersotherthanFrigidaireor its authorizedservicers;use ofpartsother
tha_1genuine Frigidaire Home Productsparts; obtained frompersons other than such servicers; or external causes
suchas abuse, misuse, inadequate power supply or acts of God.
Products with original serial numbers that have been removed or altered and cannot be readily determined.
Keepyourbillof sale,deliveryslip,or scmeotherapp_riatepayment record. _hedatecnthebillestablishesthewarranty
periodshouldservicebe required.Ifserviceisperformed,it is inyour bestinteresttoobtainand keepall receipts.This
writtenwarrantygivesyou specificlegalrights.YOU_y alsohav_ otherrightsthmtvary fromstatetostate.Serviceunder
thiswarranty must be obtained by contacting Frigidaire Home Products :
800 " 944 • 9044
Frigidaire Home Products
P.O. Box 212378
Augusta, GA30917
[] FRIGIDAIRE
HOME PRODUCTS
Productfeaturesor specificationsasdescribedor illustratedaresubjectto changewithoutnotice.All warrantiesarenmde
by White Consolidated Industries,Inc. Thiswarranty appliesonly in the 50statesof theU.S.A. and Puerto Rico.
8
-
 1
1
-
 2
2
-
 3
3
-
 4
4
-
 5
5
-
 6
6
-
 7
7
-
 8
8


Frigidaire FGR331AS0 Owner's manual
- Category
- Tumble dryers
- Type
- Owner's manual
- This manual is also suitable for
Ask a question and I''ll find the answer in the document
Finding information in a document is now easier with AI
Related papers
-
Frigidaire 134306300A User manual
-
-
-
-
Frigidaire FDGS69RHW1 Owner's manual
-
-
-
-
-
Other documents
-
White-Westinghouse SER341AQ0 Owner's manual
-
-
Crosley CDE5000FW0 Owner's manual
-
-
-
Gibson GGR442AS3 User manual
-
-
-
-
 Airlux Group 13467-1200 (0512) User manual
