Page is loading ...

INSTALLATION
INSTRUCTIONS
Ca r d re a d e r Co n v e r s i o n
INSTRUCTIONS
D’INSTALLATION
Conversion pour lecteur de carte
INSTRUCCIONES
DE INSTALACIÓN
Conversión del lector de tarjeta
TABLE OF CONTENTS
Page
Washer and Dryer Safety .............................................. 2
Tools and Parts .............................................................. 2
Installing the Card Reader ............................................ 3
Complete Installation .................................................... 4
TABLE DES MATIÈRES
Page
Sécurité de la laveuse/sécheuse ................................. 5
Outillage et pièces ......................................................... 5
Installation du lecteur de carte .................................... 6
Achever l’installation ..................................................... 7
ÍNDICE
Página
Seguridad de la lavadora y de la secadora ................ 8
Herramientas y piezas .................................................. 8
Instalación del lector de tarjeta ................................... 9
Complete la instalación .............................................. 10
www.maytagcommerciallaundry.comW10335470B

2
WASHER AND DRYER SAFETY
†® TORX is a registered trademark of Saturn Fasteners, Inc.
Parts Supplied:
card reader bezel 6-32 x .108 HX ETLW nuts (6) 6-32 x .562 HX
screws (3)
Tools Needed:
Torx
®†
T-20 security at-head screwdriver adjustable wrench
screwdriver or bit
TOOLS & PARTS

3
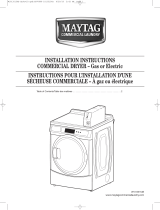
1. Unplug stacked washer/dryer or disconnect power.
2. Remove the dispenser drawer. Use a screwdriver to
push down the tab to release the drawer.
3. Remove the four control panel TORX
®†
screws.
4. Remove the four card reader bracket screws.
5. Remove the snap-in card reader cover.
6. Discard the card reader cover.
7. Install the 3 screws into the front of the control
bracket and install a nut onto each of them.
8. Snap bezel onto card reader bracket.
9. Install the card reader according to the manufacturer’s
instructions.
10. Add a second nut onto each of the screws to hold in
the card reader.
11. Plug the wiring harness into the card reader and
the card reader port on the control board at AA3.
12. Replace control panel using the original TORX
®†
screws.
INSTALLING THE CARD READER
†® TORX is a registered trademark of Saturn Fasteners, Inc.

4
COMPLETE INSTALLATION
1. Check that all parts are now installed. If there is an
extra part, go back through the steps to see which
step was skipped.
2. Check that you have all of your tools.
3. Dispose of/recycle all packaging materials.
Electric Dryers
n In the U.S.A.
For power supply cord installation, plug into an
outlet. For direct wire installation, turn on power.
n In Canada
Plug into a grounded 4-prong outlet. Turn on power.
Gas Dryers
n For gas installation, plug into a grounded
3-prong outlet.

W10335470B
© 2010
11/2010
Printed in U.S.A.
Imprimé aux É.-U.
Impreso en EE.UU.
® Registered Trademark/TM Trademark of Maytag Corporation or its related companies.
Used under license by Maytag Limited in Canada.
® Marque déposée/TM Marque de commerce de Maytag Corporation ou ses compagnies afliées.
Emploi sous license par Maytag Limited au Canada.
® Marca registrada/TM Marca de comercio de Maytag Corporation o sus compañías asociadas.
Usada bajo licencia por Maytag Limited en Canadá.
/