Page is loading ...

InstructionManual
Model Reference: GCHF-599
IM-GCHF-59914092015
Manual Air Fryer

Introduction
Thank you for choosing the Cucina by Giani Manual Air Fryer. All products brought to
you by Giani are manufactured to the highest standards of performance and safety.
Before use, please read this manual. It gives important instructions about safety, use
and maintenance of your appliance.
Remove all packaging material. You may wish to keep the packaging for future use
or storage for your appliance. Alternatively, dispose of accordingly.
Index
Important Safety Instructions............................
Product Overview...............................................
Technical Information........................................
Before First Use..................................................
Preparing For Use..............................................
How To Use Your Air Fryer................................
Tips.....................................................................
Settings...............................................................
Cleaning..............................................................
Trouble Shooting................................................
After Sales Support............................................
Product Guarantee.............................................
1
02
03
04
04
05
05
07
08
08
09
10
10

Important Safety Instructions
Please read ALL instructions before using this appliance and keep safe for future
reference.
When using electrical appliances, basic safety precautions should always be
followed, including the following:
1. This appliance is for domestic use only. It should not be used for commercial
purposes.
2. Only use this appliance for its intended domestic use. Giani Ltd will not accept
any liability if the appliance is subject to improper use, or failure to comply with
these instructions.
3. Do not use outdoors or on wet surfaces.
4. Do not handle the plug or appliance with wet hands.
5. Do not immerse the main body in water. Avoid any liquids entering the appliance
as this will cause an electric shock or will short circuit the appliance.
6. Keep all i
ngredients within the cooking basket to prevent any contact with internal
heating elements. The appliance will malfunction if this occurs.
7. This appliance can be used by children aged from 8 years and above and persons
with reduced physical, sensory or mental capabilities, or lack of experience and
knowledge, if they have been given supervision or instruction concerning the use
of the appliance in a safe way and understand the hazards involved.
8. Children should not play with the appliance.
9. Cleaning and user maintenance should not be performed by children without
supervision.
10. This product is not a toy.
11. Do not use the appliance if any parts appear to be faulty, missing or d
amaged.
12. Do not use the appliance if it has been dropped or damaged in any way.
13. Do not leave the appliance unattended when connected to the mains supply.
14. Always unplug from the mains supply before carrying out any cleaning or
performing user maintenance. The appliance needs a minimum of 30 minutes to
cool down after use.
15. Check to ensure that your electricity supply matches that shown on the rating
plate.
16. Only use the attachments/accessories supplied with the product or
recommended by Giani.
17. If the supply cord is damaged, it must be replaced by a qualified service agent i
n
order to avoid a hazard.
18. The pan and basket are not suitable for cleaning in a dishwasher.
19. Keep the appliance and its power supply cord away from heat or sharp edges
that could cause damage.
20. Keep the power supply cord away from any parts of the appliance that may
become hot during use.
21. Always use the appliance on a stable, heat resistant surface.
22. Do not place the appliance against a wall or directly next to another appliance.
Leave at least 20cm of free space around the appliance when in use.
23. Do not cover the air in
let or the air outlet whilst the appliance is operating.
24. During use, hot steam is released through the air outlet openings. Keep your
hands and face at a safe distance from the steam outlet openings.
2

25. Take extra care when removing the pan after cooking is complete. Hot air and
steam will be released. Keep your face and hands at a safe distance.
26. The surface of the appliance may get hot during operation.
27. Do not move the appliance when it is in use.
28. Do not touch any parts of the appliance that may become hot as this could cause
injury.
29. Do not cover the appliance.
30. Do not disconnect the appliance from the mains power supply by pulling the
cord, switch it off and remove the plug by hand.
31. Do not store in direct sunlight or high humidity conditions.
32. Al
ways unplug the appliance after use and before any cleaning or user
maintenance.
33. Always ensure the appliance has cooled fully after use before performing any
cleaning or user maintenance or storing away.
34. Use of an extension cord with the appliance is not recommended.
35. This appliance should not be operated by means of an external timer or separate
remote control system.
36. Keep the appliance away from flammable materials.
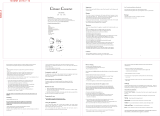
Product Overview
1. Basket
2. Pan
3. Basket Handle
4. Basket Release Button
5. Heating Up Light Indicator
6. Power On Light Indicator
3
Timer (0-30 minutes) / Power On Dial
Temperature Control Dial (80 - 200 C)
Air Inlet
10. Air Outlout
11. Power Cord
7.
8.
9.

Technical Information
Before First Use
1. Remove all packaging materials, stickers and labels.
2. Clean the basket and pan with warm soapy water and a soft cloth or non-
abrasive sponge, then rinse. Do not use any abrasive cleaning materials as this
will damage the appliance.
3. Dry thoroughly.
4. Wipe the appliance inside and out with a soft damp cloth and dry thoroughly.
NOTE: You do not need to fill the pan with oil as this appliance works on hot air.
4
Voltage
Rated Power
Temperature Interval
Basket Capacity
220 - 240V
1350W
80 - 200 C
2.2L

Preparing For Use
1. Place your appliance on a stable, horizontal and even surface.
2. DO NOT PLACE ON NON HEAT RESISTANT SURFACES.
3. MAKE SURE THERE IS AT LEAST 20CM OF FREE SPACE ALL AROUND THE
APPLIANCE.
4. Attach the basket to the pan. (Fig 3)
5. DO NOT FILL THE PAN WITH OIL OR ANY OTHER LIQUID.
6. DO NOT PUT ANYTHING ON TOP OF THE APPLIANCE;
THE AIR FRYER WILL MALFUNCTION IF THE AIR INLET
IS COVERED.
How To Use Your Air Fryer
1. Connect the mains plug to the wall socket.
2. Carefully pull the pan out of the Air Fryer using the front
handle. (Fig 4)
3. Place your food into the basket.
NOTE: Do not exceed the MAX indication level.
4. Slide the pan back into the air fryer. (Fig 5)
* NEVER USE THE PAN WITHOUT THE BASKET IN IT *
CAUTION: DO NOT TOUCH THE PAN DURING AND WITHIN 30 MINUTES AFTER
USE AS IT GETS EXTREMELY HOT. ONLY HOLD THE PAN BY THE HANDLE.
5. Turn the temperature control dial to the required
temperature (see the ‘Settings’ section to determine
the correct temperature). (Fig 6)
6. Determine the required cooking time (see the ‘Settings’
section to determine the correct cooking time).
5

7. Turn your appliance on and set the timer to the required
cooking time. (Fig 7)
NOTE: Add an additional 3 minutes to the cooking time if
your appliance is cold.
You can preheat your appliance. Simply turn the timer dial on above 3 minutes
and wait until the heat-up light indicator has gone out. Then fill the basket and
turn the timer dial to the required cooking time.
a. Both the power-on and heat-up light indicator will illuminate.
b. The timer will begin to count down for the cooking time set.
c. During the hot air frying process, the heat-up light indiactor will illuminate off
and on. This indicates the heating element is regulating the temperature whilst
cooking so the cooking process is at the temperature set.
d. Excess oil / fluid from the ingredients is collected in the bottom of the pan.
8. Your ingredients may require shaking halfway through
cooking. To do this, pull the pan out of the appliance
by the handle, taking extreme care as hot air and steam
will be released when the pan is moved out, shake and
then slide the pan back into the appliance. (Fig 8)
CAUTION: DO NOT PRESS THE BASKET RELEASE
BUTTON ON THE HANDLE DURING SHAKING. (Fig 9)
Tip: You can remove the basket from the pan and shake the
basket only to reduce the weight. To do this, pull the pan out
of the appliance, place it on the heat resistant holder and
press the button on the handle. (Fig 10)
Tip: If you set the timer to half the cooking time, you can
shake your ingredients when you hear the timer bell.
However, you will need to set the timer again for the
remaining cooking time.
9. When you hear the timer bell, the set cooking time has completed. Pull the pan
out of the appliance and place it on the heat resistant holder.
NOTE: You can also switch off the appliance manually. To do this, turn the
temperature control dial to 0 C.
10. Check if your ingredients are cooked. If they are not cooked to your
requirement, slide the pan back into the appliance and set the timer for a few
extra minutes.
11. To remove small ingredients, such as Fries, press the
basket release button and lift the basket out of the pan.
(Fig 11)
CAUTION: THE PAN AND INGREDIENTS ARE EXTREMELY
HOT AFTER HOT AIR FRYING. TAKE CARE REMOVING THE INGREDIENTS
FROM THE BASKET.
6

12. Empty the basket contents into a serving
bowl or onto a plate. (Fig 12)
TIP: To remove large or fragile ingredients, lift the
ingredients out of the basket with a pair of tongs.
TIPS
Because the rapid air technology reheats the air inside the appliance instantly,
pulling out the pan briefly during cooking will barely disturb the cooking process.
Shaking ingredients halfway through cooking optimizes the end result and can help
prevent unevenly cooked ingredients.
Add some oil to fresh potatoes for a crispy result. Fry your potatoes in the Air Fryer
within a few minutes after adding the oil.
Do not prepare extremely greasy foods such as sausages in the Air Fryer.
The optimal amount for prepared crispy fries is 500 grams.
Use pre-made dough to prepare filled snacks quickly and easily. Pre-made dough
also requires a shorter preparation time than home-made dough.
Place a baking tin or oven proof dish in the Air Fryer basket if you want to bake a
cake or qu
iche or if you want to fry fragile ingredients or filled ingredients.
You can also use the Air Fryer to reheat ingredients. To reheat ingredients, set the
temperature to 150 C for up to 10 minutes.
7

Settings
The table below will help you select the basic settings for your food types.
Note: These settings are indications only, as time adjustments will be required
depending on the size and shape of the foods you are cooking.
Cleaning
1. Turn the appliance to 0 on the timer dial.
2. Remove the mains plug from the wall socket and allow the appliance to cool
(at least 30 minutes).
Tips: Remove the pan to let the Air Fryer cool down more quickly.
3. Wipe the outside of the appliance with a soft damp moist cloth. Do not use
any abrasive materials or solutions as this will damage the appliance.
4. Clean the pan and basket with hot soapy water and a non-abrasive sponge.
8
Potatoes & Fries
Thin Frozen Fries
Thick Frozen Fries
Home-Made Fries
(8x8mm)
Home-Made Potato Wedges
Home-Made Potato Cubes
Rosti
Potato Gratin
Meat & Poultry
Steak
Pork Chops
Hamburger
Sausage Roll
Drumsticks
Chicken Breast
Snacks
Spring Rolls
Frozen Chicken Nuggets
Frozen Fish Fingers
Frozen Bread Crumbed
Cheese Snacks
Stuffed Vegetables
Baking
Cake
Quiche
Muffins
Sweet Snacks
300-700
300-700
300-800
300-800
300-750
250
500
100-500
100-500
100-500
100-500
100-500
100-500
100-400
100-500
100-400
100-400
100-400
300
400
300
400
Min-Max
Amount
(grams)
Time
(mins)
Temp
C
Shake Extra Information
9-16
11-20
16-10
18-22
12-18
15-18
15-18
8-12
10-14
7-14
13-15
18-22
10-15
8-10
6-10
6-10
8-10
10
20-25
20-22
15-18
20
200
200
200
180
180
180
200
180
180
180
200
180
180
200
200
200
180
160
160
180
200
160
Shake
Shake
Shake
Shake
Shake
Shake
Shake
Shake
Shake
Add 1/2 tbsp of oil
Add 1/2 tbsp of oil
Add 1/2 tbsp of oil
Use oven-ready
Use oven-ready
Use oven-ready
Use oven-ready
Use baking tin
Use baking tin
or oven proof dish
Use baking tin
Use baking tin
or oven proof dish

Tip: If there is stubborn food residues stuck to the basket or in the bottom of the
pan, fill the pan with hot soapy water, place the basket in the pan and allow to soak
for 10 minutes. Soaking time will vary depending on foods cooked and the amount
of stubborn residue.
5. Wipe the inside of the appliance with a damp cloth or sponge. Do not use
abrasive materials or solutions as this will damage the appliance.
6. Wipe the heating element with a soft cleaning brush to remove food residue.
Do not use abrasive materials or solutions as this will damage the appliance.
ONLY DO THIS WHEN THE APPLIANCE H
AS COOLED DOWN.
7. Allow the appliance to dry out thoroughly before storage.
Trouble Shooting
9
Problem
The Air Fryer does not work
The ingredients are not cooked
The ingredients are fried unevenly
Fried snacks are not crispy
I cannot slide the pan into the
appliance properly
White smoke comes out of
the appliance
Fresh fries are fried unevenly
Fresh fries are not crispy
Possible Cause
The appliance is not plugged in
You have not set the timer
The amount of ingredients in
the basket is too much
The set temperature is too low
Certain types of food need
shaking halfway through cooking
You have used a food that is
meant to be prepared in a
traditonal deep fryer
There is too much food in the
basket
The basket is not placed in the
pan correctly
You are preparing greasy foods
The pan still contains grease
from previous use
You did not use the right type
of potato
You did not rinse the potato
sticks properly before frying
The crispiness of the fries
depends on the amount of
oil and water in the fries
Solution
Put the mains plug into the wall socket.
Turn the timer knob to the required
cooking time.
Put smaller batches of ingredients in
the basket.
Smaller batches are fried more evenly.
Turn the temperature control dial to the
required setting.
Refer to the settings section for more
detail.
Ingredients that lie on top of or across
each other (eg fries) need to be shaken.
Use oven snacks or lightly brush some
oil onto the snacks for crispier results.
Do not fill the basket beyond the MAX
indication level.
Push the basket down into the pan until
you hear a click.
When you fry greasy ingredients in the
Air Fryer, a large amount of oil will leak
into the pan. The oil produces white
smoke and the pan may heat up more
than usual.
This does not affect the appliance or the
end result.
White smoke is caused by grease heating
up in the pan. Make sure you clean the
pan properly after each use.
Use fresh potatoes and make sure that
they stay firm during frying.
Rinse the potato sticks properly to
remove starch.
Make sure you dry the potatoes properly
before you add the oil.
Cut the potatoes smaller for a crispier
result.
Add slightly more oil for a crispier result.

After Sales Support
If the power cord is damaged, it MUST be replaced by a qualified electrician.
If you need help using your Air Fryer, please contact Giani Ltd:-
Telephone: 0161 480 6204
Email: [email protected]
Website: www.gianiuk.co.uk
(replacement instruction manuals are available to download).
10
Product Guarantee (UK Only)
If your appliance ceases to function within 1 year from the date of purchase, the retailer
will replace it free of charge, provided:
This guarantee does not affect your statutory rights.
Giani UK Ltd - SK2 6RH
You have not misused, neglected or damaged it
It has not been modified (except by Giani Ltd)
It was not purchased second hand
It has not been used commercially
You have not fitted a plug incorrectly
You can supply proof of purchase, indicating the price you paid and where and when
the appliance was purchased.
2011/65/EU
IMPORTANT INFORMATION FOR CORRECT DISPOSAL OF THE APPLIANCE IN ACCORDANCE WITH
EC DIRECTIVE 2002/96/EC
At the end of its working life, the appliance must NOT be disposed of as urban waste.
It must be taken to a special local authority differentiated waste collection centre or to a dealer providing
this service.
Disposing of a household appliance separately avoids possible negative consequences for the
environment and health deriving from inappropriate disposal and enables the constituent materials to be
recovered to obtain significant savings in energy and resources. As a reminder of the need to dispose of
ousehold appliances separately, the product is marked with a crossed-out wheeled dustbin.
/