Brandt BT603ME Owner's manual
- Category
- Washing machines
- Type
- Owner's manual

MANUEL D’INSTRUCTION FR
INSTRUCTION MANUAL EN
HANDLEIDING NL
KÄYTTÖOPAS FI
Lave-linge
Washing machine
Wasmachine
Pyykinpesukone

14
EN
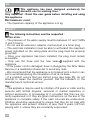
This appliance has been designed exclusively for
domestic use for washing linen.
Very important : Read this user guide before installing and using
this appliance.
SAFETY
EN
RECOMMENLED LOADS :
— The maximum capacity of the appliance is 6 kg.
The following instructions must be respected :
INSTALLATION :
— The pressure of the water supply must be between 0.1 and 1 MPa
(1 and 10 bars).
— Do not use an extension, adapter, multi-socket or a timer plug.
— The electrical installation must be able to withstand the maximum
power indicated on the rating plate and the plug must be properly
grounded.
— Once your appliance has been installed, the plug must remain
accessible.
— Only use the hose and the new seals supplied with the
appliance.
— If the power cord is damaged, have it changed by the After Sales
Service or a qualified professional to avoid any risks.
— We recommend that the appliance is not placed onto a mat or car-
pet to avoid hampering the circulation of air at its base.
— If a problem occurs that you cannot solve (see page 23), do not
attempt to repair the machine yourself. Call the reseller's or the
manufacturer's technical service.
USE :
— This appliance may be used by children of 8 years or older and by
persons with limited physical, sensorial or mental capacities or
without experience or knowledge of it, provided that they are cor-
rectly supervised or if they are given instructions on the use of the
appliance in complete safety if the risks incurred are understood.
Children should be supervised to ensure that they do not play with
the appliance and prevent children of less than 3 years old from
playing with it, unless they are constantly supervised.
G

15
SAFETY
(continued)
EN
USE
(continued)
:
—
The device should not be cleaned or maintained by unsupervised children.
— Do not load linen that has been treated with stain removers, sol-
vents or inflammable products –straight after they have been treated
(risk of explosion)
— This washing machine is fitted with a safety device to prevent any
spillage of water.
— At the end of the cycle, ensure the water tap is switched off and
the appliance unplugged.
ENVIRONMENT
This washing machine has been designed to res-
pect the environment.
PROTECTING THE ENVIRONMENT
The dose of washing product depends on how dirty
the laundry is and the hardness of the water. Do not
exceed the dose recommended by the manufactu-
rer of the washing product.
This appliance’s packaging material is recyclable.
Help protect the environment by placing the packa-
ging into the municipal containers provided for this
purpose.
Your washing machine also contains many
recyclable materials, it features this logo to
remind you that used appliances must not
be mixed with other waste.
The appliance must therefore be recycled in com-
pliance with the European directive 2012/19/EU on
used electrical and electronic equipment.
Contact your town hall or your retailer for the used
appliance collection points closest to your home.
ENERGY SAVING
Only programme a prewash when it is absolutely
necessary. For linen that is not very or normally dirty,
a low temperature programme is sufficient.

16
EN
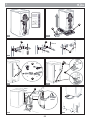
1 - INSTALLATION
1.4 - LEVELLING THE MACHINE
(Diagram 1.4)
The appliance must be installed on a horizontal
floor. If required, and if it is equipped with adjusta-
ble feet at the front of the appliance, stabilise your
washing machine so that it is level. If it is fitted with
retractable castors, it may be moved by pulling the
lever underneath the appliance completely to the
left.
1.5 - E
LECTRICAL CONNECTION
(Diagram 1.1.1)
Ensure that the indications on the data plate of the
Appliance are respected.
1.6 - CLEANING BEFORE USE
Once installed, your washing machine must be clea-
ned by programming a cotton cycle at 90°C with
nothing inside and with half a dose of washing pow-
der.
1.2 - CONNECTION TO THE WATER SUPPLY
(Diagram 1.2 )
Connect the feed pipe with its new washers to the
coupling on the rear of the washing machine and to
a tap with a threaded Ø 20x27 endpiece.
1.3 - DRAINING
(Diagram 1.3)
Position the drain hose, fitted with the curved part,
ensuring that the instructions shown on the dia-
gram are respected and especially that the connec-
tion is not air-tight: air must pass freely between the
drain hose and the drain to avoid used water from
flowing back up the hose into the machine and bad
smells being caused.
H
— Remove the 3 hose support clips, and place
E
1.1 - UNPACKING
(Diagram 1.1.2 to 1.1.4)
The following instructions must be respected :
— Remove the chocks from the lid and flaps of the
drum and open and close the drum carefully.
— Lift the washing machine and remove the
motor chock and base
(Diagram 1.1.2)
.
B
A
holes
(Diagram 1.1.3)
.
D
— Remove the strip and place the stoppers in the
C
the stoppers in the 3 holes (very important)
(Diagram 1.1.4).
F
2 - USE
RECOMMENDATIONS :
— Before inserting the linen, sort it by colour, how
dirty it is and the type of textile. Empty all pockets,
close zips, removes hooks from curtains, place
Small items of underwear in a mesh bag.
— Remove any loose buttons, pins and clips.
— Knot belts, and ties for aprons, etc.
2.1 - LOADING YOUR WASHING
(Diagram 2.1)
Operate the handle of the lid and open the drum
by pushing the button .
Once the linen has been put in, ensure that
the drum has been closed properly. Ensure
that the edge of the button is visible.
A
2.2 - WASHING PRODUCTS AND ADDITIVES
(Diagram 2.2)
The product drawer has 3 compartments :
pre-wash
(powder), wash (powder or liquid),
softener.
— Use detergents that are certified for domestic
washing machines.
— Do not use liquid detergents with the pre-wash
cycle and/or delayed start.
— Do not exceed the MAX level.

17
EN
1 -
3 - PROGRAMMING
4
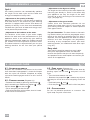
3.1 - THE CONTROL PANEL
1
2
On / Off
Start/Pause
5
4
7
Selecting the Programme
Selecting the temperature
8
6
Selector
Selecting the spin speed
3
Programming a delayed start
Options
Display
9
1
2
3
7
6
8
9
5
11
10
12
14
13
15
11
10
"Easy start" function
Child safety lock
12
Door lock
14
13
Temperature
Spin speed
15
Delayed start / Time remaining
CLOSE-UP OF THE DISPLAY
9

18
1 -
EN
1 -
3 - PROGRAMMING
(continued)
3.2 - PROGRAMMING A WASH CYCLE
STARTING THE APPLIANCE
Press the "On/Off" button .
When using your washing machine for the first time,
the manufacturer's programme will appear, and then
your preferred programme will be displayed automa-
tically, thanks to the "Easy start" function. The indi-
cator is on. If this programme suits you, press
1
10
"Start/Pause" to start the programme.
CONFIGURING THE WASH PROGRAMME
If desired, you can change the wash programme by
pressing key .
2
4
Select your programme by turning the selector .
The LED corresponding to the chosen programme
flashes. Confirm your selection by pressing the
selector. The LED stops flashing and stays lit.
CONFIGURING THE TEMPERATURE, SPIN SPEED
AND OPTIONS
If desired, you can change the temperature by pres-
sing key . The LED is steadily lit to show that you
are in selection mode.
Turn the selector until the desired temperature
3
5
3
appears in area of the display . Confirm by
pressing the selector (the LED goes out).
Nota : For a cold wash, change the temperature to
«0».
You can use key to modify the spin speed (auto-
matically limited for certain programmes). The LED
is steadily lit to show that you are in selection mode.
Turn the selector until the desired spin speed
13
9
6
3
appears in area of the display . Confirm by
pressing the selector (the LED goes out).
14
9
You can select any options using keys .
A warning beep informs you of any options that are
not compatible with your programme.
Press "Start/Pause" to start your programme.
8
2
The door lock indicator lights up.
The estimated duration of the programme appears
in area of the display . A few minutes after
the cycle is launched, the duration is updated
according to the quantity and type of laundry in the
machine.
DELAYED START OF A PROGRAMME
Select your programme.
Press "Delayed Start" . The corresponding LED
is steadily lit to show that you are in selection
mode. Turn the selector in order to delay the
start of your programme by hourly intervals until
the desired delay time (max. 24 hours) is displayed
in area of the display . Press the selector ,
12
15
9
7
3
15
9
3
then "Start/Pause" to confirm.
An animation shows the waiting period preceding
the start of the cycle. Area of the display
shows the time remaining until the start of the pro-
gramme via a countdown in hours, then in minutes
during the last hour.
2
15
9

19
EN
1 -1 -
3 - PROGRAMMING
(continued)
3.2 - PROGRAMMING A WASH CYCLE
(continued)
ADDING OR REMOVING AN ITEM DURING THE
CYCLE
(impossible during spin)
Press and hold the "Start/Pause" button to inter-
rupt the programme.
The time remaining flashes and the door lock indica-
tor goes out.
Insert or remove the linen.
The time taken to unlock the door depends
on the temperature inside the machine and
can last up to several minutes for safety reasons.
Press "Start/Pause" to restart the programme
The countdown resumes.
Nota : If you have selected a delayed start, you can
open the drum at any time before the wash pro-
gramme starts.
CANCELLING A PROGRAMME
Press and hold the "On/Off" button .
All the lights go out.
This operation may be made at any time, during the
cycle or when programming or even when paused.
Nota : In all cases, cancelling a programme means
that you have to re-programme everything from the
start again
(see paragraph 3.2)
.
2
2
1
12
END OF THE WASHING CYCLE
The display shows "Stop"
(Diagram 3.2.1)
and the
door lock indicator goes out.
You can programme a new cycle without having to
press the "On/Off" key .
This display is automatically switched off after a
maximum of 5 minutes in order to save energy in
standby mode.
Open the lid and remove the linen.
Some models automatically position the drum with
the opening at the top to make it easier to take the
linen out. This operation only lasts 3 minutes at
most.
Press and hold the "On/Off" button to switch off
the washing machine.
CHILD SAFETY
Activate "Child safety" to lock your programme by
pressing the first and second options buttons at the
same time. Once this safety device is active,
light , corresponding to the ( ) symbol
,comes on.
Simultaneously press the same buttons again to
switch off the "Child safety" function.
1
11
12
1
Information :
In the event of a power cut, the cycle will automati-
cally restart from the point where it stopped, as
soon as the power returns.

20
EN
1 -1 -
3 - PROGRAMMING
(continued)
SENSITIVE SKIN OPTION
Add an extra rinse. Ideal for people with delicate
skin.
EASY IRONING OPTION
Wash and spin dry speeds adapted to avoid crum-
pling of the linen.
DEGREE OF SOILING +/- OPTION
Use this button to shorten or lengthen the wash
cycle between two levels that can be chosen by
pressing the button successively.
— Level 1 is for dirty laundry and increases the length
of the cycle by 15% on average
(Diagram 3.2.2)
.
— Level 2 is for laundry that needs refreshing and
reduces the length of the cycle by 40% on average
(Diagram 3.2.3)
.
Important : For this programme, the doses of
detergent should be reduced by half.
DARK COLOURS OPTION
Enables your washing machine to take care of your
darks and prevent creases and traces of detergent.
FONCTION DRIP DRY ()
With very delicate laundry, this function empties the
washing machine without spin drying.
FONCTION FULL DRUM STOP ()
This function enables you to remove the washing
from your machine before the spin phase or to delay
this phase with you washing remaining in water to
prevent creasing.
When the machine has stopped with a full drum, the
”Rinse/Spin” programme indicator flashes, as well
as the " " icon, and the time remaining indicator
shows ”00:00”.
Then:
If you want to drain and spin, select a spin speed
suitable for the type of laundry using the selector.
Press the selector to confirm.
Or, if you want to drain only, use the selector to
choose the "drip dry" function (spin speed " "),
then press the selector to confirm.
The programme will stop automatically.
PROGRAMME COTTON Prewash
To remove earth, sand, blood... This sequence
includes a wash in clean water.
It is also necessary to put a detergent (wash-
ing powder only) in the prewash product
compartment
(Diagram 2.2)
.
DELICATES PROGRAMME
This programme is specially designed for an ultra
gentle wash (swing wash) that does not felt or pill
even your most delicate wools. It is advisable to turn
your woollen clothes inside out before washing
them.
PROGRAMME OPTIA 39 minutes
Programme at 40° lasting 39 minutes with a maxi-
mum of 3kg of cotton or mixed laundry that is
moderately dirty that produces a perfect result.
PROGRAMME FLASH 25 minutes
Program at 30° C for 25 minute washing cycle,
maximum of 2.5 kg of lightly soiled cotton or mixed
laundry.
Important : For this programme, the doses of
detergent should be reduced by half.
SPORT PROGRAMME
For technical textiles. Wash designed to preserve
the elastic fibres contained in sportswear and not
slacken them.
JEANS PROGRAMME
Programme especially designed to reduce creases
and fading. Additional rinsing to remove all traces of
detergent.
SHIRT PROGRAMME
This programme is specially designed to wash six
moderately soiled shirts that have been worn for
one day in less than 40 minutes. The spin speed is
adjusted to limit wrinkling.
PROGRAMME FOR BABY CLOTHES
The machine's mechanical effect is increased to
ensure that the baby clothes are spotless. In-depth
rinsing to better protect the baby's skin.
RINSE/SPIN PROGRAMME
When this programme is selected, the "Sensitive
skin" option is activated automatically. Deactivate
this option for spin drying only.

21
EN
1 -1 -
3 - PROGRAMMING
(continued)
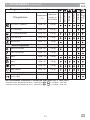
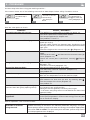
Programmes table
Programmes
Temperature
(°C)
Maximum
weight of
dry clothes
Sensitive skin
Easy ironing
Soiling +/-
Dark colours
Drip-dry
Full drum
stop
COTTON / TOWELS Cold - 90 6,0 kg
COTTON ECO Cold - 60 6,0 kg
COTTON PREWASH Cold - 40 6,0 kg
SYNTHETICS Cold - 60 2,5 kg
DELICATES Cold - 30 1,0 kg
Special programmes
OptiA 39 minutes Cold - 40 3,0 kg
Flash 25 minutes Cold - 40 2,5 kg
Sport Cold - 40 2,5 kg
Jeans Cold - 40 2,5 kg
Shirts Cold - 40 1,5 kg
Baby clothes Cold - 90 6,0 kg
Additional programmes
Rinse / Spin - -
TEST PROGRAMMES ACCORDING TO DELEGATED REGULATION (UE) N°1061/2010
- Standard cotton programme at 60°C : Cotton ECO - - no option - max spin.
60°c60°c
- Standard cotton programme at 40°C : Cotton ECO - - no option - max spin.
40°c40°c

22
EN
1 -1 -
3 - PROGRAMMING
(continued)
Opti 4
You washing machine can automatically optimise
the length of the wash cycle and the water and
energy consumption of every wash.
- Adjustment to the quantity of laundry:
Washing 1kg of laundry is not the same as washing
a full load, which is the reason why your washing
machine is equipped with sensors that detect the
quantity of laundry in the drum and automatically
calculate the right levels of water and energy requi-
red to produce a perfect wash.
- Adjustment to the hardness of the water:
The hardness of the water in your mains supply
affects the wash and rinse performances of your
appliance, which is the reason why your washing
machine automatically adapts the tumble time and
the number of rinses to produce a perfect result.
The water hardness is adjusted when you use your
washing machine for the first time (see special
insert).
- Adjustment to the degree of soiling:
The length and the intensity of the wash depend on
how dirty your laundry is, which is the reason why
your appliance can vary the length of the wash
cycle by up to 40% according to the selected set-
tings (see page 20).
- Adjustment to the type of textile:
Cotton shirts and cashmere pullovers do not
demand the same wash, which is the reason why
your washing machine adapts its tumble speed to
each type of textile.
For your information : The time shown on the wash-
ing machine when you select a programme corres-
ponds to the time for an average load. This time is
adjusted, once the appliance has taken its measu-
rements and then throughout the programme,
according to any unexpected events (too much
washing powder, an unbalanced load when spin-
ning, etc.).
Easy start
Your washing machine memorises your habits.
Every time a programme starts, the machine
records the options that you use most frequently,
and proposes these same options as soon as you
switch on the appliance.
4 - REGULAR CARE
puyll it towards you. Remove the siphon ,
sepa-
rate the drawer from the trim .
B
C
D
— Rinse everything under the tap.
— Refit all of the parts of the drawer, then fit it back
under the lid of the machine.
4.1 - AVOIDING BAD SMELLS
Respect the installation instructions for the drain
hose described in paragraph 1.3, leave the lid open
after the cycle has finished. Complete an empty
cycle with a washing agent at 60°C or 90°C once a
month.
4.2 - PRODUCT DRAWER
(Diagram 4.1)
— Release the drawer by pressing the Bumps ,
A
pushing a pen into the hole and push it to the
right.
B
4.3 - PUMP FILTER
(Diagram 4.2)
—
Release the part at the bottom of the drum by
A
—
Turn the drum towards the front.
—
Remove the pump filter , remove any objects
that may be inside and rinse everything under the
tap.
—
Refit both parts and .
C
C
A
—
Push the part to the left until it clicks into place.
4.4 - OUTSIDE PANELS
Do not use abrasive products or scourers. Use
liquid soap. Dry with a soft cloth.
A

23
EN
1 -
5 - PROBLEMS
Incidents may arise when using your washing machine :
If the screen shows one of the following errors and an alarm beeps, before calling Customer Service:
check whether:
the water tap is
open.
5.1
check whether:
- the lid is not clo-
sed correctly.
- the drump is
block
5.2
check whether:
The pump filter is
clogged ; clean the
filter
(paragraph 4.3).
5.3
Note on operation - this is not an incident :
The programme time
decreases or increases
during the wash
This is not a fault. The length of time displayed at the start of the programme is
updated according to the load in the machine (automatic weighing). This gua-
rantees perfect washing results and water and energy consumption appropriate
to the load. This is normal. The spin safety and anti-foam systems may extend
the initial programme time displayed.
Here are a few points to check :
Problems : Causes / Remedies :
The washing machine will not start : - The appliance is not plugged in or there is a power cut.
- You haven't pressed the "Start/Pause" button
.
- You have programmed a delayed start.
- See problems 5.1 and 5.2
The linen is not or not sufficiently spun : - You have selected a programme without spin drying or with
limited spin drying.
- The spin safety system has detected poor distribution of the
washing in the drum : unfold the linen and programme another
spin cycle.
- Check the height of the curved drain part
(Diagram 1.3)
.
H
A puddle of water forms on the floor : First remove the plug from the socket and turn off the water
supply.
- Check that the seals are fitted and the connectors are tigh-
tened
(Diagram 1.2)
.
- Check the curved part is positioned correctly
(Diagram
1.3)
.
H
G
Strong vibrations when spin drying : - The washing machine has not been released correctly
(Diagram 1.1.3)
.
- The floor is not level
(paragraph 1.4)
.
The machine does not drain : - You have programmed "Full drum stop".
- The drain hose is bent or squashed
(Diagram 1.3)
.
- See problem 5.3
The lid does not open : - The programme has not yet finished.
-Wait until the temperature inside the machine drops.
The drum is blocked : - If you have access, check that a small item of linen is not trap-
ped between the drum and the tank, by removing part
from the bottom of the drum
(Diagram 4.2)
.
- See problem 5.2
A
The drum doors open very slowly (on
machines fitted with gently opening doors) :
- Your machine has not operated for a long time.
- It is located in too cold a position.
- Detergent residue (powder) is blocking the hinges.
- in all cases, everything returns to normal after the doors have
opened initially.
The display is switched off at the end of the
programme:
- The display is automatically switched off 5 minutes after the
end of your programme in order to save energy. Press any but-
ton to restart the display.

24
EN
6 -
INFORMATION CONCERNING THE EU REGULATIONS 1015/2010
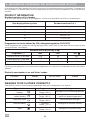
(*) Programme without options, max. spin.
For energy-saving purposes, the actual washing temperature can vary from the temperature of the selected pro-
gramme.
Off-mode :
0,49 W
'Left-on' mode :
0,49 W
In accordance with EU regulation 1015/2010, below you will find additional product information. The purpose of
this information is to provide details on the energy-saving directives to which all appliances sold in the EU must
conform.
PRODUCT INFORMATION
To find the spin-drying efficiency of your appliance, consult its energy label and refer to the table below :
Residual moisture of the laundry
72 ≤ D < 81
54 ≤ D < 63
D < 45
Residual moisture D in %
45 ≤ D < 54
Spin drying efficiency class
A (very efficient)
B
C
D
63 ≤ D < 72
E
These programmes are suitable for cleaning averagely soiled cotton cloth and are more efficient in terms of both
energy and water consumption.
Programmes for tests defined by (EU) delegated regulation 1061/2010
Electricity consumption in on and 'left-on' modes
WASHING YOUR CLOTHES CORRECTLY
Care labels on items of clothing specify appropriate detergents, temperatures and settings.
White cotton
laundry
Coloured linen or
cotton laundry
Type of cloth Programme Detergent
Detergent with a bleaching product
Detergent for coloured laundry
without a bleaching product
Colour/delicate detergent
Detergent for delicate laundry
Detergent for woollen items
Cotton
Temp.
≤
60°C
Synthetic items
Synthetic items
Temp.
≤
60°C
Delicate fabrics
Delicates
Temp.
≤
30°C
Wool
Delicates
Temp.
≤
30°C
Cotton
Temp.
≤
90°C
min
Maximum load of dry laundry (6 kg)
Programme (*)
Cotton ECO 60°C full load
Cotton ECO 60°C half load
Cotton ECO 40°C half load
kWh liters
0.79
0.50
0.44
205
123
49
32
32
120

25
EN
1 -
INTERVENTIONS / EXPORT CONSUMER RELATIONS
Any work on your appliance must be carried out by a qualified professional who is a dealer of the brand. When
you call, so that we can handle your case efficiently, make sure you have the full references of your appliance
(commercial reference, service reference, serial number). This information is on the ID plate
(Diagram 1.1.1)
.
Original parts:
When work is required, request exclusively original certified spare parts.
NOTES
For information:
or contact your seller directly.
DPN

50
1 -1
13mm
1
2
2
D
CLIC
12
12
90cm
maxi
65cm
mini
/
o 34mm
mini
E
F
1.1.1 1.1.2
1.1.3
1.1.4 1.2
1.3 1.4
A
B
C
C
D
G
H

51
1 -2
3
CLAC
2.1
A
30
70
100
ml
ml
ml
50
100
150
40
70
100
200
2.2
4
1
2
1
2
2
CLIC
1
A
B
C
4.2
1
1
2
A
B
C
D
4.1
Soiling
+ / -
3.2.23.2.1
Soiling
+ / -
3.2.3

TW2G01198-01 06/16
-
 1
1
-
 2
2
-
 3
3
-
 4
4
-
 5
5
-
 6
6
-
 7
7
-
 8
8
-
 9
9
-
 10
10
-
 11
11
-
 12
12
-
 13
13
-
 14
14
-
 15
15
-
 16
16


Brandt BT603ME Owner's manual
- Category
- Washing machines
- Type
- Owner's manual
Ask a question and I''ll find the answer in the document
Finding information in a document is now easier with AI
Related papers
-
Groupe Brandt WTC1051K Owner's manual
-
-
-
Groupe Brandt BT8600BE Owner's manual
-
Brandt BT650MA User manual
-
-
Groupe Brandt BT653MQE Owner's manual
-
-
-
Other documents
-
-
Whirlpool TDLR 6241BS FN/N Daily Reference Guide
-
Whirlpool TDLRB 6241BS EU/N Program Chart
-
Whirlpool TDLR 6230SS CS/N Daily Reference Guide
-
Whirlpool TDLR 6230SS EU/N Setup and user guide
-
-
-
Aeg-Electrolux L46010 User manual
-
-
Whirlpool PWTL1916/N Daily Reference Guide