Page is loading ...

SAUSAGE STUFFER
3 LB. CAPACITY TIN COATED 36-0003-W
5 LB. CAPACITY TIN COATED 36-5005-W
DUE TO CONSTANT FACTORY IMPROVEMENTS, THE PRODUCT PICTURED MIGHT DIFFER
SLIGHTLY FROM THE PRODUCT IN THIS BOX.

IMPORTANT SAFEGUARDS
COMPONENT LIST
CLEANING
ASSEMBLY INSTRUCTIONS
STUFFING INSTRUCTIONS
STUFFING TIPS
FOOD SAFETY
SAUSAGE INFORMATION
WARRANTY
SALVAGUARDIAS IMPORTANTES
LISTA DE COMPONENTES
INSTRUCCIONES DE LIMPIEZA
ENSAMBLADO
INSTRUCCIONES DE ENROLLADO
CONSEJOS DE RELLENADO
SEGURIDAD DE LOS ALIMENTOS
INFORMACIÓN DE LA SALCHICHA
INFORMACIÓN DE GARANTÍA WESTON
PRÉCAUTIONS IMPORTANTES
DESCRIPTION DE LA PIÈCE
INSTRUCTIONS DE NETTOYAGE
ASSEMBLAGE
INSTRUCTIONS POUR LA PRÉPARATION DE SAUCISSES
CONSEILS POUR FAIRE DES SAICISSES
SÉCURITÉ ALIMENTAIRE
INFORMATIONS SUR LES SAUCISSES
INFORMATION SUR LA GARANTIE
3
4
5
6
7
7
8
9
10
12
13
14
15
16
16
17
18
20
22
23
24
25
26
26
27
28
29
TABLE OF CONTENTS / ÍNDICE / TABLE DES MATIÈRES
2

3
ENGLISH INSTRUCTIONS
1. Read all instructions.
2. KEEP FINGERS AND HANDS CLEAR of the Main Body and Plunger at all
times. Failure to keep ngers and hands out of the Main Body may result in
personal injury.
3. THOROUGHLY CLEAN ALL PARTS THAT WILL COME IN CONTACT WITH
FOOD BEFORE AND AFTER EACH USE. Wash with warm soapy water. Rinse
with clear water. Dry immediately. This appliance is not dishwasher safe. To
prevent rusting, it is highly suggested to spray the Stuffer and all of its parts with a
food grade silicone spray.
4. The Sausage Stuffer is not intended for use near or by young children.
THIS STUFFER IS NOT A TOY. DO NOT leave the unit unattended. Close
supervision is necessary when used near children. This stuffer is not to be used
near children.
5. Check for damaged parts. Before using the Sausage Stuffer, check that all
parts operate properly and perform the intended function. Replace any damaged
part before using the unit.
6. Secure the Sausage Stuffer on a sturdy, non-skid, level surface.
7. This appliance is for household use only.
8. NEVER use any accessories or parts from other manufacturers. Doing so will
void the warranty.
9. DO NOT use the Stuffer under the inuence of drugs or alcohol.
10. The Manufacturer declines any responsibility in the case of improper use of
this appliance.
SAVE THESE INSTRUCTIONS
IMPORTANT SAFEGUARDS
READ AND FULLY UNDERSTAND ALL INSTRUCTIONS AND WARNINGS
PRIOR TO USING THIS UNIT. YOUR SAFETY IS MOST IMPORTANT!
FAILURE TO COMPLY WITH PROCEDURES AND SAFEGUARDS MAY
RESULT IN SERIOUS INJURY OR PROPERTY DAMAGE. REMEMBER:
YOUR PERSONAL SAFETY IS YOUR RESPONSIBILITY!

ENGLISH INSTRUCTIONS
4
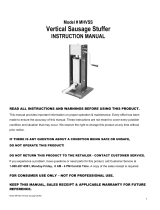
COMPONENT LIST
DIAGRAM
NUMBER
PART DESCRIPTION 3 LB. TIN
(36-0003-W)
5 LB. TIN
(36-5005-W)
1 MAIN BODY N/A N/A
2 STUFFER HANDLE 36-0032 36-5011
3 FOOD PUSHER 36-0033 36-5012
4 PLUNGER BACKING 36-0034 36-5013
5 PLUNGER BACKING SCREW 36-0035 36-5014
6 BOLT KIT 36-0036 36-5015
7 STAINLESS STEEL 30MM FUNNEL 36-0037 36-0037
8 STAINLESS STEEL 20MM FUNNEL 36-0038 36-0038
9 STAINLESS STEEL 10MM FUNNEL 36-0039 36-0039
10 RING NUT 36-0040 36-5019
11 PLUNGER RUBBER SEAL 36-0041 36-5020
12 RING NUT GASKET 36-0042 36-5021
1
6
2
3
11
4
5
5 lb Stuffer
Handle shown
9
8
7
12
10
If any components of this unit are broken, the unit does not operate properly or you
need a replacement instruction manual, visit us on the web at
WestonSupply.com
Or call Weston Brands, LLC Toll Free at 1-800-814-4895
Monday thru Friday 8:00am-5:00pm ET. Outside the U.S. call 001-216-901-6801

5
ENGLISH INSTRUCTIONS
CLEANING
• Before using the Sausage Stuffer for the rst time, thoroughly wash all
parts of the unit that will come in contact with food. Wash with warm, soapy
water. Rinse with clear water. Dry immediately. THIS APPLIANCE IS NOT
DISHWASHER SAFE.
• After each use, thoroughly wash all parts in warm, soapy water. Rinse with
clear water. Dry immediately. THIS APPLIANCE IS NOT DISHWASHER
SAFE.
• When storing the Sausage Stuffer for extended periods of time and between
uses, it is recommended to coat all surfaces with food grade silicone spray.
This will protect and prolong the life of the Sausage Stuffer.
A protective coating is applied to this unit prior to shipment. This coating
protects the unit in shipment and during its shelf life.
It is very important to thoroughly clean the unit before using it, especially
around the edges or areas that have been soldered or welded. Completely
disassemble and thoroughly clean all parts with hot water, dish detergent
and a soft cloth. Rinse with clean water and dry thoroughly. DO NOT use any
harsh or abrasive brushes, chemicals or detergents. Avoid using detergents or
cleansers containing high percentages of free alkali or acid.
DO NOT clean any parts of this unit in a dishwasher.
Coat all metal parts with a food-safe silicone spray after cleaning and before
storing.
Be certain to store the unit in the original box in a cool, dry location.
Run a small “Test Batch” through the unit before initial use.
IMPORTANT NOTES BEFORE USE

ASSEMBLY
1. Mount/secure the Main Body onto a
sturdy, non-skid, level, working surface.
2. Bolt the Stuffer Handle to the Main
Body using a Nut and a Bolt from the Bolt
Kit. FIGURE A
3. Attach the Plunger Rubber Seal and
Plunger Backing to the Food Pusher,
using the Plunger Backing Thumb Screw.
FIGURE B
4. Bolt the Food Pusher to the center hole
on the Stuffer Handle, using a Nut and Bolt
from the Bolt Kit. FIGURE C
5. To attach a Funnel, select the
appropriate sized Funnel for the casing
that will be used. Slide the narrow end of
the Funnel through the Ring Nut Gasket
and the Ring Nut. FIGURE D-1
6. Screw the complete assembly onto the
Main Body until tight, locking the Ring Nut
into place. FIGURE D-2
7. The Sausage Stuffer is now ready for
use.
FIGURE A
FIGURE B
FIGURE C
FIGURE D-1
FIGURE D-2
ENGLISH INSTRUCTIONS
6

STUFFING INSTRUCTIONS
Before using the Sausage Stuffer for the rst time, thoroughly wash all
parts of the unit that will come in contact with food. Wash with warm, soapy
water. Rinse with clear water. Dry immediately. THIS APPLIANCE IS NOT
DISHWASHER SAFE.
1. Select the Funnel of choice. Refer to the “Assembly” section of manual for
proper Funnel installation instructions.
2. Fill the Main Body with the meat and seasoning mixture.
3. Press the meat mixture into the Main Body rmly to release any trapped air.
4. Place the Plunger into the Main Body.
5. Slip the casing on the end of the Funnel until the entire casing has slid onto
the Funnel.
6. Firmly press on the Stuffer Handle to start the meat owing into the casing.
7. When the casing is full, twist, tie or hog ring the casing to seal the contents
inside.
8. When nished, disassemble and clean immediately. Refer to the “Cleaning”
section of manual.
STUFFING TIPS
To help reduce resistance when using the 10mm Funnel for stufng, try one of
the following:
1. Pour water into the casing.
• Pour cold water into the inside of the casing as you thread it over the
funnel
2. ADD WATER TO YOUR MEAT MIXTURE - Add up to 1½ cups of cold
water per 5 lbs. ( 2.3 kg) of meat/seasoning mixture.
3. ADD OIL - Add vegetable or olive oil to the meat mixture.
ENGLISH INSTRUCTIONS
7
It is important to follow the food safety guidelines outlined in
this manual. For the most up-to-date instruction, visit the USDA
website at http://www.usda.gov/.
w CAUTION
Moving Parts. Keep fingers and hands clear of the Main Body
and Plunger at all times. Failure to keep fingers and hands out
of the Main Body may result in personal injury.
w CAUTION

ENGLISH INSTRUCTIONS
8
There are basic rules to follow when handling food.
They are COOK, SEPARATE, CLEAN, and CHILL.
COOK
It’s crucial to cook food to a safe internal temperature to destroy bacteria that is present.
The safety of hamburgers and other foods made with ground meat has been receiving a lot
of attention lately, and with good reason. When meat is ground, the bacteria present on the
surface is mixed throughout the ground mixture. If this ground meat is not cooked to at least
160
o
F to 165
o
F (71
o
C to 74
o
C), bacteria will not be destroyed and there’s a good chance you
will get sick.
Solid pieces of meat like steaks and chops don’t have dangerous bacteria like E. coli on the
inside, so they can be served more rare. Still, any beef cut should be cooked to an internal
temperature of at least 145
o
F (63
o
C) (medium rare). The safe temperature for poultry is 165
o
F
(74
o
C) and solid cuts of pork should be cooked to 145
o
F (63
o
C).
SEPARATE
Foods that will be eaten uncooked and foods that will be cooked before eating MUST
ALWAYS be separated. Cross-contamination occurs when raw meats or eggs come in
contact with foods that will be eaten uncooked. This is a major source of food poisoning.
Always double-wrap raw meats and place them on the lowest shelf in the refrigerator so
there is no way juices can drip onto fresh produce. Then use the raw meats within 1-2 days
of purchase, or freeze for longer storage. Defrost frozen meats in the refrigerator, not on the
counter.
When grilling or cooking raw meats or sh, make sure to place the cooked meat on a clean
platter. Don’t use the same platter you used to carry the food out to the grill. Wash the utensils
used in grilling after the food is turned for the last time on the grill, as well as spatulas and
spoons used for stir-frying or turning meat as it cooks.
Make sure to wash your hands after handling raw meats or raw eggs. Washing hands with
soap and water, or using a pre-moistened antibacterial towelette is absolutely necessary after
you have touched raw meat or raw eggs. Not washing hands and surfaces while cooking is a
major cause of cross-contamination.
CLEAN
Wash your hands and work surfaces frequently when you are cooking. Washing with soap
and warm water for at least 15 seconds, then dry with a paper towel.
CHILL
Chilling food is very important. The danger zone where bacteria multiply is between 40
o
F and
140
o
F (4
o
C and 60
o
C). Your refrigerator should be set to 40
o
F (4
o
C) or below; your freezer should
be 0
o
F (-18
o
C) or below. Simple rule: serve hot foods hot, cold foods cold. Use chang dishes
or hot plates to keep food hot while serving. Use ice water baths to keep cold foods cold. Never
let any food sit at room temperature for more than 2 hours - 1 hour if the ambient temperature
is 90
o
F (32
o
C) or above. When packing for a picnic, make sure the foods are already chilled
when they go into the insulated hamper. The hamper won’t chill food - it just keeps food cold
when properly packed with ice. Hot cooked foods should be placed in shallow containers and
immediately refrigerated so they cool rapidly. Make sure to cover foods after they are cool.
NOTE: Special considerations must be made when using venison or other wild game, since it
can become heavily contaminated during eld dressing. Venison is often held at temperatures
that could potentially allow bacteria to grow, such as when it is being transported. Refer to
the USDA Meat and Poultry Department for further questions or information on meat and
food safety.
FOOD SAFETY

ENGLISH INSTRUCTIONS
9
SAUSAGE INFORMATION
MEAT SELECTION FOR SAUSAGE MAKING
Sausage making has evolved over many years and generations, and as a result there are countless
types of sausage you can make using the basic ingredients of meat, fat and a few carefully blended
spices. Following are a few simple guidelines that will help you make the best tasting sausage
possible.
Any type of meat can be used for making sausage: pork, beef, bison, moose and caribou, even
antelope make great sausage. It is important when preparing venison or other red game meats to trim
all the fat from the meat, as red game tallow will turn rancid in as few as ve days. Replace the fat with
either pork or beef fat, depending on the type of product you are making, at a ratio of 1 pound (0.5 kg)
of fat for every 4 pounds (1.8 kg) of game meat.
The fat content of your sausage will affect the taste, texture, cooking characteristics and shelf life of
your product. Most commercially made sausage has a fat content of about 20%. Using less than 12%
fat will result in a very dry tasting sausage, while using more than 20% may result in a sticky avorless
sausage that will be difcult to cook.
CURING
It is important to properly cure meats to preserve meat and poultry, and to destroy undesirable
microorganisms on the meat surfaces that cause spoilage and foodbourne illnesses. There are many
steps that help in this process, including smoking, cooking, drying, chilling and the addition of cure
ingredients. The oldest means of accomplishing this is by introducing salt into the meat. The resistance
of bacteria to salt varies widely among different types of bacteria. The growth of some bacteria is
inhibited by salt concentrations as low as 3%, e.g., Salmonella, whereas other types are able to survive
in much higher salt concentrations, e.g., Staphylococcus. Fortunately, the growth of many undesirable
organisms normally found in cured meat and poultry products is inhibited at low concentrations of salt.
Modern curing is based on Nitrates and is very scientic. Purchase Weston Pink Curing Salt
(02-0000-W) and follow the included instructions to ensure that you are properly curing your
homemade sausage.
CASING
Weston offers a complete variety of casings. The right choice depends on personal preference as well
as the type of sausage you wish to make. For most sausages, your choices are natural or collagen.
Don’t let the names fool you; collagen casings are not a synthetic. They are made from beef skin and
other tissues. Collagen casings are uniform in size and texture and require almost no preparation.
“Natural” casings are the intestines of lamb, sheep, hogs or beef. They are less uniform in size and
require preparation. There are also brous non-edible casings that are most commonly used for
summer sausage and ring bologna
TYPES OF SAUSAGE
Most sausages fall into one of four categories: Fresh, Smoked, Cooked or Dried. All sausages, except
dried, require refrigerated storage. There is also a sub-category of uncooked smoked sausages.
Among the fresh and uncooked smoked sausages, you will nd such avors as kielbasa or Polish
sausage, Italian sausage, breakfast sausage and many others. Both fresh and uncooked smoked
sausages require cooking before eating and also require refrigerated storage.
Smoked and cooked sausages include salami, bologna, the ever-popular hot dogs and many others.
Proper smoking requires a smokehouse or smoker. Weston offers Outdoor Propane Smokers in a
variety of sizes (41-0701-W, 41-0301-W, or 41-0401-W). Most smoked sausages are warmed before
serving. Many people think that a smoked sausage will last much longer without spoilage, but this is
not true. Smoked sausages should be treated the same as fresh sausage in terms of storage.
Dried sausages require the longest processing time, as they are air dried over a long period of time.
Dry cured sausages include salami, chorizo, pepperoni, among others. The conditions under which the
meat is dried are very exacting; temperature, time and humidity must all be carefully monitored for a
safe and delicious product.
STORAGE
For the best avors, we recommend vacuum sealing your fresh sausages, then storing them in the
refrigerator (short term) or freezer (long term). Weston manufactures a variety of vacuum sealers. Ask
the retailer from which you purchased this unit for their selection. Store dry cured products in paper or
other breathable wrapping, unrefrigerated.

This warranty applies to products purchased and used in the U.S. and Canada, which have been properly
registered within 30 days of the date of original purchase. This is the only express warranty for this
product and is in lieu of any other warranty or condition. This product is warranted to be free from defects
in material and workmanship for a period of one (1) year from the date of original purchase. During this
period, your exclusive remedy is repair or replacement of this product or any component found to be
defective, at our option.
To register your product: complete the online form at www.WestonSupply.com/Warranty.
This warranty does not cover unregistered products, unauthorized repairs or service to products, products
sold “as-is” by retailers, glass, lters, wear from normal use, use not in conformity with the printed
directions, or damage to the product resulting from accident, alteration, abuse, or misuse. This warranty
extends only to the original consumer purchaser or gift recipient and is not transferrable. Keep the original
sales receipt, as proof of purchase is required to make a warranty claim. This warranty is void if the
product is subjected to any voltage and waveform other than as specied on the rating label (e.g., 120V ~
60 Hz).
We exclude all claims for special, incidental and consequential damages caused by breach of express
or implied warranty. All liability is limited to the amount of the purchase price. Every implied warranty,
including any statutory warranty or condition of merchantability or tness for a particular purpose, is
disclaimed except to the extent prohibited by law, in which case such warranty or condition is limited to the
duration of this written warranty. This warranty gives you specic legal rights. You may have other legal
rights that vary depending on where you live. Some states or provinces do not allow limitations on implied
warranties or special, incidental, or consequential damages, so the foregoing limitations may not apply to
you.
Before returning the product for any repair or service: it must be clean and free from any food particles or
other debris; otherwise, we will return it or impose a $50 cleaning surcharge, at our option.
To make a warranty claim: go to www.WestonSupply.com/Contact; or call 1.800.814.4895 in the U.S. and
001-216-901-6801 outside the U.S., Monday – Friday, 8 am – 5 pm Eastern. You are responsible for all
costs associated with shipping us the product freight prepaid. If the product qualies for a warranty repair
or replacement, we will bear the cost of returning it to you. We are not responsible for shipping damage.
For non-warranty work: call 1.800.814.4895 in the U.S. and 001-216-901-6801 outside the U.S., Monday
– Friday, 8 am – 5 pm Eastern, to obtain a Return Merchandise Authorization Number (RMA Number).
We will refuse all returns without an RMA Number. We charge US$35/hour for all diagnostic, service,
repair and processing work. We will not start any service or repair work without prior authorization. You
are responsible for all costs associated with shipping us the product freight prepaid and our returning it to
you.
ONE-YEAR LIMITED WESTON WARRANTY
10

RELLENADOR
DE SALCHICHAS
CAPACIDAD DE 1.4 KG 36-0003-W
CAPACIDAD DE 2.3 KG 36-5005-W
DEBIDO A CONSTANTES MEJORAS EN LA FÁBRICA, EL PRODUCTO QUE SE MUESTRA PUEDE
SER LIGERAMENTE DIFERENTE DEL PRODUCTO EN ESTA CAJA.

12
INSTRUCCIONES EN ESPAÑOL
1. Lea todas las instrucciones.
2.
MANTENGA LOS DEDOS Y LAS
MANOS ALEJADAS del cuerpo principal y
del émbolo en todo momento. Si no mantiene manos y dedos lejos del cuerpo
principal pueden producirse lesiones.
3.
LIMPIE CUIDADOSAMENTE TODAS LAS PIEZAS QUE ENTREN EN
CONTACTO CON ALIMENTOS ANTES Y DESPUÉS DE CADA USO. Lave con
agua tibia y jabón. Enjuague con agua limpia. Seque de inmediato. Este aparato
no es apto para el lavavajillas. Para evitar la oxidación, es muy recomendable
rociar el rellenador y todas sus piezas con un aerosol de silicona para cocina.
4.
El rellenador de salchichas no está diseñado para usarse por niños pequeños
ni cerca de ellos. NO deje el aparato sin supervisión. ESTO NO ES UN JUGUETE
EMBUTIDORA. NO deje la unidad desatendida. Se requiere supervisión cuando la
agricultura cerca de los niños. Este relleno no debe ser agrícola cerca de los niños.
5. Revise si tiene partes dañadas. Antes de usar el rellenador de revise que
todas las partes funcionen debidamente y realice la función deseada. Reemplace
cualquier parte dañada antes de utilizar la unidad.
6. Fije el rellenador de salchichas a una supercie antideslizante, nivelada y
sólida.
7. Este aparato es sólo para uso doméstico.
8. NUNCA use accesorios o partes de otros fabricantes. Hacerlo anula la
garantía.
9. NO USE el rellenador bajo los efectos de drogas o alcohol.
10. El fabricante rechaza cualquier responsabilidad en caso de usos indebidos
del aparato.
¡GUARDE ESTAS INSTRUCCIONES!
SALVAGUARDIAS IMPORTANTES
LEA Y ENTIENDA COMPLETAMENTE TODAS LAS INSTRUCCIONES Y
ADVERTENCIAS ANTES DE UTILIZAR ESTA UNIDAD. ¡SU SEGURIDAD
ES LO MÁS IMPORTANTE! NO SEGUIR LOS PROCEDIMIENTOS
Y PRECAUCIONES PUEDE PROVOCAR LESIONES GRAVES Y
DAÑOS MATERIALES. RECUERDE: ¡SU SEGURIDAD PERSONAL ES
RESPONSABILIDAD DE USTED!

13
INSTRUCCIONES EN ESPAÑOL
LISTA DE COMPONENTES
NÚMERO DE
DIAGRAMA
DESCRIPCIÓN DE LA PIEZA
3 LB. TIN
(36-0003-W)
5 LB. TIN
(36-5005-W)
1 CUERPO PRINCIPAL N/A N/A
2 MANGO DEL RELLENADOR 36-0032 36-5011
3 PISÓN DEL ALIMENTO 36-0033 36-5012
4 ÉMBOLO DEL RESPALDO 36-0034 36-5013
5 TORNILLO DEL ÉMBOLO DEL RESPALDO 36-0035 36-5014
6 JUEGO DE PERNO 36-0036 36-5015
7 EMBUDO DE ACERO INOXIDABLE DE 30MM 36-0037 36-0037
8 EMBUDO DE ACERO INOXIDABLE DE 20 MM 36-0038 36-0038
9 EMBUDO DE ACERO INOXIDABLE DE 10 MM 36-0039 36-0039
10 TUERCA DE ARO 36-0040 36-5019
11 SELLO DEL ÉMBOLO 36-0041 36-5020
12 JUNTA DE LA TUERCA DE ARO 36-0042 36-5021
Si cualquier componente de esta unidad está roto, si no funciona debidamente, o si necesita un
instructivo de repuesto, visítenos en la Web en
WestonSupply.com
O llame a Weston Brands, LLC larga distancia sin costo 1-800-814-4895
De lunes a viernes, de 8:00 am a 5:00 pm tiempo del ET. Fuera de Estados Unidos llame
al 001-216-901-6801
1
6
2
3
11
4
5
9
8
7
12
10
Rellenador de stuffer
capacidad de 2.3 kg
mango dl rellenador se
muestra

LIMPIEZA
• Antes de utilizar el rellenador de salchichas por primera vez, lave todas las
partes del aparato que vayan a entrar en contacto con alimentos. Lave con
agua tibia y jabón. Enjuague con agua limpia. Seque de inmediato. ESTE
APARATO NO ES APTO PARA EL LAVAVAJILLAS.
• Después de cada uso, lave cuidadosamente todas las piezas con agua tibia
y jabón. Enjuague con agua limpia. Seque de inmediato. ESTE APARATO
NO ES APTO PARA EL LAVAVAJILLAS.
• Cuando guarde el rellenador de salchichas durante largos períodos de
tiempo y entre los usos, es recomendable que recubra todas las supercies
con un aerosol de silicona para cocina. Esto protegerá y prolongará la vida
del rellenador de salchichas.protect and prolong the life of the Sausage
Stuffer.
Antes de su envío se aplica una capa protectora a este aparato. Este
recubrimiento protege el aparato durante el transporte y durante su vida útil.
Es muy importante limpiar a fondo el aparato antes de usarlo, especialmente
alrededor de los bordes o en las áreas que han sido soldadas. Desensamble
completamente y limpie a fondo todas las piezas con agua caliente,
detergente para trastos y un paño suave. Enjuague con agua clara y
seque bien. NO utilice cepillos, productos químicos o detergentes ásperos
o abrasivos. (Evite el uso de detergentes o productos de limpieza que
contengan altos porcentajes de álcalis o ácidos libres).
NO limpie ninguna pieza de esta unidad en un lavavajillas.
Cubra todas las partes metálicas con un aerosol de silicona para cocina
después de limpiarlo y antes de guardarlo.
Asegúrese de almacenar la unidad en su caja original en un lugar fresco y
seco.
Haga un ensayo con un pequeño “Lote de prueba” a través de la unidad antes
de su uso inicial.
NOTA IMPORTANTE ANTES DE USAR
14
INSTRUCCIONES EN ESPAÑOL

LIMPIEZA
NOTA IMPORTANTE ANTES DE USAR
15
INSTRUCCIONES EN ESPAÑOL
ENSAMBLADO
1. Monte/je el cuerpo principal en
una supercie de trabajo robusta,
antideslizante y nivelada.
2. Atornille el mango del rellenador al
cuerpo principal usando una tuerca y un
perno del Juego de pernos. FIGURA A
3. Coloque el sello del émbolo y
el émbolo del respaldo en el pisón
del alimento utilizando el tornillo de
mariposa del émbolo de respaldo.
FIGURA B
4. Atornille el pisón del alimento en el
oricio central del mango del rellenador,
utilizando una tuerca y un tornillo del Juego
de pernos. FIGURA C
5. Para colocar un embudo, seleccione
el tamaño apropiado de embudo para
el forro que vaya a utilizar. Deslice el
extremo estrecho del embudo a través
de la junta de la tuerca de aro y de la
tuerca de aro. FIGURA D-1
6. Atornille el conjunto completo sobre
el cuerpo principal hasta que la tuerca
de aro quede acoplada rmemente en
su lugar. FIGURA D-2
7. El rellenador de salchichas está listo
ya para su uso.
FIGURE A
FIGURE B
FIGURE C
FIGURE D-1
FIGURE D-2

INSTRUCCIONES DE RELLENADO
Antes de utilizar el rellenador de salchichas por primera vez, lave todas
las partes del aparato que vayan a entrar en contacto con alimentos.
Lave con agua tibia y jabón. Enjuague con agua limpia. Seque de
inmediato. ESTE APARATO NO ES APTO PARA EL LAVAVAJILLAS.
1. Seleccione el Embudo preferido. Consulte la sección “Ensamblaje”
del manual para obtener instrucciones adecuadas de instalación del
embudo.
2. Llene el cuerpo principal con la carne y la mezcla de condimentos.
3. Presione rmemente la mezcla de carne hacia abajo en el cuerpo
principal para expulsar el aire que estuviera atrapado.
4. Coloque el émbolo en el cuerpo principal.
5. Deslice el forro en el extremo del embudo hasta que se haya
deslizado completamente en el embudo.
6. Presione rmemente el mango del rellenador para que la carne
empiece a uir dentro del forro.
7. Cuando el forro esté lleno, ate, tuerza o ponga un aro en el extremo
para sellar el contenido.
8. Cuando haya terminado, desarme y limpie inmediatamente. Consulte
la sección “Limpieza” del manual.
CONSEJOS DE RELLENADO
Para ayudar a reducir la resistencia Cuando se usa el embudo de 10 mm
para relleno, pruebe uno de los siguientes:
1. Agua en la carcasa.
• Para agua fría en el interior de la carcasa como hilo por encima de
la embudo
2. AÑADIR A SU AGUA 2 CARNE MEZCLA - Agregue hasta 1 ½ tazas
de frío agua por 5 libras. (2.3 kg) de la mezcla de carne / condimento.
3. AGREGAR ACEITE - Añadir aceite vegetal o de oliva a la mezcla
de carne.
16
INSTRUCCIONES EN ESPAÑOL
Es importante seguir las pautas de seguridad alimentaria
descritas en este manual. Para obtener la instrucción
más actualizada, visite el sitio web del USDA en
http://www.usda.gov/.
w PRECAUCIÓN
Partes que se mueven. Mantenga los dedos y las
manos alejadas del cuerpo principal y del émbolo en
todo momento. Si no mantiene manos y dedos lejos del
cuerpo principal pueden producirse lesiones
w PRECAUCIÓN

INSTRUCCIONES DE RELLENADO
CONSEJOS DE RELLENADO
17
INSTRUCCIONES EN ESPAÑOL
Hay que seguir ciertas reglas básicas al manejar alimentos.
Las reglas son COCINAR, SEPARAR, LIMPIAR y ENFRIAR.
COCINAR
Es muy importante cocinar los alimentos a una temperatura interna que destruya cualquier
bacteria que esté presente. Últimamente se ha puesto mucha atención en la higiene de
las hamburguesas y otros alimentos elaborados con carne molida y con razón. Cuando se
muele la carne, las bacterias presentes en la supercie se revuelven en toda la mezcla de la
carne molida. Si la carne molida no se cuece a por lo menos 71°C a 74°C (160°F - 165°F),
no se destruyen las bacterias y hay una buena posibilidad de enfermarse.
Las piezas de carne sólida, como los letes y las chuletas, no tienen en su interior bacterias
peligrosas como le E. coli, por lo que pueden servirse menos cocidas. Aun así, cualquier
corte de vacuno debe cocinarse a una temperatura interna de por lo menos 63°C (145°F)
(medio cocido). La temperatura recomendable para las aves es de 74°C (165°F) y los cortes
sólidos de carne de puerco deben cocinarse a 71°C (160°F).
SEPARAR
SIEMPRE DEBE separar los alimentos que se comen crudos y los que se vayan a cocer
antes de comerse. La contaminación cruzada se presenta cuando la carne o los huevos
crudos entran en contacto con alimentos que se van a consumir sin cocimiento. Ésta es una
importante causa de intoxicaciones. Siempre use una doble envoltura para la carne cruda
y colóquela en la repisa más baja del refrigerador, para que no haya manera de que su
jugo gotee en las verduras frescas. Use la carne cruda 1 o 2 días después de comprarla, o
congélela para guardarla más tiempo. Descongele la carne congelada en el refrigerador, no
en el mesón de la cocina.
Cuando ase o cocine carne o pescado crudo, coloque la carne ya cocida en un platón
limpio. No use el mismo platón que usó para llevar la carne al asador. Lave los utensilios
usados en el asador después de haber volteado los alimentos por última vez, así como las
cucharas y espátulas usadas para freír o para voltear la carne al estarla cocinando.
No olvide lavarse las manos después de manejar carne o huevos crudos. Es absolutamente
necesario lavarse las manos con agua y jabón o usar una toallita húmeda antibacteriana
después de tocar carne o huevos crudos. No lavarse las manos o las supercies cuando se
cocina es una causa importante de contaminación cruzada.
LIMPIAR
Lávese las manos y las supercies de trabajo con frecuencia mientras esté cocinando.
Lávese con agua tibia y jabón durante por lo menos 15 segundos; después séquese con
una toalla de papel.
ENFRIAR
Es muy importante enfriar los alimentos. La zona de peligro para la multiplicación de
bacterias está entre los 4 °C y 60 °C (40 °F - 140 °F). El refrigerador debe estar a 4 °C (40
°F) o menos; el congelador debe estar a -18 °C (0 °F) o menos. Regla básica: sirva calientes
los alimentos calientes y sirva fríos los alimentos fríos. Use platos calientes para mantener
caliente la comida a la hora de servirla. Use baños de agua con hielo para mantener fría
la comida fría. Nunca deje ningún alimento a temperatura ambiente por más de 2 horas;
o por más de 1 hora si la temperatura ambiente es de 32 °C (90 °F) o superior. Cuando
empaque para un picnic, asegúrese de que la comida ya esté fría cuando la meta en la
canasta aislada. La canasta no enfría la comida; sólo la mantiene fría si está debidamente
empacada con hielo. Los alimentos cocidos calientes deben colocarse en recipientes bajos
y refrigerarse de inmediato para que se enfríen rápidamente. No olvide cubrir los alimentos
una vez que se enfríen..
NOTA: Debe tener especial consideración al usar venado y otra carne de caza, ya que
puede contaminarse durante la preparación de campo. El venado suele mantenerse a
temperaturas que podrían permitir el crecimiento de bacterias, como cuando se transporta.
Consulte con el Departamento de Carnes y Aves de la USDA si tiene más preguntas o
quiere más información sobre higiene de carne y alimentos.
SEGURIDAD DE LOS ALIMENTOS

18
INSTRUCCIONES EN ESPAÑOL
INFORMACIÓN DE LA SALCHICHA
SELECCIÓN DE CARNE PARA HACER SALCHICHAS
La elaboración de salchichas ha evolucionado a lo largo de muchos años y generaciones, y como resultado,
hay un sinnúmero de tipos de salchichas que puede hacer usando los ingredientes básicos como carne,
grasa y algunas especias cuidadosamente combinadas. A continuación se presentan algunos lineamientos
sencillos que le ayudarán a elaborar salchichas con el mejor sabor posible.
Se puede utilizar cualquier tipo de carne para elaborar embutidos: carne de cerdo, de res, de bisontes, de
alces y de caribúes, incluso con la de antílope se hacen excelentes salchichas. En la preparación de la carne
de venado o de otras carnes rojas de caza es importante quitar toda la grasa de la carne, ya que el sebo de
la carne roja de caza se vuelve rancio en tan sólo cinco días. Reemplace la grasa, con grasa de cerdo o de
vaca, dependiendo del tipo de producto que esté elaborando, en una proporción de 0.5 kg (1 lb) de grasa por
cada 1.8 kg (4 lb) de carne de caza.
El contenido de grasa de la salchicha afectará el sabor, la textura, las características de cocción y la vida
útil de su producto. La mayoría de las salchichas comerciales tienen un contenido de grasa de alrededor del
20%. El uso de menos de 12% de grasa dará lugar a una salchicha muy seca a la degustación, mientras que
con más del 20% puede dar como resultado una salchicha sin sabor y pegajosa que será difícil de cocinar.
CURADO
Es importante curar adecuadamente las carnes para conservarlas, y destruir los microorganismos
indeseables en las supercies de la carne que causan su descomposición así como enfermedades derivadas
de ésta. Hay muchas medidas que son de ayuda en este proceso, como el ahumado, la cocción, el secado,
la refrigeración, y la adición de ingredientes para curado. Los medios más antiguos para lograr esto eran
mediante la introducción de la sal en la carne. La resistencia de las bacterias a la sal varía ampliamente entre
los diferentes tipos de bacterias. El crecimiento de algunas bacterias se inhibe por concentraciones de sal
tan bajas como el 3% en por ejemplo la Salmonela, mientras que otros tipos son capaces de sobrevivir en
concentraciones mucho más altas de sal, por ejemplo el estalococo. Afortunadamente, el crecimiento de
muchos organismos no deseados que normalmente se encuentran en los productos de carne y de aves de
corral curadas se inhibe a concentraciones bajas de sal. El curado moderno se basa en nitratos y es muy
cientíco. Adquiera Sal rosa para curar Weston (02-0000-W) y siga las instrucciones para asegurar que está
curando adecuadamente su salchicha casera.
FORRO
Weston ofrece una variedad completa de envoltorios. La elección correcta depende de su la preferencia
personal, así como del tipo de salchicha que desea elaborar. Para la mayoría de las salchichas, sus opciones
son naturales o de colágeno. No deje que los nombres le engañen; los forros de colágeno no son un producto
sintético. Están hechos de piel de res y otros tejidos. Los forros de colágeno son uniformes en tamaño y
textura y casi no requieren preparación. Los forros “naturales” son los intestinos de cordero, de ovejas, de
cerdos o de res. Son menos uniformes en tamaño y requieren una preparación. También hay forros brosos
no comestibles que se utilizan para algunas variedades de salchichas y mortadelas ahumadas. También hay
envoltorios brosos no comestibles que son usados más comúnmente para salchichón y bolonia
TIPOS DE SALCHICHAS
La mayoría de las salchichas caen dentro de una de cuatro categorías: Frescas, ahumadas, cocidas o secas.
Todas las salchichas, excepto las secas, requieren ser refrigeradas para su almacenamiento. También hay
una subcategoría de salchichas ahumadas crudas.
Entre las salchichas ahumadas frescas y las crudas, encontrará sabores como kielbasa o salchicha polaca,
salchicha italiana, salchichas para desayuno y muchos otros. Las salchichas ahumadas frescas y crudas
requieren cocción antes de comerse y también requieren de almacenamiento refrigerado.
Las salchichas ahumadas y las cocidas incluyen al salami, a la mortadela, a los siempre populares perros
calientes y a muchas otras. El ahumado adecuado requiere un ahumadero o un ahumador. Weston ofrece
ahumadores de propano para estar al aire libre en varios tamaños (41-0701-W, 41-0301-W, o 41-0401-W).
La mayoría de las salchichas ahumadas se calientan antes de servir. Muchas personas piensan que una
salchicha ahumada va a durar mucho más tiempo sin echarse a perder, pero esto no es cierto. Las salchichas
ahumadas deben ser tratadas de la misma manera que las salchichas frescas en cuanto al almacenamiento.
Las salchichas secas requieren un tiempo de procesamiento más largo, ya que se secan al aire durante un
largo período de tiempo. Las salchichas curadas en seco incluyen salami, chorizo y pepperoni, entre otras.
Las condiciones en las que se seca la carne son muy exigentes; la temperatura, el tiempo y la humedad
deben ser monitoreados cuidadosamente para obtener un producto seguro y delicioso.
ALMACENAMIENTO
Recomendamos sellar al vacío sus salchichas frescas, luego almacenarlas en el refrigerador (por corto
tiempo) o en el congelador (por largo tiempo) para obtener el mejor sabor. Weston fabrica diversas selladoras
al vacío. Pida su selección al vendedor donde compró esta unidad. Almacene los productos curados secos y
sin refrigerar en papel u otra envoltura transpirable.

INFORMACIÓN DE LA SALCHICHA

Esta garantía aplica a los productos que se compran y usan en los EE. UU. y Canadá, y que se registraron
adecuadamente dentro de 30 días de la fecha de compra original. Esta es la única garantía expresa para este
producto y reemplaza cualquier otra garantía o condición. Este producto está garantizado contra defectos materiales
y de fabricación por un período de un (1) año a partir de la fecha de compra original. Durante este período, su único
recurso es la reparación o sustitución de este producto o de cualquier componente que se encuentre defectuoso, a
nuestra elección.
Para registrar su producto, complete el formulario en línea en www.WestonSupply.com/Warranty.
Esta garantía no cubre productos no registrados, reparaciones o servicios a productos no autorizados, productos
vendidos “tal cual” por minoristas, vidrio, ltros, desgaste por uso normal, uso que no sea conforme a las
instrucciones impresas o daño al producto como resultado de un accidente, alteración, abuso o mal uso. Esta
garantía se extiende únicamente al comprador consumidor original o quien reciba el producto como regalo y no es
transferible. Guarde el recibo de compra original ya que se requiere de un comprobante de compra para hacer un
reclamo de garantía. Esta garantía es nula si el producto es sujeto a cualquier voltaje u forma de onda que no sea la
que se indica en la etiqueta de especicaciones (p. ej., 120 V ~ 60 Hz).
Excluimos todo reclamo por daños especiales, incidentales o que resulten como consecuencia del incumplimiento
de la garantía expresa o implícita. Toda responsabilidad se limita al monto del precio de compra. Toda garantía
implícita, incluyendo cualquier garantía legal o condición de comerciabilidad o aptitud para un propósito en particular,
se niega excepto en la medida que lo prohíbe la ley, en cuyo caso dicha garantía o condición se limita a la duración
de esta garantía por escrito. Esta garantía le otorga derechos legales especícos. Puede tener otros derechos
legales que varían según donde vive. Algunos estados o provincias no permiten limitantes en garantías implícitas
o daños especiales, incidentales o consecuentes, por lo tanto, es posible que las limitaciones mencionadas
anteriormente no apliquen para usted.
Antes de devolver el producto para cualquier reparación o servicio: debe estar limpio y libre de partículas de
alimentos u otra suciedad; de otra manera, se le devolverá o aplicará un cargo de 50 USD por limpieza, a nuestra
elección.
Para reclamar una garantía, visite www.WestonSupply.com/Contact o llame al 1.800.814.4895 en los EE. UU. o al
001-216-901-6801 fuera de los EE. UU., de lunes a viernes de 8 a. m. a 5 p. m. hora del este. Usted es responsable
de todos los costos asociados con enviarnos el producto con el ete prepagado. Si el producto calica para una
reparación o un reemplazo bajo garantía, asumiremos el costo de devolverle el producto. No somos responsables
por los daños resultantes del envío.
Para trabajo fuera de garantía: llame al 1.800.814.4895 dentro de los EE. UU. o al 001-216-901-6801 fuera de
los EE. UU., de lunes a viernes de 8 a. m. a 5 p. m. hora del Este, para obtener un número de autorización de
devolución de mercancía (Return Merchandise Authorization, RMA). Rechazaremos toda devolución sin número de
RMA. Aplicaremos un cargo de 35 USD/hora por todo trabajo de diagnóstico, servicio, reparación o procesamiento.
No iniciaremos ningún servicio o trabajo de reparación sin autorización previa. Usted es responsable de todos los
costos asociados con enviarnos el producto con el ete prepagado y con nuestra devolución hacia usted.
UN AÑO DE GARANTÍA WESTON LIMITADA
20
/