Page is loading ...

OWNER’S MANUAL
HYDRAULIC BOTTLE JACK
Questions, problems, missing parts? Before returning to your retailer, call our customer service department at
1-888-44-TORIN (1-888-448-6746), 8 a.m.- 5 p.m., PST, Monday-Friday.
Read carefully and understand all ASSEMBLY AND OPERATION INSTRUCTIONS before operating. Failure
to follow the safety rules and other basic safety precautions may result in serious personal injury.
Item.: T90203, T90213, T90403, T90413, T90603, T90613, T90803, T91203, T92003
12152016Version

2
IMPORTANT
OWNER / USER RESPONSIBILITY
INTENDED USE
TECHNICAL SPECIFICATIONS
Before You Begin Register This Product.
For future reference, record the model name, model number, date of manufacture and purchase date of this
product. You can nd this information on the product.
Model Name ___________________
___
__
Model Number ________________________
Date of Manufacture ____________________
___
_
Date of Purchase ________________________
DO NOT OPERATE OR REPAIR THIS PRODUCT WITHOUT READING THIS MANUAL.
Read and follow the safety instructions. Keep Instructions readily available for operators. Make certain all
operators are properly trained and understand how to safely and correctly operate the product. By proceeding
you agree that you fully understand and comprehend the full contents of this manual. Failure to operate this
product as intended may cause injury or death. The manufacturer is not responsible for any damages or injury
caused by improper use or neglect. Allow product operation only with all parts in place and operating safely.
Use only genuine replacement parts. Service and maintain the product only with authorized or approved
replacement parts; negligence will make the product unsafe for use and will void the warranty. Carefully
inspect the product on a regular basis and perform all maintenance as required. Store these instructions
in a protected dry location. Keep all decals on the product clean and visible. Do not modify and/or use for
any application other than that for which this product was designed. If you have any questions relative to a
particular application, DO NOT use the product until you have rst contacted the distributor or manufacturer to
determine if it can or should be performed on the product.
For technical questions please call 1-888-448-6746.
This Bottle Jack is designed for lifting. The jack can be used vertically or angled to 3 degrees from vertical
position. After lifting, loads must be immediately supported by jack stands. Each model is suitable for use in
lifting or positioning vehicles, machinery, houses and/or other building structures. These jacks comply with
ASME PASE Standards.
Item Capacity
Lifting Range
Min. (inch)
Lifting Range
Max. (inch)
Lifting Range
Min. (cm)
Lifting Range
Max. (cm)
T90203 2 TON 7-1/8 13-5/8 18.1 34.5
T90213 2 TON 7-1/8 13-9/16 18 34.4
T90403 4 TON 7-5/8 14-5/8 19.5 37
T90413 4 TON 7-5/8 14-3/4 19.4 37.2
T90603 6 TON 8-1/2 16-1/4 21.6 41.3
T90613 6 TON 8-1/2 16-5/16 21.6 41.3
T90803 8 TON 9-1/8 18 23 45
T91203 12 TON 9-1/8 18-1/4 23 46.5
T92003 20 TON 9-1/2 17-3/4 24 45

3
GENERAL SAFETY RULES
JACK USE AND CARE
INSPECTION
GENERAL SAFETY RULES
IMPORTANT SAFETY CONSIDERATIONS
WARNING: Read and understand all instructions.
Failure to follow all instructions listed below may
result in serious injury.
WARNING: The warnings, cautions, and instructions discussed in this instruction manual cannot
cover all possible conditions or situations that could occur.
It must be understood by the operator
that common sense and caution are factors that cannot be built into this product, but must be supplied by
the operator.
CAUTION: Do not allow persons to operate or assemble this jack until they have read this manual
and have developed a thorough understanding of how the jack works.
DO NOT OPERATE OR REPAIR THIS EQUIPMENT WITHOUT READING THIS MANUAL.
To maintain the Service Jack and user safety, the responsibility of the owner is to read and follow these
instructions.
• Inspect the service jack for proper operation and function.
• Keep instructions readily available for equipment operators.
• Make certain all equipment operators are properly trained; understand how to safely and correctly operate
the unit.
• Allow unit operation only with all parts in place and operating properly.
• Use only genuine replacement parts.
• Service and maintain the unit only with authorized or approved replacement parts; negligence will make the
jack unsafe for use and void the warranty.
• Carefully inspect the unit on a regular basis and perform all maintenance as required.
• Store these instructions in the handle of your jack.
• Keep all decals on the unit clean and visible.
• Inspect the jack carefully before each use. Ensure the jack is not damaged, excessively worn, or missing
parts.
• Do not use the jack unless it is properly lubricated.
• Using a jack that is not in good clean working condition or properly lubricated may cause serious injury.
• Inspect the work area before each use. Make sure it is free and clear of any potential hazards.
•
Do not modify the Jack in any way.
Unauthorized modication may impair the function and/or safety and
could affect the life of the equipment. There are specic applications for which the Jack was designed.
•
Always check of damaged or worn out parts before using the Jack.
Broken parts will affect the Jack
operation. Replace or repair damaged or worn parts immediately.
•
Store idle Jack.
When Jack is not in use, store it in a secure place out of the reach of children. Inspect it for
good working condition prior to storage and before re-use.
•
Not for use by children
or people with reduced mental capacity.
•
Do not use under the inuence of drugs or alcohol.
•
Ensure children and other bystanders are kept at a safe distance when using product.

4
SAFETY
SAFETY MARKINGS
Always follow safety precautions when installing and operating this jack. Keep all decals on the unit clean and
visible. Before proceeding ensure that you fully understand and comprehend the full contents of this manual.
Failure to operate this equipment as directed may cause injury or death. The distributor is not responsible for
any damages or injury caused by improper use or neglect.
Always use Jack Stands!
DO NOT USE
wood blocks or any other non-approved load sustaining devices. The manufacturer only
warrants loads to be sustained by jack stands that meet current ASME standards.
DO NOT USE
wood blocks or any other non-approved lifting devices for a means of lifting with the jack and or
load being raised. Failure to head these warnings may cause injury or death.
THIS IS A LIFTING DEVICE ONLY!
• This jack is designed only for lifting part of the total vehicle.
• Do not move or dolly the vehicle while on the jack.
• The vehicle must be supported after lifting immediately by appropriately rated jack stands.
• NEVER go under a vehicle that is not supported with appropriately rated jacks stands.
• Use wheel chocks or other blocking device on opposing wheels before using jack stands.
WARNING!
WARNING!
1. Study, understand, and follow all instructions before operating this device.
2. Do not exceed rated capacity.
3. Use only on hard, level surfaces, with less than 3 degrees of slope.
4. Lifting device only. Immediately after lifting, support the vehicle with appropriate means.
5. Do not move or dolly the vehicle while on the jack.
6. Lift only on areas of the vehicle as specied by the vehicle manufacturer.
7. No alterations shall be made to this product.
8. Only attachments and/or adapters supplied by the manufacturer shall be used.
9. Do not get under or allow anyone under the vehicle until it has been supported by jack stands.
10. Center load on saddle prior to lifting.
11. Use wheel chocks or other blocking device on opposing wheels before using jack.
12. Never use on a lawn mower or lawn tractor.
13. Do not use this jack for any use other than the manufacturer specied usage.
14. Do not rock the vehicle while working on or around equipment.
15. The following are not recommended for supporting on this equipment: Foundations, Homes, Mobile
Homes, Trailers, RV’s, Campers, nor Fifth Wheels, etc...
16. Failure to heed these markings may result in personal injury and/or property damage.

5
GENERAL SAFETY INSTRUCTIONS
Position the Jack
Position the jack to only lift on the areas of the vehicle as specied by the vehicle manufacturer.
Always Use Jack Stands
After lifting the vehicle always support the load with appropriately rated vehicle Jacks stands before working
on the vehicle.
Do Not Overload Jack
Do not overload this jack beyond its rated capacity. Overloading this jack beyond its rated capacity can cause
damage to or failure of the jack.
Always Use on Hard Level Surfaces
This jack is designed only for use on hard level surfaces capable of sustaining the load. Use on unstable or
other possible loss of load.
Chock and Block (Stabilize)
Apply parking brake in vehicle before operating jack.
A chock is a wedge for steadying an object and holding it motionless, or for preventing the movement of a
wheel Chock the wheel opposite the end being lifted.
When you block a load, you secure and support a load that is being lifted. The block(s) or stabilizer(s) should
have a weight capacity that is greater than the weight of the load which is being lifted.
Center Load on Jack Saddle
Center load on jack saddle before lifting vehicle.
Off-center loads and loads lifted when the jack is not level can cause loss of load or damage to the jack.
Do not raise or lower the vehicle unless tools, materials and people are clear.
When the lift is being lowered, make sure everyone is standing at least six feet away. Be sure there are no
tools or equipment left under or around the jack before lowering.
Always lower the jack slowly.
DO NOT USE THE JACK TO SUPPORT OR STABILIZE A LOAD.
Using the jack to support or stabilize a load may result in unexpected movement and result in serious injury,
being crushed and death. Always securely chock and block (stabilize) the load to be lifted. Never place any
part of the body under a raised load without properly chocking and supporting the load.
Never use the jack on curved or tubular vehicle
Bumpers, this will result in the vehicle slipping off the jack and falling, causing serious injury or death. Use a
bumper lift to lift most vehicles with curved bumpers or plastic bumpers.
Wear ANSI-approved safety glasses and heavy-duty work gloves during use.
Do not adjust the safety valve.
Do not move or dolly vehicle while jack is in use.
Stay alert. Use caution and common sense when operating jack.
Do not use a jack when tired,
incoherent, dizzy, under the use or drugs or alcohol.
Training
Read this manual before use. Do not allow anyone who has not read this manual, and/or does not understand
the requirements, to use the jack.
Spectators
Do not allow bystanders around the jack or under the load supported only by the jack. -Do not allow anyone in
the vehicle while the jack is in use. Keep all bystanders away from vehicle when in use.
Inspection
Inspect the jack carefully before each use. Ensure the jack is not damaged, excessively worn, or missing
parts. -Do not use the jack unless it is properly lubricated. -Using a jack that is not in good clean working
condition or properly lubricated may cause serious injury.
Additional Notes:
Save the receipt, warranty and these instructions.
Do not modify the jack in any way.
Unauthorized modication may impair the function and/or safety and
could affect the life of the equipment. There are specic applications for which the jack was designed.
Always check for damaged or worn out parts before using the jack.
Broken parts will affect the
equipment operation. Replace or repair damaged or worn parts immediately.
When jack is not in use, store it in a secure place out of the reach of children. Inspect it for good working
condition prior to storage and before re-use.

6
ASSEMBLY
SYSTEM AIR PURGE PROCEDURE
1. Familiarize yourself with the jack.
2. Attach the 2 handle pieces making sure to align
the holes on both sections.
3. Line up the handle to the handle socket located
on the side of the jack, then insert the handle
inside the handle socket.
4. Secure the handle in place inside the handle
socket. Without any vehicle on the jack. Cycle
the lift up and down several times to insure the
hydraulic system is operating properly. (Perform
to the Air Purge Procedure before rst use.)
1. Turn release valve counterclockwise on full turn to
the open position.
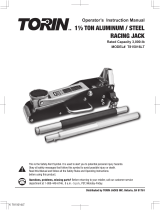
FIGURE 1 - Typical Bottle Jack
Ram
Saddle
Extension
Screw
Release
Valve
Handle
Sleeve
Handle
Assembly
Oil Plug
(on reservior)
IMPORTANT: BEFORE FIRST USE
Perform the following Air Purge Procedure to
remove any air that may have been introduced into
the hydraulic system as a result of product shipment
and handling. This step is to be completed without
any weight on the jack.

7
2. Rapidly pump the handle 6-8 times. Leave handle
in down position to expose oil ll plug.
3. With a at blade screwdriver, push the oil ll plug
slightly to the side to purge trapped air from
system. (Use cation not to tear or puncture the oil
plug.)
4. Turn release valve clockwise to the closed
position.
5. Jack is now ready for use. Check for proper pump
action.
7. Before raising the vehicle double check and verify
the saddle is centered and also has full contact
with the lifting point.
1. Before using this product, read the owner's
manual completely and familiarize yourself
thoroughly with the product and the hazards
associated with its improper use.
2. Perform the air purge procedure. (See previous
instructions for system purge procedure.)
3. Check and that the pump operates smoothly
before putting into service.
4. Inspect before each use. Do not use if bent,
broken or cracked components are noted.
RAISING THE JACK
1. Block the vehicle’s wheels for lifting stability.
Secure the load to prevent inadvertent shifting
and movement
2. Position the jack near desired lift point.
3. Set the Parking Brake in the vehicle.
4. Refer to the vehicle manufacturer owner’s manual
to locate approved lifting points on the vehicle.
Position the jack so that the saddle is centered
and will contact the load lifting point rmly.
5. Assemble the handle, ensure that spring clips
align with slots.
6. Close the release valve by turning it clockwise
until it is rmly closed.
BEFORE USE

8
LOWERING THE JACK
CAUTION:
NEVER WIRE, CLAMP OR
OTHERWISE DISABLE THE LIFT CONTROL
VALVE TO FUCTION BY ANY MEANS
OTHER THAN BY USING THE OPERATOR'S
HAND. USE THE HANDLE PROVIDED WITH
THIS PRODUCT OR AN AUTHORIZED
REPLACEMENGT HANDLE TO ENSURE
PROPER RELEASE VAVLE OPERATION. DO
NOT USE EXTENSIONS ON THE AIR HOSE
OR ON THE OPERATING HANDLE.
WARNING:
WARNING USE EXTREME
CAUTION WHEN LOWERING THE JACK.
THE JACK HANDLE MAY TURN RAPIDLY.
OPENING THE RELEASE VALVE TO FAST
CAN CAUSE THE JACK TO LOWER RAPIDLY.
FAILURE TO HEAD THESE WARNINGS
COULD CAUSE SERIOUS INJURY OR DEATH.
8. Pump handle to lift until saddle contacts load.
Continue to pump the jack handle to lift the
vehicle to the desired height. After lifting, support
the load with appropriately rated vehicle support
stands before working on the vehicle.
2. Remove support stands.
3. Grasp the handle rmly with both hands. Securely
hold on to the jack handle so your hands do not
slip and ensure the release valve does not rapidly
lower.
4. Carefully open the Release Valve by slowly
turning the handle counterclockwise. (Do not
allow bystanders around the jack or under the
load when lowering the jack.
5. After removing jack from under the load, push ram
and handle sleeve down to reduce exposure to
rust and contamination.
1. Raise load high enough to allow clearance for the
jack stands to be removed, then carefully remove
jack stands.

9
MAINTENANCE INSTRUCTIONS
If you use and maintain your equipment properly, it will give you many years of service. Follow the
maintenance instructions carefully to keep your equipment in good working condition. Never perform any
maintenance on the equipment while it is under a load.
Inspection
You should inspect the product for damage, wear, broken or missing parts (e.g.: pins) and that all components
function before each use. Follow lubrication and storage instructions for optimum product performance.
Binding
If the product binds while under a load, use equipment with equal or a larger load capacity to lower the load
safely to the ground. After un-binding; clean, lubricate and test that equipment is working properly. Rusty
components, dirt, or worn parts can be causes of binding Clean and lubricate the equipment as indicated in
the lubrication section. Test the equipment by lifting without a load. If the binding continues contact Customer
Service.
Cleaning
If the moving parts of the equipment are obstructed, use cleaning solvent or another good degreaser to clean
the equipment. Remove any existing rust, with a penetrating lubricant.
Lubrication
This equipment will not operate safely without proper lubrication. Using the equipment without proper
lubrication will result in poor performance and damage to the equipment. Some parts in this equipment are not
self-lubricating inspect the equipment before use and lubricate when necessary. After cleaning, lubricate the
equipment using light penetrating oil, lubricating spray.
• Use a good lubricant on all moving parts.
• For light duty use lubrication once a month.
• For heavy and constant use lubrication recommended every week.
• NEVER USE SANDPAPER OR ABRASIVE MATERIAL ON THESE SURFACES!
Rust Prevention:
Check rams and pump plungers on the power unit assemblies daily for any signs of rust or corrosion.
Without a load lift the equipment as high as it goes and look under and behind the lifting points. If signs of rust
are visible clean as needed.
Grease Fittings
Some models contain grease ttings the will regularly need to be greased and lubricated.
How the Jack Operates
With release valve closed, an upward stroke of the jack handle draws oil from the reservoir tank into the
plunger cavity. Hydraulic pressure holds the valve closed, which keeps the oil in the plunger cavity. A
downward stroke of the jack handle releases oil into the cylinder, which forces the ram out. This raises the
saddle. When the ram reaches maximum extension, oil is bypassed back into the reservoir to prevent an over
extended ram stroke and possible damage to the jack. Opening the release valve allows oil to ow back into
reservoir. This releases hydraulic pressure on the ram, which results in lowering the saddle.
Storing the Jack
1. Lower the Lifting ram.
2. Place the handle in the upright position.
3. Store in a dry location, recommended indoors.
Note: If the jack is stored outdoors, be sure to lubricate all parts before and after use to ensure the jack stays
in good working condition. Always store jack in the fully retracted postion when stored in outdoor or caustic
enviroments that can cause corrosion and/or rust.

10
TO ADD JACK OIL
TO REPLACE JACK OIL
1. Position the jack on level ground and lower the
saddle.
1. Position the jack on level ground and lower the
saddle.
2. Open release valve by turning handle counter-
clockwise (4 full turns).
2. Remove the oil plug.
3. Fill the oil case until oil level is just beneath the
lower rim of the oil ll hole.
4. Replace oil plug.
5. Perform the Air Purge Procedure.
*SEE ASSEMBLY IMAGE FOR JACK OIL
RESEVOIR LOCATION.

11
3. Remove the oil ll plug. 7. Replace oil plug.
4. Turn the jack on its side so that old oil will drain
from the oil ll hole.
8. Perform the Air Purge Procedure.
* SEE ASSEMBLY IMAGE FOR JACK OIL RESEVOIR
LOCATION
5. Position the jack on level ground and lower the
saddle.
6. Fill the oil case until oil level is just beneath the
lower rim.
KEEP DIRT AND OTHER MATERIAL CLEAR
WHEN POURING.
• DO NOT USE MOTOR OIL IN THE JACK.
• ONLY USE ANTI-FOAMING JACK OIL.
• ALWAYS USE A GOOD GRADE HYDRAULIC
JACK OIL.
• DO NOT USE HYDRAULIC BRAKE FLUID,
ALCOHOL, GLYCERINE, DETERGENT, MOTOR
OIL OR DIRTY OIL.
• USE OF A NON-RECOMMENDED FLUID
CANCAUSE DAMAGE TO A JACK.
• AVOID MIXING DIFFERENT TYPES OF FLUID
AND NEVER USE BRAKE FLUID, TURBINE
OIL, TRANSMISSION FLUID, MOTOR OIL OR
GLYCERIN. IMPROPER FLUID CAN CAUSE
PREMATURE FAILURE OF THE JACK AND THE
POTENTIAL FOR SUDDEN AND IMMEDIATE
LOSS OF LOAD.
• DISPOSE OF HYDRAULIC FLUID IN
ACCORDANCE WITH LOCAL REGULATIONS.
ADDITIONAL LUBRICATION:
1. Periodically check the pump piston and ram for
signs of rust or corrosion. Clean as needed and
wipe with an oil cloth. NEVER USE SANDPAPER
OR ABRASIVE MATERIAL ON THESE
SURFACES!
2. When not in use, store the jack with pump piston
and ram fully retracted.
ADDITIONAL WARNINGS:

13
Ref.
Part#
T90203 T90403 T90603 T90803 T91203 T92003
1
2
3
4
5 TF1201C-29 TF1201C-29 TF1201C-29 TF1201C-29 TF1201C-29 TF1201C-29
6
7 T90403-25(ASM) T90403-25(ASM) T90403-25(ASM) T90403-25(ASM) T90403-25(ASM) T90403-25(ASM)
8 GB308-6 GB308-6 GB308-6 GB308-6 GB308-6 GB308-6
9
10
11
12
13
14
15
16 T90203-31(ASM) T90203-31(ASM) T90603-31(ASM) T90603-31(ASM) T91203-31(ASM) T91203-31(ASM)
17 QLQD2B.2-5 QLQD2B.2-5 QLQD2B.2-5 QLQD2B.2-5 QLQD2B.2-5 QLQD2B.2-5
18 T90403-22(ASM) T90403-22(ASM) T90403-22(ASM) T90403-22(ASM) T90403-22C(ASM) T90403-22C(ASM)
19 T90403-19 T90403-19 T90403-19 T90403-19 T90403-19C T90403-19C
20 T90403-26h(ASM) T90403-26h(ASM) T90403-26h(ASM) T90403-26h(ASM) T90403-26h(ASM) T90403-26h(ASM)
21
22
23 T90203.MF T90403.MF T90603.MF T90803.MF T91203.MF T92003.MF
Ref.
Description
Part#
T90203 T90403 T90603 T90803 T91203 T92003
1 TF1201C-29 1
2
O-ring
D21.2x3.55G
O-ring
D28x3.55
O-ring
D31.5x3.55G
O-ring
D34.5x3.55
O-ring
D42.5x3.55G
O-ring
D53x3.55G
2
3
Rectangular ring
D42x38x1.2
Rectangular ring
D51x46x1.2
Rectangular ring
D59x53x1.2
Rectangular ring
D66x61x1.2
Rectangular ring
D71x64x1.3
Rectangular ring
D86x78x1.2
1
4 Reservoir 1
5 Oil plug 1
6 T-ring 1
7 Release value assembly 1
8 Ball 6mm 1
9 Base parts 1
10 Oil lter pipe 1
11 Cylinder ring 1
12 Cylinder
13 TF1201C-29 1
14 TF1201C-29 1
15
O-Ring
D19x2.65G
O-Ring
D22.4x3.55G
O-Ring
D28x3.55
O-Ring
D32.5x3.55G
O-Ring
D37.5x3.55
O-Ring
D45x5.3G
1
16 Bowl washer 1
17 Piston rod assembly 2
18 Handle assembly 1
19 Cutter pin 1
20 Handle socket assembly 2
21 Pin 1
22 Pump plunger assembly 2
23 Pump 1

14
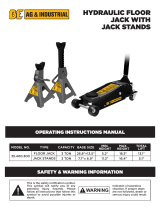
TROUBLESHOOTING
WARRANTY NOTICE
WARRANTY INFORMATION
JACK
WILL
NOT
LIFT
LOAD
JACK
WILL
NOT
HOLD
LOAD
JACK
WILL
NOT
LOWER
POOR
JACK
LIFTING
WILL NOT
LIFT TO
FULL
EXTENSION
CAUSES AND SOLUTIONS
Release valve is not completely closed
(Turn handle clockwise).
Weight Capacity Exceeded.
Air is in the hydraulics.
Purge air from system.
Low oil level. Add oil as required.
Oil reservoir is overlled.
Drain excessive oil.
Lubricate moving parts.
Jack is binding or foreign obstruction
Power unit malfunctioning.
Replace the power unit.
X XX
X
X X
X X XX
X X X
X
X
Safe Operating Temperature is between 40°F – 105°F (4°C - 41°C)
This bottle jack is covered under a 1-year limited warranty when used as recommended. Only those items
listed with a Part # are available for purchase. For assistance with the operation or the availability of
replacement parts, contact our Parts and Warranty Department at 1-888-44-TORIN (1-888-448-6746). Please
have available a copy of your receipt, the model number of the product, serial number, and specic details
regarding your question.
Not all equipment components are available for replacement; illustrations provided are a convenient reference
of location and position in the assembly sequence.
The manufacturer reserves the rights to make design changes and or improvements to product lines
and manuals without notice.
We want to know If you have any concerns with our products. If so, please call toll-free for Immediate
assistance. For additional web customer support help inquiries visit the Customer Service section at: http://
www.torin-usa.com.

15
TORIN ONE YEAR LIMITED WARRANTY
Torin Inc.® has been producing quality automotive repair and maintenance products since 1968. All products
sold are felt to be of the highest quality and are covered by the following warranty:
With proof of purchase for a period of one year from the date of that purchase, the manufacturer will repair or
replace, at its discretion, without charge, any of its products or parts thereof which fail due to a defect in
material or workmanship. This warranty does not cover damage or defects caused by improper use, careless
use or abuse of the equipment. This warranty does not cover parts normally considered to wear out or be
consumed in the normal operation of the equipment. Except where such limitations and exclusions are
specically prohibited by applicable law, (1) the CONSUMERS SOLE AND EXCLUSIVE REMEDY SHALL BE
THE REPAIR OR REPLACEMENT OF DEFECTIVE PRODUCTS AS DESCRIBED
ABOVE, and (2) THE MANUFACTURER SHALL NOT BE LIABLE FOR ANY CONSEQUENTIAL OR
INCIDENTAL DAMAGE OR LOSS WHATSOEVER, and (3) THE DURATION OF ANY AND ALL
EXPRESSED AND IMPLIED WARRANTIES, INCLUDING, WITHOUT LIMITATION, ANY WARRANTIES OF
MERCHANTABILITY AND FITNESS FOR A PARTICULAR PURPOSE, IS LIMITED TO A PERIOD OF ONE
YEAR FROM DATE OF PURCHASE. Product alteration in any manner by anyone other than us, with the sole
exception of alterations made pursuant to product instructions and in a workman like manner. You
acknowledge and agree that any use of the product for any purpose other than the specied use(s) stated in
the product instructions is at Your own risk.
Always check for damaged or worn out parts before using any product. Broken parts will affect the equipment
operation. Replace or repair damaged or worn parts immediately. Do not modify the product in any way.
Unauthorized modication may impair the function and/or safety and could affect the life of the equipment.
There are specic applications for which products are designed and tested during production. Manufacturer
provided warranted items are not authorized to be repaired by anyone other than the manufacturer or
manufacture approved repair person. Distributor does not have authorization to amend these statements. You
acknowledge and agree that any modication of the product for any purpose other than manufacturer
completed repairs is at your own risk. Before using this product, read the owner's manual completely and
familiarize yourself thoroughly with the product and the hazards associated with its improper use.
IMPORTANT: BEFORE FIRST USE on any Lift verify that a daily inspection has been completed and that all
components are in the proper working order.
This limited warranty gives you specic legal rights, and you also may have other rights, which vary from
state to state. Some states do not allow limitations or exclusions on implied warranties or incidental or
consequential damages, so the above limitations may not apply to You. This limited warranty is governed by
the laws of the State of California, without regard to rules pertaining to conicts of law. The state courts
located in San Bernardino County, California shall have exclusive jurisdiction for any disputes relating to this
warranty.
Manufacturer reserves the rights to make design changes and or improvements to this product lines and
manual without notice. We at Torin have taken every effort to ensure complete and accurate instructions have
been included in this manual. However, possible product updates, revisions and or changes may have
occurred since this printing. Torin Inc. reserves the right to change specications without incurring any
obligation for equipment previously or subsequently sold. Not responsible for typographical errors.
Alternately Customer Service can be reached through www.torin-usa.com or via email at
Not all equipment components are available for replacement, but are illustrated as a convenient reference of
location and position in the assembly sequence. Contact Customer Service for equivalent component. When
you contact us, please have your Product’s Model number, Serial Number and Description ready so that we
may help you efciently. This information can be found on a sticker on the product.
For any warranty support or if your Torin® equipment is not functioning properly contact
Torin® Customer Service directly by telephone at 1-888-44-TORIN (1-888-448-6746)
8:00am – 5:00pm Pacic Time, Monday – Friday
www.torin-usa.com Made in China

23
8. Pompez le levier pour effectuer le levage jusqu ‘à
ce que la sellette entre en contact avec la charge.
Continuez de pomper le levier pour soulever le
véhicule à la hauteur voulue . Après avoir effectué
le levage, supportez toujours la charge à l’aide
de chandelles de levage de capacité sufsante
avant de travailler sur le véhicule.
MISE EN GARDE :
NE JAMAIS CÂBLER,
RETENIR OU AUTREMENT METTRE HORS
D’ÉTAT LE ROBINET DE COMMANDE
DE LEVAGE POUR QU’IL FONCTIONNE
D’AUTRES MANIÈRES QU’À L’AIDE DE
LA MAIN DE L’OPÉRATEUR. UTILISER LE
LEVIER FOURNI AVEC CE PRODUIT OU UN
LEVIER DE RECHANGE AUTORISÉ AFIN
D’ASSURER LE BON FONCTIONNEMENT
DE LA SOUPAPE DE SÉCURITÉ. NE PAS
UTILISER DE RALLONGES SUR LE FLEXIBLE
D’AIR OU SUR LE LEVIER.
ABAISSEMENT DU CRIC
1. Soulevez la charge assez haut pour permettre de
dégager les chandelles et les retirer, puis enlevez
avec précaution les chandelles de levage.
2. Retirez les chandelles de levage.
3. Saisissez le levier fermement à l’aide des deux
mains. Tenez fermement le levier du cric an
que vos mains ne glissent pas et assurez-vous
que la soupape de sécurité ne s’abaisse pas
rapidement.
4. Ouvrez prudemment la soupape de sécurité en
tournant lentement le levier en sens antihoraire.
Ne permettez pas aux spectateurs de se tenir
autour du cric ou sous la charge lorsque vous
abaissez le cric.
5. Après avoir retiré le cric de sous la charge,
enfoncez le vérin et repoussez l’emboîtement du
levier pour réduire leur exposition à la rouille et
aux contaminants.
AVERTISSEMENT :
SOYEZ TRÈS PRUDENT
LORSQUE VOUS ABAISSEZ LE CRIC. LE
LEVIER DU CRIC PEUT TOURNER TRÈS
RAPIDEMENT. L’OUVERTURE TROP RAPIDE
DE LA SOUPAPE DE SÉCURITÉ PEUT FAIRE
BAISSER LE CRIC RAPIDEMENT. IL PEUT
EN RÉSULTER DES BLESSURES GRAVES
OU LA MORT SI VOUS NE SUIVEZ PAS CES
AVERTISSEMENTS.

Contact Torin® Customer Service directly by telephone at:
1-888-44-TORIN (1-888-448-6746)
8:00am – 5:00pm Pacic Time, Monday – Friday
Communiquez directement avec le Service à la clientèle Torin® au:
1-888-44-TORIN (1-888-448-6746)
De 8 heures à 17 heures, heure du Pacique, du lundi au vendredi
Comuníquese conel Servicio de Atención al Cliente de Torin® directamente por teléfono al:
1-888-44-TORIN (1-888-448-6746)
De lunes a viernes de 8:00 a. m. a 5 p. m. hora del Pacíco
Torin Inc.
4355 E. Brickell Street Ontario, CA USA
www.torin-usa.com
Made in China - Fabriqué en Chine - Hecho en China
/