
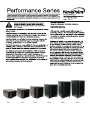
6U 9U 12U 15U 18U 22U
2018
20180327

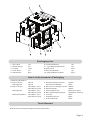
1. Top Panel 1pc
2. Bottom Panel 1pc
3. Frames 2pcs
4. Front Door
1pc
5. Side Panels
2pcs
6. Horizontal Beams 1pc
7. L Type Mounting Brackets
1pc
8. Back Panel 2pcs
9. Mounting Bracket 1pc
10. Vertical Mounting Rails
2pcs
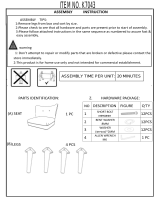
Packaging List
Item List Accessories Packaging
Assembly Hardwares:
M6*12 Screw
M6 Cage Nut
M6*12 Screw
A.
B.
M6 Cage Nut
M6 Plastic Washer
12PCS
12PCS
12PCS(6U~12U)
24PCS(15U 22U)~
12PCS(6U~12U)
24PCS(15U~22U)
12PCS(6U~12U)
24PCS(15U~22U)
M4*8 Self-tapping Screw C.
White Plastic Washer
M8*12 Inner Hexagon Screw
D.
M8 Flange Nut
E.
Casters(Optional)
F.
Lock Kit H.
Expansion Screw
I.
Ground Wire Kit
J.
12PCS
1PCS
16PCS
16PCS
4PCS(15U 22U)~
M6*12 Self-tapping Screw G. 16PCS(For Casters)
1PCS
4PCS
1PCS
Tools Needed
Allen Wrench(included),Phillips screwdriver and Pliers
Page 2

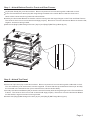
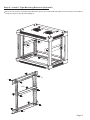
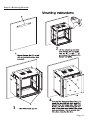
Step 1 – Attach Bottom Panel to Front and Rear Frames
Step 2 – Attach Top Panel
Lay Bottom Panel (#2) on a hard surface. Be sure to protect it from scratching with cardboard or cloth.
Insert Front and Rear Frames (#3) with large flange oriented to the inside.Be sure that the slots in the
surface is facing inward. cagenut
Attach with (Bag D) M8 Hexagon Screws (8 pcs) and (Bag E) M8 Flange Nuts (8 pcs)
Overlay the Horizontal Beams so that the notches interlay with the large flanges on the Front and Rear Frames.
The holes for the hex nut and screw should align properly. Be sure to orient the Horizontal Brams so that the flat,
Place the Top Panel (#1) on the hard surface. Be sure to protect it from scratching with cardboard or cloth.
Overlay the Horizontal Beams (#6) so that the notches interlay with the large flanges on the Front and Rear
Attach with (Bag D) (8 pcs) and (Bag E) (8 pcs)M8 Hexagon Screws M8 Flange Nuts
Turn the assembly over and insert it into the top panel. Be sure that the top and bottom Panels (#1 and #2)
are oriented in the same direction (front matches front, back matches back).
Frames. The holes for the hex nut and screw should align properly. Be sure to orient the Horizontal Beams
so that the flat, cagenut surface is facing inward.
center of the frames are facing inward as shown below.
Page 3

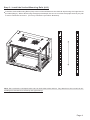
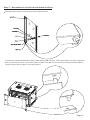
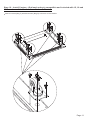
Step 3 – Install the Vertical Mounting Rails (#10)
Install the Vertical Mounting Rails (#10) to the Horizontal Beams at the desired depth using the Cage Nut Kit
provided (Bag A). When determining the appropriate depth, be sure to consider the equipment that you plan
to mount inside the enclosure. (This may include the provided L Brackets).
1
2
3
4
5
6
1
2
3
4
5
6
Note: Be sure that the rail depth is the same on both sides of the cabinet. Pay attention to the numerical unit
markings on the rails to be sure they are right side up.
Page 4

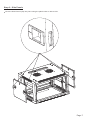
Step 4 – Install L Type Mounting Brackets (Optional)
Mount the provided L Type Mounting Brackets (#7) to the Vertical Mouting Rails on each side of the cabinet
using the cage nut kits provided (Bag A)
Page 5

Step 5 – Attach the Back Panel
Attach the Back Panel (#8) to the assembly using the M4 Screws (Bag C) (6 pcs) provided.
4
Page 6

Step 6 – Side Panels
Click the Side Panels (#5) into place using the plastic tabs on either side.
Page 7

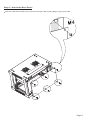
Step 7 – Assemble the front lock and attach the Door
Assemble the front door lock as shown in the picture below:
To install the Tempered Glass Door (#4), locate the side with two pins. Insert the fixed pin into door hinge hole.
With your thumb, pull down on the spring pin and slide it into place over second door hinge hole and release.
The pin should click into place, securing the door.
Page 8

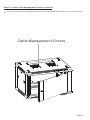
Step 8 – Install Cable Management Covers (optional)
Attach the top and Bottom Cable Management Panels using the M4 Screws (BagC 2 pcs each) provided.
Cable Management Covers
Page 9

Step 9 – Mounting Bracket
M4
4
Page 10
Bag

Step 10 – Install Casters - (Optional and only compatible and included with 15, 18 and
Attach Casters(Bag F) with M6 screws (Bag G) to bottom of the cabinet.
22U versions of the Performance Series Cabinets)
Page 11
-
 1
1
-
 2
2
-
 3
3
-
 4
4
-
 5
5
-
 6
6
-
 7
7
-
 8
8
-
 9
9
-
 10
10
-
 11
11


NavePoint 9U Wall Mount Network Server 19 Inch IT Cabinet Rack Enclosure Glass Door Lock Installation guide
- Type
- Installation guide
Ask a question and I''ll find the answer in the document
Finding information in a document is now easier with AI
Other documents
-
Patio Festival PF19270 Operating instructions
-
Kmart 43150472 User manual
-
-
Unbranded 9156510780 Operating instructions
-
-
 Homepop K7043-F2234 Installation guide
-
Kmart Tall User manual
-
-
-
Karl home 782981815827 User manual
