
YOUR SAFETY AND THE SAFETY OF OTHERS ARE VERY IMPORTANT
This manual and the appliance itself provide important safety messages, to be read and observed at all times.
All Safety messages will tell you what the potential hazard is, tell you how to reduce the
chance of injury, and tell you what can happen if the instructions are not followed.
- The appliance must be disconnected from the power supply before carrying out any
installation work.
- Installation and maintenance must be carried out by a qualified technician, in compliance with
the manufacturer’s instructions and local safety regulations. Do not repair or replace any part of
the appliance unless specifically stated in the user manual.
- Do not store or use gasoline or other flammable vapors and liquids in the vicinity of this
appliance.
- When the hob is installed, provide a multi-pole circuit breaker with a contact separation of
at least 3 mm, that provides full disconnection.
- Regulations require that the appliance is grounded.
- The power cable must be long enough for connecting the appliance, once fitted in its
housing, to the power supply
- If necessary, the electrical power cable must be replaced exclusively with a power cable having
identical characteristics to the original supplied by manufacturer (H05RR-F3x2,5mm
2
). This
operation must be performed by a qualified electrician.
- The manufacturer cannot be held responsible for any injury to persons or animals or
damage to property arising from failure to comply with these requirements.
- Do not use multiple plug adapters or extension cords.
- Do not pull the power supply cord in order to unplug the appliance.
- The electrical components must not be accessible to the user after installation.
- Do not touch the appliance with any wet part of the body and do not operate it when
barefoot.
- This hob is designed solely for private household use for cooking food. Do not use this
appliance as a space heater to heat or warm the room. Doing so may result in carbon
monoxide poisoning and overheating of the hob. The Manufacturer declines all
responsibility for inappropriate use or incorrect setting of the controls.
- Young children should be kept away from the appliance and supervised to ensure that
they do not play with it.
- Do not touch the appliance heating elements during and after use. Do not allow the
appliance to come into contact with cloths or other flammable materials until all the
components have cooled sufficiently.
- Do not place flammable materials on or near the appliance.
- Do not place metal objects, such as kitchen utensils (knives, forks, spoons, lids, etc.), on the
cooking zone, as they can become very hot.
- If the surface of the hob is damaged (glass cracked or broken), do not use the appliance.
Call the After-Sales Service.
- The appliance is not intended to be operated by means of an external timer or separate
remote control system.
- Overheated oils and fats catch fire easily. Always remain vigilant when cooking foods rich
in fat, oil or alcohol (e.g. rum, cognac, wine).
- Keep the packaging materials out of the reach of children.
- Before cleaning or maintenance wait for hob to cool down.
IMPORTANT SAFETY INSTRUCTIONS
This is the safety alert symbol, pertaining to safety, which alerts users to potential hazards to themselves and others.
All safety messages will follow the safety alert symbol and either the terms:
DANGER
Indicates a hazardous situation which, if not avoided, will cause
serious injury.
WARNING
Indicates a hazardous situation which, if not avoided, could cause
serious injury.
WARNING
If the information in this manual is not followed exactly, a fire or
explosion may result causing property damage or injury.
WARNING
The appliance and its accessible parts become hot during use.
Care should be taken to avoid touching heating elements.
Children less than 8 years old shall be kept away, unless
continuously supervised.
This appliance can be used by children aged from 8 years and
above and persons with reduced physical, sensory or mental
capabilities or lack of experience and knowledge if they have
been given supervision or instruction concerning use of the
appliance in a safe way and understand hazards involved.
Children shall not play with the appliance. Cleaning and user
maintenance shall not be made by children without supervision.
WARNING
Unattended cooking on a hob with fat or oil can be dangerous
and may result in fire. NEVER try to extinguish a fire with water,
but switch off the appliance and then cover flame e.g. with a lid
or a fire blanket.
WARNING
Danger of fire: do not store items on the cooking surface. This
appliance is not intended to be operated by means of an external
timer or separate remote-control system.
WARNING
If the surface is cracked, switch off the appliance to avoid the
possibility of electric shock.
SAVE THESE INSTRUCTIONS
GB AKM 750 BUILT-IN HOB
FR SA
5019 319 66089

After unpacking the hob, make sure that it has not been damaged during transport. In the event of problems, contact the
dealer or your nearest After-sales Service.
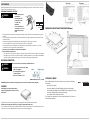
PREPARING THE CABINET FOR FITTING
• This product can be embedded in a worktop 30 to 40 mm thick.
• Before installation, make sure that:
- the outer surfaces of the furniture or appliances adjacent to the hob are heat resistant according to local regulations;
- this appliance is not connected to a fume exhaust device. It shall be installed in accordance with current installation
regulations. Particular attention shall be given to the relevant requirements regarding ventilation.
ELECTRICAL CONNECTION
IMPORTANT: the data relevant to the voltage and power absorption are indicated on the rating plate.
ASSEMBLY
DIMENSIONS AND DISTANCES TO BE MANTAINED (mm)
AFTER-SALES SERVICE
INSTALLATION
WARNING
- Install a separator panel
under the hob.
-The lower part of the
product must not be
accessible after
installation.
- In case of installation of
an undertop oven, do not
interpose the separator
panel.
• The distance between the underside of the appliance and the separator panel must respect the dimensions given in
the figure.
• For correct operation of the product, do not obstruct the minimum opening between the worktop and the top of the
cabinet (min.5 mm).
• Do all cabinet cutting work before fitting the hob, and carefully remove any shavings or sawdust.
• In case of installation of an undertop oven, make sure the oven has a cooling system.
• Do not install the hob above a dishwasher or washing-machine, so that the electronic circuits do not come into
contact with steam or moisture which could damage them.
WARNING
This operation must be performed by a qualified technician.
WARNING
• The electrical connections must comply
with local regulations.
• The earthing of this appliance is
compulsory by law.
• Do not use an extension cord.
POWER SUPPLY: 220-240 V ~ 50/60 Hz
After having cleaned the perimeter surface,
apply the supplied gasket to the hob as shown
in the figure.
Position the hob in the worktop opening made respecting the dimensions indicated in the Instruction.
NOTE: the power supply cable must be long enough to permit its upward extraction.
To secure the hob, use the brackets provided with it. Fit the brackets into the relevant bores and fasten them by means of
their screws in accordance with the thickness of the worktop (see the following figures).
min 5 mm
min 20 mm
min 5 mm
Before calling the After-Sales Service, make sure you can give the following
information:
- type of fault or problem;
- exact model (written on the label affixed to the instruction/warranty);
- service number that follows the word SERVICE on the rating plate under the
hob and on the label affixed to instruction/warranty;
- your complete address and phone number.
If any repairs are required, please contact an authorised After-Sales Service, as
indicated in the warranty.
Top 30 mm Top 40 mm

CLEANING THE HOB SURFACE
IMPORTANT: Do not use abrasive sponges or scouring pads. Their use could eventually ruin the glass.
- After each use, clean the hob (when it is cool) to remove any deposits and stains due to food residuals.
- Sugar or foods with a high sugar content damage the hob and must be immediately removed.
- Salt, sugar and sand could scratch the glass surface.
- Use a soft cloth, absorbent kitchen paper or a specific hob cleaner (follow the Manufacturer's instructions).
• This hob has been designed, constructed and marketed in compliance with:
- safety objectives of the “Low Voltage” Directive 2006/95/CE (which replaces 73/23/CEE and subsequent
amendments);
- protection requirements of EEC Directive “EMC” 2004/108/EC.
• This hob is suitable for contact with foodstuffs and complies with EEC (CE) Regulation n. 1935/2004.
Disposal of packing material
The packing material is 100% recyclable and is marked with the recycle symbol ( ). The various parts of the
packing must therefore be disposed of responsibly and in full compliance with local authority regulations
governing waste disposal.
Scrapping the product
- This appliance is marked in compliance with European Directive 2002/96/EC, Waste Electrical and Electronic
Equipment (WEEE).
- By ensuring this product is disposed of correctly, you will help prevent potential negative consequences for
the environment and human health, which could otherwise be caused by inappropriate waste handling of
this product.
- The symbol on the product or on the accompanying documentation indicates that it should not be treated
as domestic waste but must be taken to an appropriate collection centre for the recycling of electrical and
electronic equipment.
- With the vitroceramic heating elements it is advisable to use flat-bottomed pots and pans of the same width
(or slightly larger) as the hotplate.
- Avoid spilling liquids; therefore when boiling or heated, lower the heat setting.
- Do not leave the cooking zone activated when not being used or with empty pots or pans on it.
- Deactivate the zone at the end of cooking.
All operations can be performed using touch control sensitive keys (optical sensors) located on the front of the
control board; each key has a corresponding display. All actions are confirmed by an audible signal.
N.B.: the first time that the hob is connected to the power supply, the keylock function will be inserted. Press
button 8 to deactivate it and start using the product.
Switching the appliance on and off. “Mini-Square” Touch control
Switching on the appliance:
1. Touch the key for 2 seconds.
The control is powered on: the power level indicator (3) shows 0.
The next operation must be performed within 10 seconds or the appliance will automatically switch off.
Switching on a cooking zone
After switching on the appliance by pressing , a cooking zone must be switched on within 10 seconds as follows:
1. Press the key 2 corresponding to the cooking zone. The relative display will show 0 flashing, indicating that
the zone is now on.
2. Set the power level (1 to 9) using the keys + and - (5/4).
The keys + and - have a repeater function, i.e. holding these keys pressed will increase or reduce the setting by
one unit every 0.3 seconds.
Only one cooking zone may be switched on at a time, so only one hob zone is flashing at a time.
Switching off the cooking zone
1. The cooking zone must be on.
2. Press keys + and - (5/4) simultaneously the zone will switch off immediately.
Residual heat indicators
While the cooking zone is still hot enough to cause burns, the corresponding display shows the symbol H
(residual heat). The symbol only disappears when the temperature falls below 60°C and there is no longer any risk
of burning.
The display shows 0 as long the temperature remains below 60°C, switching to H only when the temperature
raises above 60°C.
To save energy, switch off the cooking zone before cooking is completed in order to make use of the residual heat.
The residual heat indicator H will go out if the power supply is interrupted.
The appliance may be switched off at any time by pressing the power key .
Appliance lock function
The entire appliance may be locked to prevent unintentional operation pressing the lock key (8).
The lock function is not deactivated before the appliance is switched off, it will still be active when the appliance
is next switched on.
While the lock function is activated, operating the keys, will have no effect.
Automatic switch off
If one or more of the cooking zones is left on by mistake, the control will automatically switch them off after a
certain time limit.
In the event of automatic switch off, the symbol H is displayed.
To prevent automatic switch off, simply touch the zone selection key or the + and - keys before the time limit
expires.
WARNING
- Do not use steam cleaners.
- Before cleaning, make sure the cooking zones are switched off and that
the residual heat indicator (“H”) is not displayed.
DECLARATION OF CONFORMITY
SAFEGUARDING THE ENVIRONMENT
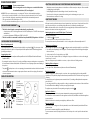
PRODUCT DESCRIPTION
1. On/Off
2. Cooking zone
3. Set value display
4. Increase
5. Decrease
6. Timer
7. Timer display
8. Lock
9. Timer indicators
10. Lock indicator
11. Decimal point
1 84 52
3 3679
10
9
11
Ø 210
Ø 145
Ø 180
Ø 145
PRACTICAL ADVICE ON USING THE VITROCERAMIC HEATING ELEMENTS
HOW TO USE THE HOB

Automatic preheating (Heat-up function)
This function simplifies the cooking process as it obviates the need of human intervention. The cooking zone is
first preheated at maximum power to rapidly bring the zone up to the cooking temperature, after which the
power is automatically reduced to the preset level.
Activating the automatic preheating function
Select the cooking zone by pressing key 2. Select power level 9 using the - key, then select level 9 with a decimal
point, using the + key. Now select the desired power level, e.g. 6, using the - key. In the automatic preheating
mode, the cooking zone display will alternately show the set level (“6”) with a decimal point (11).
Changing the power level setting during automatic preheating
1. The relative cooking zone must be on. The decimal point (11) on the corresponding display must be lit up.
2. The heat-up value can only be increase with the + button. If the level is increased, the + new preheating time
will be calculated taking into account the time elapsed since the previous setting.
Example: Level 1 i s first selected, corresponding to a preheating time of 1'11". After 30", the power level is
increased to 4, which requires a preheating time of 5'28". After changing the level, the automatic preheating will
last a further 4'58" (5'28"-30” = 4'58”).
Deactivating the automatic preheating function.
1. The relative zone must be on. The decimal point (13) on the corresponding display must be lit up.
2. Press - (4) after the function has been activated for at least 10 seconds.
Timer function
This automatic function also obviates the need of human intervention during the entire cooking cycle. The
cooking zone is automatically switched off after setting the time period.
Activation of the timer function.
1. The zone to be programmed must be on.
2. Select a level between 1 and 9.
3. Press the timer key (7): the timer display will show “00”.
4. Select the cooking time (from 0 to 99 minutes) using keys + and - (5/4).
The timer function is + automatically activated within a few seconds. The indicator light (9) corresponding to the
programmed zone illuminates. To rapidly adjust the cooking time, hold pressed the + or - keys.
The timer function applies to all hob zones.
Changing a previously set cooking time.
The programmed cooking time may be changed at any time.
1. The relative zone must be on. The corresponding display flashes together with the LED corresponding to the
zone timer (9).
2. Press the timer key (7).
3. Set a new cooking time using the keys + and - (5/4).
To rapidly adjust the cooking time, hold pressed the + or - keys.
Deactivating the timer function.
When the set cooking time has elapsed, an audible signal sounds for 2 minutes. To interrupt the signal, simply
press any key. The cooking zone is now switched off.
If you want to interrupt the timer before the programmed time period has elapsed:
1. The relative zone must be on.
2. Press the timer key (7).
3. Zero the time by pressing - (4). The timer is now deactivated but the cooking zone will remain on until it is
switched off manually.
Rapid switch off
1. The relative zone must be on.
2. Press keys + and - (5/4) simultaneously; the cooking zone is switched off immediately. The timer will also be
deactivated.
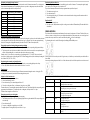
POWER LIMITATION
This hob model has a maximum power limitation function carried out by means of software. Therefore, if the user
wishes to activate a cooking zone at a power higher than that allowed, the system emits an acoustic signal and
prevents the zone power increase; at the same time the symbol is shown on the display.
E.g. Assuming the user has set the following levels, utilizing all the available power:
If the user tries to increase the power level of a given zone, a double beep sounds and the power levels will not
be modified.
However, by reducing the power level of one of the other zones, the level of the required zone can be increased:
Power level Heat-up function (Time in minutes)
11’11”
22’ 44”
34’ 47”
45’ 28”
56’ 26”
61’ 11”
72’ 44”
82’ 44”
9-
ADVICE ON USING THE VITROCERAMIC HEATING ELEMENT
Energy regulator Heat intensity Types of cooking
1-2 Minimum - Melting fat, etc.
- Heating small amounts of liquid
3-4 Very low - Heating medium amounts of liquid
- Preparing long-cooking sauces and creams
5-6 Low - Thawing
- Heating large amounts of liquid
- Cooking below boiling point
7-8 Medium - Cooking tender roasts
- Cooking at boiling point
9-10 High - Cooking roasts
-Boiling meat
- Cooking meat in pan
10-11 Maximum - Bringing large amounts of liquid to boil
-Frying
-
 1
1
-
 2
2
-
 3
3
-
 4
4


Ask a question and I''ll find the answer in the document
Finding information in a document is now easier with AI
Related papers
-
Whirlpool ACM 795/BA User guide
-
Whirlpool KIF 952 BXLD B User guide
-
-
-
Smeg SIM592D Owner's manual
-
Whirlpool ACM 846/BA/IXL User guide
-
Whirlpool ACM795BA User guide
-
-
-
Other documents
-
KitchenAid KHIP3 90400 Owner's manual
-
Bauknecht ESPIF 8950 IN User guide
-
-
HOTPOINT/ARISTON KIF 952 BXLD B User guide
-
KitchenAid KHIS 9003 User guide
-
Bauknecht ESMIF 8740 IN User guide
-
Hotpoint CIF 952 BXLD B User guide
-
-
-