Kichler Lighting 49777BK User manual

Type
User manual

Kichler Lighting 49777BK is a versatile lighting fixture that can be mounted on either a rigid stem or a sloped ceiling. It features a canopy, stem(s), lockwasher, lock-up knob, shade, threaded nipple, and coupling. The fixture can be adjusted to suit the position of the fixture, and the shade can be attached by threading the coupling of the shade onto the short threaded nipple on the end of the stem. It requires a bulb, which is not included. Please refer to the instructions for detailed information on assembly and installation.

Kichler Lighting 49777BK is a versatile lighting fixture that can be mounted on either a rigid stem or a sloped ceiling. It features a canopy, stem(s), lockwasher, lock-up knob, shade, threaded nipple, and coupling. The fixture can be adjusted to suit the position of the fixture, and the shade can be attached by threading the coupling of the shade onto the short threaded nipple on the end of the stem. It requires a bulb, which is not included. Please refer to the instructions for detailed information on assembly and installation.

Date Issued: 06/24/16 IS-49777-CB
We’re here to help 866-558-5706
Hrs: M-F 9am to 5pm EST
CAUTION – RISK OF SHOCK –
Disconnect Power at the main circuit breaker panel or main fuse
box before starting and during the installation.
INSTRUCTIONS
For Assembling and Installing Fixtures in Canada
Pour L’assemblage et L’installation Au Canada
RIGID STEM MOUNT
1) Select proper length of stem(s) required. Pass wire thru
short threaded nipple and thread into coupling at top of
fixture using thread locking compound. Thread stem(s)
onto nipple using thread locking compound. Continue with
remaining stem(s). Thread small nipple into top of last stem
(ceiling side) using thread locking compound.
2) NOTE: Thread locking compound must be applied to all
stem threads to prevent accidental rotation of stems during
cleaning, relamping, etc
3) Pass fixture wires thru hole in canopy. Make sure open side
of canopy faces ceiling. Pass threaded nipple of stem thru
hole in canopy. Slip lockwasher over end of nipple. Thread
hexnut onto end of stem. Tighten to secure.
4) Find the appropriate threaded holes on mounting strap. As-
semble mounting screws into threaded holes.
5) Attach mounting strap to outlet box. Mounting strap can be
adjusted to suit position of fixture.
6) Make wire connections. Reference chart below for correct
connections and wire accordingly.
7) Push fixture to ceiling, carefully passing mounting screws
through holes in canopy. Make sure all wires are inside
canopy and do not get pinched between canopy and ceil-
ing.
8) Slip lockwashers over mounting screws. Thread lockup
knobs onto mounting screw and tighten to secure fixture to
ceiling.
9) Raise shade up to stem. Connect the shade onto the stem
by threading the coupling of the shade onto the short
threaded nipple on the end of the stem. Tighten to secure
the shade onto the stem.
10) Insert recommended bulb (Not included).
SLOPE CEILING MOUNT
1) Follow step 1 from RIGID STEM MOUNT instructions.
2) Pass fixture wire thru threaded hole in first loop. Thread
loop onto last threaded nipple in stem using thread locking
compound. Tighten to secure.
3) Thread small threaded nipple into second loop using thread
locking compound.
4) Add chain link between both loops. Close chain link ends
together using chain pliers or padded pliers to prevent dam-
age to finish.
5) Weave fixture wire thru chain link and second loop and pass
thru threaded nipple in second loop.
6) Continue with steps 3 thru 10 from RIGID STEM MOUNT
instructions.
SMALL
THREADED
NIPPLE
LOOP
CHAIN LINK
LOOP
SMALL
THREADED
NIPPLE
OUTLET BOX
WIRE
CONNECTOR(S)
STRAP
MOUNTING
SCREW(S)
MOUNTING
SCREW(S)
MOUNTING
STRAP
CANOPY
HEXNUT
LOCKWASHER
LOCK-UP
KNOB
SHORT
THREADED
NIPPLE
STEM
COUPLING
SHADE
Connect Black or
Red Supply Wire to:
Connect
White Supply Wire to:
Black White
*Parallel cord (round & smooth) *Parallel cord (square & ridged)
Clear, Brown, Gold or Black
without tracer
Clear, Brown, Gold or Black
with tracer
Insulated wire (other than green)
with copper conductor
Insulated wire (other than green)
with silver conductor
*Note: When parallel wires (SPT I & SPT II)
are used. The neutral wire is square shaped
or ridged and the other wire will be round in
shape or smooth (see illus.)
Neutral Wire
Date Issued: 06/24/16 IS-49777-CB
INSTRUCTIONS
For Assembling and Installing Fixtures in Canada
Pour L’assemblage et L’installation Au Canada
Nous sommes là pour vous aider 866-558-5706
Heures : du lundi au vendredi, de 9h à 17h (heure de l’Est)
MONTAGE DE LA TIGE RIGIDE
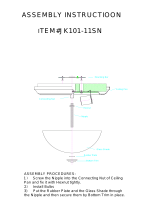
1) Choisir la bonne longueur de tuyau nécessaire. Passe fil
raccord court et sur la thread dans le raccord en haut de
l’appareil à l’aide de fil de blocage composé. Fil stem(s) sur
le mamelon à l’aide de fil de blocage composé. Continuer
avec la tige restante. Petit mamelon de thread en haut de la
dernière tige (côté plafond) à l’aide de fil de blocage com-
posé.
2) NOTE: fil composé de verrouillage doit être appliqué à
l’ensemble de la tige threads pour éviter toute rotation ac-
cidentelle des tiges pendant le nettoyage, remplacement de
l’ampoule, etc.
3) Passer les fils du luminaire à travers le trou dans la cano-
pée. Faire bien sûr ouverte côté de visages de verrière au
plafond. Col de raccord de tige à travers le trou dans la
canopée. Glisser la rondelle sur l’extrémité du mamelon.
Visser l’écrou hexagonal sur l’extrémité de la tige. Serrer de
façon à garantir.
4) Trouver le cas échéant les trous sur une courroie de fixation
filetés. Monter vis de fixation dans les trous taraudés.
5) Fixer la sangle de fixation pour boîte de sortie. Sangle
de fixation peut être ajusté en fonction de la position de
l’appareil.
6) Connecter les ls. Se porter au tableau ci-dessous pour faire
les connexions.
7) Pousser le luminaire au plafond, soigneusement en passant
vis de fixation dans les trous dans la canopée. Assurez-
vous que tous les fils sont à l’intérieur de la verrière et de ne
pas se coincer entre la verrière et le plafond.
8) Glisser des rondelles de blocage sur les vis de montage.
Enfiler les boutons de blocage sur les vis de montage et
serrer pour fixer l’appareil au plafond.
9) Soulever ombre d’endiguer. Se connecter à l’ombre sur la
tige en enfilant le couplage de l’ombre sur le mamelon fileté
court à l’extrémité de la tige. Serrer de façon à garantir
l’ombre sur la tige.
10) Inserte recommandé ampoule (non inclus).
PENTE DE MONTAGE AU PLAFOND
1) Suivez l’étape 1 des instructions de montage de tige rigide.
2) Passer au fil à travers le trou fileté dans la première boucle.
Boucle de fil sur le mamelon fileté dernier dans la tige à
l’aide de fil de blocage composé. Serrer de façon à garantir.
3) Raccord à vis petit fil dans la deuxième boucle à l’aide
d’adhésif de freinage.
4) Ajouter le maillon de la chaîne entre les deux boucles.
Maillon de la chaîne étroite se termine à l’aide de pinces de
chaîne ou rembourré de pinces pour éviter tout dommage à
la fin.
5) Tissent le fil de l’appareil par le biais de maillon de chaîne et
de la deuxième boucle et passer à travers un raccord fileté
dans la deuxième boucle.
6) Suivez les étapes 3 à 10 des instructions de montage de
tige rigide.
PETIT
RACCORD
FILETÉ
BOUCLE
MAILLON
DE CHAÎNE
BOUCLE
PETIT
RACCORD
FILETÉ
BOÎTE À PRISES
CONNECTEURS
DE FIL
VIS DE
L’ÉTRIER DE
MONTAGE
VIS DE
MONTAGE
ÉTRIER
DE MONTAGE
COUVERCLE
ÉCROU
HEXAGONAL
RONDELLE
DE BLOCAGE
BOULE DE
BLOCAGE
PETIT
RACCORD
FILETÉ
TIGE
ACCOUPLEMENT
CACHE
Connecter le fil noir ou
rouge de la boite
Connecter le fil blanc de la boîte
A Noir A Blanc
*Au cordon parallèle (rond et lisse)
*Au cordon parallele (à angles droits el strié)
Au bransparent, doré, marron, ou
noir sans fil distinctif
Au transparent, doré, marron, ou
noir avec un til distinctif
Fil isolé (sauf fil vert) avec
conducteur en cuivre
Fil isolé (sauf fil vert) avec
conducteur en argent
*Remarque: Avec emploi d’un fil paralléle
(SPT I et SPT II). Le fil neutre est á angles
droits ou strié et l’autre fil doit étre rond ou
lisse (Voir le schéma).
Fil Neutre
  • Page 1 1
  • Page 2 2

Kichler Lighting 49777BK User manual

Type
User manual

Kichler Lighting 49777BK is a versatile lighting fixture that can be mounted on either a rigid stem or a sloped ceiling. It features a canopy, stem(s), lockwasher, lock-up knob, shade, threaded nipple, and coupling. The fixture can be adjusted to suit the position of the fixture, and the shade can be attached by threading the coupling of the shade onto the short threaded nipple on the end of the stem. It requires a bulb, which is not included. Please refer to the instructions for detailed information on assembly and installation.

Ask a question and I''ll find the answer in the document

Finding information in a document is now easier with AI

in other languages