Schlage BE468 CAM 605 User manual

Category
Alarm clocks
Type
User manual
SCHLAGE CONNECT™
Touchscreen Deadbolt with Alarm
Installation Instructions
2
ENGLISH
PACKAGE CONTENTS
Touchscreen
Assembly
Set Screw
Battery Cover
Reinforcement
Plate
Reinforcement
Screws (2)
Strike
Bolt/Strike
Screws (4)
Bolt
Backup Key
Alarm
Assembly
Support Plate
Alarm Assembly
Screw
Support Plate
Screws (2)
Century Style
Camelot Style Shown
Throughout Guide
3
ENGLISH
LET’S GET STARTED!
Once you have all your tools together, please follow each step carefully and in order. Because
this is an electronic lock, the order of steps is very important. If you skip a step, you may have
to perform a factory default reset and start over.
You will denitely need this tool:
Phillips screwdriver
You can use a manual or electric
screwdriver, but please DO NOT use a
power drill!
You may also need these tools:
Tape Measure
Flathead Screwdriver
Pencil
Wood Block
Hammer
INSTALLATION NOTES! PLEASE READ!
DO NOT use a power drill for installation! This could damage the lock.
Please read all the instructions before calling customer support.
Please call customer support before returning the product to the store.
DO NOT install the batteries before installing the lock! Follow the instructions in order!
If you have previously installed this lock on another door, you MUST perform a
Factory Default Reset FIRST! See the Users Guide for more information.
This lock is designed for the following operating temperatures:
Outside Lock Body (exterior mounted): -31˚F (-35˚C) to 151˚F (66˚C)
Inside Lock Body (interior mounted): 14˚F (-10˚C) to 120˚F (49˚C)
STEPS AT A GLANCE
1 Check current door/frame alignment. ....................................................................................4
2 Remove the current deadbolt from the door. ........................................................................4
3 Watch the online video. ...........................................................................................................4
4 Check door/frame dimensions. ..............................................................................................5
5 Locate programming and User Codes. ..................................................................................5
6 Install bolt and strike. ..............................................................................................................6
6a Adjust bolt length, if necessary. ..........................................................................................6
6b Change the faceplate, if necessary. ...................................................................................6
6c Install the bolt into the door. ................................................................................................7
6d Install the strike into the frame. ...........................................................................................7
6e Test bolt alignment. .............................................................................................................8
7 Install the Touchscreen Assembly..........................................................................................8
7a Install the Touchscreen on the outside of the door. ............................................................8
7b Install the Support Plate on the inside of the door. .............................................................9
8 Install the Alarm Assembly. .....................................................................................................9
8a Remove the battery cover from the Alarm Assembly. .........................................................9
8b Connect the cable to the Alarm Assembly. .......................................................................10
8c Install the Alarm Assembly. ...............................................................................................10
8d Secure the Alarm Assembly to the Support Plate. ............................................................ 11
9 Install the Batteries. ...............................................................................................................11
9a Install the batteries into the battery tray. ........................................................................... 11
9b Install the battery cover. ....................................................................................................12
10 Set up the Lock. .....................................................................................................................12
11 Test the Lock. .........................................................................................................................12
11a Extend the bolt (lock) using the inside thumbturn. ............................................................12
11b Extend the bolt (lock) using the Touchscreen. ..................................................................13
11c Retract the bolt (unlock) using the Touchscreen. .............................................................13
11d If the lock failed to lock or unlock: .....................................................................................13
12 Continue to the User’s Guide. ..............................................................................................14
4
ENGLISH
1 Check current door/frame alignment.
Because the bolt on this lock is extended automatically, it is important that the door and frame
are aligned. Use this checklist to determine if your current alignment will work without any
adjustment.
I can lock the door without pushing, pulling or lifting the door.
My door alignment— the ability to lock the door easily and smoothly— stays the same with
changing seasons.
When the door is closed, there is space for the deadbolt to extend 1” into the frame when
locked.
If you could not check every box in the checklist, you will need to adjust your door and/or
frame. Please visit answers.schlage.com for more information.
2 Remove the current deadbolt from the door.
Remove the entire deadbolt, including the bolt. You may also want to remove the strike.
L In order to maintain BHMA Grade 1, you must install the included reinforcement plate and
strike (see step 6d on page 7).
L A standard Schlage deadbolt is shown. Check with your specic deadbolt manufacturer if
you need help.
3 Watch the online video.
The online videos will give you a good overview of the installation process. Please visit
answers.schlage.com and then click on Touchscreen Deadbolt with Alarm. Watch the
video Installing the Touchscreen Deadbolt With Alarm. You can also scan the code on the
back of this guide with your smartphone.
5
ENGLISH
4 Check door/frame dimensions.
Measure the dimensions shown. If your door dimensions
do not match, you will need to change your door
preparation. Go to answers.schlage.com for drilling
instructions.
L If your door is thicker than 1C\v”, you will need a thick
door kit. Please call Customer Service:
L Mark your crossbore and backset measurements
on this page. You will need these measurements for installation. Either measurement is
normal.
Backset
2C\,” (60 mm)
OR
2C\v” (70 mm)
Minimum 5"
(127 mm)
This lever represents
your current knob or
lever, which may be
already installed.
Door Thickness
1C\,” to 1C\v
Crossbore
Diameter
2Z\,” (53 mm)
OR
1Z\x" (38 mm)
1” (25 mm)
Hole
Door Stop
Hole at least
1” (25 mm)
deep.
5 Locate Programming and User Codes.
Codes are located on the sticker on the back of the Users Guide. You will need these codes
to operate the lock. They are also located on the back of the Alarm Assembly.
L Do NOT remove the sticker from the back of the lock! If you lose your Programming Code,
you can reset your lock back to these default codes.
installation or programming, don’t return
the Keypad Lock to the store. Our Schlage
Customer Service representatives are ready
to help.
Toll-Free: 1.888.805.9837
Live Chat: schlage.com

24060857
If you have questions about
any part of installation or
programming, don’t return
the Touchscreen Deadbolt
with Alarm to the store. Our
Schlage Customer Service
representatives are ready to
help.
Toll-Free: 1.888.805.9837
Live Chat: schlage.com
Si tiene dudas acerca de cualquier
parte de la instalación o programación,
no devuelva el cerrojo de pantalla
táctil con alarma a la tienda. Nuestros
representantes del Departamento de
Servicio de Asistencia al Cliente de
Schlage están listos para ayudarlo.
Línea gratuita
: 1.888.805.9837
Chat en vivo
: schlage.com
Si vous avez des questions
concernant l’installation ou
programmation, ne ramenez
pas le pêne dormant avec
écran tactile muni d’une alarme
au magasin. Les représentants
du service à la clientèle de
Schlage sont à votre service.
Sans frais
: 1.888.805.9837
Clavardage en direct : schlage.com
To learn more about this
product, scan the code with
your smartphone.
Download the app at
scanlife.com.
Para obtener más información sobre
este producto, escanee el código con
un teléfono inteligente.
Descargue la aplicación en
scanlife.com.
Pour de plus amples renseignements
sur ce produit, numérisez le code avec
votre téléphone intelligent.
Téléchargez l’application au
scanlife.com.
© Allegion 2014
Printed in Country
24060857 Rev. 01/14-a
Default Programming Code
Código de Programación
Predeterminado
&RGHGHSURJUDPPDWLRQSUpGp¿QL
Default User Codes
Códigos de Usuario Predeterminado
&RGHVG¶XWLOLVDWHXUSUpGp¿QLV
Place Label Here
Coloque la Etiqueta Aquí
Apposer l’étiquette ici
Default Codes
Códigos Predeterminados
&RGHVSUpGp¿QLV
SCHLAGE
00000000
BE469
Firmware Ver.: xxx-x
Programming Code: 000000
User Code A: 0000
User Code B: 0000
0000000-000
00000000
FCC ID: xxxxxxxx
SCHLAGE
00000000
BE469
Firmware Ver.: xxx-x
Programming Code: 000000
User Code A: 0000
User Code B: 0000
0000000-000
00000000
FCC ID: xxxxxxxx
The same codes
are located in both
places.
SCHLAGE
00000000
BE469
Firmware Ver.: xxx-x
Programming Code: 000000
User Code A: 0000
User Code B: 0000
0000000-000
00000000
FCC ID: xxxxxxxx
installation or programming, don’t return
the Keypad Lock to the store. Our Schlage
Customer Service representatives are ready
to help.
Toll-Free: 1.888.805.9837
Live Chat: schlage.com
Ingersoll Rand (NYSE:IR) advances the quality of life by creating and
and our family of brands—including Club Car®, Ingersoll Rand®,
Schlage®, Thermo King® and Trane® —work together to enhance
the quality and comfort of air in homes and buildings; transport
and protect food and perishables; secure homes and commercial
are a $14 billion global business committed to a world of sustainable
progress and enduring results.
800-847-1864 www.ingersollrand.com
www.schlage.com
www.trane.com
© 2012 Ingersoll Rand
All rights reserved.
Printed in Country
24060840 Rev. 10/12-a

24060840
If you have questions about any part of
installation or programming, don’t return the
Touchscreen Deadbolt with Alarm to the store.
Our Schlage Customer Service representatives
are ready to help.
Toll-Free: 1.888.805.9837
Live Chat: schlage.com
To learn more about this
product, scan the code with
your smartphone.
Download the app at
scanlife.com.
Default Programming Code
Default User Codes
Default Codes
SCHLAGE
00000000
BE469
Firmware Ver.: xxx-x
Programming Code: 000000
User Code A: 0000
User Code B: 0000
0000000-000
00000000
FCC ID: xxxxxxxx
Toll-Free Calling From:
U.S.A.: (888) 805-9837
Canada: (800) 997-4734
Mexico: 018005067866
6
ENGLISH
6 Install bolt and strike.
6a Adjust bolt length, if necessary.
If the backset (see step 4 on page 5) of your door was 2C\,” (60 mm), you do not
need to do anything. Proceed to step step 6b.
If the backset (see step 4 on page 5) of your door was 2C\v” (70 mm), you need to
adjust your bolt. Twist the faceplate until the button pops into the 2C\v” space.
Twist the
faceplate.
Make sure the button
pops into place.
6b Change the faceplate, if necessary.
L In step 6c, your installation will depend on which kind of door edge you had in this step.
No Mortise
If your door looks like this, complete the
steps below.
1. Use a athead screwdriver to pry the
faceplate off.
2. Remove the backplate.
Mortise
If your door looks like this, you don’t
need to do anything. Go to step 6c.
OR
Alternate Mortise
Use the square-corner faceplate if
desired. A square-corner faceplate can
be purchased from Customer Support.
1. Use a athead screwdriver to pry the
faceplate off.
OR
2. Press the square-corner faceplate
into place. The faceplate may
not stay in place until screws are
installed in next step.
4. Go to step 6c, Figure B.
3. Go to step 6c, Figure A.
3. Slide the round faceplate into place.
7
ENGLISH
6c Install the bolt into the door.
Choose the picture below that matches your door.
FIgure A: Mortise Figure B: No Mortise
Use a block of wood and
a hammer (not included)
to tap the bolt into place.
You don’t need to use the
screws.
Actual Size (2)
OR
Make sure
the word
TOP faces
up when
installing
the bolt.
6d Install the strike into the frame.
Install all the parts shown for maximum security.
L In order to maintain BHMA Grade 1, you must install the included reinforcement plate and
strike.
Actual Size (2)
Reinforcement Screws: Actual Size (2)
Door Stop
Make sure this
hole is at least 1”
(25 mm) deep.
L The reinforcement screws may not t on doors with sidelights.
8
ENGLISH
6e Test bolt alignment.
1. Close the door.
2. Insert a athead screwdriver into the slot in the bolt, as shown.
3. Rotate the screwdriver toward the door edge to extend the bolt into the hole in the frame.
This operation should be smooth. You should be able to rotate the screwdriver 90˚, fully
extending the bolt.
4. If the operation was not smooth, or if the bolt did not fully extend, adjust your frame and/or
door preparation. Go to answers.schlage.com and watch the video Proper Alignment of
Door and Frame for a Smoothly Operating Lock for further instructions.
5. Retract (unlock) the bolt before continuing to step 7.
L If the deadbolt continues to rub against the strike, contact Customer Support for an
alternate strike with an additional .060” (2 mm) clearance.
Retract the bolt
before continuing
to step 6.
CAUTION
Test from the inside to
avoid being locked out!
If you can rotate the
screwdriver a full
90˚, then the bolt is
fully extended.
7 Install the Touchscreen Assembly.
7a Install the Touchscreen on the outside of the door.
L The clips snap into the crossbore (see step 4 on page 5) to assist in holding the
keypad on the door.
L The Touchscreen Assembly should install smoothly. If it does not, check that the bolt is set
to the correct backset (see step 6a on page 6).
Clips snap into
the crossbore.
Align the tab
with the notch.
Route the cable
under the bolt.
L NOTE: If you have a crossbore (see step 4 on page 5) that is slightly less than 2Z\,
(54 mm), the lock may not install smoothly. You can remove the spacer. Always remove
the spacer for a 1Z\x” (38 mm) crossbore. See Spacer Removal on page 15 before
continuing.
9
ENGLISH
7b Install the Support Plate on the inside of the door.
L Make sure the Touchscreen and Support Plate are straight on the door before tightening
the screws. Tighten screws fully to prevent the lock from moving over time.
TOP
Make sure the
indented circle is
facing the door.
Have someone hold
the Touchscreen on the
outside of the door while
you tighten the screws.
Actual Size (2)
Route the cable
through the slot.
8 Install the Alarm Assembly.
8a Remove the battery cover from the Alarm Assembly.
DO NOT remove
the battery tray
(not shown)!
ELECTROSTATIC DISCHARGE
WARNING!
Touching the circuit board
may damage the lock!
10
ENGLISH
8b Connect the cable to the Alarm Assembly.
L Locate the screws in step 8d before beginning this step so they will be handy when you
need them.
The connector ts only one
way. Match the dot on the
connector with the dot on the
circuit board.
8c Install the Alarm Assembly.
1. Align the tab with the notch as shown.
2. Route the cable into the channel.
3. Then slide the Alarm Assembly towards the door.
Align tab with
notch.
Route the cable into
the channel to avoid
crimping the cable.
11
ENGLISH
8d Secure the Alarm Assembly to the Support Plate.
Actual Size
8-32 x 1Z\,
Actual Size
8-32 x .187 UP FHMS
Install the lower
screw rst.
NOTE
Please do not rotate the thumbturn at this time. It may not rotate
easily. Setup will be performed after installation is complete.
9 Install the Batteries.
9a Install the batteries into the battery tray.
1. Unsnap the connector.
2. Remove the battery tray.
3. Install four high-quality alkaline AA batteries.
L Lithium batteries may cause undesirable
operation.
4. Carefully replace the battery tray, with the
batteries facing the door.
5. Snap the connector back into place.
-
+
-
+
-
+
-
+
ELECTROSTATIC DISCHARGE
WARNING!
Touching the circuit board
may damage the lock!
12
ENGLISH
9b Install the battery cover.
Speaker Hole
DO NOT install screw!
10 Set up the Lock.
1. Open the door if it is not already open.
2. Press the Outside Schlage Button.
3. Enter one of the Default User Codes into the
lock (see step 5 on page 5).
4. The lock will perform a setup routine. Wait until
the bolt stops moving before continuing.
L If the Touchscreen did not light up during this
step, you may have a power problem. Install
fresh batteries and make sure the battery wires
are connected (see step 9a on page 11).
If that does not help, make sure the cable is
connected and is not crimped (see step 8b on
page 10).
11 Test the Lock.
CAUTION
Keep the key with you
during testing to avoid
being locked out!
L For complete information about programming
and light/beep patterns, see the Programming
the Touchscreen and Troubleshooting
sections in the Users Guide.
11a Extend the bolt (lock) using the inside thumbturn.
1. Close the door.
2. Rotate the thumbturn toward the door jamb to extend the
bolt.
Was this operation smooth?
Continue to
step 11b.
You may need to adjust your door/
frame. Continue to step 11b for
further testing, or go to answers.
schlage.com and watch the video
Proper Alignment of Door and
Frame for a Smoothly Operating
Lock for adjustment instructions.
NOYES
13
ENGLISH
11b Extend the bolt (lock) using the Touchscreen.
1. Unlock the door using the thumbturn if you have
not already.
2. Take the key and the Default User codes with you!
Go outside and close the door.
3. Press the Outside Schlage Button.
4. The bolt should extend.
Alignment is
correct.
You need to adjust your
door/frame. Go to
answers.schlage.com
for adjustment
instructions.
YES
NO
The lock has both a low power and
high power mode. It will try low power
rst and then high power when
unsuccessful. After three times using
high power, it will always use the high
power mode instead of trying twice each
time. You may want to adjust your door/
frame to conserve battery power, but it
is not necessary.
YES
NO
Did the bolt extend (is the door locked)?
Did the bolt take two tries to
extend?
Each try sounds like two
cycles.
11c Retract the bolt (unlock) using the Touchscreen.
1. Press the Schlage button.
2. Enter one of the default User Codes into the lock.
3. The bolt should retract.
Alignment is
correct.
Use the key to unlock the
door. You need to adjust
your door/frame. Go to
answers.schlage.com
for adjustment
instructions.
YES
NO
Did the bolt retract (is the door unlocked)?
11d If the lock failed to lock or unlock:
1. If the Touchscreen did not light up, you may have a power problem. Install fresh batteries
and make sure the battery connector is connected (see step 9a on page 11). If that
does not help, make sure the cable is connected to the Alarm Assembly and is not
crimped (see step 8b on page 10).
2. If the lock had power but you need to adjust your door/frame, please go online to
answers.schlage.com for complete adjustment instructions and videos.
14
ENGLISH
12 Continue to the User’s Guide.
Your lock is installed and functional. Continue to the Users Guide for complete information
about how to congure and operate the lock and alarm.
15
ENGLISH
SPACER REMOVAL
(OPTION FOR SMALL CROSSBORES ONLY)
ONLY if your door has less than a 2Z\," (54 mm) crossbore, remove the spacer as shown.
1. Remove screw. 2. Rotate and remove spacer. 3. Replace screw.
Less than 2Z\," (54 mm)
Crossbore
NEED HELP?
Please call customer support before returning the product to the store.
Toll-Free Calling From: U.S.A.: (888) 805-9837
Canada: (800) 997-4734
Mexico: 018005067866
Visit our web site for videos, FAQs and more: answers.schlage.com
21
ESPAÑOL
4 Consulte las dimensiones de la puerta/marco.
Mida las dimensiones que se muestran. Si las
dimensiones de su puerta no coinciden, deberá cambiar
la preparación de su puerta. Visite
answers.schlage.com para ver instrucciones sobre la
perforación.
L Si el espesor de su puerta es mayor a 1C\v”, necesitará
un kit para puerta gruesa. Comuníquese con el Servicio
de Asistencia al Cliente.
L Recuerde la medición de su entrada. La necesitará para el próximo paso. Las mediciones
son normales.
Entrada
2C\,” (60 mm)
O
2C\v” (70 mm)
Mínimo de 5"
(127 mm)
Esta palanca
representa su perilla o
palanca actual, que ya
puede estar instalada.
Espesor de la puerta
1C\,” a 1C\v
Diámetro del
oricio transversal
2Z\,” (53 mm)
O
1Z\x" (38 mm)
1” (25 mm)
Agujero
Tope de la
puerta
Perforación
de, al menos,
1” (25 mm) de
profundidad.
5 Ubique los códigos de programación y de usuario.
Los códigos guran en el adhesivo que se encuentra en la parte posterior de la Guía del
usuario. Necesitará estos códigos para operar la cerradura. También se encuentran en la
parte posterior de la unidad de la alarma.
L ¡NO retire el adhesivo de la parte posterior de la cerradura! Si pierde su código de
programación, puede restablecer su cerradura a estos códigos predeterminados.
installation or programming, don’t return
the Keypad Lock to the store. Our Schlage
Customer Service representatives are ready
to help.
Toll-Free: 1.888.805.9837
Live Chat: schlage.com

24060857
If you have questions about
any part of installation or
programming, don’t return
the Touchscreen Deadbolt
with Alarm to the store. Our
Schlage Customer Service
representatives are ready to
help.
Toll-Free: 1.888.805.9837
Live Chat: schlage.com
Si tiene dudas acerca de cualquier
parte de la instalación o programación,
no devuelva el cerrojo de pantalla
táctil con alarma a la tienda. Nuestros
representantes del Departamento de
Servicio de Asistencia al Cliente de
Schlage están listos para ayudarlo.
Línea gratuita
: 1.888.805.9837
Chat en vivo
: schlage.com
Si vous avez des questions
concernant l’installation ou
programmation, ne ramenez
pas le pêne dormant avec
écran tactile muni d’une alarme
au magasin. Les représentants
du service à la clientèle de
Schlage sont à votre service.
Sans frais
: 1.888.805.9837
Clavardage en direct : schlage.com
To learn more about this
product, scan the code with
your smartphone.
Download the app at
scanlife.com.
Para obtener más información sobre
este producto, escanee el código con
un teléfono inteligente.
Descargue la aplicación en
scanlife.com.
Pour de plus amples renseignements
sur ce produit, numérisez le code avec
votre téléphone intelligent.
Téléchargez l’application au
scanlife.com.
© Allegion 2014
Printed in Country
24060857 Rev. 01/14-a
Default Programming Code
Código de Programación
Predeterminado
&RGHGHSURJUDPPDWLRQSUpGp¿QL
Default User Codes
Códigos de Usuario Predeterminado
&RGHVG¶XWLOLVDWHXUSUpGp¿QLV
Place Label Here
Coloque la Etiqueta Aquí
Apposer l’étiquette ici
Default Codes
Códigos Predeterminados
&RGHVSUpGp¿QLV
SCHLAGE
00000000
BE469
Firmware Ver.: xxx-x
Programming Code: 000000
User Code A: 0000
User Code B: 0000
0000000-000
00000000
FCC ID: xxxxxxxx
SCHLAGE
00000000
BE469
Firmware Ver.: xxx-x
Programming Code: 000000
User Code A: 0000
User Code B: 0000
0000000-000
00000000
FCC ID: xxxxxxxx
Los mismos
códigos se ubican
en ambos lugares.
SCHLAGE
00000000
BE469
Firmware Ver.: xxx-x
Programming Code: 000000
User Code A: 0000
User Code B: 0000
0000000-000
00000000
FCC ID: xxxxxxxx
installation or programming, don’t return
the Keypad Lock to the store. Our Schlage
Customer Service representatives are ready
to help.
Toll-Free: 1.888.805.9837
Live Chat: schlage.com
Ingersoll Rand (NYSE:IR) advances the quality of life by creating and
and our family of brands—including Club Car®, Ingersoll Rand®,
Schlage®, Thermo King® and Trane® —work together to enhance
the quality and comfort of air in homes and buildings; transport
and protect food and perishables; secure homes and commercial
are a $14 billion global business committed to a world of sustainable
progress and enduring results.
800-847-1864 www.ingersollrand.com
www.schlage.com
www.trane.com
© 2012 Ingersoll Rand
All rights reserved.
Printed in Country
24060840 Rev. 10/12-a

24060840
If you have questions about any part of
installation or programming, don’t return the
Touchscreen Deadbolt with Alarm to the store.
Our Schlage Customer Service representatives
are ready to help.
Toll-Free: 1.888.805.9837
Live Chat: schlage.com
To learn more about this
product, scan the code with
your smartphone.
Download the app at
scanlife.com.
Default Programming Code
Default User Codes
Default Codes
SCHLAGE
00000000
BE469
Firmware Ver.: xxx-x
Programming Code: 000000
User Code A: 0000
User Code B: 0000
0000000-000
00000000
FCC ID: xxxxxxxx
Líneas gratuitas:
EE. UU.: (888) 805-9837
Canadá: (800) 997-4734
México: 018005067866
37
FRANÇAIS
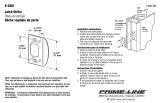
4 Vérifiez les dimensions de la porte et du cadre.
Mesurez les dimensions illustrées. Si les dimensions
de la porte ne correspondent pas, vous devrez apporter
des modications à la préparation. Pour les instructions
de perçage, consultez answers.schlage.com.
L Si l’épaisseur de votre porte dépasse 4,5 cm (1C\v po), il
vous faut un ensemble pour porte épaisse. Appelez le
service à la clientèle.
L Notez la distance d’entrée. Vous en aurez besoin lors
de l’étape suivante. Toutes les mesures sont normales.
Distance d’entrée
2C\,” (60 mm)
OU
2C\v” (70 mm)
Minimum 5"
(127 mm)
Ce levier représente
votre poignée ou
bouton de porte
actuel, qui est peut-
être déjà installé.
Épaisseur de la porte
1C\,” à 1C\v
Diamètre du
logement du corps
2Z\,” (53 mm)
OU
1Z\x" (38 mm)
1” (25 mm)
Trou
Arrêt de
porte
Trou d’une
profondeur
minimale de
1” (25 mm)
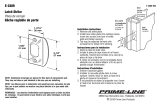
5 Repérez les codes de programmation et d’utilisateur.
Les codes se trouvent sur l’étiquette apposée au verso de ce guide d’utilisation. Vous en
aurez besoin pour faire fonctionner la serrure. Ils sont également inscrits au dos du boîtier de
l’alarme.
L NE RETIREZ PAS l’étiquette apposée au dos de la serrure! Si vous perdez votre code de
programmation, ces codes par défaut vous permettront de réinitialiser la serrure.
installation or programming, don’t return
the Keypad Lock to the store. Our Schlage
Customer Service representatives are ready
to help.
Toll-Free: 1.888.805.9837
Live Chat: schlage.com

24060857
If you have questions about
any part of installation or
programming, don’t return
the Touchscreen Deadbolt
with Alarm to the store. Our
Schlage Customer Service
representatives are ready to
help.
Toll-Free: 1.888.805.9837
Live Chat: schlage.com
Si tiene dudas acerca de cualquier
parte de la instalación o programación,
no devuelva el cerrojo de pantalla
táctil con alarma a la tienda. Nuestros
representantes del Departamento de
Servicio de Asistencia al Cliente de
Schlage están listos para ayudarlo.
Línea gratuita
: 1.888.805.9837
Chat en vivo
: schlage.com
Si vous avez des questions
concernant l’installation ou
programmation, ne ramenez
pas le pêne dormant avec
écran tactile muni d’une alarme
au magasin. Les représentants
du service à la clientèle de
Schlage sont à votre service.
Sans frais
: 1.888.805.9837
Clavardage en direct : schlage.com
To learn more about this
product, scan the code with
your smartphone.
Download the app at
scanlife.com.
Para obtener más información sobre
este producto, escanee el código con
un teléfono inteligente.
Descargue la aplicación en
scanlife.com.
Pour de plus amples renseignements
sur ce produit, numérisez le code avec
votre téléphone intelligent.
Téléchargez l’application au
scanlife.com.
© Allegion 2014
Printed in Country
24060857 Rev. 01/14-a
Default Programming Code
Código de Programación
Predeterminado
&RGHGHSURJUDPPDWLRQSUpGp¿QL
Default User Codes
Códigos de Usuario Predeterminado
&RGHVG¶XWLOLVDWHXUSUpGp¿QLV
Place Label Here
Coloque la Etiqueta Aquí
Apposer l’étiquette ici
Default Codes
Códigos Predeterminados
&RGHVSUpGp¿QLV
SCHLAGE
00000000
BE469
Firmware Ver.: xxx-x
Programming Code: 000000
User Code A: 0000
User Code B: 0000
0000000-000
00000000
FCC ID: xxxxxxxx
SCHLAGE
00000000
BE469
Firmware Ver.: xxx-x
Programming Code: 000000
User Code A: 0000
User Code B: 0000
0000000-000
00000000
FCC ID: xxxxxxxx
Les mêmes codes
sont notés aux deux
endroits.
SCHLAGE
00000000
BE469
Firmware Ver.: xxx-x
Programming Code: 000000
User Code A: 0000
User Code B: 0000
0000000-000
00000000
FCC ID: xxxxxxxx
installation or programming, don’t return
the Keypad Lock to the store. Our Schlage
Customer Service representatives are ready
to help.
Toll-Free: 1.888.805.9837
Live Chat: schlage.com
Ingersoll Rand (NYSE:IR) advances the quality of life by creating and
and our family of brands—including Club Car®, Ingersoll Rand®,
Schlage®, Thermo King® and Trane® —work together to enhance
the quality and comfort of air in homes and buildings; transport
and protect food and perishables; secure homes and commercial
are a $14 billion global business committed to a world of sustainable
progress and enduring results.
800-847-1864 www.ingersollrand.com
www.schlage.com
www.trane.com
© 2012 Ingersoll Rand
All rights reserved.
Printed in Country
24060840 Rev. 10/12-a

24060840
If you have questions about any part of
installation or programming, don’t return the
Touchscreen Deadbolt with Alarm to the store.
Our Schlage Customer Service representatives
are ready to help.
Toll-Free: 1.888.805.9837
Live Chat: schlage.com
To learn more about this
product, scan the code with
your smartphone.
Download the app at
scanlife.com.
Default Programming Code
Default User Codes
Default Codes
SCHLAGE
00000000
BE469
Firmware Ver.: xxx-x
Programming Code: 000000
User Code A: 0000
User Code B: 0000
0000000-000
00000000
FCC ID: xxxxxxxx
Sans frais depuis ces pays :
États-Unis : (888) 805-9837
Canada : (800) 997-4734
Mexique : 018005067866
If you have questions about
any part of installation or
programming, don’t return
the Touchscreen Deadbolt
with Alarm to the store. Our
Schlage Customer Service
representatives are ready to
help.
Toll-Free: 1.888.805.9837
Live Chat: schlage.com
Si tiene dudas acerca de cualquier
parte de la instalación o programación,
no devuelva el cerrojo de pantalla
táctil con alarma a la tienda. Nuestros
representantes del Departamento de
Servicio de Asistencia al Cliente de
Schlage están listos para ayudarlo.
Línea gratuita:
1.888.805.9837
Chat en vivo: schlage.com
Si vous avez des questions
concernant l’installation ou
programmation, ne ramenez pas
le pêne dormant avec écran tactile
muni d’une alarme au magasin. Les
représentants du service à la clientèle
de Schlage sont à votre service.
Sans frais : 1.888.805.9837
Clavardage en direct :
schlage.com
To learn more about this
product, scan the code with
your smartphone.
Download the app at
scanlife.com.
Para obtener más información
sobre este producto, escanee
el código con un teléfono
inteligente.
Descargue la aplicación en
scanlife.com.
Pour de plus amples renseignements
sur ce produit, numérisez le code avec
votre téléphone intelligent.
Téléchargez l’application au scanlife.
com.
*24060840*
24060840
© Allegion 2014
Printed in Country
24060840 Rev. 12/14-g
4.75
9.000
FRONT
Additional Notes: Revision History Revision Description:
G > Revised artwork.
1. None B C D E F G
030710 033120 036526 042575 054550 060815
Material
White Paper
Edited By Approved By EC Number Release Date
R. Byun M. Sasso 060815 12-13-14
Notes
1. printed two sides
2. printed black
3. tolerance ± .13
4. printed in country may vary
5. drawings not to scale
6. 48-page saddle-stitched booklet
Title
BE469 IS
Creation Date
10-12-12
Number
24060840
Revision
G
Created By
M. Sasso
Activity
3899 Hancock Expwy
Security, CO 80911
Allegion
Copyright © 2014Software: InDesign CS6
9.500
9.000
BEGINNING SHEET FOLDED SHEET
FRONT
  • Page 1 1
  • Page 2 2
  • Page 3 3
  • Page 4 4
  • Page 5 5
  • Page 6 6
  • Page 7 7
  • Page 8 8
  • Page 9 9
  • Page 10 10
  • Page 11 11
  • Page 12 12
  • Page 13 13
  • Page 14 14
  • Page 15 15
  • Page 16 16
  • Page 17 17
  • Page 18 18
  • Page 19 19
  • Page 20 20
  • Page 21 21
  • Page 22 22
  • Page 23 23
  • Page 24 24
  • Page 25 25
  • Page 26 26
  • Page 27 27
  • Page 28 28
  • Page 29 29
  • Page 30 30
  • Page 31 31
  • Page 32 32
  • Page 33 33
  • Page 34 34
  • Page 35 35
  • Page 36 36
  • Page 37 37
  • Page 38 38
  • Page 39 39
  • Page 40 40
  • Page 41 41
  • Page 42 42
  • Page 43 43
  • Page 44 44
  • Page 45 45
  • Page 46 46
  • Page 47 47
  • Page 48 48
  • Page 49 49

Schlage BE468 CAM 605 User manual

Category
Alarm clocks
Type
User manual

Ask a question and I''ll find the answer in the document

Finding information in a document is now easier with AI