Page is loading ...

BH FITNESS RS3 RECUMBENT CYCLE
OWNER’S MANUAL
BH FITNESS
20155 Ellipse, Foothill Ranch, CA 92610
Phone: 949-206-0330,
866-325-2339 (USA & Canada)
Fax: 949-206-0013
Email: [email protected]
Web: www
.%+)LWQHVV86$.com

RS3 RECUMBENT CYCLE
1
INTRODUCTION
Congratulations for selecting the RS3 Recumbent Cycle as a fitness resource. The BH Fitness
RS3 offers many exercise programs that benefit users of all levels and ages.
The RS3 is designed to make your workouts more effective and enjoyable.
Please read this manual carefully before using the RS3. This will allow you to get a full
understanding of all the features the BH Fitness Recumbent Cycle provides. If you have
questions or concerns, please contact BH FITNESS or any authorized BH FITNESS distributors
in your area.
BH FITNESS
20155 Ellipse, Foothill Ranch, CA 92610
Phone: 949-206-0330
, 866-325-2339 (USA & Canada)
Fax: 949-206-0013
Email: [email protected]
Web: www.bhnorthamerica.com
and www.bhfitness.com
BEFORE YOU BEGIN
It is very important to become familiar with the frequently used components of your RS3.
20155 Ellipse, Foothill Ranch, CA 92610
Phone: 949-206-0330,
866-325-2339 (USA & Canada)

2
TABLE OF CONTENTS
SECTION PAGE
1. IMPORTANT SAFETY INSTRUCTIONS ..................................................... ..3
2. PRE & ASSEMBLY INSTRUCTIONS...................
.................................... . 5
3. PARTS LIST................................................................................................. 13
4. EXPLODED VIEW ....................................................................................... 15
5. COMPUTER CONSOLE.............................................................................. 18
6. HEART RATE CALCULATION..................................................................... 19
7. WARRANTY ................................................................................................ 20
20155 Ellipse, Foothill Ranch, CA 92610
Phone: 949-206-0330,
866-325-2339 (USA & Canada)
RS3 RECUMBENT CYCLE

3
SECTION 1 - IMPORTANT SAFETY INSTRUCTIONS
Read all instructions before using the Unit.
User Safety:
Before using this or any other exercise equipment consult your family physician or health care
professional in order to develop a well-planned exercise program to fit your health needs. If you
encounter any pain or breathing discomfort while working out, STOP!, and consult a physician before
continuing.
1. Close supervision is necessary when this unit is used by or near children, invalids or disabled
persons. Children are curious and vulnerable to accidents. Do not use the unit as a toy.
2. Do not wear loose or dangling clothing while using the unit.
3. Maximum user weight is 350 lbs.
4. Only one person can use the unit at a time.
5. Keep hands away from moving parts.
6. The owner is responsible for explaining safety instructions to each user.
Unit Safety:
WARNING: To reduce the risk of fire, electric shock, injury to persons or inflicting the
harm of a burn:
7. Never leave the unit unattended when plugged in. Unplug the unit from the electrical power before
leaving the room, when unused and before cleaning, servicing or adding or removing parts.
8. Unplug the unit prior to cleaning to reduce the risk of electric shock, serious burns, and the risk of
injuries.
9. Never operate this unit if it has a damaged electrical cord or plug. Do not operate this unit if it is not
working properly. Do not operate this unit if it has been dropped or damaged. Do not operate this unit
if it has been immersed into water. Return the unit to a service center for examination and repair.
10. Do not pull or carry the unit by the electrical cord. Do not use the cord as a handle.
11. Keep the electrical cord away from heated surfaces.
12. Connect this unit to a properly grounded 110-120V, 15 or 20 Amp dedicated outlet only.
13. Call your service center or BH Fitness with your concerns before taking your unit in for repair.
14. Do not place sharp objects near the unit. Never drop or insert any object into any opening.
15. Do not use outdoors.
16. Do not operate where aerosol (spray) products are being used or where oxygen is being
administered.
20155 Ellipse, Foothill Ranch, CA 92610
Phone: 949-206-0330,
866-325-2339 (USA & Canada)
RS3 RECUMBENT CYCLE

4
IMPORTANT SAFETY INSTRUCTIONS (cont’d)
17. Use the unit only as described in this manual. Only use attachments recommended by the
manufacturer.
18. For safety, keep a minimum clearance of 18” on the front and each side and 24” at the rear of the unit.
Place the unit on a flat stable surface.
Please save these Instructions
ELECTRICAL POWER CONNECTOR
Your RS3 Recumbent Cycle has a two prong external electrical power connector for use on a
nominal 110-120 volt circuit. Use only the electrical power connector provided with your RS3
Recumbent Cycle. If you misplace the electrical connector, please contact BH Fitness for an
original replacement. Use of the wrong electrical connector may cause damage to your RS3
Recumbent Cycle. Do not use an adapter or extension cords with this product.
CLEANING
Clean with soap and slightly damp cloth only; never use solvents.
20155 Ellipse, Foothill Ranch, CA 92610
Phone: 949-206-0330,
866-325-2339 (USA & Canada)
RS3 RECUMBENT CYCLE

5
SECTION 2 - PRE ASSEMBLY INSTRUCTIONS
20155 Ellipse, Foothill Ranch, CA 92610
Phone: 949-206-0330,
866-325-2339 (USA & Canada)
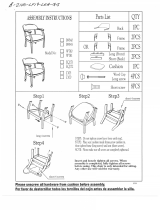
Front Frame Rear Frame
Saddle support
tube
RS3 RECUMBENT CYCLE

6
PRE ASSEMBLY INSTRUCTIONS (cont’d)
20155 Ellipse, Foothill Ranch, CA 92610
Phone: 949-206-0330,
866-325-2339 (USA & Canada)
1/4"x40L
Water bottle
(N4)Screw
M6X8
(N9) (N10)
(M1) Bottle holder
(M3) Water
bottle
J2-(R)
J1-(L)
(N11 )
(O)-Adaptor
M8X15
M8 M8X16X1.2T
M8X35
M8X20
M6X10
M8X16X1.2T(BLACK)
(L1) Strap(L)
(L2)Strap(R)
(N15) Screw
M8X35X2/
RS3 RECUMBENT CYCLE

7
ASSEMBLY INSTRUCTIONS
20155 Ellipse, Foothill Ranch, CA 92610
Phone: 949-206-0330,
866-325-2339 (USA & Canada)
FIGURE 1
REAR STABILIZER ASSEMBLY
or loosening them (turning counterclockwise) until stable.
FIGURE 2
FRONT STABILIZER ASSEMBLY
Assemble the front stabilizer(C)
to the front main frame(A)
using the bolts(N7), spring washers
(N2) and flat washers(N3).
D
N7
B
B
FRONT & REAR MAIN FRAME ASSEMBLY
Step1. Connect the sensor wires(A10) to (B20).
Step2. Slide front main frame over rear main frame and secure
the assembly with hex bolts(N1), spring washers(N2) and
flat washers(N3).
LEVELING THE MACHINE
If the machine is unstable and rocking, adjust the foot pads under
the front and rear stabilizers by tightening them (turning clockwise).
Assemble the rear stabilizer(D) to the
rear main frame(B) using the bolts(N7),
spring washers(N2) and flat washers(N3).
A
B20
A10
N7
C
N2
N3
N1
N2
N3
N2
N3
RS4 RECUMBENT CYCLERS3 RECUMBENT CYCLE

8
ASSEMBLY INSTRUCTIONS (cont’d)
20155 Ellipse, Foothill Ranch, CA 92610
Phone: 949-206-0330,
866-325-2339 (USA & Canada)
FIGURE 3
CENTRAL SUPPORT TUBE ASSEMBLY
Step1. Slide decorative cover(N9) into center
support tube(E) from bottom up
Step2. Connect the cables A8 to E2 and
A10 to E3
Step3. Place center support tube(E) onto the
front main frame(A) and secure
them by bolts(N7), spring washers(N2)
and flat washers(N3).
Step4. Slide the decorative cover over the seam
FRONT HANDLE BAR ASSEMBLY
FIGURE 4
Place the front handle bar(F) on top of
the center support tube and tighten
with bolts(N5) and flat washers(N11).
E2
E3
N3
N2
A10
A8
N9
A
E
N7
F
E
N11
N5
L-Left
L-Right
in step 3.
RS3 RECUMBENT CYCLE

9
ASSEMBLY INSTRUCTIONS (cont’d)
20155 Ellipse, Foothill Ranch, CA 92610
Phone: 949-206-0330,
866-325-2339 (USA & Canada)
FIGURE 5
MONITOR ASSEMBLY
Remove screws(N14) from the computer back
housing. Mate connectors E2 & E3 to ones on the monitor(G).
Then, insert the monitor into the plate of the
central support tube. Secure with screws(N14) removed earlier.
WATER BOTTLE HOLDER ASSEMBLY
First, remove the screws(M2)on the center support (E2)
Attach the bottle holder (M1) to the center support and
secure it with screws (M2) and the bottle can be
snapped into the holder
FIGURE 6
Slide the handle (N10) into the barrel and
secure it with stopping screws(N4).
SIDE HANDLE BAR ASSEMBLY
Step1. Mate the sensor wire(H14)
to (B19).
Step2. One by one, slide the side
& H2 onto thehandle bars H1
tabs of the main frame and
secure them with screws(N8).
G
M3
E2
E3
M2
H1
H2
B19
B19
H14
H14
N8
N8
M1
E
N14
N10
N4
SEAT ADJUST HANDLE ASSEMBLY
RS3 RECUMBENT CYCLE

10
ASSEMBLY INSTRUCTIONS (cont’d)
20155 Ellipse, Foothill Ranch, CA 92610
Phone: 949-206-0330,
866-325-2339 (USA & Canada)
K1
K2
J
N15
N3
N1
N6
FIGURE 7
BACK SUPPORT TUBE ASSEMBLY
Put the back support tube(J) on the seat
carriage and secure them with bolts(N15),
flat washers(N3).
SEAT CUSHION ASSEMBLY
Place the seat cushion(K2) on the back support
bottom and secure them with bolts(N1),
flat washers(N3) from underneath.
BACK REST ASSEMBLY
Mount the back rest (K1) onto the back
support tube and secure it with bolts(N6).
N3
RS3 RECUMBENT CYCLE

11
ASSEMBLY INSTRUCTIONS CONTINUED
20155 Ellipse, Foothill Ranch, CA 92610
Phone: 949-206-0330,
866-325-2339 (USA & Canada)
FIGURE 8
SEAT POSITIONING
Push down the seat adjust handle to release and slide the
seat back or forth to a comfortable sitting position
Position machine near a wall 110VAC outlet
Plug into the outlet and the other end the adaptor
to the DC plug on the machine as shown.
PULL UP
(STOP)
PULL DOWN
(RELEASE)
O
then pull the seat adjust handle up to lock
FIGURE 9
AC Adapter
RS3 RECUMBENT CYCLE

12
ASSEMBLY INSTRUCTIONS (cont’d)
20155 Ellipse, Foothill Ranch, CA 92610
Phone: 949-206-0330,
866-325-2339 (USA & Canada)
FIGURE 10
MOVE THE MACHINE
The front stabilizer has built-in wheels. Stand at rear of the machine and lift it up
until the weight of the machine is transferred to the wheels. You can now easily
move the machine to a new location.
MOBILITY
WHEELS
RS3 RECUMBENT CYCLE

13
SECTION3–PARTSLIST
20155 Ellipse, Foothill Ranch, CA 92610
Phone: 949-206-0330,
866-325-2339 (USA & Canada)
P/N
YT’QNOITPIRCSED
P/N
6
4JP6tlebgnivirD6A
1emarfniaM1A
” 1
L771elbacnoisneT7A
1062
leehwgnivirD1-2A
1
120-TMlortnocrotoM8A
1351*71
elxA2-2A
401*5MwercS9A
46MtuN3-2A
1L0061elbacrosneS01A
461*6MwercS4-2A
1L002eriwrosneS11A
2ZZ3026gniraeB5-2A
1L21-23-6#wercS21A
271CpilCC6-2A
1)8*81
(C000StengaM7-2A
A13
1L51*21pilcrosneS
1GK9*062
leehwylF3A
A14
1L071)tfeL(knarC
201CpilCC1-3A
A15
1L071)thgiR(knarC
1ZZ3026gnuraeB2-3A
A16
252*8MtloB
8/3tuN4-3A ” 1T5.0*
A17
2revoctloB
1elxA5-3A
A18
1L006eniLCD
1emarfraeR1B
2ZZ3006gniraeB6-3A
1)tfeL(reppotS2B
1ZZ0036gniraeB7-3A
1)thgiR(reppotS3B
19.06*71
*73ylluP8-3A
1gniraebyawenO9-3A
B4
4L21*4MwercS
A3-10 Nut 3/8” 2mm7*62*
B5
122*51
tlobreppotS
1tengam-gnisuoH11-3A
B6
1L785*8.401*4.25kcartmunimulA
401*8MtloB7B
16MtuN21-3A
1pacdnE8B
15.1T*91
*6MrehsaW31-3A
1pacdnE1-8B
10.1*22
*6rehsaW41-3A
121*4MwercS2-8B
106*6MwercS51-3A
1tnemesabgnivoM9B
16MtuN61-3A
ekarB01B
1L55*11*2.1
*2.01gnirpS71-3A
156*5.04
*82*0.2TnoihsucekarB11B
18Mtu
N81-3A
185
1221*21
elxA21B
125*8MwercS91-3A
leehwcirtneccE31B
1epiPgnisserP4A
22.33*42*21
201CpilC41B
152*8MwercS1-4A
wercsgnippaT51B
25.1*22*8MrehsaW2-4A
201*6M
2T3.0*42*01rehsaW3-4A
B16
Sleeve
105*21
18MtuN4-4A
B17
4L11*5.73
*8.7leehW
121CpilCC5-4A
B18
422*8MtloB
26-4A
B19
1L0541elbacrosneS
gniraeB
B20
1)tfeL(revocnoitaroceD
1L101*3
gni
pS8-4A
B21
1)thgiR(revocnoitaroceD
1L-revocniahC1-5A
B22
151*08*04
pacdnE
1R-revocniahC2-5A
B23
1pacdnE
1L04*101pacdnE42B
2Packing filmB25
702*4MwercS3-5A
Y
T’QNOITPIRCSED
-
11 -
RS3 RECUMBENT CYCLE

14
20155 Ellipse, Foothill Ranch, CA 92610
Phone: 949-206-0330,
866-325-2339 (USA & Canada)
SECTION3–PARTSLIST(cont’d)
eriwrosneS
3H
1044*8.1*99*6.57rezilibatstnorF1C
2
ebuttroppuselddaS
2121*601*28)thgiR(pacdnE2C
1
1J
2121*601*28)tfeL(pacdnE3C
1tserkcaB1K
50.3TtuntsujdA4C
1noihsucelddaS2K
55.24*92
*8MtlobtsujdA5C
)tfeL(ladeP
1L
2leehwgnivoM6C
1
)thgiR(ladeP
2L
4L8/5*23*8#wercs7C
1
100-RASredlohelttoB1M
1rezilibatstnorF1D
1
2
51*5MwercS2M
1ebuttroppuslartneC1E
1elttobretaW3M
1L056elbacrosneS2E
1051*8MtloB1N
1L056elbacrosneS3E
318MrehsawgnirpS2N
1rabeldnahtnorF1F
20T2.1*61*8MrehsaW3N
4pacdnE2F
28*6MwercsgnippaT4N
1rotinoMG
253*8MwercS5N
1)tfeL(rabeldnahediS1H
1)thgiR(rabeldnahediS2H
*8MwercS7N 702
801*6MwercS
wercS6N 4
8N
revoc
noitaroceD9N
1
rabeldnahgnikarB01N
1
-01N
1 Seatadjustment ha
1
6
32*21
eldn
L17*8
parwcitsalP2-01N 1
2T2.1*61*8MrehsaW11N
6
02*5MwercS21N
151*4MwercS31N
1rotpadAO
Form grip
H4
2
Hand pulse
H5
2
Screw
H6
2
End cap
H7
4
J2
1
N14
Screw
2
L-(L)
L-(R)
Strap(L)
Strap(R)
1
1
J3
End cap
1
End cap
N15 Screw
2
RS3 RECUMBENT CYCLE

15
SECTION4–RS3 EXPLODED VIEW
L-L
L-R
N6
J3

16
A
4
-
8
A
4
A
4
-
1
A
4
-
2
A
4
-
3
A
4
-
4
A
4
-
5
A
4
-
6
A
3
-
1
9
A
3
-
1
8
A
3
A
3
-
1
A
3
-
2
A
3
-
3
A
3
-
4
A
3
-
6
A
3
-
1
1
A
3
-
1
3
A
3
-
1
2
A
3
-
1
4
A
3
-
1
5
A
7
A
3
-
1
7
A
3
-
1
0
A
3
-
1
6
A
3
-
5
A
3
-
7
A
3
-
8
A
3
-
9
RS3 EXPLODED (cont’d)

17
20155 Ellipse, Foothill Ranch, CA 92610
Phone: 949-206-0330,
866-325-2339 (USA & Canada)
BUTTON FUNCTION:
MODE/ENTER
In idle, MODE is to toggle between manual and program; ENTER to confirm settings
RESET
In idle, return to main menu
START/STOP To Start or to Stop exercise program
RECOVERY To test heart rate recovery status
UP
To select training mode or to increase level of difficulty
DOWN
To select training mode or to decrease level of difficulty
P1 To switch to program profile 1
P2 To switch to program profile 2
P3 To switch to program profile 3
P4 To switch to program profile 4
P5 To switch to program profile 5
P6 To switch to program profile 6
P7 To switch to program profile 7
P8 To switch to program profile 8
P9 To switch to program profile 9
P10 To switch to program profile 10
P11 To switch to program profile 11
P12 To switch to program profile 12
DISPLAY EXERCISE DATA:
TIME Display range 0:00~99:99 ; Setting range 0:00~99:00
DISTANCE Display range 0.00~99.99; Setting range 0.00~99.90km
CALORIES Display range 0~9999; Setting range 0.00~9990
PULSE Display range P-30~240 ; Setting range 0-30~240
SPEED 0~99.9km
RPM 0~999
OPERATION PROCEDURE
1. Connect power supply and computer will power on with a long beep sound, LCD display all
segments (drawing A) for 2 seconds.
2. Computer will display main menu (drawing B)
SECTION5–COMPUTERCONSOLE
RS3 RECUMBENT CYCLE

18
20155 Ellipse, Foothill Ranch, CA 92610
Phone: 949-206-0330,
866-325-2339 (USA & Canada)
A
3. In main menu, first exercise program MANUAL will flash, user may press UP and DOWN button to select
MANUAL
PROGRAM (P1-P12), USER HRC WATT.
4.
Quick Start and Manual:
Before exercise in Manual mode, user my set upTIME, DISTANCE, CALORIES and PULSE target.
After power on, user may press START/STOP button to start exercise in MANUAL immediately without
any setting.
Level can be adjusted during exercise by press UP or DOWN.
5. PROGRAM
In Stop mode, user may press buttons of P1 – P12 to swift to selected programs.
Before exercise in Program mode, user may set up TIME target.
Press UP and DOWN to select Program profiles and press ENTER/MODE to confirm.
Level can be adjusted during exercise by press UP or DOWN.
6. H.R.C.
Before exercise in H.R.C. mode, user may select 55%, 75%, 90% or Target pulse.
Computer will take user’s inputs to calculate target bpm.
User may set up workout time and press START/STOP button to start exercise.
7. USER PROGRAM
User may press UP, DOWN and then press MODE to create his own profile. (from column 1 to column20)
User may hold on pressing MODE button for 2 seconds to quit profile setting.
8. RECOVERY :
After exercising for a period of time, keep holding on handgrips and press “RECOVERY”
button. All function display will stop except “TIME” starts counting down from 00:60 to 00:00.
Screen will display your heart rate recovery status with the F1,F2….to F6. with F1 being the best and F6
being the worst. User may keep exercising to improve the heart rate recovery status.
(Press the RECOVERY button again to return to the main display.)
-
RS3 RECUMBENT CYCLE
B

18
SECTION 6 – CALCULATING YOUR TARGET HEART RATE
Heart Rate (HR) training has become one of the most popular forms of monitoring your
workouts. Nothing tells you how your body is feeling like your own heart. By using your heart
rate to tell you how hard to train, you can maximize your workout results.
STEP ONE
Determining your Maximum Heart Rate:
The standard calculation for determining your maximum heart rate, B
eats per Minute (BPM), is
to subtract your age from the number 220.
Example: If you are 30 years of age, your maximum heart rate is:
220 – 30 = 190 BPM.
STEP TWO
Select your ideal workout HR Zone:
Once you have your maximum heart rate you can use it to determine your Target HR Zone
based on your fitness goal(s).
Recent studies have shown:
60-70% of your maximum HR will allow you to lose weight.
70-80% of your maximum HR will improve your aerobic fitness.
80-85% of your maximum will increase your athletic performance.
NOTE
: DO NOT exceed 85% of your maximum heart rate.
STEP THREE
Calculate your ideal Target HR:
Using the above percentages, you can calculate your ideal Target Heart Rate for your specific
goal.
As an example, the average 30 year old can:
Maximize burn fat / weight loss, by maintaining ~123 BPM during your workout
190 * 0.65 =123 BPM.
Improve aerobic fitness, by maintaining ~142 BPM during your workout
190 * 0.75 =142 BPM.
Do not exceed 190 * 0.85 = 161 BPM
Remember to consult your family physician or health care professional to develop a
well-planned exercise program to fit your health needs.
20155 Ellipse, Foothill Ranch, CA 92610
Phone: 949-206-0330,
866-325-2339 (USA & Canada)
RS3 RECUMBENT CYCLE
/