Tekcomm TCT1500 User manual
- Category
- TV set-top boxes
- Type
- User manual
This manual is also suitable for
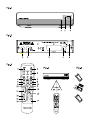
Tekcomm TCT1500: Experience a world of entertainment with this versatile digital satellite receiver. Enjoy crystal-clear TV and radio channels with exceptional audio quality. Effortlessly connect to your satellite dish and TV using the provided SCART cable. Enhance your audio experience by connecting to a digital audio amplifier via the S/PDIF output. Utilize the USB port to connect external storage devices for convenient media playback and software updates. The user-friendly interface and remote control make navigating channels and settings a breeze.
Tekcomm TCT1500: Experience a world of entertainment with this versatile digital satellite receiver. Enjoy crystal-clear TV and radio channels with exceptional audio quality. Effortlessly connect to your satellite dish and TV using the provided SCART cable. Enhance your audio experience by connecting to a digital audio amplifier via the S/PDIF output. Utilize the USB port to connect external storage devices for convenient media playback and software updates. The user-friendly interface and remote control make navigating channels and settings a breeze.


-
 1
1
-
 2
2
-
 3
3
-
 4
4
-
 5
5
-
 6
6
-
 7
7
-
 8
8
-
 9
9
-
 10
10
-
 11
11
-
 12
12
-
 13
13
-
 14
14
-
 15
15
-
 16
16
-
 17
17


Tekcomm TCT1500 User manual
- Category
- TV set-top boxes
- Type
- User manual
- This manual is also suitable for
Tekcomm TCT1500: Experience a world of entertainment with this versatile digital satellite receiver. Enjoy crystal-clear TV and radio channels with exceptional audio quality. Effortlessly connect to your satellite dish and TV using the provided SCART cable. Enhance your audio experience by connecting to a digital audio amplifier via the S/PDIF output. Utilize the USB port to connect external storage devices for convenient media playback and software updates. The user-friendly interface and remote control make navigating channels and settings a breeze.
Ask a question and I''ll find the answer in the document
Finding information in a document is now easier with AI
Other documents
-
Strong PrimaSat II User manual
-
Skymaster DX 7 Operating Instructions Manual
-
Strong SRT 7100 User manual
-
-
Strong SRT 7805 Specification
-
-
Ross HD DVB-S2 1201 User manual
-
Megasat 3400 User manual
-
Thomson THS813 Installation guide
-
Xoro HRS 2500 Owner's manual