
DECT2185 base with
answering system and
cordless handset
Base AC adapter
(PS-0034)
Telephone
cord
Charger AC
adapter
(PS-0035)
Battery
cover
DCX210
accessory
handset &
charger
If you purchased
model number:
You should
have:
DECT2185 None
DECT2185-2 1 of each
DECT2185-3 2 of each
DECT2185-4 3 of each
DECT2185-5 4 of each
DECT2185-6 5 of each
You might also nd:
Rechargeable
battery pack
(BT-1016)
Battery
cover
Rechargeable
battery pack
(BT-1016)
If any items are missing or damaged, contact our Customer Care
Line immediately. Never use damaged products!
Need Help? Get answers 24/7 at our website: www.uniden.com.
If You... Contact Uniden’s... Phone Number
have a question or problem Customer Care Line*
817-858-2929 or
800-297-1023
need a replacement part or
an accessory (such as a wall
mount bracket)
Parts Department* 800-554-3988
need special assistance due
to a disability
Accessibility Help Line
800-874-9314
(voice or TTY)
* During regular business hours, Central Standard Time. Visit our website for detailed business hours.
DECT2185 Series User's Guide
What's in the box?

Important Safety Instructions!
When using your telephone equipment, basic safety precautions should
always be followed to reduce the risk of fire, electric shock and injury to
persons, including the following:
This unit is NOT waterproof. DO NOT expose this unit to rain or moisture.
Do not use this product near water, for example, near a bath tub, wash bowl,
kitchen sink or laundry tub, in a wet basement or near a swimming pool.
Avoid using a telephone (other than a cordless type) during an electrical
storm. There may be a remote risk of electric shock from lightning.
Do not use the telephone to report a gas leak in the vicinity of the leak.
Use only the power cord and batteries indicated in this manual. Do not
dispose of batteries in a fire. They may explode. Check with local codes for
possible special disposal instructions.
Do not place the handset in any charging cradle without the battery installed
and the battery cover securely in place.
SAVE THESE INSTRUCTIONS!
-
-
-
-
-
-
What's in the manual?
Installing Your Phone ...................... 1
Charge the Battery ......................... 1
Connect the Telephone Cord ........ 2
Getting to Know Your Phone.......... 3
Parts of the Base ............................ 3
Parts of the Handset ....................... 5
Reading the Displays .................... 6
Using the Menus .............................. 7
Using the Base Menu ..................... 7
Using the Handset Menus ............. 8
Entering Text on Your Phone ........ 9
Using Your Phone .......................... 10
Changing the Volume .................. 10
Using the Redial List .................... 11
Using Caller ID and Call Waiting .. 11
Using Seven-Digit Dialing ............ 12
Using the Phonebook................... 13
Chain Dialing ................................ 13
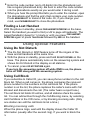
Finding a Lost Handset ................ 14
Using Special Features .................. 14
Using Do Not Disturb ................... 14
Using Call Block............................ 14
Using Voice Message Notication 15
Using Multi-station Features ........ 16
Expanding Your Phone ................ 16
Using Conference Calling ............ 16
Using Privacy Mode ..................... 16
Using Call Transfer ....................... 17
Using the Intercom ....................... 17
Using the Answering System ...... 18
Setting Up Your Answering
System ....................................... 18
Getting Your Messages ............... 19
Screening Your Calls.................... 20
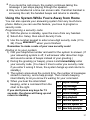
Using the System While You're
Away from Home ....................... 21
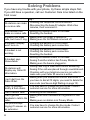
Solving Problems ........................... 22
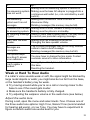
Weak or Hard To Hear Audio ..... 23
Noise or Static On The Line ......... 24
Changing from Tone to Pulse
Dialing ........................................ 25
Resetting and Registering
Handsets..................................... 25
Handling Liquid Damage ............. 26
Important Information ................... 27
Terms Used In This Guide ........... 27
Specications ............................... 27
Battery Information ...................... 27
Compliance information .............. 28
One-year Limited Warranty ......... 30

1
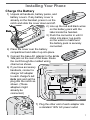
Installing Your Phone
Charge the Battery
Unpack all handsets, battery packs, and
battery covers. If any battery cover is
already on the handset, press in on the
notch and slide the cover down and off.
Line up the red and black wires
on the battery pack with the
label inside the handset.
Push the connector in until it
clicks into place; tug gently
on the wires to make sure
the battery pack is securely
connected.
Place the cover over the battery
compartment and slide it up into place.
Connect the base AC adapter to the
AC IN
7.8V
jack on the rear of the base. Route
the cord through the molded wiring
channel as shown.
If you have accessory
handsets, connect a
charger AC adapter
to each charger's
AC
IN 8V
jack and set the
plug into the notch as
shown. (These
adapters might
already be
connected.)
Plug the other end of each adapter into
a standard 120V AC power outlet.
1)
2)
3)
4)
5)
6)
7)
Red
Black
Red
Black
AC IN 8VAC IN 8V

2
Place a handset in the base and any accessory handset(s) in the
charger(s) with the display(s) facing forward. The
CHARGE
light on the base and each charger
should all turn on.
If... Try...
the
CHARGE
light does
not turn on
reseating the handset.
checking the AC adapter connection.
seeing if the outlet is controlled by a
wall switch.
-
-
-
Charge all handsets completely (about 15
hours) before using them.
Connect the Telephone Cord
Use the telephone cord to
connect the
TEL LINE
jack to a
standard telephone wall jack.
Test the connection
Pick up the handset from
the cradle and press
TALK
. You should hear a
dial tone, and the display
should say
Talk
.
If... Try...
you don't hear a dial tone or the
display says
Check Tel Line
checking the connection between
the base and the phone jack.
Make a quick test call. (Press
END
to hang up.)
If... Try...
you keep hearing a dial tone changing the dial mode (see page 25).
there's a lot of noise or static
see page 24 for tips on avoiding
interference.
Test any accessory handsets the same way. If you can't get a
dial tone or the handset display says
Unavailable
, try
moving the
handset closer to the base or resetting it (see page 25). Charge
all handsets completely (about 15 hours) before using them.
8)
1)
2)
3)

3
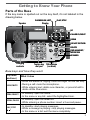
Getting to Know Your Phone
Parts of the Base
If the key name is spelled out on the key itself, it's not labeled in the
drawing below.
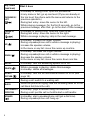
Base keys and how they work
Key name
(and icon)
What it does
CLEAR/MUTE
While this station is ringing: mute the ringer for this call only.
During a call: mute the microphone.
While entering text: delete one character, or press & hold to
delete all the characters.
-
-
-
MENU/SELECT
In standby: open the menu.
In the menu or any list: select the highlighted item.
-
-
REDIAL/PAUSE
In standby: open the redial list.
While entering a phone number: insert a 2-second pause.
-
-
PLAY/STOP
( )
In standby: start playing messages.
While a message is playing: stop playing messages.
In the menu or a list: exit the menu completely.
-
-
-
UP
PHONEBOOK/LEFT
DOWN
DO NOT DISTURB
CALLER ID/RIGHT
FIND HANDSET/
INTERCOM
Microphone
(on back)
Twelve-key
dial pad
Speaker
Charging
contacts
Display
DELETE
SPEAKER
PLAY/STOP
UP
PHONEBOOK/LEFT
DOWN
DO NOT DISTURB
CALLER ID/RIGHT
FIND HANDSET/
INTERCOM
Microphone
(on back)
Twelve-key
dial pad
Speaker
Charging
contacts
Display
DELETE
SPEAKER
PLAY/STOP

4
Key name
(and icon)
What it does
PHONEBOOK/
LEFT
( / )
In standby or during a call: open the phonebook.
In any menu or list: go up one level. (If you are already at
the top level, the phone exits the menu and returns to the
previous operation.)
During text entry: move the cursor to the left.
While playing messages: for the first 2 seconds, go to the
previous message; after that: go to the start of this message.
-
-
-
-
CALLER ID/
RIGHT
( / )
In standby or during a call: open the Caller ID list.
During text entry: move the cursor to the right.
While a message is playing: skip to the next message.
-
-
-
UP ( )
In standby: increase the ringer volume.
During a speakerphone call or while a message is playing:
increase the speaker volume.
In the menu or any list: move the cursor up one line.
-
-
-
DOWN ( )
In standby: decrease the ringer volume.
During a speakerphone call or while a message is playing:
decrease the speaker volume.
In the menu or any list: move the cursor down one line.
-
-
-
ON/OFF
In standby: turn the answering system on or off.
-
DELETE ( )
While a message is playing: delete this message.
In standby: delete all messages.
-
-
DO NOT
DISTURB ( )
In standby: turn the Do Not Disturb feature on or off (see
page 14).
-
FLASH
During a call: switch to a waiting call.
-
BLOCK
While the phone is ringing: add the incoming caller ID to the
call block list (block the call).
-
FIND HANDSET/
INTERCOM
In standby: page a handset using the intercom.
During a call: put the call on hold & start a call transfer.
-
-
SPEAKER
( )
In standby: start a speakerphone call (get a dial tone).
During a speakerphone call: hang up.
-
-

5
Parts of the Handset
If the key name is spelled out
on the key itself, it's not
labeled in the drawing to the
right.
Handset keys and how
they work
Key name
(and icon)
What it does
UP ( )
In standby: increase the ringer volume.
During a call: increase the call volume.
In the menu or any list: move the cursor up one line.
-
-
-
CALLER ID/
RIGHT ( )
In standby or during a call: open the Caller ID list.
During text entry: move the cursor to the right.
-
-
DOWN ( )
In standby: decrease the ringer volume.
During a call: decrease the call volume.
In the menu or any list: move the cursor down one line.
-
-
-
MENU/SELECT
In standby: open the menu.
In the menu or any list: select the highlighted item.
-
-
END
During a call: hang up.
In the menu or any list: exit & go to standby.
-
-
CLEAR/
INTERCOM
In standby: page another station using the intercom.
During a call: put the call on hold & start a call transfer.
While entering text: delete one character, or press & hold to
delete all the characters.
-
-
-
PHONEBOOK/
LEFT ( )
In standby or during a call: open the phonebook.
In the menu: go back to the previous screen.
During text entry: move the cursor to the left.
-
-
-
TALK/FLASH
In standby: start a telephone call (get a dial tone).
During a call: switch to a waiting call.
-
-
Microphone
Twelve-
key dial
pad
Display
Charging
contacts
Earpiece
UP
PHONEBOOK/
LEFT
SPEAKER
DOWN
CALLER ID/
RIGHT
REDIAL/
PAUSE
MESSAGES/
MUTE
CLEAR/
INTERCOM
Microphone
Twelve-
key dial
pad
Display
Charging
contacts
Earpiece
UP
PHONEBOOK/
LEFT
SPEAKER
DOWN
CALLER ID/
RIGHT
REDIAL/
PAUSE
MESSAGES/
MUTE
CLEAR/
INTERCOM

6
Key name
(and icon)
What it does
SPEAKER ( )
Switch a normal call to the speakerphone (& back).
-
REDIAL/PAUSE
( )
In standby: open the redial list.
While entering a phone number: insert a 2-second pause.
-
-
BLOCK
While the phone is ringing: add the incoming Caller ID
information to the call block list (block the call).
-
MESSAGES/
MUTE ( )
In standby: access your answering system.
During a call: mute the microphone.
While the phone is ringing: mute the ringer for this call only.
-
-
-
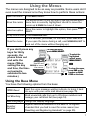
Reading the Displays
On the base On the handset
SUN 12:00 AM
New CID: 5
Answer ON
Message
counter
Status
icons
Caller ID
count
Day and
time
Answering
system status
12:00A
Handset #1
New CID: 5
Handset
banner
Status icons
Caller ID
count
Time
The table below shows the possible icons and what they mean. Since
the icons appear based on what you're doing with the phone, you
won't ever see all of these icons at the same time.
Icon What it means
The ringer is turned off: this station will not ring when a call
comes in.
You have a voice message waiting (see the section titled
"Using Voice Message Notification" on page 15).
Privacy Mode is on: no other station can join your call.
The speakerphone is on.
The microphone is muted, & the caller can't hear you.
(Handset only) T-coil mode is on. (See "Do you use a T-coil
hearing aid?" on page 24.)
(Handset only) The battery is 1) fully charged, 2) half charged,
3) getting low, or 4) empty.

7
Using the Menus
The menus are designed to be as easy as possible. Some users don't
even need the manual once they know how to perform these actions:
Open the menu Press
MENU/SELECT
.
Move the cursor
The arrow cursor on the left side of the line shows which
menu item is currently highlighted. Use
UP
to move the
cursor up &
DOWN
to move it down.
Select an option
Move the cursor to highlight the option, then press
MENU/
SELECT
.
Go up one screen Press
PHONEBOOK/LEFT
.
Close the menu
On the handset, press
END
; on the base, press
PLAY/STOP
.
(If you open the menu during a call, use
PHONEBOOK/LEFT
to
back out of the menu without hanging up.)
If you don't press any
keys for thirty
seconds, the
phone times out
and exits the
menu. (When
setting the day
and time, the time-
out period is
extended to two
minutes.)
Using the Base Menu
You have the following options from the base:
VMWI Reset
Reset the voice message waiting indicator to bring it back
into sync with your voice mail service (see page 15).
Call Blocking
Block unwanted calls from up to 20 phone numbers and
manage your call block list (see page 14).
Base Language
Change the display language.
Register
Handset
Register additional handsets to the base or re-register
a handset that you had to reset for some reason (see
"Resetting and Registering Handsets" on page 25).
Handset Setup
Ans. Setup
Day & Time
Global Setup
To open the menu,
press
MENU/SELECT.
To select the
highlighted
option, press
MENU/SELECT.
To close the menu,
press
END
on the
handset or
PLAY/
STOP
on the base.
OR
Use
UP
and
DOWN
to move
the cursor.
Handset Setup
Ans. Setup
Day & Time
Global Setup
To open the menu,
press
MENU/SELECT.
To select the
highlighted
option, press
MENU/SELECT.
To close the menu,
press
END
on the
handset or
PLAY/
STOP
on the base.
OR
Use
UP
and
DOWN
to move
the cursor.

8
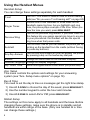
Using the Handset Menus
Handset Setup
You can change these settings separately for each handset.
T-coil
Turn on T-coil mode to reduce noise on some hearing
aids (see "Do you use a T-coil hearing aid?" on page 24).
Ringer Tones
Choose one of four melodies or three tones for the
handset's main ring tone. As you highlight each ring
tone, the phone plays a sample of the tone. When you
hear the tone you want, press
MENU/SELECT
.
Personal Ring
Turn on the personal ring feature. If you have Caller ID,
this feature lets you assign special ring tones to anyone
in your phonebook: this handset will use the special
ring tone when that person calls.
Autotalk
Turn on Auto Talk so you can answer the phone just by
picking up the handset from the cradle (without having
to press any buttons).
Any Key Answer
Turn on Any Key Answer so you can answer the phone
by pressing a key on the twelve-key dial pad.
Banner
Change the name used on the handset's display.
Handset Language
Change the display language.
Key Touch Tone
Have the keypad sound a tone when you press a key.
Ans. Setup
This menu controls the options and settings for your answering
system (see "Ans. Setup menu options" on page 18).
Day & Time
You need to set the day & time so messages get the right time stamp.
Use
UP
&
DOWN
to choose the day of the week; press
MENU/SELECT
.
Use the number keypad to enter the hour and minutes.
Use
UP
&
DOWN
to select
AM
or
PM
; press
MENU/SELECT
.
Global Setup
The settings on this menu apply to all handsets and the base. Before
changing these settings, make sure the phone is in standby and all
handsets are within range of the base. (Only one handset at a time
can change these settings.)
1)
2)
3)

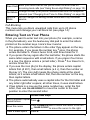
9
Area Code
Enter your area code so the phone hides the area code on
incoming local calls (see "Using Seven-digit Dialing" on page 12).
Dial Mode
Change the way your phone communicates with the telephone
network (see "Changing from Tone to Pulse Dialing" on page 25).
Set Line
Mode
Do not change this setting unless instructed to by customer
service.
Call Blocking
This menu lets you block unwanted calls from up to 20 phone
numbers and manage your call block list (see page 14).
Entering Text on Your Phone
When you want to enter text into your phone (for example, a name
in the phonebook), use the twelve-key dial pad to enter the letters
printed on the number keys. Here's how it works:
The phone enters the letters in the order they appear on the key.
For example, if you press the number key
2
once, the phone
enters the letter
A
. Press
2
twice for
B
, and three times for
C
.
If you press the key again after the last letter, the phone starts the
same letter sequence with small letters. If you press
2
four times
in a row, the phone enters
a
(small letter). Press
2
five times for
b
,
and six times for
c
.
If you see the icon
[Aa]
in the display, the phone enters capital
letters first (
A B C
), then small letters (
a b c
), then the number on
the key (
2
). The icon
[aA]
means the phone starts at the small
letters, so it enters small letters first, then the number on the key,
then capital letters.
The phone automatically uses a capital letter for the first letter and
any letter right after a space; all other times, it uses small letters.
If two letters in a row use the same number key, enter the first
letter, then use
CALLER ID/RIGHT
to move the cursor to the next
position to enter the second letter.
To Follow these steps
Switch between capital
& small letters
Press .
Move the cursor
Press
PHONEBOOK/LEFT
to move the cursor to the left
or
CALLER ID/RIGHT
to move the cursor to the right.
Leave a blank space Press
#
.

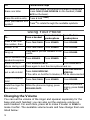
10
To Follow these steps
Erase one letter
Move the cursor to the letter you want to erase and
press
CLEAR
(
CLEAR/INTERCOM
on the handset;
CLEAR/
MUTE
on the base).
Erase the entire entry Press & hold
CLEAR
.
Enter punctuation or a
symbol
Press
0
to rotate through the available symbols.
Using Your Phone
To... From a handset
From a handset
speakerphone
From the base
speakerphone
make a call: Dial
the number, then
Press
TALK/FLASH
. Press
SPEAKER
. Press
SPEAKER
.
answer a call Press
TALK/FLASH
. Press
SPEAKER
. Press
SPEAKER
.
hang up
Press
END
or put the handset in the
cradle.
Press
SPEAKER
.
switch between the
speaker & earpiece
Press
SPEAKER
. Press
SPEAKER
. NA
mute the micro-
phone during a call
Press
MESSAGES/MUTE
. Press
CLEAR/MUTE
.
Press again to turn the microphone back on.
put a call on hold
Press
CLEAR/INTERCOM
.
Press
FIND HANDSET/
INTERCOM
.
If the call is on hold for 5 minutes, it will be disconnected.
return to a call on
hold
Press
TALK/FLASH
. Press
SPEAKER
. Press
SPEAKER
.
mute the ringer for
this call only
While the phone is ringing, press
MESSAGES/MUTE
.
While the phone is
ringing, press
CLEAR/
MUTE
.
Changing the Volume
You can set the volume of the ringer and speaker separately for the
base and each handset; you can also set the earpiece volume on
each handset. For each item, press
UP
to make it louder or
DOWN
to
make it softer. The available volume levels and how change them are
listed below:

11
Change the When On the base On a handset
ringer
volume
the phone is in
standby
select
Off, Low,
Medium
,
or
High
select
Off, Low,
Medium
,
or
High
earpiece
volume
you are on a normal
call
NA
choose one of 6
volume levels
speaker
volume
you use the speaker-
phone for a call or
getting messages
choose one of 10
volume levels
choose one of 6
volume levels
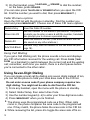
Using the Redial List
The phone saves the last 5 numbers you dial on each station. To
open the redial list, press
REDIAL/PAUSE
; use
UP
and
DOWN
to scroll
through the list. To close the list, press
PHONEBOOK/LEFT
. With the
phone in standby, open the list and find the number you want.
Then:
to redial the selected number
On the handset, press
TALK/FLASH
or
SPEAKER;
on the base, press
SPEAKER
.
to delete the number Press
MENU/SELECT
& select
Delete Entry
.
to save it to the phonebook Press
MENU/SELECT
& select
Store Into Pb
.
Using Caller ID and Call Waiting
You have to subscribe to Caller ID, Call Waiting, and Caller ID
on Call Waiting services to use the features described in this
section: contact your telephone provider for more information.
When a call comes in, the phone displays the caller’s number and
name (if available). The phone saves the information for the last 30
received calls to the CID list. When it's in standby, the phone displays
how many calls came in since the last time you checked the CID list.
Open the CID list Press
CALLER ID/RIGHT
.
Scroll through the CID
list
Press
DOWN
to scroll through the list from newest to
oldest. Press
UP
to scroll from oldest to newest.
Close the CID list Press
PHONEBOOK/LEFT
.
Dialing from the Caller ID list
Find the entry you want to dial.
If the number is a toll or long distance call, but there's no 1 at the
front of the CID record, press to add the 1.
1)
2)

12
On the handset, press
TALK/FLASH
or
SPEAKER
to dial the number;
on the base, press
SPEAKER
.
(You can also press
TALK/FLASH
or
SPEAKER
before you open the CID
list. Find the number you want to dial, then press
MENU/SELECT
.)
Caller ID menu options
Open the CID list with the phone in standby. Find the number you
want and press
MENU/SELECT
. Choose one of these CID menu options:
Delete Entry
Erase this Caller ID number.
Store Into Pb
Add this number to this station's phonebook. The phone
prompts you to enter a name & edit the number; handsets
also prompt you to choose a personal ring.
Delete All
Erase this station's CID list. (This does not affect the CID
lists saved on any other stations.)
Add Call Block
(Handset only) Add the number to the call block list (see
page 14).
Using Call Waiting
If you get a Call Waiting call, the phone sounds a tone and displays
any CID information received for the waiting call. Press
FLASH
(
TALK/
FLASH
on a handset) to switch between the current call and the waiting
call; remember, each time you switch, there is a short pause before
you're connected to the other caller.
Using Seven-Digit Dialing
If you can make a local call by dialing only seven digits instead of ten,
you can tell the phone to hide your local area code in the CID list.
Do not enter an area code if your phone company requires ten-
digit dialing. You might not be able to dial from the CID list.
From any handset, open the menu with the phone in standby.
Select
Global Setup
, then select
Area Code
.
Use the number keypad (
0 - 9
) to enter your three-digit area code.
Press
MENU/SELECT
when you’re finished.
The phone uses the programmed code as a filter. When calls
come in, the phone compares the area code to the programmed
one. If they match, the phone hides the area code in the CID list.
While reviewing the list, press
#
to toggle the area code off & on.
3)
1)
2)
3)
4)

13
Using the Phonebook
Each station can store up to 70 entries in its phonebook.
Open/close the phonebook Press
PHONEBOOK.
Scroll through the entries
Press
DOWN
to scroll through the phonebook
from A to Z or
UP
to scroll from Z to A.
Jump to entries that start
with a certain letter
Press the number key corresponding to the
letter you want to jump to.
Dial an entry
Find the entry you want to dial.
On the handset, press
TALK/FLASH
or
SPEAKER
; on the base, press
SPEAKER
.
1.
2.
Phonebook menu options
Open the phonebook with the phone in standby, then press
MENU/
SELECT
to open the phonebook menu. Choose one of these options:
Create
New
Add an entry to your phonebook. The phone prompts you to enter
the name & phone number. (Handsets will also prompt you to
choose a personal ring.)
Copy All
Copy the whole phonebook to another station.
Delete
All
Erase all the entries in this station's phonebook. (This does not
affect the entries saved on any other stations.)
Phonebook entry options
With the phone in standby, open the phonebook and find the entry
you want. Press
MENU/SELECT
to open the individual phonebook entry
menu. Choose one of these options:
Edit
Edit this entry. The phone prompts you to enter the name & phone
number. (Handsets will also prompt you to choose a personal ring.)
Copy
Copy this entry to another station.
Delete
Erase this entry.
Chain Dialing
If you often have to enter a series of digits or a code number
during a call, you can save that code number to a phonebook
entry and use the phonebook to send the code number.

14
Enter the code number (up to 20 digits) into the phonebook just
like a regular phonebook entry. Be sure to enter the code number
into the phonebook exactly as you would enter it during a call.
When you hear the prompt that tells you to enter the number, open
the phonebook and find the entry that contains your code number.
Press
MENU/SELECT
to transmit the code. Or, if you change your
mind, use
PHONEBOOK/LEFT
to close the phonebook.
Finding a Lost Handset
With the phone in standby, press
FIND HANDSET/INTERCOM
on the base.
Select the handset you want to find (or
All
to page all handsets). The
paged handset(s) beep for 1 minute or until you press
FIND HANDSET/
INTERCOM
again or press
TALK/FLASH
followed by
END
on the handset.
Using Special Features
Using Do Not Disturb
The Do Not Disturb or DND feature turns off the ringers of the
base and all handsets at the same time.
With the phone in standby, press and hold
DO NOT DISTURB
on the
base. The phone automatically turns on the answering system and
shows
Do Not Disturb
in the display on all stations.
To cancel, press
DO NOT DISTURB
again.
If you turn the answering system off while DND is on, the phone
turns off DND along with the answering system.
Using Call Block
If you subscribe to Caller ID, you can save phone numbers to the call
block list. When a call comes in, the phone compares the received
phone number to the numbers on the call block list. If the phone
number is on the list, the phone replaces the caller's name with
Call
Blocked
and disconnects the call. (The caller hears a reject tone.)
The call block list holds 20 entries, and all stations share the same
list. You can add entries through the
Call Blocking
menu, by selecting
Add Call Block
in the CID menu, or by blocking incoming calls. (Only
one station can edit the call block list at a time.)
Blocking incoming calls
When the phone rings, wait until the display shows the Caller ID
information (usually after the second ring). If you want to block the

15
call and add this number to the call block list, press
BLOCK
. When the
phone asks you to confirm, press
MENU/SELECT
or
BLOCK
.
Blocking an incoming call from an "Unknown" or "Private"
number is the same as selecting
Unknown Number
or
Private
Number
from the
Call Blocking
menu.
Call Blocking menu options
With the phone in standby, open the menu and select
Call Blocking
.
Choose one of these options:
View Number
See the numbers on your call block list.
Create New
(Handset only) Add an entry to your call block list. The phone
will prompt you to enter a name & phone number.
Private
Number
(Handset only) Block all calls from numbers reported by CID
as "Private." (This does not count as one of the 20 entries.)
Unknown
Number
(Handset only) Block all calls from numbers reported by CID
as "Unknown". (This does not count as one of the 20 entries.)
Call block entry options
With the phone in standby, open the call block list and find the entry
you want. Press
MENU/SELECT
to open the individual entry menu.
Choose one of these options:
Edit
(Handset only) Edit this entry. The phone will prompt you to edit
the name & phone number.
Delete
Erase this entry from the list & allow calls from this number.
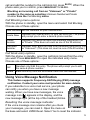
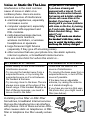
Using Voice Message Notication
This feature supports Frequency-Shift Keying (FSK) message
notification. Contact your voice mail provider for more details.
If you subscribe to a voice mail service, your phone
can notify you when you have a new message
waiting. When you have new messages, the voice
message icon
(
) appears in the display, and the
new message light (at the top of the handset) blinks.
Resetting the voice message indicator
If the voice message icon remains after you check
your messages, you can reset it. Open the menu on
the base and select
VMWI Reset
. Select
Yes
to reset the indicator.

16
Using Multi-station Features
The expandable base and the cordless handset give you some useful
multi-station features. (A station can be any handset or the base.)
Expanding Your Phone
Your base supports a total of six cordless handsets: the one that
came with the base and up to five DCX210 accessory handsets.
Your base might be compatible with other Uniden accessory
handsets: please visit our website for a list of compatible handsets.
Accessory handsets must be registered to the base before you
can use them. Handsets that aren't registered display a
Handset
not registered
message. For instructions on registering handsets to
this base, see page 25 or the manual for the accessory handset.
Any accessory handsets that came packaged with the base are
already registered to that base for you.
If a handset was previously registered to a base, you have to reset
it so you can register it to a new base (see page 25 for DCX210).
Using Conference Calling
When an outside call comes in, the base
and two handsets can join in a
conference call with the outside caller. To
join the call, just press
SPEAKER
on the
base or
TALK/FLASH
on a handset. To leave
the conference call, hang up normally;
the other station remains connected to
the call. (You can also use the handset speakerphone for a
conference call, just like you can with a normal call.)
Using Privacy Mode
You can prevent other stations from joining a call. Start your call as
usual, then press
MENU/SELECT
: the display shows
Call Privacy
. Press
MENU/SELECT
again to turn privacy mode on (you'll see a in the
display). When you hang up, privacy mode turns off automatically.
As long you have privacy mode on, no other stations can interrupt
your call. To allow another station to join the call, just turn privacy
mode off by repeating the process above (press
MENU/SELECT
twice).
Outside call
Handset
#1
Handset
#2
Base
speakerphone
Outside call
Handset
#1
Handset
#2
Base
speakerphone

17
Using Call Transfer
To... From the base From a handset
transfer a
call
Press
FIND HANDSET/INTERCOM
to
put the call on hold.
1.
Press
CLEAR/INTERCOM
to
put the call on hold.
1.
Select the station you want to transfer the call to, or select
All
to page all the stations at the same time.
When the other station accepts the call, you'll be disconnected,
but you can join the call again.
2.
cancel a
transfer
Press
SPEAKER
to return to the
call.
Press
TALK/FLASH
to return to
the call.
accept a
transferred
call
To answer the page & speak to the transferring station,
1.
press
FIND HANDSET/INTERCOM
. press
CLEAR/INTERCOM.
To accept the call,
2.
press
SPEAKER
. press
TALK/FLASH
.
Using the Intercom
Here are some things you need to know about using the intercom:
Whenever the phone is in standby, you can make an intercom call
between stations without using the phone line.
You can make an intercom call from any station, but only two
stations can be in an intercom call at any time.
If an outside call comes in during an intercom call, the phone shows
the CID information. If the other station hasn't answered the page,
the phone cancels the page so you can answer the incoming call.
To... From the base From a handset
make an intercom
page
Press
FIND HANDSET/INTERCOM
.
1.
Press
CLEAR/INTERCOM
.
1.
Select the station you want to talk with, or select
All
to
page all the stations at the same time.
2.
cancel a page Press
FIND HANDSET/INTERCOM.
Press
END
.
answer an
intercom page
Press
FIND HANDSET/INTERCOM
or
SPEAKER
.
Press
CLEAR/INTERCOM
or
TALK/FLASH
.
leave an intercom
call
Press
FIND HANDSET/INTERCOM.
Press
END
.
answer an outside
call during an
intercom call
Press
SPEAKER.
Press
TALK/FLASH
.

18
Using the Answering System
Setting Up Your Answering System
You can set up your answering system from any handset.
To... Follow these steps
Record your
personal
outgoing
message or
greeting
Your greeting can be between 2 seconds and 30 seconds
long. If you don't record an outgoing message, the system
uses a pre-recorded greeting: Hello, no one is available to
take your call. Please leave a message after the tone.
Press
MESSAGES/MUTE
to access the answering system. Wait
until the system finishes its announcements, or press
5
(STOP)
to skip them.
Press
8
.
Wait for the system to say "Record greeting," then begin
speaking.
When you're finished, press
8
to stop recording. The
system plays back your new greeting.
To keep this greeting, press
END
. To re-record it, go back to
step 2.
1.
2.
3.
4.
5.
Switch
between the
pre-recorded
greeting &
your own
greeting
Press
MESSAGES/MUTE
to access the answering system. Wait
until the system finishes its announcements, or press
5
(STOP)
to skip them.
Press
6
.
The system plays back the greeting it is currently
using.
Press
6
again to switch greetings.
1.
2.
3.
Delete your
greeting
Switch to your personal greeting following the steps above.
While the system is playing back your greeting, press
4
.
1.
2.
Ans. Setup menu options
You can change the answering system options from any handset.
Just open the menu and select
Ans. Setup
.
Security Code
Enter a 2-digit PIN so you can access your answering
system from any touch-tone phone (see page 21).
Ring Time
Set the number of rings (
2
,
4
, or
6
) before the answering
system answers the phone. Choose
Toll Saver (TS)
to
have the system pick up after 2 rings if you have new
messages or after 4 rings if you don't.
Page is loading ...
Page is loading ...
Page is loading ...
Page is loading ...
Page is loading ...
Page is loading ...
Page is loading ...
Page is loading ...
Page is loading ...
Page is loading ...
Page is loading ...
Page is loading ...
-
 1
1
-
 2
2
-
 3
3
-
 4
4
-
 5
5
-
 6
6
-
 7
7
-
 8
8
-
 9
9
-
 10
10
-
 11
11
-
 12
12
-
 13
13
-
 14
14
-
 15
15
-
 16
16
-
 17
17
-
 18
18
-
 19
19
-
 20
20
-
 21
21
-
 22
22
-
 23
23
-
 24
24
-
 25
25
-
 26
26
-
 27
27
-
 28
28
-
 29
29
-
 30
30
-
 31
31
-
 32
32


Ask a question and I''ll find the answer in the document
Finding information in a document is now easier with AI
Related papers
-
Uniden DECT1363 User manual
-
-
-
-
Uniden Video Game Headset XDECT R055 User manual
-
-
-
Uniden D1788 User manual
-
-
Uniden D3588-2 Owner's manual