Kenmore 40753550310 User manual
- Category
- Dehumidifiers
- Type
- User manual
This manual is also suitable for

Use & Care Guide
Manual de Uso y Cuidado
English / Espafiol
Models, Modelos: 407.53550, 407.53570
l(en.moreo
Dehum.°dif
Des_u _d_0_cac_or
Sears Brands Management Corporation
Hoffman Estates, IL 60179 U.S.A.
www.sears.corn
www.kmart.com
www.kenmore.com

Package Contents......................................................2
Warranty ...................................................................2
Safety Instructions.....................................................3
Electrical Requirements............................................4
Installation ..................................................................4,5
Key Features..............................................................5
Control Panel ........................................................ 6
Water Disposing Options ......................................7-9
Care and Maintenance .........................................10
Troubleshooting.......................................................11-12
ProductSpecification ...............................................14
SpanishiEspal_lol .....................................................15
Sears Service............................................Back Cover
* Kenmore Dehumidifier
* Use and Care Guide
Kenmore Limited Warranty
When installed, operated and maintained according to all supplied instructions, if this appliance fails due
to a defect in material and workmanship within one year from the date of purchase, call 1-800-4-MY-
HOME® to arrange for free repair.
If this appliance is ever used for other than private family purposes, this warranty applies for only 90 days
from the date of purchase.
Thiswarranty covers only defects in material and workmanship.Warranty coverage does NOT include:
1. Expendable itemsthat can wear out from normal use,includingbut not limited to filters,belts,
light bulbs, and bags.
2. A servicetechnician to instruct the userin correct product installation,operation or maintenance.
3. A service technicianto clean or maintain thisproduct.
4. Damage to or failure of thisproduct if it is not installed,operated or maintained according to the
all instructions supplied with the product.
5. Damage to or failure of this product resultingfrom accident, abuse, misuseor use for other than
its intendedpurpose.
6. Damage to or failure of this product caused by the useof detergents, cleaners, chemicals or
utensils other than those recommended in all instructionssuppliedwith the product.
7. Damage to or failure of parts or systems resulting from unauthorized modifications made to this
product.
Disclaimerof implied warranties; limitationof remedies
Customer'ssole and exclusiveremedy under this limited warranty shall be product repair as provided
herein. Implied warranties, includingwarranties of merchantability or fitness for a particular purpose, are
limited to one year or the shortest period allowed by law. Sears shall not be liable for incidental or conse-
quential damages. Some states and provincesdo notallow the exclusion or limitation of incidental or
consequential damages, or limitation on the duration of implied warranties of merchantability or fitness,
so these exclusions or limitations may not apply to you.
This warranty applies only while this appliance is used in the United States.
This warranty gives you specific legal rights, and you may also have other rights which vary from state to
state.
Sears BrandsManagement Carporationt HofFmanEstates, IL 60179
2

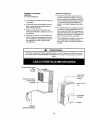
IMPORTANT CAUTIONS FOR USING YOUR DEHUMIDIFIER.
To reduce the risk of fire_electrical shock_in]ury_or damage to the
dehumidifiers,thesesafety precautionsmust be foilowed_
Safety
• Do not place the power cord near a heater.
• Do not use an electrical outlet near flam-
......................................... mable or combustible materials such as
•gasoline, propane, paint thinners, etc.
" Do not disassemble or modify dehumidifier
parts or components. It may cause electric
shock and failure.
° Plug in the power cord properly.
° Do not turn the unit on and off by inserting
or pulling out the power plug,
° Do not damage the power cord or use an
unspecified power cord.
• Do not modify power cord length.
° Do not share the outlet with another appli-
ance.
• Always plug into a grounded outlet. Not
grounding unit may cause electrical shock.
• Unplug the unit if it emits strange sounds,
odors, or smoke.
• Do not use an electrical outlet if it is loose
or damaged.
° Do not operate or plug in unit with wet
hands or in a wet environment.
• Ventilate area before operating dehumidi-
fier. Check for the presence of natural gas
or the buildup of other combustible vapors.
° Do not clean the dehumidifier with water.
Water may enter the unit and degrade the
insulation resulting in an electrical shock.
° If water enters the product, turn off the
dehumidifier's power switch, then unplug
the unit. Do not plug in unit until it has been
inspected by an authorized repair service.
° Because the fan rotates at high speed dur-
ing operation_ always unplug dehumidifier
before attempting any recommended
maintenance or cleaning.
• Do not block the inlet or outlet. It may
cause unit to fail or to operate inefficiently.
3
• Do not remove plug from outlet by pull-
ing on the cord.
• When not in use, turning the unit off will
save energy. Unplug the dehumidifier
when not using for long periods of time.
• When removing the filter, be aware that
some metal parts may have sharp edges
and may cause injury.
• Do not use the water collected in the
bucket for drinking purposes, it is not
sanitary and could cause illness.
• Do not allow children to play with this
product.
Tips
• Make sure the dehumidifier is the correct
size for the area you want to dehumidify.
It is nat designed to dehumidify the entire
house.
• For proper operation, the dehumidifier
should only be placed on a level floor.
• Close all doors, windows and other open-
ings to the room. The dehumidifier must
operate in an enclosed area to be effec-
tive.
• To clean, use a soft cloths do not use
wax, thinners, or strong detergents as
they may change the color of the unit or
cause surface damage.
• Be sure to replace the bucket properly
after emptying to prevent water from
collecting on the floor causing damage to
some types of flooring.
° Do not put a pet or house plant where it
will be exposed to direct air flow. This
could injure the pet or plant.
• Operation without filter will cause unit
failure. Insert the filter securely. Clean it
every two weeks. (See Care and Mainte-
nance section in this manual.)

OBSERVEALLLOCALCODESAND ORDI-
NANCES.
DO NOT, UNDER ANY CIRCUMSTANCESr
REMOVE THE POWER SUPPLYCORD
GROUND PRONG.
ELECTRICALGROUND IS REQUIREDON
THIS APPLIANCE
A 1IS-VOLT 60Hzl AC ONLYw15AFUSED
AND PROPERLY GROUNDED ELECTRICAL
SUPLLYISREQUIRED.
A time delay fuse or time delay circuit
breaker is recommended. Use a dedicated
circuit serving only this appliance.
3-prong grounded plug
Power supply cord
Grounded 3-prong
electrical outlet
DO NOT USEAN EXTENSION CORD.
RECOMMENDED GROUNDING METH-
OD
For your personal safety, this appliance
must be grounded. This appliance has a
power supply cord with a 3-prong ground-
ed plug. To minimize possible shock haz-
ard the cord must be plugged into a
matching grounded electrical outlet that
complies with the latest edition of the
National Electrical Codes and all local
codes and ordinances.
if a grounded 3-prong electrical outlet is
not available, it is the personal responsibil-
ity and obligation of the customer to have
one installed by a qualified electrician.
ELECTRICAL SHOCK HAZARD
WAR"ING.....
• Plug into a grounded 3-prong outlet.
• Do not remove the ground pin from the
plug.
• Do not use an adapter.
• Do not use an extension cord.
• Failure to follow these instructions can
result in death, fire or electrical shock.
* Install the dehumidifier on a level floor
strong enoughto supportthe unit with a
full bucket of water.
* For bestperformance, allow at least 12-18
inches of air space on all sidesof the unit
for good air circulation.
• Keep all outside doors,windowsand other
openingsclosedwhen operating the dehu-
midifier. Humid outdoor air will add to the
unit'sworkload.
• Leave the dehumidifier in an upright posi-
tion for 30 minutesbefore turning on.
DEFROSTOPERATION
The dehumidifier has a built-in defrost
control that senses frost buildup on the
evaporator coils.
During defrosting, the compressor will
automatically turn off; the fan will continue
running to defrost the coils.
4

CHOOSING THE PROPERLOCATION
Usethe dehumidifier:
• in the basement to help prevent moisture
damage.
• in the kitchen, laundry room, bathroom,
and spa/exercise areas that have exces-
sive moisture.
• to prevent moisture damage anywhere
books or valuables are stored.
• during construction or remodeling to
reduce drying time for drywall and paint.
However, check and clean filter often.
AUTOMATIC SHUT OFF
• When the bucket is full, or when the
bucket hasbeen removed, the compres-
sorwill automatically stop. The fan will
continue to run to dehumidify for 3
minutes. Thenthe BucketFull indicator
wilt flash and you will hear a ten second
audible alarm.
• The bucket mustbe placed in the proper
positionfor the dehumidifier to work.
The BucketFulllight will flash and the
dehumidifier will not run if the bucket is
not in the proper position.Dehumidifier
settingscan not be changed when the
bucket isnot in itsproper position.
• The dehumidifier fan will shutoff in 3
minutes,once the desired Relative Hu-
midity (RH) settingisreached, plus_r
minus5% RH.
_l, WARNING
i To reduce the risk of fire, electric shock or injury to sons, read the important SAFETY IN-
I STRUCTIONS found on page3 before operating this appliance.
• _ i I1 III IIIIIIIII - ill III IJlll ..... i J HJ I IIIUI
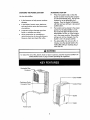
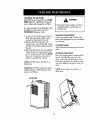
Washable Filter
Enclosure
Continuous Drain
Connector Door'"1
i
=
Power Cord
•. • • Carry Handle
=
• .... Control Panel
i
J
..... _...... Bucket
Caster

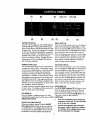
(7) (8) (9)
(4) (5) (2)
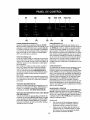
POWER ON/OFF (1)
Once the unit is plugged in, the POWER INDICA-
TOR (10) will light. Pressing the POWER button
once wilt turn the unit ON and illuminate the digi-
tal display (9). The fan will operate for 3 minutes
to draw air through the dehumidifier to properly
senserelative humidity. The display will show the
humidity level of the room in 5% increments,
down to a minimum of 25%. Pressingthe Power
button again will turn the display OFF and the
unit will cease operating.
HUMIDITY LEVEL(2/3)
The humiditylevel can be set in 5% incrementsin
a range from 35% to 80%. The humidity setting
isshown in the digital display. When the humidi-
ty level of the room reaches the set level, the
compressor will stop,but the fan will continue
operating for 3 minutes. Toset the unit to continu-
ous operation, press the down arrow button until
the display shows35%. Pressagain and the dis-
play will showCO. The Continuous indicator (13)
wilt light up on the control panel. To leave contin-
uous operation, pressthe UP arrow.
To check the current humidity setting, pressthe up
or down arrow. The display will show and set 5%
above or below the currentsettings.
FAN SPEED(5)
PressFan Speed to toggle between Low, Med,
and High fan speeds. Speed will be shown in FAN
SPEEDINDICATOR (8)
BUCKET FULL INDICATOR (11)
When the collection bucket is full, the BUCKET
FULL indicator (11) wilt light up and you wilt hear
an audible alarm. The audible alarm will last up
to ten seconds The dehumidifier will not run until
the bucket is removed, emptied and replaced.
(3) (t) (6)
DELAY START (4)
Unit can be programmed to turn on at a desired
delay time by pressing the Timer (4) key. When
the unit is powered OFF, press the timer key once
for 2-hour delay start. The2 Hrs (7) timer indica-
tor wilt light up when the timer key is pressed.
Pressthe timer key once more for a A-hour delay
start. The 4 Hrs (7) timer indicator will now light
up. Pressthe timer key a third time to ctear the
timer setting. No timer indicators will light up
when the timer setting is cleared.
AUTO SHUT-OFF (4)
Unit can be programmed to turn off at a desired
time by pressing the Timer(4) key. When the unit
is powered ON, press the timer key once for 2-
hour automatic shut-off. The 2 Hrs (7) timer indi-
cator will light up when the timer key is pressed.
Pressthe timer key once more for a 4-hour auto-
matic shut-off. The 4 Hrs (7} timer indicator will
now light up. Pressthetimer key a third time to
clear the timer setting. No timer indicators will
light up when the timer setting is cleared.
FILTERRESET(12)
The FILTERRESETindicator (12) will light up when
the filter needscleaning. Remove the filter and
clean accordingly. Replace the filter when fin-
ishedand pressand holdthe FILTER(6) key up to
5 secondsto reset the filter indicator.
IMPORTANT:
• Once the set humiditylevel isreached_the
compressorwil! shutoff:. The fan willcontin-
ueto runfor up to 3 minutes.
• Anytime the compressorstopsrunningfor
any reason,it will not restart for a minimum
of 3 minutes.Thisisa design feature to pro-
tect the compressorfrom damage.
6

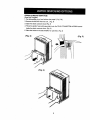
OPTION I: EMPTYING MANUALLY
1. Pullout the bucket_grasping the side handles.(Fig. 1)
2. Carry the bucket by grasping the front corner of the bucket with one hand and the back of
the bucketwith the other hand( Fig. 2)
3. Empty the bucket and replace the bucket in the dehumidifier. (Fig. 3)
NOTE: Dehumidifier will not work and settingscan not be changed when the BUCKETFULL
indicator light is flashing or without the bucket properly installed.
........................................................DO NOT REMOVE THESTYROFOAM IN THE BUCKET
This dehumidifier is equipped with a reliable Styrofoam float system. The Styrofoam
located inside the float in the bucket is essential to the bucket full system working
properly. Do not remove the Styrofoam from the float.
(Fig. 1)
(Fig. 2)
(Fig. 3)

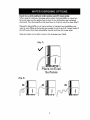
OPTION 2=GRAVITY DRAIN HOSE
(Hose Not Provided)
1. Set dehumidifier on a level surface (see page 11,Fig 7-8)
2. Remove the BUCKETfrom the unit. (Fig. 4)
3. Open the drain connectordoor (Fig. 5)
4. Thread a garden hose(soldseparately) ontothe DRAIN CONNECTOR NOZZLE located
inside the drain connectordoor.(Fig. 5)
5. Place the bucket inthe dehumidifier for operation. (Fig.6)
(Fig. 4)
! i
(Fig. 5)
(Fig. 6)

PLACE ON A LEVEL SURFACE WHEN USING GRAVITY DRAIN HOSE
When using the continuous drainage option, place the dehumidifier on a level sur-
face and make sure the garden hose is clear of any obstructions and is directed
downward. Press down gently on the drain door so it rest on top of the hose. (Fig.7)
Placing the dehumidifier on an uneven surface or improper hose installation may
result in water filling up the bucket and causing the unit to shut off:. Empty bucket if
shut off: occurs, then check dehumidifier location and hose for proper setup.
Make sure there are no kinks or knots in the drainage hose. (Fig,8)
(Fig. 7)
Place on Even
Surfaces
(Fig. 8)
X X X
9

CLEANING THE AIR FILTER
After 250 hours of operation the FILTER
RESET indicator will light up to remind
you to clean and change the air filter.
It is recommended to periodically check
the filter for excess dirt even if the
FILTER RESET indicator is off.
1. To remove the air filter, press the two
filter tabs and pull the filter holder
away from the back of the unit.
2. Remove the filter and clean with
warm, soapy water. Rinse and allow
the filter to dry before placing back in
the unit.
3. Place the filter back into dehumidifier.
Plug unit back into outlet, power the
unit on and press and hold the FILTER
key up to 5 seconds on the control
panel to reset the filter setting.
NOTE: DO NOT place the filter in a
dishwasher
CAUTION: DO NOT operate the dehu-
midifier without a filter. Doing so may
cause a unit failure.
WARNING
• Disconnect power supply cord from
receptacle before performing any
maintenance.
CLEANING THE EXTERIOR
Clean the cabinet using a damp cloth
and a mild detergent. Do not use bleach
or abrasives.
CONTROL PANEL
Wipe down the control panel with a dry
cloth.
CLEANING THE BUCKET
Every few weeks, clean the dehumidifier
bucket. Partially fill the bucket with
clean water and mild detergent. Swish
the mixture around in the bucket, empty
and rinse. Replace the bucket when fin-
ished
NOTE: Do not place the bucket in a
dishwasher.
FILTERTABS
\
]0

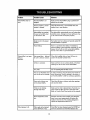
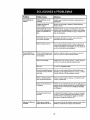
ProMem PossibleCauses Solutions
Dehumidifierdoes not The dehumidifier is un- Make surethe dehumidifier's plug ispushedcam-
start, plugged, ptetely into the outlet.
The fuseis blown / circuit Checkthe housefuse/ circuit breaker box and
breaker istripped, replace fuse or reset breaker.
Dehumidifier has reached
the user set humidity level
or the bucket is full.
Dehumidifier is not oper-
ating as
Intended.
The dehumidifier automatically turns off wheneither
condition occurs.Change to a lower setting or emp-
ty the water bucket and replace properly.
i i i i,, 1,1,,,111
Bucketisnot in the proper The bucket mustbe in place and securelyseated for
position, the dehumidifier to operate.
Power Failure. Thereisa protective time delay of 3 minutes to
prevent tripping of the compressoroverload. Forthis
reason,the unitwill not start normal dehumidifica-
tion for 3 rain. after it ispowered back on.
Not enough time allowed
for unit to removemoisture.
Airflow is restricted.
Dirty filter.
i
The user set Humidity Level
may not be set low enough.
Doors and windows may
not be closed tightly.
Water is not draining
through drain hose
Roomtemperature istoo
_ew,
When first installed, allow at least 24 hours to
achieve the desired humidity level.
Make sure there are no curtains, blinds, or furniture
blocking the side or back of the dehumidifier.
ii ii¸ iiiii1,,im,ii ,
See the Cleaning The Air Rlter section
, ,.ll .,ll,..i i,,, .1.
To reduce moisture,pressthe down arrow button to
lower the percent humidity desired in the room_or
setthe dehumidifierto CO for continuousoperation.
Check that all doors,windows, and other openings
are securelyclosed.
Make surethe drain is placed below the drain con-
nectornozzle to allow gravity to drain the water
(Refer to Gravity Drain Hose sectionin this manual).
Moisture removal is best at higher room tempera-
tures. Lower room temperatures will reduce the
moisture removal rate. Thismodel isdesigned to
above 41 F.
operate at temperatures o
Filter Indicator islit. Filter needsto be cleaned Once filter has been cleaned, pressthe FILTERbut-
every 250 hours of use. ton for 3 secondsto turn the filter indicator off.
]!

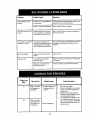
Prob!_,n
Dehumidifier runs too
much
Frost appears on the
coils
, ijlllll i
The controls cannot be
set or changed
HH,HI', ,11111 IIIII II
Fan Noise
Water on the floor
Posdble Causes
HII IIIII I I III IHIIIII I IIIIII I I I I I I I I
The area to be dehumidified
is too large.
Doors and windows are
open.
The dehumidifier has recent-
ly been turned on or the
room temperature is below
41°F.
IIII I I I I I
Bucket is full or it has been
removed.
,w. ,.q, • , i
Air is moving through the
unit.
Hose connection may be
loose.
Hose is attached but not
draining into a drain.
Solutions
i.l.,i i
The capacity of your dehumidifier may not
be adequate for the room size.
i ill i
Close all doors and windows to the outside.
This isnormal. Frostwilt usuallydisappear
within 60 minutes.
i.iI.HH..I
Empty bucket and install properly in unit.
Thisis normal.
Check the hose connection. See the Drain-
age Section.
,,,,Luu,,, i i
Check hose for obstruction.
Error Code
n
Error Type
Ambient Tem-
perature Sensor
Malfunction
Possible Cause
1. Sudden Change in
the surrounding
temperature.
2. Faulty Sensor
Corrective Action
i iii [ i i
1. Unplug the dehumidifier.
2. Check the surrounding area for
possible reasons for sudden
temperature changes.
3. Wait 30 minutes before plug-
ging the dehumidifier bgck in
for normal operation.
F2
Evaporative
Coil Tem-
perature
Sensor Mal-
function
.
if the "Error" is still indicated,
please contact your nearest
service center. Call 1-
800-488-1222 for service center
locations.
12

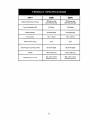
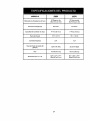
50 Pints per day
(23.5 Liters per day)
615 Watts
.,l,,,,,, i,i, i,,,,ll,i ,i.ll ,,,,l, ,,l,,
17 Pints(8 Liters)
115V / 60 HZ
ITEM#
Moisture Removal per 24 hours
Power Consumption(W)
BucketCapacity
Power Source
r ............
_70
,.,, ,,...,,, , ,,,
70 Pints per clay
(32.9 Liters per clay)
,,,, ,
Rated Current (Amps)
Sound PressureLevel dB (L!M/H)
,,,,,,, ,
Weight
,,,.,,,, ,,, ,
Dimensions (W x D x H)
745 'Watts
17 Pints(8 LiterS)
115V / 60 HZ
iii iiiiii iii ii/111111/11 I_ I I /I II
5.2A 7.3A
,,,,,, ,,,,,,,,,,,,,,T,, , ,,,, ,,,, ,, ,,,,,,,,, ,
45/47/49 dB(A) 45/47/49 dB(A)
,,,,,, ,,,,,,,,, ,, ,, ,,,, , ,,,,,,, ,, ,, ,
45.2 Ibs (20.5 kg) 45.2 Ibs (20.5 kg)
,,,,,,, ,,,,,,,, . ,,, ,, J J
t5.1" x 11.7" x 24.1" 15.1"x 11.7"x 24.1"
(384x297x613 mm) (384x297x613 mm)
13

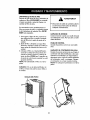
Master Protection Agreements
Congratulations on making a smart purchase. Your new Kenmore®product is de-
signed and manufactured for years of dependable operation. But like all products,it
may require preventive maintenance or repair from time to time. That's when hav-
ing a Master ProtectionAgreement can save you money and aggravation. The
Master ProtectionAgreement also helps extend the life of your new product. Here's
what the Agreement* includes:
IZ Parts and labor not just for repairing defects, but to help keep products oper-
ating properly under normal use. Our coverage goes well beyond the prod,
uct warranty. No deductibles, no functional failure excluded from coverage--
real protection.
[] Expert service by a force of more than 10,000 authorized Sears service
technicians, which means someone you can trust will be working on your
product.
Unlimited service calls and nationwide service, as often as you want us,
whenever you want us.
[] "No-lemon" guarantee - replacement of your covered product if four or more
product failures occur within twelve months.
[] Product replacement if your covered product can't be fixed.
[] Annual Preventive Maintenance Check at your request- no extra charge.
Fast help by phone - we call it Rapid Resolution - phone support from a
Sears representative on all products. Think of us as a "talking owner's manu-
al."
[] Power surge protection against electrical damage due to power fluctuations.
[] $250 Food Loss Protection annually for any food spoilage that is the result of
mechanical failure of any covered refrigerator or freezer.
[] Rental reimbursement if repair of your covered product takes longer than
promised.
t_ 10% discount off=the regular price of any non-covered repair service and re-
lated installed parts.
Once you purchase the Agreement, a simple phone call is all that it takes for you to
schedule service. You can call anytime day or night, or schedule a service appoint-
ment online.
The Master Protection Agreement is a risk free purchase. If you cancel for any rea-
son during the product warranty period, we will provide a full refund. Or, a prorated
refund anytime after the product warranty period expires. Purchase your Master
Protection Agreement today!
Some limitations and exclusions apply. For prices and additional information
in the U.S.A. call 1-800-827-6655.
Sears Installation Service
For Sears professional installation of home appliances, garage dooropeners, water
heaters, and other major home items, in the U.S.A. or Canada call 1-800-4,MY-
HOME®.
]4

Contenidos de la Caja .............................. 13
Garantia ........................................................13
Instrucciones de Seguridad ..........................14
Requisitos El_ctricos .....................................15
Instalaci6n .....................................................15,16
Caracteristicas Importantes ................... 16
Panel de Control .........................................17
Opciones para Eliminarel Agua ................18
Cuidado y Mantenimiento ....................... 19
Soluciones a Problemas ................................20,21
Especificacionesdel Producto ....................22
Espafiol .........................................................23
Servicio Sears ..........................Contraportada
• Deshumidificador Kenmore • Guia de Usa y Cuidados
Garanffa Limitada Kenmore
Cuando la _nstalaci6n, usa, y mantenlm[ento es de acuerdo a todas tas instruct|ones suministradas y este
electrodom_stico folio debido a materiales defectuosos yio manufactura dentro de un aria de la fecha de
compra, par favor Ilamar 1-800-4-MY-HOME® (1-800-469- 4663) para coordinar la reparaci6n gratis.
Si este electrodom_stico no es usado para prop6sitos prlvados familiares0 esta cjaranffa apt|ca solamente
para 90 d[as desde la fecha de compra.
Esta garanffa cubre 0nicamente defectos en los material y/o manufactura. La cobertura de garanffo NO
incluye io sigulente:
t. los art[culos y partes que pueden tener desgaste par el usa normal, incluyendo y sin limitar los
filtros, correas, bombillas, y balsas.
2. Un t_cnico de serv[¢io para instruir al usuario en la instalaci6n correcta del producto, su usa, o
mantenlmiento.
3. Un t_cnico de servicio para limpiar odar mantenimiento a este producto.
4. Los da_os o fallas de este producto sila instalac[6n, usa o mantenimiento no est6n de acuerda a
todas las instrucciones suministradas con el producto.
5. Los da_os o fa|las a este producto coma resu|tado de un accidente0 abuso, usa indebido o los
usos que no sean los indicados.
6. Dafios o fallas de este producto causados par el usa de detergentes, limp|adores, utensil[as, o
€lufmicos que no sean los recomendados en todas las instrucciones suministradas con este productoo
7. Da_os o fallas de partes o sistemas coma resultado de modificaciones no autorizadas a este
producto.
Descargo de garantfas impllcitas_ llmltaclones de recurSos legales
El recuso legal y exclusivo del cliente bajo esta garanffa limitada set6 la reparacibn del producto coma
se estipuia en este manual del propietario. Los Garanffas implicitas, incluyendo cjarant[as de comerciabi-
|idad o adaptabilidacl para un prop6sito particulart est6n limitadas a un a_o o al pertodo mas corto
permitido par la ley. Sears no ser_ responsable par da_os incidentales o consecuentes. Algunos estados y
provincias no permiten la exclusi6n o limitaci6n de daffos |ncidentales o consecuentes, o los limitaciones
en la duraci6n de garant[as impffcitas de comerciabilldad o adaptabilidacl, par Io tanto estas e×ciusiones
o iimitaciones podr/an no aplicar para usted.
Esta garantia aplica solamente cuando este etectrodom_stico es usado en los EEUU.
Esta garantla le da austed derechoslegales especfficos, y usted podria tenet otros derechos que varfan
de estado a estado.
SearsBrandsManagement Corpofatlon s HofFmanEstates,IL 60179
t5

PRECAUCIONES IMPORTANTES CUANDO USESU DESHUMIDIFICADOR.
Parareducirelriescjodeincendiotdescargael_'trica,le_ionesodafioa losdeshumidifica-
dares, estas precauciones de seguridadse deben segulr:
Segurldad
* No coloque el cable el_ctrico cerca de un ca-
lentador.
• No use un tomacorrient.e cerca de materiales
combustibles o inflamables coma gasolina, gas
propano, disolvente de pinturas,etc.
o No desarmar o modificar partes o componentes
del deshumidificador. EstopodHa causar una
descarga el_ctrica y la falla de la unidad.
• Enchufe el cable el_ctrico apropiadamente.
• No encienda o apague la unidad desconectan-
do o conectando el enchufe a untomacorriente.
• No dafie et cable el_ctrico o useun cable el_c-
trico no especificado.
• No modifique la iongitud del cable el_ctrico.
"No comparta et usa del toma corriente con
arras electrodom_sticos.
, Siempre enchufe el cable a un tomacorriente
con contacto tierra. Si no hay contacto tierra
podHa provocar una descarga el_ctrica.
* Desconecte la unidad si emite sonidos extrafios,
olores, o humo.
"No utJlice un toma corrienteque este flojo o
dafiado.
° No opere o conecte |a unidad con las manos
mojadas o en un media ambiente mojado.
°Venfile el 6tea antes de usar el deshumidifica-
dot. Revisesi hay presencia de gas natural o la
acumulaci6n de otros vapores combustibles.
, No Iimpie el deshurnidificadorcon agua. El
agua podria entrar en el interior de la unidad y
degradar el material atslante resultando en
descarga el_ctrica.
• Si el agua se introduce dentro de la unidad,
apague el bot6n de encendido del deshumidifi-
cador y desconecte la unidad. No conecte la
unidad hasta que sea inspeccionada par un
agente de servicioautorizado.
° Debido a que el ventilador gira a a[tas veloci-
dades durante suoperaci6nt siempredesconecte
el deshumidificador antesde intentar cualquier
mantenimiento recomendado o Iimpieza del
unJdad.
° No bloquear las entradas o salidasde ]a uni-
dad. Podr[acausar la faila o el funcionamiento
deficiente de la unidad.
16
• No desconecteel enchufe del toma corriente
tTrandodel cable.
• Apague la unidad cuando no este en usa,esto
le ahorrara energfa. Desconecte el deshumidi-
ficador cuando no este en usapar largos
periodos de tiempo.
' Cuando quite et filtro, tenga en cuenta que
algunas partes met61icas podHan tenet bordes
afilados que le podrian causar lesiones.
• No useel agua colectada en el contenedor
de agua para beber. No es saludable y puede
causar enfermedades.
• No perrnita que los nifios juecjuencon este
producto.
ConsejosUtiles
• Aseg0rese de que el tamafio del deshumidifi-
cador es e! correcto para el 6tea que usted
quiere deshumedecer. No esta disefiado para
deshumedecertoda la casa.
• Para el funcionamiento apropiada, el deshu-
midificador debe set colocado en un piso
nivelado.
• Cierre todas las puertastventanas, y otras
aberturas de la habitaci6n. Eldeshumidifica-
dot debe operar en un 6tea cerrada para que
sea efecfivo.
° Para Iimpiar la unidad useuna toa]la suave;
no usecera, disolventes,o detergentes fuertes
ya que podrian cambiar el color o dafiar el
superficie de la unidad.
• Aseg0rese de colocar et contenedor de agua
apropiadamente despu_sde vaciarlo para
prevenir el derrame de agua en el piso ya que
podria causar dafios a ciertas clases de pJsos,
• No ponga una mascota o planta donde esta-
rian expuestos directamente al flujo de aire.
Esto poclrialesionar o dafiar la mascota o
planta.
• La operaci6n de la unidad sin el filtro causara
fal]as a la unidad. Inserte el filtro de farina
segura. Limpie el filtro cada 2 semanas.(Vet
la secci6n de Cuidados y Mantenimiento en
este manual.)

OBSERVETODAS LASORDEI'_kNZAS Y CO-
DIGOS LOCALES.
BAJO NINGUNA CIRCUNSTANCIAt REMUE-
VA O QUITE LA PATILLADE CONTACTO
TIERRADEL CABLEDESUMINISTRO ELECTRI-
CO.
ELCONTACTO ELECTRICOTIERRASE RE-
QUIERE EN ESTEELECTRODOMESTICO.
TAMBIEN ESREQUERIDO LO SIGUIENTE.
SUMINISTRO ELECTRICODE 115.VATIOS
60Hz_ SOLO AC, FUSIBLEDE 15AY ELCON-
TACTO TIERRAAPROPIADO.
Se recomienda un fusible cortacircuitos con
demora de tiempo o un interruptorcortacir-
cuitos con demora de tiempo. Use un circulto
dedicado solamente para esta unidad
Enchufe de 3 Clavijas
,Cable de Suministro
El_ctdco
NO USEEXTENSIO-
NES.
Tomacorriente Con
Contacto Tierra para 3
Clavijas
METODO DE CONTACTO TIERRA
RECOMENDADO
Para su seguridad personal, este electra
domestico debe tenet contacto tierra. Este
electrodom_stJco tiene un cable de suminis-
tro el_ctrico con 3-ctavi]as con cantacto
tierra. Para minimizar posibie petigro de
descarga el_ctrica, el cable el_ctrico debe
estar conectado a un toma corriente el@ctri-
co correspondiente que cumpta con la ultJma
edici6n de National Electrical Codes
(C6digos EI6ctricos Nacionales) y con los
c6digos y ordenanzas locales.
Si un tomacorriente de 3 entradas con cen-
tacto tierra no esta disponible, es responsa-
bilidad y obligaci6n personal del ciiente
instalar uno par un electricista caiificado
PELIGRO DE DESCARGA ELECTRICA
_1_ A'DVE'RTE'NclA '.........
• Conectar a un toma corriente de 3 entra-
das con contacto tJerra.
• No quite la clavija de contacto tierra del
enchufe.
• No use un adaptador.
• No use una extensJ6n para suministro
el_ctrico.
• El no seguir estas instrucciones puede
resultar en muerte, incendio, o descarga
• Instaleel deshumidificadorsabre un piso
nivelado y Io suficientementefuerte para
soportar la unidad con el contenedor de
acjua Ileno.
• Para obtener un mejor rendimiento,permi-
ta par Io menosde 12 a18 pulgadas de
espacio alrededor de la unidad para una
buena circulaci6n del aire.
• Mantenga todas laspuertas exteriores,
ventanas,y otrasaberturas cerradas
cuando el deshumidificadoresta en usa. El
aire hOmedodel exterior aumentara la
carga de trabajo para la unidad.
• MantencJa la unidad en posici6nvertical
par 30 minutosantes de encenderla.
OPERACI6N DE
DESCONGELAMIENTO
El deshumidiflcador tiene un control de des-
congelado incorporado que detecta la acu-
mulaci6n de hieloiescarcha en las bobinas
del evaporador
Durante el descongelamiento, el compresor
se apagara autom6ticamente y el ventilador
contJnuara funcionado para descongelar las
bobinas.
17

ELIGIENDO LAUBICACION
ADECUADA
Useel deshumidiflcador:
• en el s6tano para ayudar a prevenir da_os par
la humedad.
• en la cacina_ cuarto de tavandeHa, cuarto de
ba_o, yen las a_reas de ejercicio/spa que
fienen humedad excesiva.
• para prevenir da_os par humedad en cual-
quler lugar donde libros y objetos de valor son
almacenados.
• durante la construcci6n o remodelaci6n, para
reducir el fiempo de secado de paredes pinta-
das o tratadas con recubrlmientos, sin embar-
go, aseg6rese de revisor y llmplar el filtro
frecuentemente.
APAGADO AUTOMATiCO
• Cuando el contenedor de agua esta Ileno,o
cuando eJcontenedorde agua no esta en la
posici6ncorrecta la luz indicadora de BUCKET
FULL(contenedor Ileno de agua) seencender6
y usted escuchara la alarma audible par I0
segundos. La unidad seapagara autom6tico-
mente.
• Elcontenedor debe sercolocado en la posici6n
apropiada para que el deshumidificadorfun-
clone. La luz de BUCKETFULL(contenedor de
agua Ileno) permanecer6 encendida y el deshu-
midificador no funcionara si el contenedor de
agua no esta en to posici6n apropiada.
• El deshumidificador se apagara cuando alcan-
ce la configuraci6n de humedad deseada,
basra mas o menos el 5% de la humedad rela-
tlva (RH).
[,ii i
_, ADVERTENCIA
,H IIILllll I I I
Para reducirel Hesgode incendio,descarga el_ctrTca,o lesionesa personas, lea toda la importante
_nformaci6n referente a INSTRUCIONES DE SEGURIDAD en la pag[na 3 antes de usar este electrodo-
m_stico.
Comparfimiento para
el Filtro ..... ';
Lovable
I
i
.+
Puerta de Conector !i
para Drenaje
Continua ....
i
i
=
=
=
Cable de
Suministro El_ctrico
Agarradera
• =
.................... para f6cil
: manejo
Panel de Con-
trol
I
J
..... i ...... Contenedor
i de Agua
J
Ruedas
18

(t.o)
(12)(t3)
(4) (s) (2) (3)
(1) (6)
POWER (ENCENDIDO/APAOADO) (1)
Cuando la unidad esta conectada, el indlcador POWER
(10) se encenderci. Presionando el bot6n de POWER una vez
encenderci la unidad (ON) iluminado la pantalla digital(9).
La panta]la mostrara el nNel de humedad en la habitaci6n
en incrementos del 5% hasta llegar al 20%. Presionado el
bot6n de POWER de nuevo apagara la pantaila digital
(OFF) y la unldad de.iara de funcionar.
NIVEL DE HUMEDAD {2/3)
El nTvetde humedod puede ser conflgurado en incrementos
de 5% desde 35% hasta 80%. La humedad configurada se
mostrara en la panta|Ja. Cuando el nivel de humedad en la
habitaci6n aicanza eJnivel cOnfigurado, la unidad de_ara
de deshumidificar.
Para contlgurar ]a unidad en modo continua, presione el
bot6n can la flecha hacia abajo hasta que la pantalla
rnuestre 35%. Preslone de nuevoy la pantalla mostrara
*'CO". El _ndicador de continua (CONTINUOUS) (13} se
encender6 en el panel de control. Para finalizar la opci6n
de operaci6n continua, presione el bot6n con la flecha
hacia arriba.
Para revisar ta configuraci6n de humedad actual, prestone
los botones hacia arriba o hacia abajo. La pantalla mostra_
ray conflgurara con el 5% mas o menos de la configura-
c_6n actual.
VELOCIDAD DELVENTILADOR (5)
Presione FAN SPEED(Velocidad del Ventilador) para cam,
biar entre las velocidades LOW (Baja), MED (Mediano), y
HI (Alto). La velocldad se mostrara en el indicador de
velocidad del venfilador (FAN SPEED INDICATOR) (8)
[NDICADOR DE CONTENEDOR DE AGUA LLENO (BUCKET
FULL INDICATOR) (11)
Cuando ei contenedor de agua esta llano, et _ndicador de
contenedor de agua llano (BUCKET FULL) {11) se encender_l
y usted escuchara una alarma audible. La alarma audible
durara diez segundos. El deshumidificador no funcionara
hasta que el contenedor de agua sea removldo, vac_ado, y
colocado de nuevo en su lugar.
INICIO RETRASADO (4)
La unidad puede set programada para funcionar en el
fiempo retrasado deseado. Presionando el bot6n temporlza-
dor (TIMER) (4). Cuando la unidad este apagada presione
el bot6n tempor|zador {TIMER.)una vez para 2 horas de
inic{o retrasado. El indicador de temporizador de 2 horas
(7) se encender6 cuando el bot6n temporlzador esta presio-
nado. Presione el bot6n temporizador una vez mas para el
inicio retrasado de 4 horas (7). EIindicador de temporiza-
dor de 4 horas (7) se encender6. Presiane el bot6n tempor_-
zaclor par tercera vez para cancelar la conflgurac[6n de
tempor|zador. Los indicadores de temporizador no se en-
cenderen cuando la configuraci6n de temporizador ha sido
cancelada.
AUTO APAGADO (4)
La unidad puede ser programada para apagarse a ia hora
deseada presionado el bot6n temporizador (TIMER)(4).
Cuando la unidad esta encendida, presione el bot6n tempo-
Hzador (TIMER) una vez para el apagado autom_tico en 2
horas. La ]uz {ndlcadora de temporizador de 2 haras (7) se
encender6 cuando el bot6n temporizador esta presionado.
Pres_one eI bot6n temporizador una vez mas para e] apao
gado autom6t|co en 4 horas (7). La iuz indicadora de
temporlzador de 4 horas (7) se encender6. Preslone el
bot6n temporizador par tercera vez para canceJar Ja confi-
guraci6n del temporizador. Los iuz indicadora de tempori-
zador no se encender6 cuando la conflguraci6n de tempori-
zador ha sido canceiada.
REAJUSTANDO EL FILTRO (12)
Lo luz ind_cadora de reajuste de filtro (FILTERRESETIndtca-
dor) (12) se encender6 cuando el fiitro requiera limpieza.
Remueva el filtro y limpielo coma se indica. Coloque el fittro
de nuevo en su lugar cuando finalice la limpieza, presione
y detenga el bot6n de filtro FILTER (6) par 5 segundos para
reajustar el indicador de flltro.
]9
IMPORTANTE:
• Una vez que el nivel de humedad se alcanza, el
compresor seapagar6. El ventilador continuar6
func_onando durante un m6ximo de 3 minutos.
• Cada vez que el compresor deja de func_onar par
cualquier raz6n, no se reiniciarci durante un minima
de 3 minutos. Esta es una caracteHst|ca de disefio
para proteger el compresor de dafios.

OPCION 1=VACIAR MANUALMENTE
1. $aque el contenedor de aguat agarran-
do Jas manijas de los lados. (Fig. 1)
2, L|eve/transporte el contenedor de acJua
agarrando la esquina frontal con una
mano y la parte trasera del contenedor
con la otra mano. ( Fig. 2)
3. Vacfe el contenedor y col6quelo de nue-
vo en et deshumidificador. {Fig. 3)
NOTA: El deshumidiflcador no funcionara
.....cuando la luz indicadora de contenedor
lleno(BUCKET FULL) esta encendida o si el
contenedor no esta colocado apropiada-
mente.
OPCION 2= DRENAJE POR GRAVEDAD CON
MANGUERA
(Manguera no incluida)
1. Saque el contenedor de la unidad.(Fig. 4)
2. Abra la puerta del conector de drenaje. (Fig. 5)
3. Conecte una manguera de jardin (vendida
separadamente) a la boquilla del conector de
drenaje iocalizada adentro de la puerta del
conector de drenaje.. (Fig. 5)
4. Coloque el contenedor en el deshumidificador
para operaci6n. (Fig. 6)
(Fig. 4)
(Fig, 1)
i
(Fig.2)
(Fig.. 5)
(Fig. 3)
2O
(Fig. 6)
Page is loading ...
Page is loading ...
Page is loading ...
Page is loading ...
Page is loading ...
Page is loading ...
Page is loading ...
Page is loading ...
-
 1
1
-
 2
2
-
 3
3
-
 4
4
-
 5
5
-
 6
6
-
 7
7
-
 8
8
-
 9
9
-
 10
10
-
 11
11
-
 12
12
-
 13
13
-
 14
14
-
 15
15
-
 16
16
-
 17
17
-
 18
18
-
 19
19
-
 20
20
-
 21
21
-
 22
22
-
 23
23
-
 24
24
-
 25
25
-
 26
26
-
 27
27
-
 28
28


Kenmore 40753550310 User manual
- Category
- Dehumidifiers
- Type
- User manual
- This manual is also suitable for
Ask a question and I''ll find the answer in the document
Finding information in a document is now easier with AI
in other languages
Related papers
-
Kenmore 407.52501 User manual
-
-
-
-
-
-
-
-
-
Other documents
-
LG WT1901CK Owner's manual
-
LG UD551GKG3 Owner's manual
-
LG UD701KOG3 Owner's manual
-
-
 Perfect aire Damp2Dry 1PACD150 User manual
-
LG BHD-301-E Owner's manual
-
Haier HEN70ETF Owner's manual
-
Soleus Air SG-DEH-70EIP-6 User manual
-
Keystone DD7L Junior User manual
-
