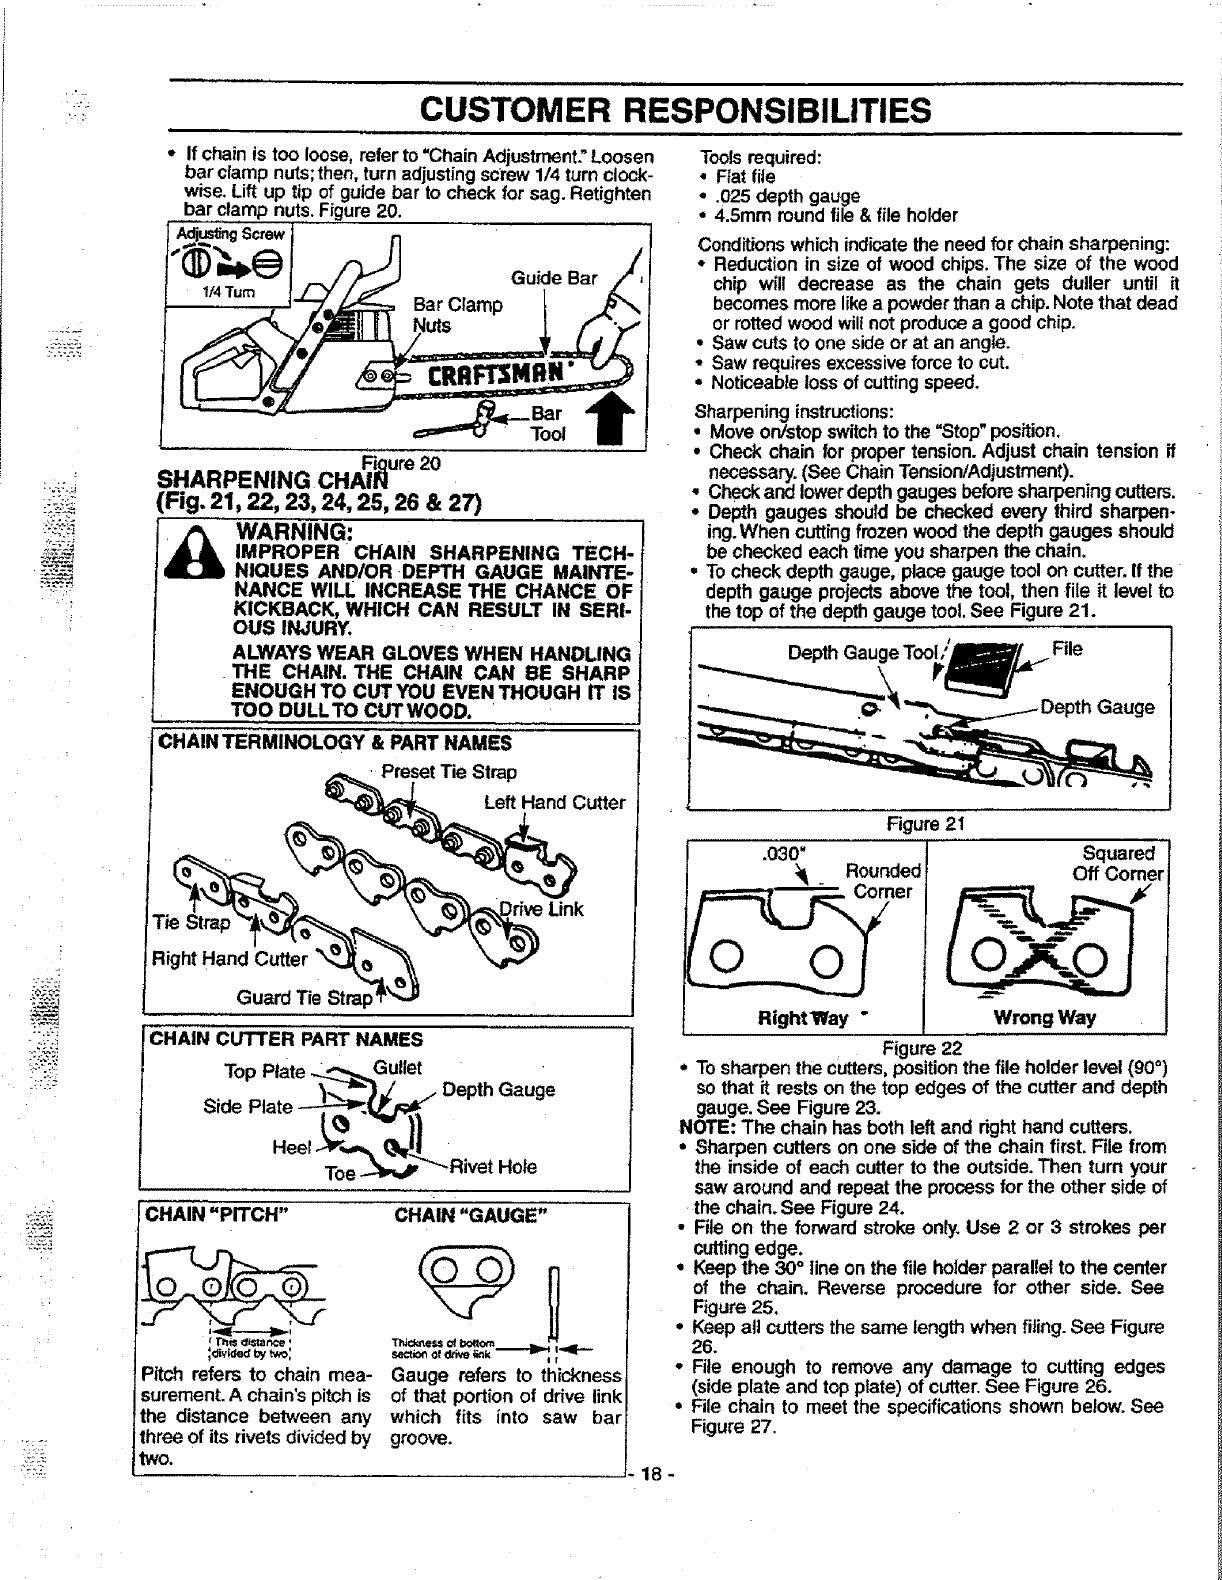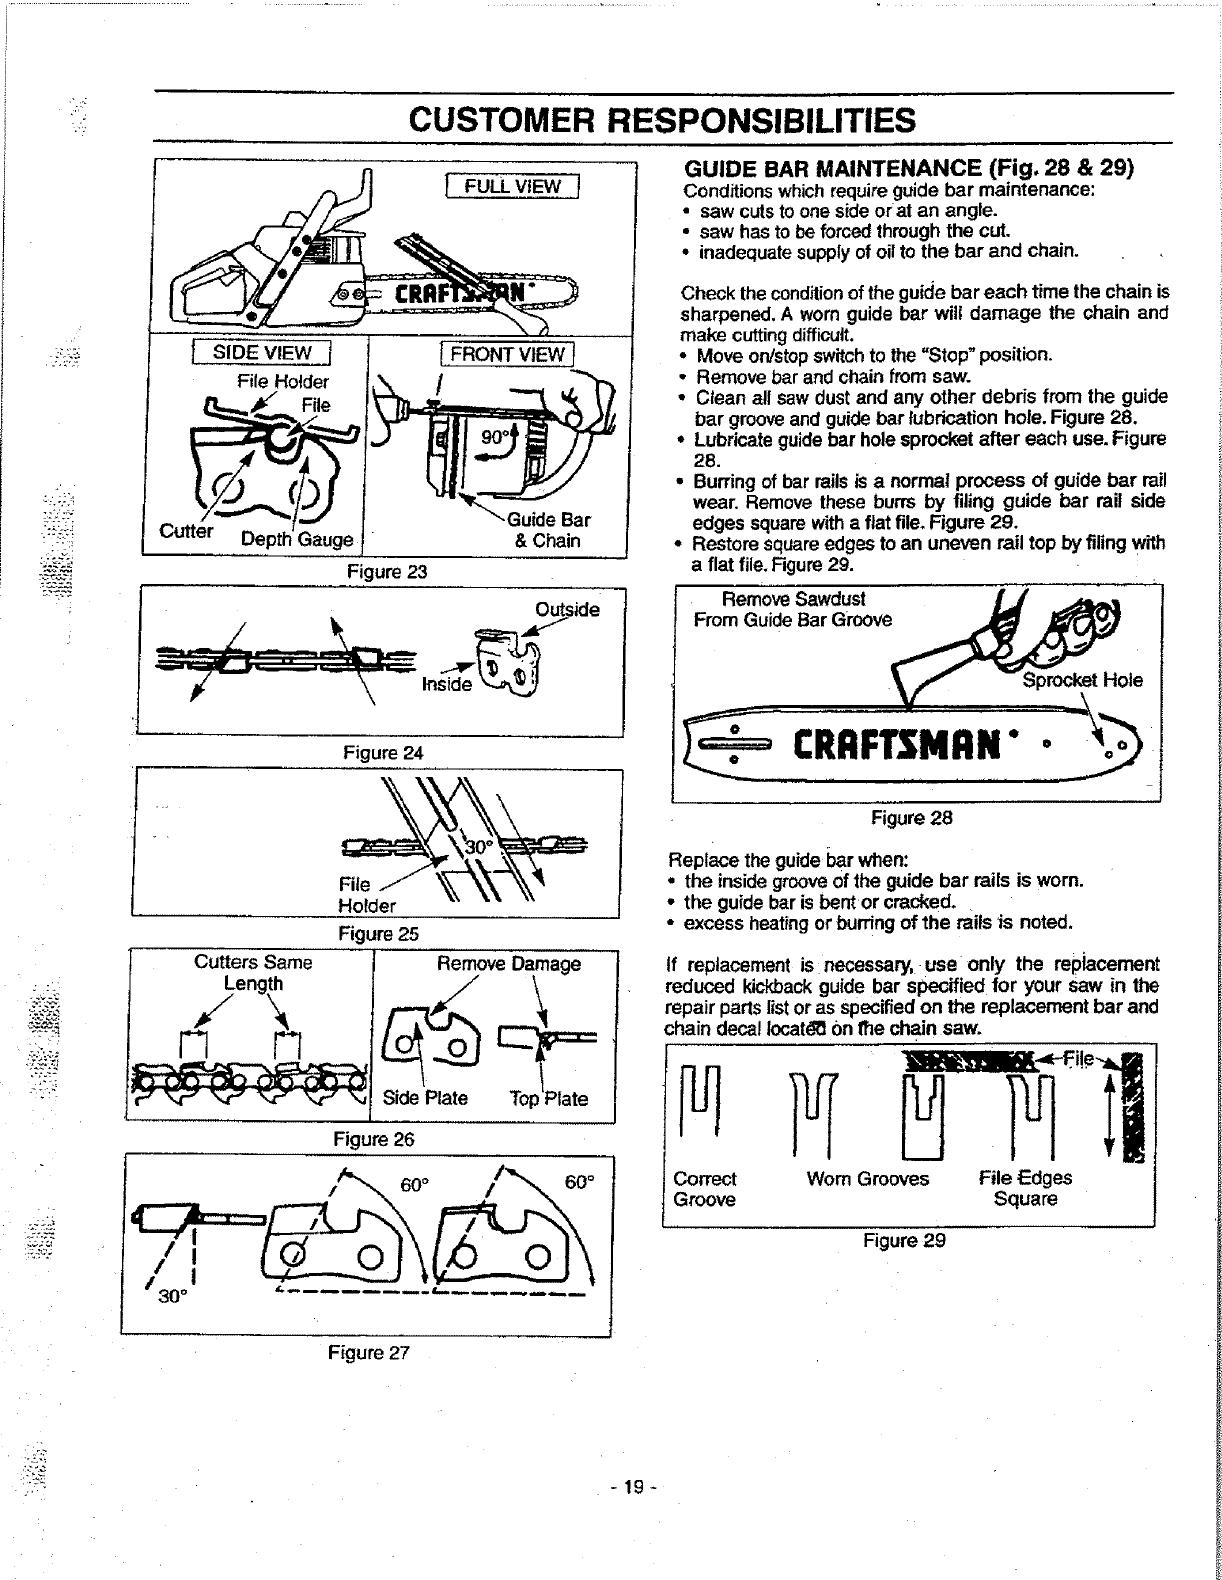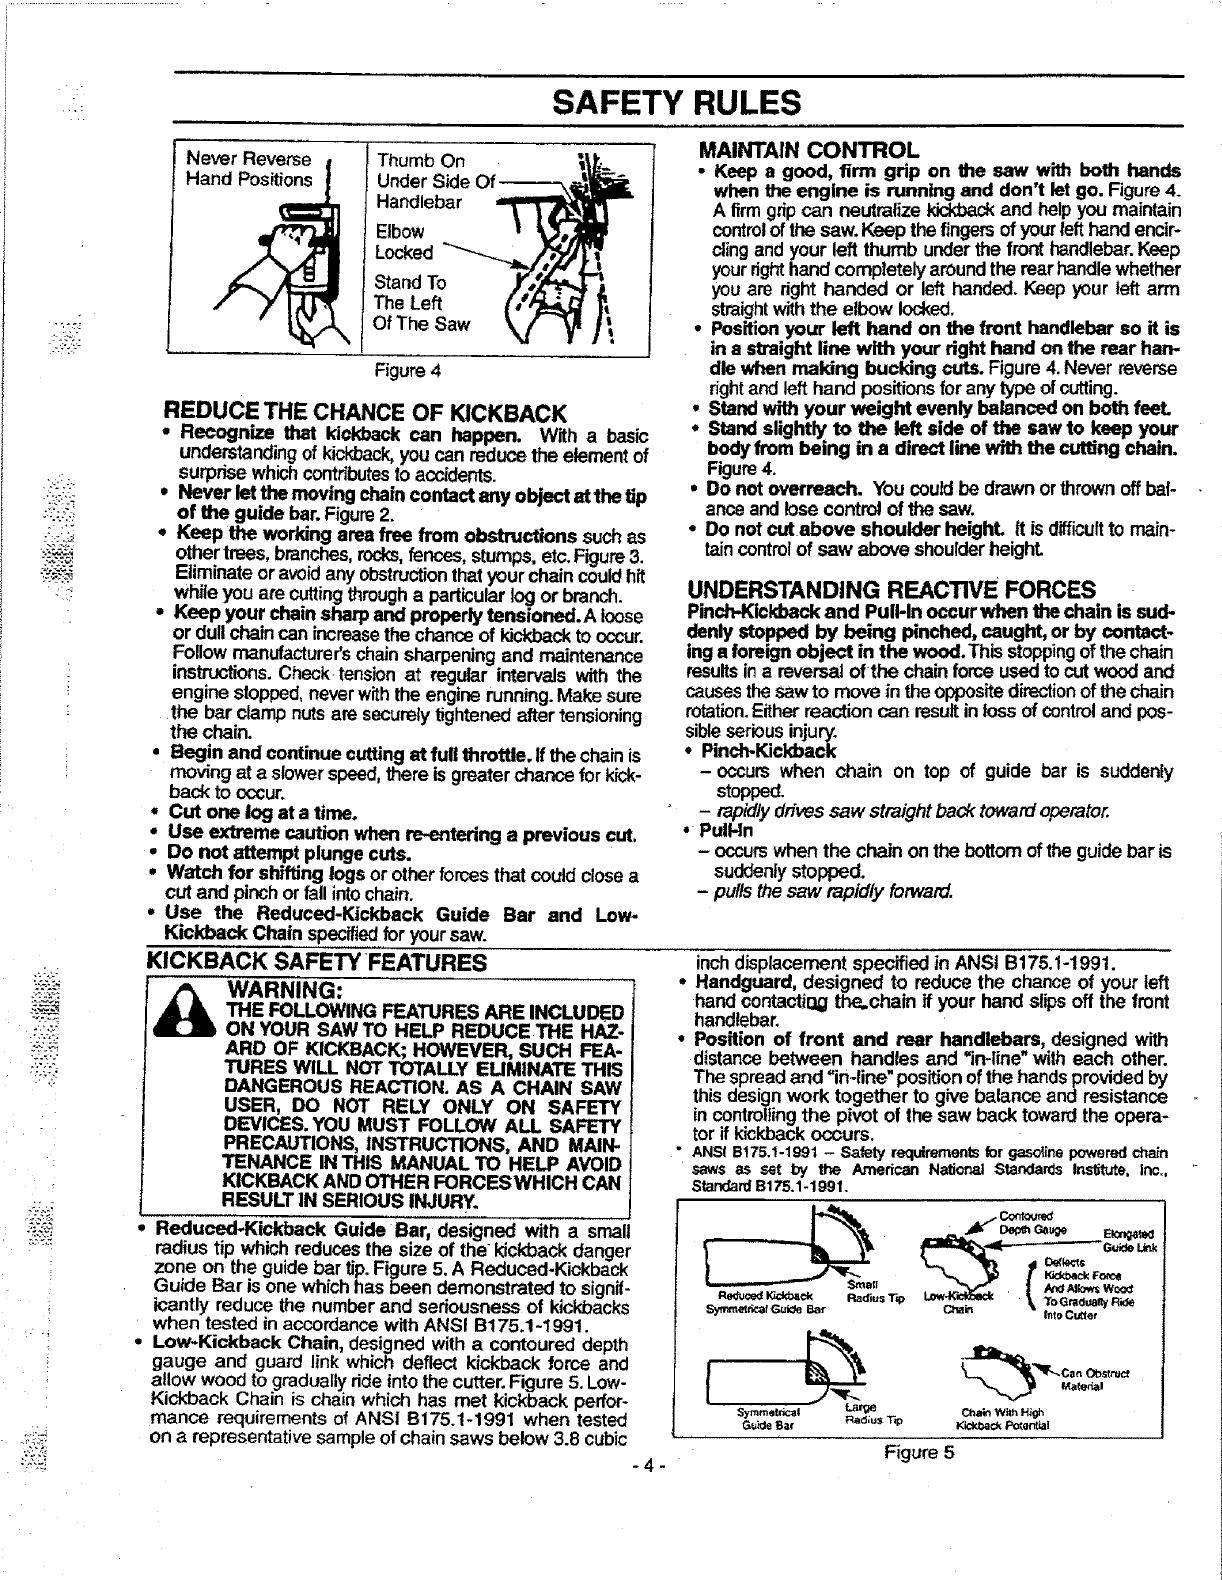
k
SAFETY RULES
"'2";
Ha ! Under Side Of
_ Handlebar
| Elbow
_Locked "'_
lstand
t OfThe Saw
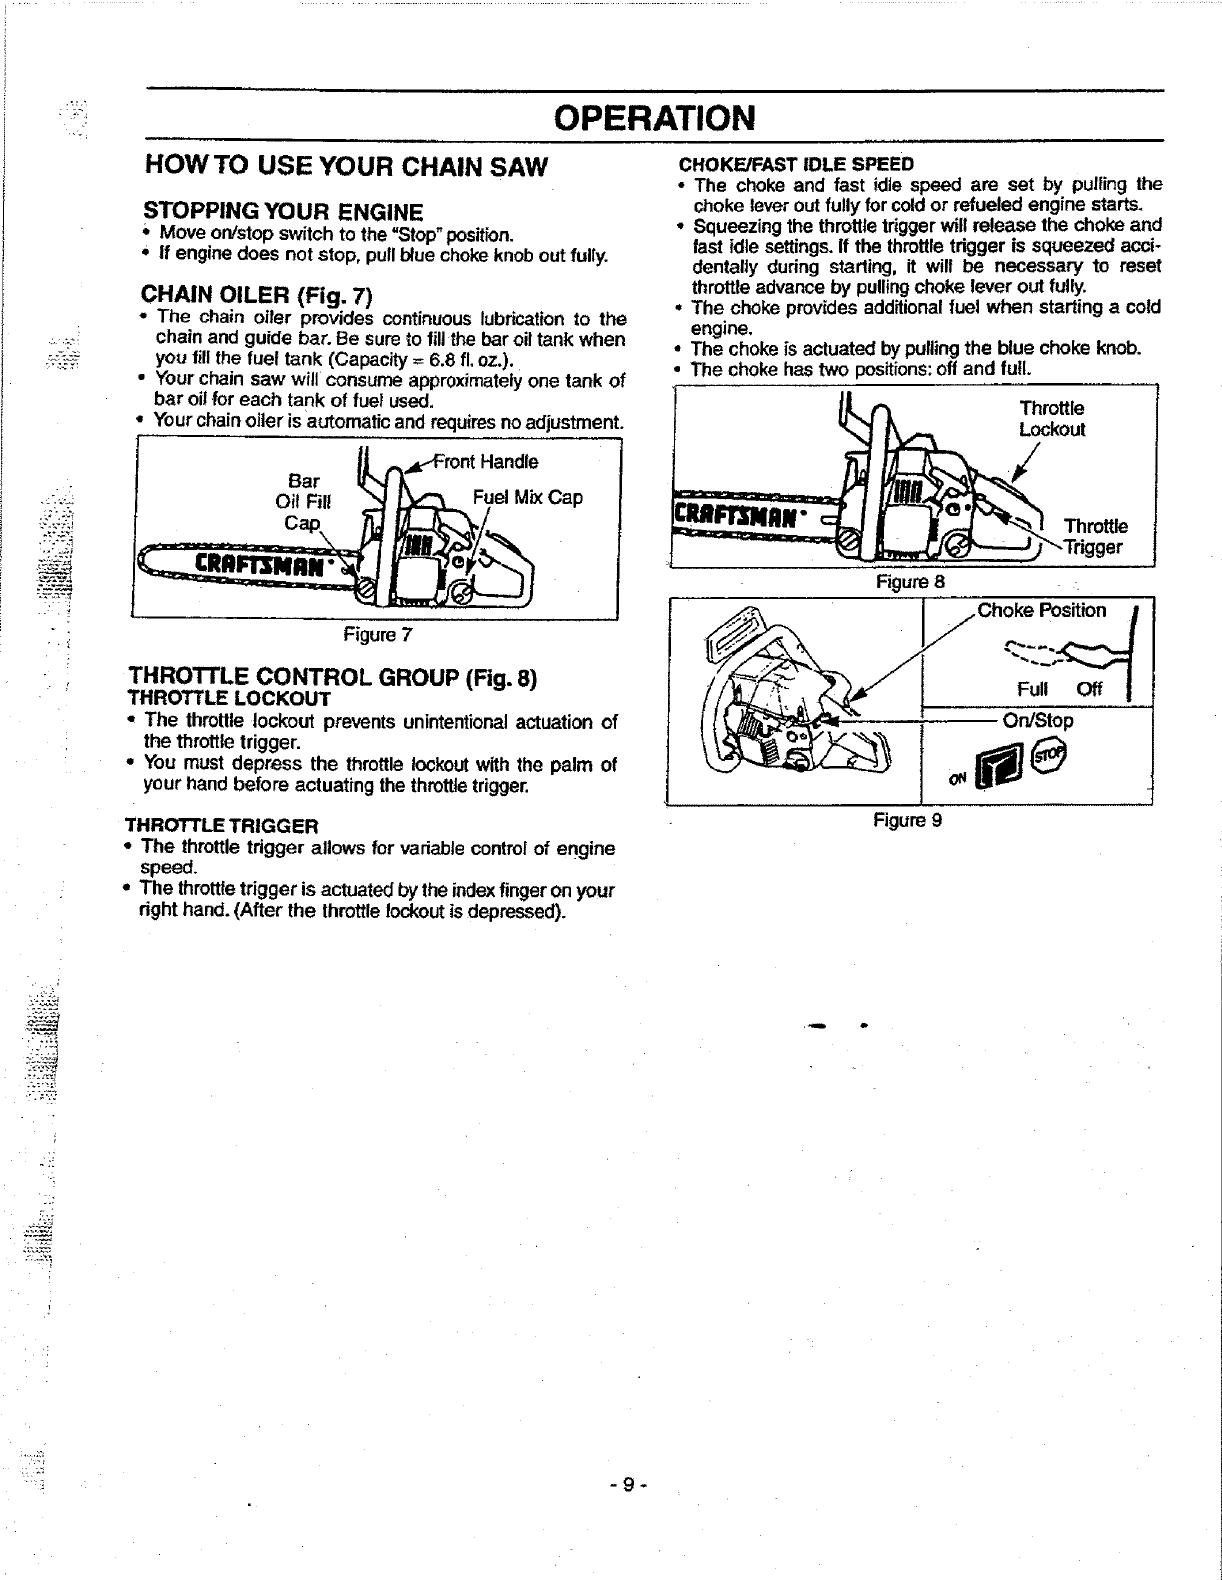
Figure4
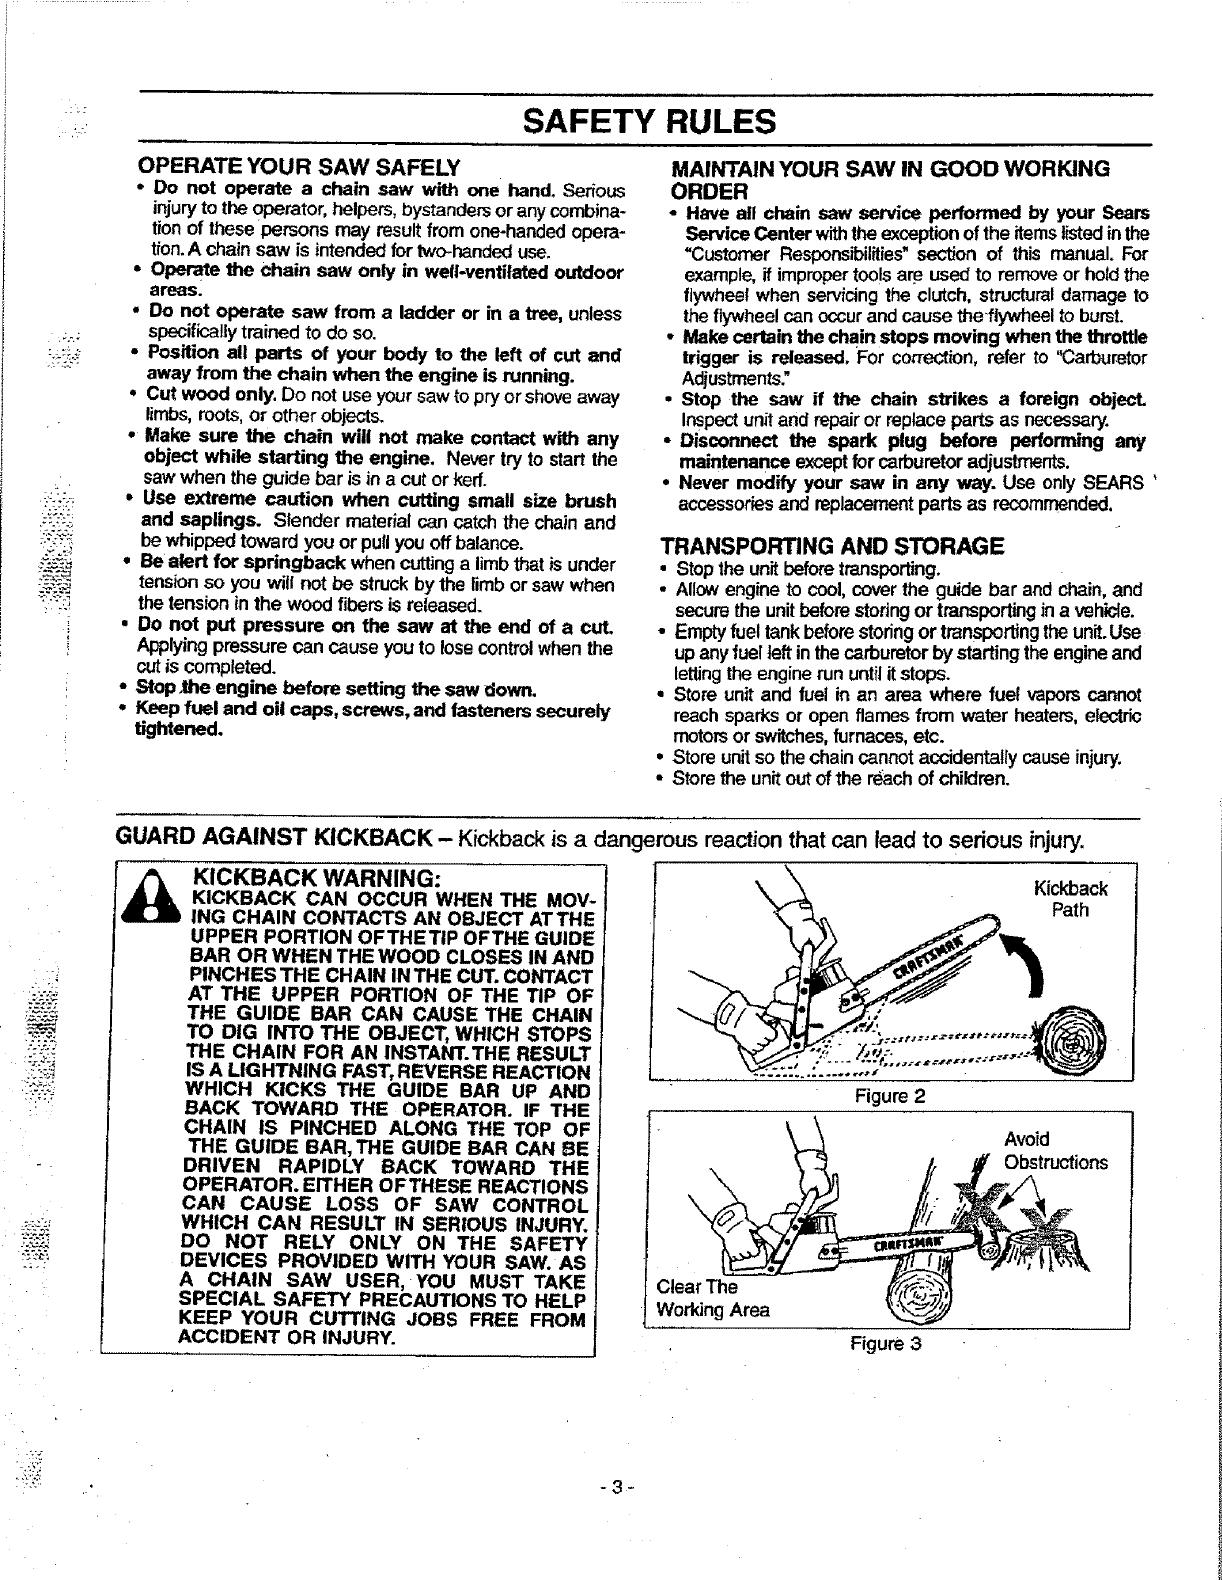
REDUCE THE CHANCE OF KICKBACK
• Recognize that kickback can happen. With a basic
understandingof kicl_ack,you canreducethe elementof
surprisewhichcontributesto accidents.
* Never letthe moving chaincontact any object at the tip
of the guide bar.Figure2.
. Keep the working area free from obstructions suchas
othertrees, branches,rocks,fences,stumps,etc.Figure3.
Eliminateor avoidanyobstructionthatyourchaincouldhit
while you arecuttingthrougha particularlogor branch.
, Keep your chain sharpand properly tenaioned.A loose
or dullchaincan increasethe chanceofkickbackto occur.
Followmanufacturer'schainsharpeningand maintenance
instructions.Check tensionat regular intervals with the
engine stopped,neverwiththeengine running.Makesure
the bar clamp nutsare securelytightenedafter tensioning
the chain.
• Begin and continuecutting at fullthrottle. Ifthechainis
moving at a slowerspeed,there isgreaterchance forkick-
back to occur.
• Cut one log at a time.
• Use extreme caution when re-entering a previous cut.
• Do not attempt plunge cuts.
• Watch for shifting logsor otherforcesthat couldclosea
cutand pinchorfall intochain.
° Use the Reduced-Kickback Guide Bar and Low-
Kickback Chain specked foryoursaw.
KICKBACK SAFETY FEATURES
_ WARNING:
THE FOLLOWING FEATURES ARE INCLUDED
ON YOUR SAW TO HELP REDUCE THE HAZ-
ARD OF KICKBACK; HOWEVER, SUCH FEA-
TURES WILL NOT TOTALLY ELIMINATE THIS
DANGEROUS REACTION. AS A CHAIN SAW
USER, DO NOT RELY ONLY ON SAFETY
DEVICES. YOU MUST FOLLOW ALL SAFETY
PRECAUTIONS, INSTRUCTIONS, AND MAIN-
TENANCE IN THIS MANUAL TO HELP AVOID
KICKBACK ANDOTHER FORCESWHICH CAN
RESULT IN SERIOUS INJURY.
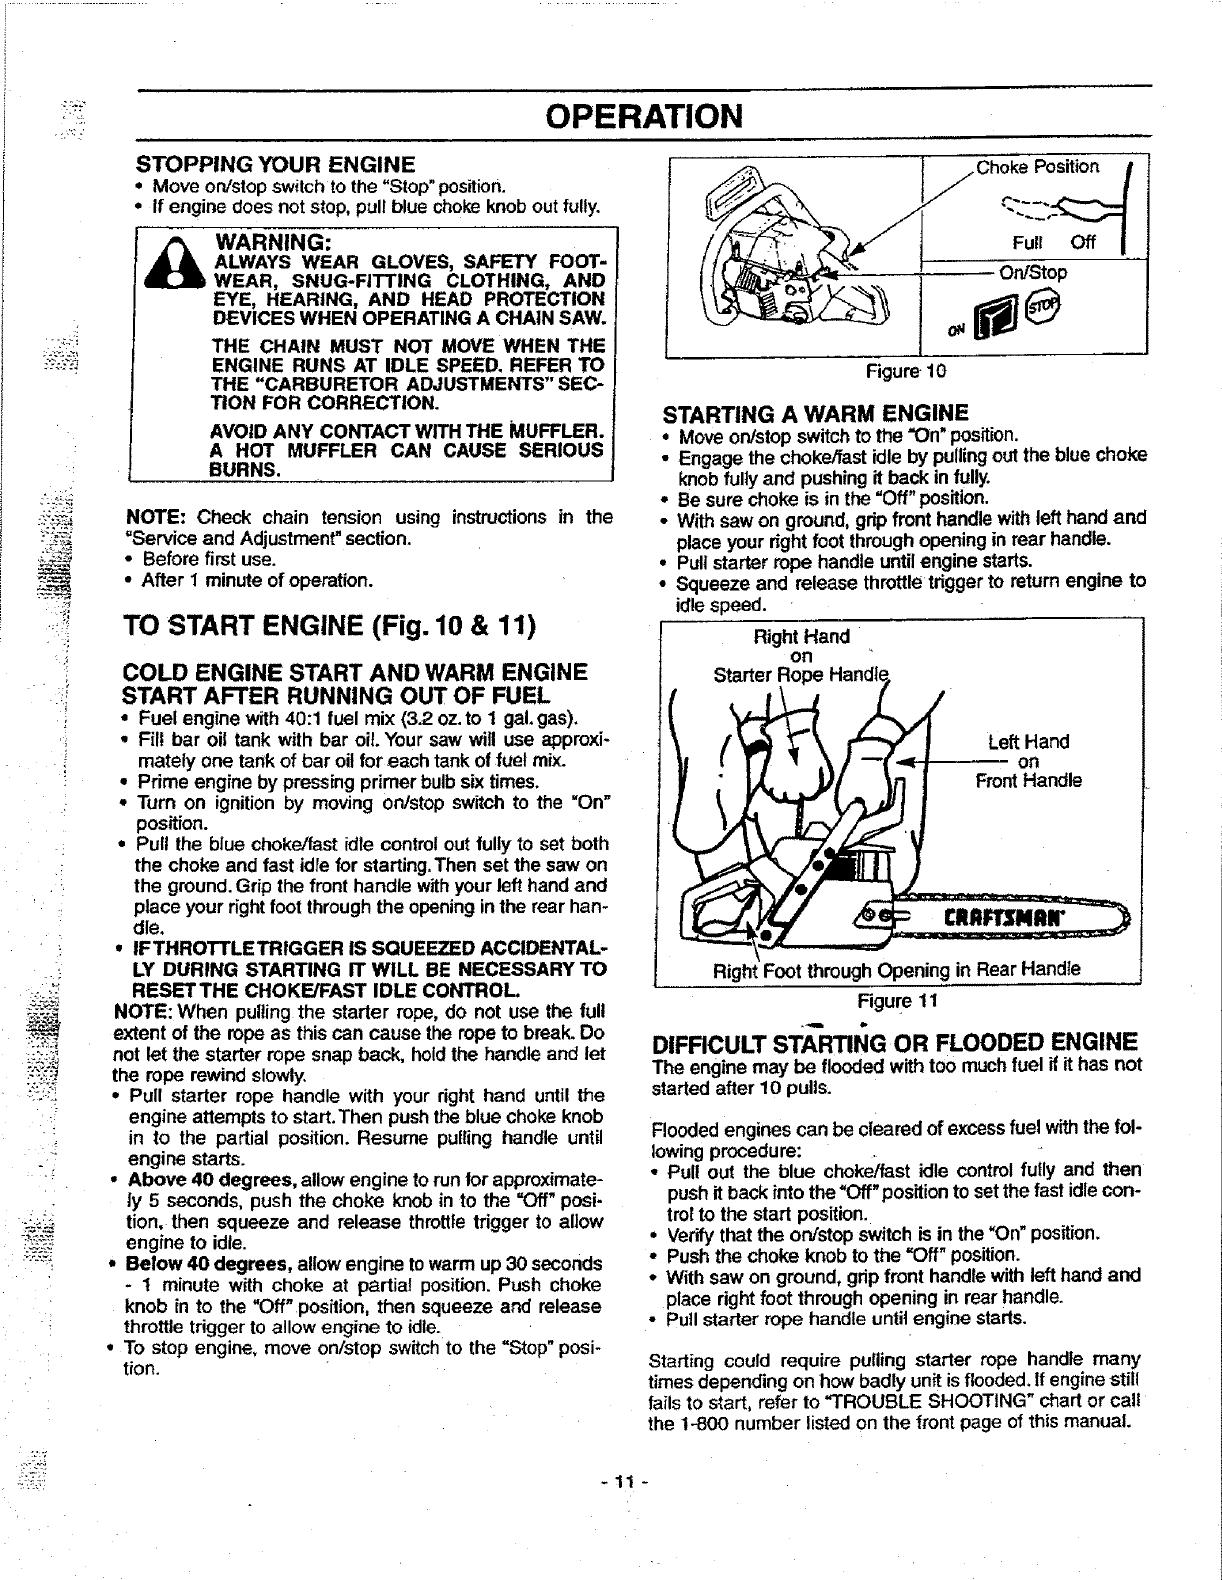
Reduced-Kickback Guide Bar, designed with a sma
radius tip,whichreduces the size of the kickback danger
zone on me guioe par tip. Figure 5,A Reduced-Kickback
Guide Bar is one whichhasbeen demonstrated to signif-
icantly reduce the number and seriousness of kickbacks
MAINTAIN CONTROL
• Keep a good, firm grip on the saw with both hands
when the engine is running and don't letgo. Figure4.
A firm grip can neutralize kickbackand help you maintain
controlof the saw.Keep the fingersof your left hand encir-
cling and your left thumb under the front handlebar.Keep
your righthand completely around the rearhandle whether
you are right handed or left handed. Keep your left arm
straightwiththe elbow locked,
• Positionyour left hand on the front handlebar so it is
in a sl_aightline with your right hand on the rear harp
die when making bucking cuts. Figure4.Never reverse
right andlefthand positionsforany type ofcutting.
• Stand with your weight evenly balanced on both feel
• Stand slightly to the left side of the saw to keep your
bodyfrom being in a direct line with the cutting chain.
Figure4.
• Do not overreach. You couldbe drawnor thrownoffbal-
anceand losecontrolofthe saw.
• Do not cut above shoulder heighL It isdifficult to main-
taincontrol ofsaw above shoulderheight.
UNDERSTANDING REACTWE FORCES
Pinch-Kickback and Puff-Inoccur when thechain issud-
denly stopped by being pinched, caught, or by contact-
inga foreignobject in the wood.This stoppingofthe chain
resultsina reversal of the chainforceusedtocutwoodand
causesthesawto movein theoppositedirectionofthechain
rotation.Eitherreactioncan resultinlossofcontrol and pos-
sibleseriousinjury.
• Pinch-Kickback
-occurs when chain on top of guide bar is suddenly
stopped.
- rapidlyd/_vessaw straightbacktowardoperator.
• PulHn
- occurswhen the chain on the bottomoftheguidebar is
suddenlystopped.
- pulisthesaw rapidlyforward.
inchdisplacement specified in ANSI B175.1-1991.
Handguard, designed to reducethe chance of yourleft
handcontactiQgthe.chain if your hand slipsoff the front
handlebar,
Position of front and rear handlebars, designed with
distancebetween handles and =in-line"witheach other.
The spreadand =in-line" positionofthe handsprovidedby
thisdesignwork together to give balance and resistance
in centmlling the pivot ofthe saw back towardthe opera-
tor ifkickbackoccurs.
ANS! B175.1-1991 - Safety requirements for gasotine powered chain
saws as set by the ._nedcan NaSor_l Standards Institute, inc.,
Standard B175.1-1991.
2 ._ Dep_ Gauge Ek:ng_
ReducedlGdd_ck Rad{usT_) Lo_-KL_Ee_ _ To Gra_lualty Ride
_nf_tettP..af G_i_} Bar Chain l_to C_ter
when tested in accordance with ANSI B175.t-1991.
Low-Kickback Chain, designed with a contoured depth
gauge and guard link which deflect kickback force and
allow woodto gradually ride into the cutter. Figure 5. Low-
Kickback Chain is chain which has met kickback perfor-
mance requirements of ANSI B175.1-1991 when tested
on a representative sample of chain saws below 3.8 cubic
-4-
{
Sym_etricat Large
Guide Bat Rad;u$ T'=p
Male_l
C_ain With H_gh
Kick_¢_ Poter_ia_
Figure 5