
GE Refrigerators
LARGE FREEZER/
REFRIGERATOR
OPERATIONS GUIDE
MODEL NAMES/HOME APPLIANCE
TFJ20JR
TFJ30PR
TPJ24BR
TFJ22PR
TFJ25PR
TFJ28PR
TPJ24PR
TFJ30PF
TFJ28PF
TPJ24PF
Table of Contents
Instructions for Safe Operation . . . . . . . . . . . . . . . .1–7
Part Names . . . . . . . . . . . . . . . . . . . . . . . . . . . . . . . .8, 9
Specifications—External Dimensions . . . . . . . . .10–12
Instructions for Installation . . . . . . . . . . . . . . . . . . . .13
Instructions for Operation . . . . . . . . . . . . . . . . . . . . .14
Operation of Refrigerator:
Operation of Temperature Control Dials . . . . .15
Interior Temperature Control . . . . . . . . . . .16–18
Operation of Custom Dispenser . . . . . . . . .19–21
Utilizing the Interior Space . . . . . . . . . . . .22–26
Electronic Monitor & Diagnostic System . .27–29
Storage of Food . . . . . . . . . . . . . . . . . . . . . . . .30
What To Know About Frozen Foods . . . . . . . . . . . . .31
Care and Cleaning of Refrigerator . . . . . . . . . . . . . . .32
Self-Diagnosis of Refrigerator . . . . . . . . . . . . . . . . . .33
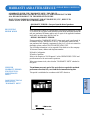
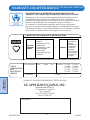
Warranty and After-Service . . . . . . . . . . . . . . . . .34, 35
• Thank you very much for purchasing the
GE Large Freezer/Refrigerator.
• Please read and completely understand this
Operations Guide before use to ensure accurate
and safe operation of this appliance.
• After reviewing, retain this guide for future reference.
• Be sure to obtain the “Warranty Note.”
For Safety
Read Before
Using
OperationCare, Cleaning
& Self-Diagnosis
Warranty &
After-Service
Part No. 162D9792P002
Pub No. 49-6896
12-96

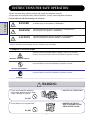
Examples of Pictorial Signs
Indicates caution (including danger, warning). Details of WARNING
(caution) are posted inside or near the illustration in pictures or words.
Indicates this action is not to be done. Details of such actions
are posted inside or near the illustration in pictures or words.
Indicates forced action (must do). Details of forced actions
are posted inside or near the illustration in pictures or words.
INSTRUCTIONS FOR SAFE OPERATION
• Please read these safety cautions carefully and operate the refrigerator correctly.
• Please make sure to heed the safety cautions listed here, for they contain important information.
DANGER
This sign indicates that there is a high probability of causing death
or serious injury to the operator, if mishandled.
WARNING
This sign indicates that there is a possibility of causing death or
serious injury to the operator, if mishandled.
CAUTION
This sign indicates that there is a possibility of causing bodily
injury to the operator or material damage*, if mishandled.
Caution indicators and their meanings are as follows:
* Material damage includes damage to house, furniture, pets or bedding.
“WARNING: ELECTRIC SHOCK”
“DO NOT DISASSEMBLE”
“UNPLUG”
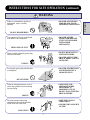
WARNING
Do not store flammable substances
such as ether, benzene, alcohol, drugs,
LP gas (cartridge for lighters).
SPRAY
LP GAS
THINNER
GLUE
ETHER
• DANGER OF EXPLOSION.
DO NOT
Do not hang on or sit on glass shelf.
• DANGER OF INJURY
DUE TO DOOR FALLING
OR PINCHING HAND.
DO NOT
For Safety
1

INSTRUCTIONS FOR SAFE OPERATION (continued)
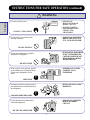
WARNING
Under no circumstances should you
disassemble, repair, or modify
anything.
• DANGER OF STARTING
FIRE (OR MAY CAUSE
ABNORMAL OPERATION).
DO NOT DISASSEMBLE
Use regulation 15A only for dedicated
wall outlet for the refrigerator.
• DANGER OF FIRE
FROM OVER-HEATING
IF OUTLET IS SHARED
WITH OTHER
APPLIANCES.
DEDICATED OUTLET
When cleaning, unplug the power plug
from the wall outlet.
• DO NOT HANDLE PLUG
WITH WET HANDS.
• DANGER OF ELECTRIC
SHOCK, SHORT CIRCUIT,
OR INJURY.
UNPLUG
Do not press power plug with the back
of refrigerator.
• DANGER OF FIRE FROM
OVER-HEATING BY A
DAMAGED PLUG.
DO NOT PRESS
When the refrigerator/freezer is out of
order, stop operation by disconnecting
the power plug.
• OPERATING THE
APPLIANCE WHEN
SOMETHING IS
ABNORMAL COULD
RESULT IN AN ELECTRIC
SHOCK OR FIRE.
UNPLUG
The metal prongs or the prong
attachment of power plug should be
wiped clean with a dry cloth.
• WIPE PLUG CLEAN
WHEN DIRTY.
• MAY BECOME A SOURCE
OF FIRE.
CLEAN PLUG
For Safety
2
Power
source
AC 100V
Standard 15A
wall outlet
“Humming
Noise”
“Sparkle”

INSTRUCTIONS FOR SAFE OPERATION (continued)
For Safety
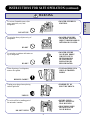
WARNING
Connect grounding wire.
• DANGER OF
MALFUNCTION OR
SHORT CIRCUIT.
• PLEASE CONSULT
DEALERSHIP WHEN
CONNECTING
GROUNDING.
CONNECT GROUNDING
Do not install in a location where
freezing is possible.
• DANGER OF RUPTURED
HOSES, PIPES, VALVES,
ETC., LEAKING WATER.
DO NOT INSTALL
Do not store medicines or scientific
specimens in refrigerator.
• SUBSTANCES REQUIRING
STRICT TEMPERATURE
CONTROL SHOULD NOT
BE STORED IN A HOME
REFRIGERATOR.
DO NOT STORE
In the event of a city gas leak, provide
good ventilation by opening the doors.
Do not touch refrigerator or wall
outlet.
• POSSIBILITY OF FIRE
LEADING TO AN
EXPLOSION.
VENTILATE
Discard foods which are discolored or
foul smelling due to malfunctioning of
the refrigerator.
• SPOILED FOOD CAN BE
HARMFUL.
DISCARD SPOILED FOODS
Do not splash water outside and/or
inside the refrigerator.
• DANGER OF ELECTRIC
SHOCK OR SHORT
CIRCUIT.
DO NOT SPLASH WATER
3
Confirm the
ground wire

INSTRUCTIONS FOR SAFE OPERATION (continued)
WARNING
Do not use flammable sprays (hair
spray, insecticide, etc.) near
refrigerator.
• DANGER OF FIRE BY
IGNITION.
DO NOT USE
Do not place heavy objects on top of
refrigerator.
• DANGER OF INJURY
CAUSED BY FALLING
OBJECTS WHEN DOOR IS
OPENED AND CLOSED.
DO NOT
Do not place a container with water on
top of refrigerator.
• DANGER OF FIRE
CAUSED BY SHORT
CIRCUIT DUE TO
DETERIORATION
OF ELECTRICAL
INSULATION BY
SPILLED WATER.
DO NOT
When disposing of a refrigerator,
remove door gasket.
• IT IS DANGEROUS IFA
CHILD IS TRAPPED
INSIDE.
REMOVE GASKET
Unplug power plug when replacing
interior light bulb.
• POSSIBILITY OF
ELECTRIC SHOCK.
UNPLUG
Do not touch the ice-making part of
the automatic icemaker.
• INJURY COULD
RESULT WHEN ICE
TRAY ROTATES.
• HEATER BECOMES
HOT AND COULD
CAUSE BURNS.
DO NOT TOUCH
For Safety
4

INSTRUCTIONS FOR SAFE OPERATION (continued)
For Safety
WARNING
CAUTION
Secure the refrigerator in place to
prevent it from toppling over during an
earthquake.
• COULD RESULT IN
INJURIES IF THE
REFRIGERATOR
TOPPLES OVER.
PREVENT FROM
TOPPLING OVER
The adjustable shelves and baskets
should be attached securely to
designated points in the refrigerator.
• DANGER OF CAUSING
INJURIES DUE TO
SHELVES COMING LOOSE
AND FALLING IF NOT
SECURELY ATTACHED.
ATTACH SHELVES
SECURELY
Piping for the icemaker should be
installed in accordance with the wiring
and piping schematics.
• UNIT MAY LEAK IF NOT
INSTALLED CORRECTLY.
INSTALLATION WARNING
A 100V alternating current power
source is to be used for the wall outlet.
• POSSIBILITY OF FIRE OR
ELECTRIC SHOCK.
100V ONLY
Do not pull cord when disconnecting
power plug.
• UNPLUG BY HOLDING
THE POWER PLUG.
• ELECTRIC SHOCK OR
SHORT CIRCUIT COULD
RESULT.
DO NOT PULL
5
Use 100 VAC

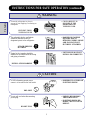
INSTRUCTIONS FOR SAFE OPERATION (continued)
CAUTION
Do not use a damaged cord, power
plug, or loose wall outlet.
• POSSIBILITY OF
ELECTRIC SHOCK,
SHORT CIRCUIT,
OR FIRE.
DO NOT USE
Do not damage the electric
power cord.
• DO NOT DAMAGE, BREAK,
ALTER, FORCIBLY BEND,
PULL, TWIST, OR BUNDLE THE
ELECTRIC POWER CORD. DO
NOT PLACE A HEAVY OBJECT
ON IT, CRIMP IT, OR ALTER IT
IN ANY WAY.
• A BROKEN CORD MAY CAUSE
FIRE OR ELECTRIC SHOCK.
DO NOT DAMAGE
Install the refrigerator in a location
away from excess moisture or where
water may be present.
• INSULATION WILL
DETERIORATE AND
CAUSE A SHORT CIRCUIT.
KEEP DRY
Unplug the power plug from wall
outlet when the refrigerator will not be
used for an extended period of time.
• DETERIORATING
INSULATION COULD
CAUSE AN ELECTRIC
SHOCK OR SHORT
CIRCUIT.
UNPLUG
Do not store bottles or cans in freezer
compartment.
CRACK!
• CONTENTS WILL FREEZE
CAUSING THE BOTTLES
TO EXPLODE WHICH
MAY CAUSE INJURIES.
NO BOTTLES
Close the refrigerator door by holding
the door handle.
• DANGER OF INJURY TO
FINGERS IF THE DOOR
HANDLE IS NOT USED
WHEN CLOSING DOOR.
USE DOOR HANDLE
For Safety
6
NO!

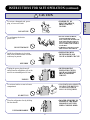
INSTRUCTIONS FOR SAFE OPERATION (continued)
CAUTION
Hire professional movers to move the
refrigerator, because it is heavy and
dangerous to move.
• DANGER OF INJURIES BY
ATTEMPTING TO MOVE THE
REFRIGERATOR YOURSELF.
• CONSULT YOUR DEALERSHIP
OR A PROFESSIONAL MOVER
TO TRANSPORT THE
REFRIGERATOR.
EMPLOY
PROFESSIONAL MOVERS
Do not touch food or containers
(metallic) inside the freezer
compartment with wet hands.
• FREEZING
TEMPERATURES MAY
CAUSE FREEZER BURN.
DO NOT TOUCH
Install refrigerator on a sturdy
flat floor.
Straight!
• INSTALLING ON AN
UNSTEADY FLOOR
COULD CAUSE THE
REFRIGERATOR TO
TOPPLE WHEN OPENED
AND CLOSED AND COULD
CAUSE INJURY.
DO NOT INSTALL
Do not put hands under the
refrigerator.
• METAL PLATES AND
ROTATING PARTS
LOCATED UNDER THE
REFRIGERATOR MAY
CAUSE INJURY.
DO NOT TOUCH
Do not re-freeze foods after they have
been thawed.
Frozen Food
• CONSUMING SPOILED
FOODS IS HARMFUL.
FOOD POISONING
WARNING
If you resell or give away this
appliance, provide the new owners
with this Operations Guide.
Operations
Guide
• THE NEW OWNER WILL
NEED THIS OPERATIONS
GUIDE FOR SAFE AND
CORRECT USE.
PROVIDE
OPERATIONS GUIDE
7
For Safety

PART NAMES
Read Before
Using
TFJ28PF,TFJ30PF,TPJ24PF
Freezer Compartment
Icemaker Compartment
(with inspection door)
(built-in icemaker)
Compartment Shelves
(3 levels)
Large Freezer Basket
Door Pockets (4 levels)
Custom Dispenser
(back side) (ice cold
water dispenser)
Refrigerator Compartment
Temperature Control Dial
Internal Lamps
Quick-Serve Shelf (with 2
or 4 serving dishes)
Internal Shelf (3 levels)
Wine Rack
Airtight Snack Case
High Humidity Vegetable
Compartment
Chilling/Vegetable
Compartment
Astro-Door (flip door)
Type Utility Compartment
Refrigerator Mini Door
Jumbo Door Pocket
(4 levels)
Four Wheel Castors
Front Grille
Utility Box (can be used as
egg case also)
1
3 5
7
9
1
3
5
9
7
TFJ22PR,TFJ25PR,TFJ28PR,TFJ30PR,TPJ24BR,TPJ24PR
Freezer Compartment
Icemaker Compartment
(with inspection door)
(built-in icemaker)
Compartment Shelves
(3 levels)
Large Freezer Basket
Door Pockets (4 or 5 levels)
Custom Dispenser
(back side) (ice cold
water dispenser)
Refrigerator Compartment
Temperature Control Dial
Internal Lamps
Internal Shelf (3 levels)
Wine Rack
Airtight Snack Case
High Humidity Vegetable
Compartment
Chilling/Vegetable
Compartment
Astro-Door (flip door)
Type Utility Compartment
Door Pockets (4 levels)
Four Wheel Castors
Front Grille
Utility Box (can be used as
egg case also)
1
3 5
7
9
1
3
5
9
7
10
10
11
11
12
12
13
13
14
14
15
15
16
16
17
17
18
19
17
17
19
18
1
1
2
2
3
3
4
4
5
5
1
2
3
4
5
6
6
7
7
7
8
8
9
9
10
11
12
13
14
15
16
1
2
3
4
5
6
7
7
8
9
10
11
12
13
14
15
16
6
7
8
9
8

PART NAMES (continued)
9
TFJ20JR
Freezer Compartment
Icemaker Compartment
(with inspection door)
(built-in icemaker)
Compartment Shelves
(3 levels)
Large Freezer Basket
Door Pockets (5 levels)
Custom Dispenser (back
side) (ice cold water
dispenser)
Refrigerator Compartment
Temperature Control Dial
Internal Lamps
Internal Shelf (3 levels)
High Humidity Vegetable
Compartment
Chilling/Vegetable
Compartment
Astro-Door (flip door)
Type Utility Compartment
Door Pockets (4 levels)
Four Wheel Castors
Front Grille
Utility Box (can be used as
egg case also)
10
10
11
11
12
12
13
13
14
15
15
14
1
1
2
2
3
3
4
4
5
5
6
6
7
7
7
8
8
9
9
Read Before
Using

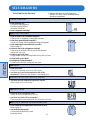
SPECIFICATIONS
Read Before
Using
10
UNITS TFJ30PF TFJ30PR TFJ28PF TFJ28PR TFJ25PR TPJ24PF TPJ24PR/BR TFJ22PR TFJ20JR
USEFUL TOTAL (L) 806 806 764 764 686 630 630 588 531
VOLUME FREEZER (L) 301 301 284 284 243 229 229 175 175
FRESH FOOD (L) 505 505 480 480 443 401 401 413 356
ELECTRICAL VOLTAGE (V) SINGLE PHASE 100/100
POWER FREQUENCY (Hz) 50/60
SOURCE MOTORS (W) 247/238 247/238 247/238 247/238 252/245 248/233 248/233 243/231 241/228
HEATERS (W) 675/675 675/675 675/675 675/675 675/675 675/675 675/675 595/595 595/595
AVG MONTHLY ELECTRICAL 86/89 81/81 81/80 71/73 77/78
CONSUMPTION (KWH/MON)
COOLING METHOD AND COLD AIR CIRCULATION TYPE (INDIRECT COOLING)
FREEZER CODE
CONDENSER COOLING FORCED AIR (FAN COOLED CONDENSER)
DEFROST CONTROL AUTO START - AUTO STOP
DEFROST WATER REMOVAL FORCED AIR EVAPORATION
AUTOMATIC ICEMAKER YES
MOBILITY WHEELS ATTACHED
BUILT-IN POSSIBLE
DOOR REVERSIBILITY -
ELECTRICAL RATING (A) 15
WEIGHT (Kg) 168 168 163 163 143 159 159 132 123
CORD LENGTH (M) 2.2
* Values for useful internal volume and the Electrical Standard Values are based on the Japanese Industry Standard
(JIS C9607).
* Values separated by “/” indicate 50 Hz on left and 60 Hz on right. Others indicate common 50 Hz
and 60 Hz.
•
Freezer Performance
This freezer/refrigerator is “Four Star” coded.
Performance of freezer is classified by codes.
Each code indicates the performance capability according to the regulation
delineated in the Japanese Industry Standard (JIS C9607). The regulation
defines the test conditions for measuring the freezing-load temperature
(food temperature). The following table shows the test results:
CODE FREEZING-LOAD TEMP. FROZEN FOOD PRESERVATION
(FOOD TEMPERATURE) ESTIMATED TIME
Below -6°C. Approx. 1 week
Below -12°C. Approx. 1 month
or Below -18°C. Approx. 3 months

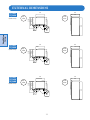
EXTERNAL DIMENSIONS
11
TFJ30PF
TFJ30PR
(Units: mm)
Top
View
Side
View
TFJ28PF
TFJ28PR
(Units: mm)
Top
View
Side
View
TPJ24PF
TPJ24PR
TPJ24BR
(Units: mm)
Top
View
Side
View
Read Before
Using
915
905
155
750
1775
295
385
1150
1290
875
825
710
115
50
915
870
120
750
1775
295
385
1150
1290
830
780
710
70
50
915
765
120 645
1775
295
385
1045
1185
725
675
605
70
50

Read Before
Using
12
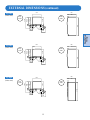
EXTERNAL DIMENSIONS (continued)
TFJ22PR
(Units: mm)
Top
View
Side
View
TFJ20JR
(Units: mm)
Top
View
Side
View
TFJ25PR
(Units: mm)
Top
View
Side
View
915
875
150
725
1775
280
470
1150
1290
845
795
725
70
50
850
840
115
725
1720
270
470
1065
1278
840
795
725
70
45
800
830
105 725
1720
270
400
1065
1227
840
795
725
70
45

13
Read Before
Using
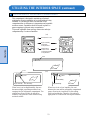
If the refrigerator is installed
directly on carpet or other mats, the
compressor under the refrigerator
may touch the mat, causing
discoloration of the mat, or may
interfere with the cooling capability
by reducing air flow.
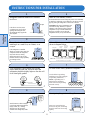
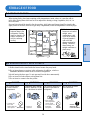
INSTRUCTIONS FOR INSTALLATION
Refrigerator should be installed on a firm and
level floor.
1
Install in a low-humidity location.
5
Place a firm board under the refrigerator when
installing it on a weak floor, on a tatami, or on
a carpet.
2
If the refrigerator is tilted, adjust with leveling
screws under the front end. The front end of the
refrigerator should be slightly higher so the door will
close when lightly pushed.
3
To avoid electric shock, ground the refrigerator.
7
Install away from heat sources.
4
Do not put anything in front of the grille.
8
If the floor is not firm, noise
or vibration may occur. When
opening and closing the door,
the refrigerator may topple and
cause injuries.
An electrical short circuit or rusting may occur. If it is necessary
to install in a washroom or on a damp floor, be sure to provide
gaps by placing the refrigerator on some sort of blocks.
CAUTION: This type of refrigerator uses
forced fan cooling. Therefore, to prevent
reduction in the cooling capacity, place the
refrigerator on top of a firm board before
placing it on blocks. Do not place the
refrigerator directly on top of the blocks.
Avoid locations in direct sunlight
or near heat-producing appliances
(range, heater, etc.). Cooling
efficiency may be lowered or
external color changes may result.
Straight!
Consult dealer for grounding
installations. (Fee will be charged
for grounding installations.)
NOTE: A grounding wire is
attached to this refrigerator.
Please connect these grounding
terminals correctly.
Since air is suctioned in from
the front of the grille, obstructing
the grille could lower the cooling
capacity.
Leveling Screws
Rotate
clockwise
to raise
Rotate
clockwise
to raise
Allow sufficient space around the refrigerator as
shown in diagrams below.
6
Units: mm
Wall Outlet
Icemaker
50~100
X = 16 (TFJ20/22/25), = 3 (TPJ24, TFJ28/30)
Y = 25 (TFJ20/22/25), = 13 (TPJ24, TFJ28/30)
Z = 25 (TFJ20/22/25, TPJ24), = 3 (TFJ28/30)
50~100
50~100
Y
50
Y
Z
X X
X X
Stop Valve
for Icemaker
if installed
Stop Valve for
Icemaker
If Icemaker is installed

Read Before
Using
14
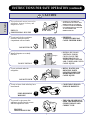
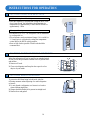
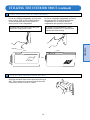
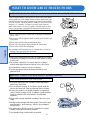
INSTRUCTIONS FOR OPERATION
CAUTIONS WHEN DISCARDING
3
To prevent a child from being locked inside, take the
following measures when disposing of a used refrigerator
or freezer:
1. Do not discard a refrigerator or a freezer in a location
where children might play.
2. Hinges should be destroyed to prevent an airtight seal.
3. Remove door and gasket.
CAUTION DURING POWER OUTAGE
1
CAUTIONS DURING EXTENDED SHUTDOWN
2
Sudden interruption of electricity
• Limit the frequency of opening and closing the door. If the
door is kept closed, the refrigerator should maintain its
temperature for approximately 2 hours and the freezer for
approximately 1 hour.
For expected outage
• Accumulate a lot of ice. The refrigerator can be maintained
by cooling with ice.
• The refrigerator can be maintained longer if it is cooled for
2–3 hours prior to a blackout by setting the temperature
control dial to the HIGH cooling position.
• Store as little food as possible. Fresh foods should be
consumed first.
When the refrigerator will not be used for an extended period
of time, follow the procedures outlined below to prevent odor
and mildew:
1. Remove all foods.
2. Clean out refrigerator and keep the door open for a few
days to dry out inside.

15
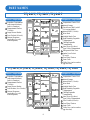
Operation
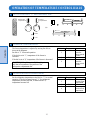
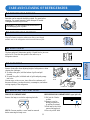
OPERATION OF TEMPERATURE CONTROL DIALS
SET AT POSITION “5” FOR NORMAL USE
1
FREEZER COMPARTMENT
2
The freezer temperature is adjusted by moving the dials as
shown in the diagrams.
Set dial at “5” for normal operation.
If the dial is set at “1,” temperature of the freezer is
increased.
If the dial is set at “9,” temperature of the freezer is decreased.
CAUTION: If the dial is set at “0,” the refrigerator
will shut off regardless of the position of the
refrigerator compartment dial.
1
3 5
7
9
1
3
5
9
7
REFRIGERATOR COMPARTMENT
3
Set the refrigerator temperature control dial to “5” for normal
operation. If the dial is turned toward “1,” the refrigerator
temperature becomes high and, if turned toward “9,”
temperature becomes low.
Dial Setting Temperature Operations
1 HIGH For storage of
3 foods at higher
temperatures.
5 MEDIUM Normal
7 LOW For storage of
9 foods at lower
temperatures.
Dial Setting Temperature Operations
1 HIGH Food is to be
3 stored for
shorter periods
of time.
5 MEDIUM Normal
7 LOW Food is to be
9 stored for
longer periods
of time.
Refrigerator
Compartment
Warm
Cold
Freezer
Compartment
(or)

Operation
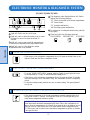
INTERIOR TEMPERATURE CONTROL
NOTICE: NEW FREEZING ROOM TEMPERATURE FEATURE
YOUR REFRIGERATOR HAS BEEN DESIGNED TO INCLUDE A FEATURE THAT WILL
PREVENT THE CONTENTS OF THE REFRIGERATOR COMPARTMENT FROM FREEZING,
EVEN IF THE ROOM TEMPERATURE IS BELOW FREEZING. THIS IS A TOTALLY
AUTOMATIC SYSTEM AND WILL REQUIRE NO ACTION ON YOUR PART. THIS SYSTEM
PROVIDES THIS FEATURE BY PERIODICALLY TURNING THE LIGHTS IN THE
REFRIGERATOR COMPARTMENT ON AND OFF. THE WARMTH FROM THESE LIGHTS
WILL AUTOMATICALLY KEEP THE FOOD FROM FREEZING. THIS SYSTEM OPERATES
AT ROOM TEMPERATURES FROM 15°C. TO -5°C. THE SYSTEM WILL TURN ON THE
LIGHTS ONLY WHEN NEEDED. IF YOU SHOULD NOTICE THAT THE REFRIGERATOR
LIGHTS ARE ON, EVEN THOUGH THE DOOR IS CLOSED, THIS IS THE SYSTEM AT
WORK, KEEPING YOUR FRESH FOOD FROM FREEZING.
How to Prevent Freezing
NOTE: IF YOU EXPECT THE ROOM TEMPERATURE TO FALL BELOW FREEZING,
AND YOUR REFRIGERATOR HAS THE ICE/WATER DISPENSER FEATURE
BUILT INTO THE FREEZER DOOR, OR HAS AN ICEMAKER, THEN YOU
SHOULD PERFORM THE FOLLOWING STEPS. THIS DEACTIVATES THE
ICE/WATER SYSTEM AND WILL PREVENT THE EXTERNAL WATER LINES
FROM FREEZING.
1.Disconnect power to the refrigerator.
2.Close valve on water line connecting refrigerator to main water supply.
3.Position a container under the refrigeration connection to collect any spillage and disconnect inlet
water supply line from refrigerator. Also collect water from the inlet supply line.
4.Position the container under the plastic outlet tube that supplies the icemaker (on Refrigerator
side) to collect any water spillage and disconnect the tube.
5.Position the container under the plastic outlet tube that supplies the water tank (on Freezer side)
to collect any water spillage and disconnect the plastic outlet tube.
6.Reconnect the icemaker and water tank tubes to the water inlet valve.
7.Turn off the icemaker (inside freezer) by moving sensor arm to the “UP” locked position.
8.Remove the front grille.
9.Position a container under the water line connectors located under the freezer, to collect any
spillage, and disconnect the two ends of the water line.
10. Allow water to drain from the two ends.
11. Reconnect the two ends of the water line.
12. Install the front grille.
13. Reconnect power to the refrigerator.
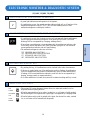
How to Restore to Normal Condition
NOTE: WHEN THE ROOM TEMPERATURE RISES ABOVE FREEZING, YOU CAN
REACTIVATE YOUR ICE/WATER DISPENSER SYSTEM BY PERFORMING
THE FOLLOWING STEPS:
1.Disconnect power to the refrigerator.
2.Reconnect the inlet water supply line to the refrigerator.
3.Open the valve on water line connecting refrigerator to main water supply.
4.Turn on the icemaker (inside freezer) by moving sensor arm to the “DOWN” unlocked position.
5.Reconnect power to the refrigerator.
6.Dispense water from freezer door. Throw away the first few glasses.
7.Check all connections for leaks. Tighten as necessary.
16

INTERIOR TEMPERATURE CONTROL (continued)
17
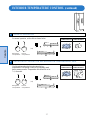
NORMAL OPERATION
1
For normal operation, set the dials as shown below:
ADDITIONAL COOLING ON REFRIGERATOR COMPARTMENT SIDE
2
Use this setting when food is to be stored at low
temperatures. This setting is likely to be frequently used
during warmer months. Temperature dials should be set at
7–9, as needed.
FREEZER REFRIGERATOR
COMPARTMENT COMPARTMENT
1
3 5
7
9
1
3
5
9
7
FREEZER REFRIGERATOR
COMPARTMENT COMPARTMENT
Refrigerator
Compartment
Freezer
Compartment
(or)
1
3 5
7
9
1
3
5
9
7
(or)
Refrigerator
Compartment
Freezer
Compartment
Operation

Operation
18
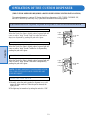
INTERIOR TEMPERATURE CONTROL (continued)
ADDITIONAL COOLING ON FREEZER COMPARTMENT SIDE
3
Use this setting when food is to be stored for longer periods
of time.
FREEZER REFRIGERATOR
COMPARTMENT COMPARTMENT
Refrigerator
Compartment
Freezer
Compartment
(or)
(or)
A SMALL AMOUNT OF FOOD IS STORED
4
Use this setting when food is to be stored at warmer
temperatures.
FREEZER REFRIGERATOR
COMPARTMENT COMPARTMENT
Refrigerator
Compartment
Freezer
Compartment
1
3 5
7
9
1
3
5
9
7
1
3 5
7
9
1
3
5
9
7

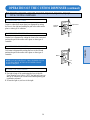
OPERATION OF THE CUSTOM DISPENSER
OPERATION OF TFJ30PF, TFJ28PF & TPJ24PF TYPE CUSTOM DISPENSER
When the Touch Key Sign is lightly pushed, a green light will
come on with a “beep” sound. Large ice cubes (half-moon
shape) are dispensed by pushing the pad with a glass.
Operation
19
The custom dispenser is a unique GE feature that allows dispensing of ICE CUBES, CRUSHED ICE,
and COLD WATER by touch key or by a pad switch without the door being opened.
1. DISPENSING ICE CUBES
When the Touch Key Sign is lightly pushed, a green light will
come on with a “beep” sound. Crushed ice is dispensed by
pushing the pad with a glass.
2. DISPENSING CRUSHED ICE
When the Touch Key Sign is lightly pushed, a green light will
come on with a “beep” sound. Cold water is dispensed by
pushing the pad with a glass.
NOTE: DO NOT OBSTRUCT THE CRUSHED ICE OR
ICE CUBE CHUTE WITH YOUR FINGER OR ANY
KIND OF OBJECT.
3. DISPENSING COLD WATER
1.Normally, when the pad is pushed to dispense ice or cold
water, the light comes on. When the pad is released, the
light goes off.
2.The light may be turned on by setting the switch to “ON.”
• USING THE LIGHT SWITCH
Push the
Pad
Light
Switch
Pad
Light
Switch
Pad
Push the
Pad
(THE CUSTOM DISPENSER REQUIRES AWATER SUPPLY PIPING SYSTEM INSTALLATION.)
Page is loading ...
Page is loading ...
Page is loading ...
Page is loading ...
Page is loading ...
Page is loading ...
Page is loading ...
Page is loading ...
Page is loading ...
Page is loading ...
Page is loading ...
Page is loading ...
Page is loading ...
Page is loading ...
Page is loading ...
Page is loading ...
-
 1
1
-
 2
2
-
 3
3
-
 4
4
-
 5
5
-
 6
6
-
 7
7
-
 8
8
-
 9
9
-
 10
10
-
 11
11
-
 12
12
-
 13
13
-
 14
14
-
 15
15
-
 16
16
-
 17
17
-
 18
18
-
 19
19
-
 20
20
-
 21
21
-
 22
22
-
 23
23
-
 24
24
-
 25
25
-
 26
26
-
 27
27
-
 28
28
-
 29
29
-
 30
30
-
 31
31
-
 32
32
-
 33
33
-
 34
34
-
 35
35
-
 36
36


