Frigidaire 988377 User guide

Category
Microwaves
Type
User guide
Frigidaire.com USA 1-800-374-4432 Frigidaire.ca Canada 1-800-265-8352
808528114 A (November 2019)
use
&
care
GAS
RANGE
Introduction. . . . . . . . . . . . . . . . . .2
Important Safety Instructions. . . . . . . .3
Cooking Recommendations. . . . . . . . .11
Before Setting Surface Controls . . . . . 14
Setting Surface Controls. . . . . . . . . . 17
Before Setting Oven Controls. . . . . . .20
Setting Oven Controls . . . . . . . . . . . 21
Care and Cleaning . . . . . . . . . . . . . 34
Before You Call . . . . . . . . . . . . . . . 39
Warranty . . . . . . . . . . . . . . . . . . 43
2
INTRODUCTION
INTRODUCTION
Doors
Handles are secure and tight
Door seals completely to cabinet on all sides
Leveling
Range is level side-to-side and front-to-back.
Cabinet is setting solid on all corners
Electrical Power
House power turned on
Range wired or plugged in
Final Checks
Shipping material removed
Registration card sent in
Installation Checklist
Welcome to our
family
Thank you for bringing Frigidaire into your home!
We see your purchase as the beginning of a long
relationship together.
This manual is your resource for the use and care
of your product. Please read it before using your
appliance. Keep it handy for quick reference. If
something doesn’t seem right, the troubleshooting
section will help you with common issues.
FAQs, helpful tips and videos, cleaning products, and
kitchen and home accessories are available at www.
frigidaire.com.
We are here for you! Visit our website, chat with an
agent, or call us if you need help. We may be able
to help you avoid a service visit. If you do need
service, we can get that started for you.
Let’s make it ocial! Be sure to register your prod-
uct.
Keep your product info here so it’s easy to find.
Model Number
Serial Number
Purchase Date
Serial Number Location
3
IMPORTANT SAFETY INSTRUCTIONS
DEFINITIONS
This is the safety alert symbol. It is
used to alert of potential personal injury
hazards. Obey all safety messages that
follow this symbol to avoid possible injury
or death.
WARNING
Indicates a potentially hazardous
situation which, if not avoided, may
result in death or serious injury.
CAUTION
CAUTION indicates a potentially hazardous
situation which, if not avoided, may result in
minor or moderate injury.
IMPORTANT
IMPORTANT indicates installation,
operation or maintenance information
which is important but not hazard-
related.
Read all instructions before using this
appliance.
This manual contains important safety
symbols and instructions. Please pay
attention to these symbols and follow all
instructions given.
Do not attempt to install or operate your
appliance until you have read the safety
precautions in this manual. Safety items
throughout this manual are labeled with a
WARNING or CAUTION statement based
on the risk type.
Warnings and important instructions
appearing in this guide are not meant to
cover all possible conditions and situations
that may occur. Common sense, caution,
and care must be exercised with installing,
maintaining, or operating your appliance.
WARNING
If the information in this manual is not fol-
lowed exactly, a re or explosion may result
causing property damage, personal injury or
death.
FOR YOUR SAFETY: Do not store or use gas-
oline or other ammable vapors and liquids in
the vicinity of this or any other appliance.
WHAT TO DO IF YOU SMELL GAS:
Do not try to light any appliance.
Do not touch any electrical switch.
Do not use any phone in your building.
Immediately call your gas supplier from a
neighbor’s phone. Follow the gas supplier’s
instructions.
If you cannot reach your gas supplier, call the
re department.
Installation and service must be performed by
a qualied installer, servicer or the gas suppli-
e r.
NOTE
NOTE indicates a short, informal
reference – something written down
to assist the memory or for future
reference.
4
IMPORTANT SAFETY INSTRUCTIONS
IMPORTANT INSTRUCTIONS FOR UN-
PACKING AND INSTALLATION
IMPORTANT
Read and follow the below instructions and
precautions for unpacking, installing, and ser-
vicing your appliance.
Remove all tape and packaging before using
the appliance. Destroy the carton and plastic
bags after unpacking the appliance. Never allow
children to play with packaging material. Do not
remove the wiring label and other literature at-
tached to the appliance. Do not remove model/
serial number plate.
Cold temperatures can damage the electronic
control. When using this appliance for the rst
time, or when the appliance has not been used
for an extended period of time, be sure the
appliance has been in temperatures above 32ºF
(0ºC) for at least 3 hours before turning on the
power to the appliance.
Never modify or alter the construction of the
appliance by removing the leveling legs, panels,
wire covers, anti-tip brackets/screws, or any
other part of the appliance.
Be sure to have an appropriate foam-type re
extinguisher available, visible, and easily acces-
sible located near the appliance.
WARNING
Air curtain or other overhead range hoods
which operate that operate by blowing a
downward air ow onto a range or cooktop,
shall not be used in conjunction with gas
ranges or cooktops other than when the range
or cooktop and hood have been designed,
tested, and listed by an independent test
laboratory for use in combination with each
other.
WARNING
Tip Over Hazard
• A child or adult can tip
the range and be killed.
• Verify the anti-tip device
has been installed to floor
or wall.
• Ensure the anti-tip device is
re-engaged to floor or wall when the
range is moved.
• Do not operate the range without the
anti-tip device in place and engaged.
• Failure to follow these instructions can
result in death or serious burns to
children and adults.
Range
leveling
leg
Anti-tip
bracke
t
To check if the anti-tip bracket is installed
properly, use both arms to grasp the rear edge
of the range back. Carefully attempt to tilt
range forward. When properly installed, the
range should not tilt forward.
Refer to the anti-tip br
acket installation instruc-
tions supplied with your range for proper
installation.
Save these instruction for future reference
5
IMPORTANT SAFETY INSTRUCTIONS
GROUNDING INSTRUCTIONS
WARNING
Avoid re hazard or electrical shock. Failure to
follow this warning may cause serious injury,
re, or death.
Avoid re hazard or electrical shock. Do not
use an adapter plug, use an extension cord,
or remove grounding prong from the power
cord. Failure to follow this warning may cause
serious injury, re, or death.
Proper Installation—Be sure your appliance is
properly installed and grounded by a qualied
technician. In the United States, install in ac-
cordance with the National Fuel Gas Code ANSI
Z223.1/NPFA No. 54, latest edition and National
Electrical Code NFPA No. 70 latest edition, and
local electrical code requirements. In Canada,
install in accordance with CAN/CGA B149.1 and
CAN/CGA B149.2 and CSA Standard C22.1,
Canadian Electrical code, Part 1-latest editions
and local electrical code requirements. Install
only per installation instructions provided in the
literature package for this appliance.
For personal safety, this appliance must be
properly grounded. For maximum safety, the
power cord must be securely connected to an
electrical outlet or junction box that is the cor-
rect voltage, is correctly polarized and properly
grounded, and protected by a circuit breaker in
accordance with local codes.
It is the personal responsibility of the consumer
to have the appropriate outlet or junction box
with the correct, properly grounded wall recep-
tacle installed by a qualied electrician.
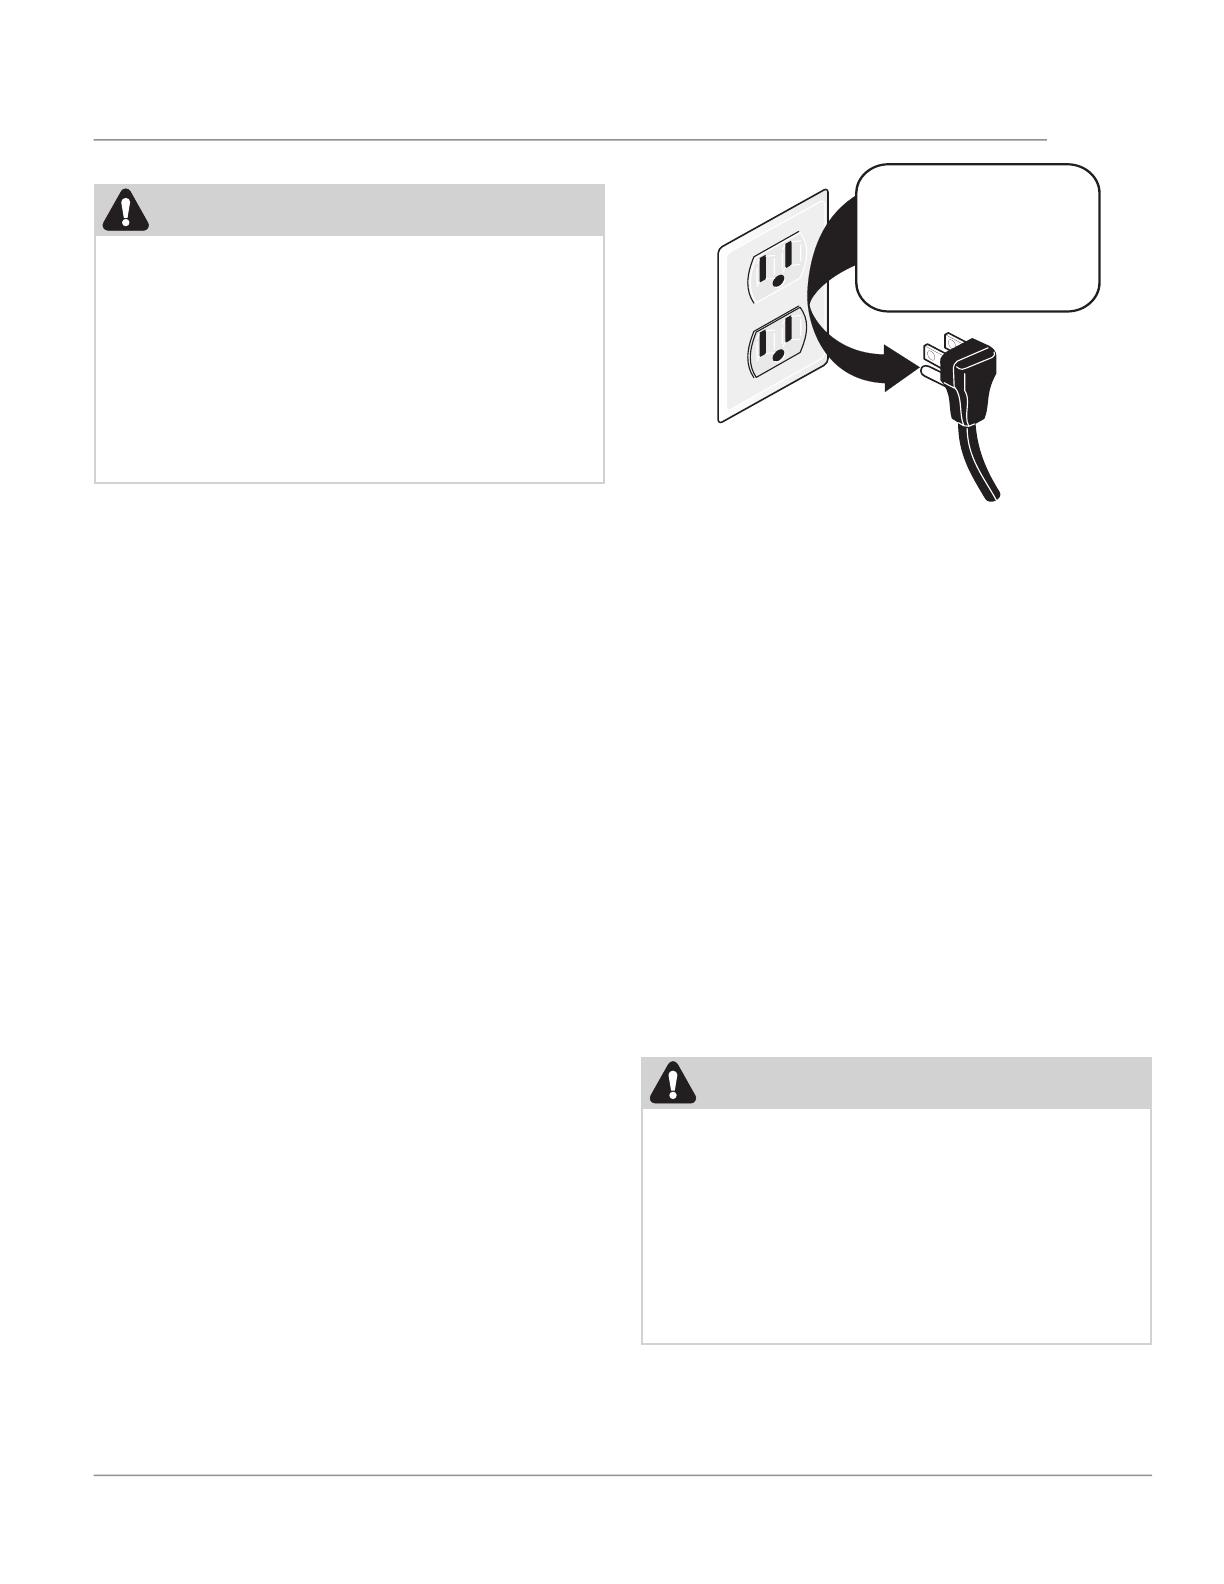
This appliance is equipped with a 3-prong
grounding plug for your protection against
shock hazard and should be plugged directly
into a properly grounded receptacle. Do not cut
or remove the grounding prong from this plug.
For personal safety, the appliance must be
properly grounded. For maximum safety, the
power cord must be plugged into an electrical
outlet that is correctly polarized and properly
grounded.
If a 2-prong wall receptacle is the only available
outlet, it is the personal responsibility of the
consumer to have it replaced with a properly
grounded 3-prong wall receptacle, installed by a
qualied technician.
See the installation instructions packaged with
this appliance for complete installation and
grounding instructions.
Do not cut, remove, or
bypass the grounding
plug under any
circumstances.
Grounding type
wall receptacle
Power supply cord
with 3-prong
grounding plug
Save these instruction for future reference
Conversion to (L.P.) Gas
This appliance allows for conversion to
Liquefied Petroleum (L.P.) Gas.
WARNING
Personal injury or death from electrical
shock may occur if the conversion to L.P.
gas is not made by a qualified installer
or electrician. Any additions, changes or
conversions required in order for this ap-
pliance to satisfactorily meet the applica-
tion needs must be made by a qualified
technician.
If L.P. conversion is needed, contact your
local L.P. Gas provider for assistance.
6
IMPORTANT SAFETY INSTRUCTIONS
WARNING
Stepping, leaning, or sitting on the door or
drawers of this appliance can result in serious
injuries and also cause damage to the appli-
ance.
Never cover any slots, holes, or passages in
the oven bottom or cover an entire oven rack
with any materials, such as aluminum foil or
aftermarket oven liners. -Doing so blocks air
ow through the oven and may cause car-
bon monoxide poison oning. Aluminum foil
and other liners may trap heat, causing a re
hazard.
Do not use oven or warmer drawer (if
equipped) for storage.
Never use your appliance as a space heater to
heat or warm the room. Doing so may result
in carbon monoxide poisoning and overheat-
ing of the appliance.
CAUTION
When heating fat or grease, watch it closely.
Grease may catch re if it becomes too hot.
Do not use water or our on grease res.
Smother re or ame or use dry chemical or
foam-type extinguisher. Cover the re with a
pan lid or use baking soda.
Use dry potholders. Moist or damp pothold-
ers on hot surfaces may result in burns from
steam. Do not let potholders touch hot cook-
ing areas. Do not use towels or other bulky
cloths.
Do not heat unopened food containers - Build-
up of pressure may cause container to burst
and result in injury.
IMPORTANT INSTRUCTIONS FOR USING
THE APPLIANCE
WARNING
Storage In or On Appliance—Flammable mate-
rials should not be stored in an oven or micro-
wave, near surface burners or elements, or in
the storage or warmer drawer (if equipped).
This includes paper, plastic, and cloth items,
such as cookbooks, plastic ware, and towels,
as well as ammable liquids. Do not store
explosives, such as aerosol cans, on or near
the appliance.
Do not leave children alone - Children should
not be left alone or unattended in the area
where appliance is in use. They should never
be allowed to sit or stand on any part of the
appliance, including the storage drawer, lower
broiler drawer, warmer drawer, or lower dou-
ble oven.
Do not store items of interest to children in
the cabinets above the appliance or on the
backguards of ranges. Children climbing on
or near the appliance to reach items could be
seriously injured.
Do not allow children to climb or play around
the appliance. The weight of a child on an
open oven door may cause the appliance to
tip, resulting in serious burns or other injury.
An open drawer when hot may cause burns.
Save these instruction for future reference
7
IMPORTANT SAFETY INSTRUCTIONS
CAUTION
Wear proper apparel - Loose-tting or hanging
garments should never be worn while using
the appliance. Do not let clothing or other
ammable materials contact hot surfaces.
Do not touch surface burners or elements,
areas near these burners or elements, interior
surfaces of the oven, or the warmer drawer
(if equipped). Surface burners and elements
may be hot even though they appear cool.
Areas near surface burners and elements may
become hot enough to cause burns. During
and after use, do not touch, or let clothing or
other ammable materials touch these areas
until they are cool. These areas may include
the cooktop, surfaces facing the cooktop,
oven vent areas, oven door, and oven window.
Do not attempt to operate the appliance
during a power failure. If the power fails, al-
ways turn o the appliance. If the appliance is
not turned o and the power resumes, electric
surface elements may resume operation when
power is restored. Once the power resumes,
reset the clock and the oven function.
IMPORTANT INSTRUCTIONS FOR USING
YOUR GAS COOKTOP
CAUTION
Use Proper Flame Size — Adjust ame size
so it does not extend beyond the edge of the
utensil. The use of undersized utensils will
expose a portion of the burner ame to direct
contact and may result in ignition of clothing.
Proper relationship of utensil to ame will also
improve eciency
Know which knob or key controls each surface
heating area. Place cookware with food on the
cooking area before turning it on. Turn the
cooking area o before removing the cookware.
Use proper pan size. This appliance is equipped
with one or more surface units of dierent
sizes. Select cookware with at bottoms that
match the surface unit heating element. The
use of undersized cookware may expose a
portion of the ame to direct contact and may
result in the ignition of clothing or other items.
Using the proper cookware on the cooking
areas will improve eciency.
Always turn knob to the full LITE position when
igniting top burners. Visually check that burner
has lit. Then adjust the ame so it does not
extend beyond the edge of the utensil.
When you are aming foods under a ventilating
hood, turn the fan on.
Save these instruction for future reference
8
IMPORTANT SAFETY INSTRUCTIONS
IMPORTANT INSTRUCTIONS FOR USING
YOUR OVEN
Protective liners—Do not use aluminum
foil, aftermarket oven liners, or any other
materials or devices to line oven bottom,
oven racks, or any other part of the appli-
ance. Only use aluminum as recommend-
ed for baking, such as lining cookware or
as a cover placed on food. Any other use
of protective liners or aluminum foil may
result in a risk of electric shock or fire or a
short circuit.
Use care when opening oven door, lower
oven door, or warmer drawer (some mod-
els). Stand to the side of the appliance
when opening the door of a hot oven. Let
hot air or steam escape before you remove
or replace food in the oven.
Keep oven vent ducts unobstructed.
Touching surfaces in this area when the
oven is on may cause severe burns. Do not
place plastic or heat-sensitive items on or
near the oven vent. These items can melt
or ignite.
Placement of oven racks - Always place
oven racks in desired location while oven
is cool. If rack must be moved while oven
is hot, do not let potholder contact hot
burner or element in oven. Use potholders
and grasp the rack with both hands to re-
position. Remove all cookware and utensils
before moving the rack.
Do not use a broiler pan without its insert.
Broiler pans and inserts allow dripping fat
to drain away from the high heat of the
broiler. Do not cover the broiler insert with
aluminum foil; exposed fat and grease
could ignite.
Do not cook food on the oven bottom. Al-
ways cook in proper cookware and always
use the oven racks.
Save these instruction for future reference
To reduce the risk of burns, ignition of
ammable materials, and spillage due to
unintentional contact with the utensil, the
handle of the utensil should be positioned so
that it is turned inward, and does not extend
over adjacent surface burners
Never leave surface burners unattended at
high heat settings — Boil overs cause smoking
and greasy spill overs that may ignite, or a
pan that has boiled dry may melt.
Glazed cooking utensils — Only certain types
of glass, glass/ceramic, ceramic,earthenware,
or other glazed utensils are suitable for cook
top service without breaking due to the
sudden change in temperature. Check the
manufacturer’s recommendations for cook top
use.
9
IMPORTANT SAFETY INSTRUCTIONS
IMPORTANT INSTRUCTIONS FOR CLEAN-
ING YOUR APPLIANCE
CAUTION
Before manually cleaning any part of the ap-
pliance, be sure all controls are turned o and
the appliance is cool. Cleaning a hot appliance
can cause burns.
Clean the appliance regularly to keep all parts
free of grease that could catch re. Do not
allow grease to accumulate. Greasy deposits in
the fan could catch re.
Always follow the manufacturer’s recommended
directions for use of kitchen cleaners and aero-
sols. Be aware that excess residue from clean-
ers and aerosols may ignite causing damage
and injury.
Clean venitlating hoods frequently - Grease
should not be allowed to accumulate on hood
or lter. Follow the manufacturers instructions
for cleaning vent hoods.
IMPORTANT INSTRUCTIONS FOR SELF
CLEANING OVENS
CAUTION
Before using self clean, remove the broiler
pan, any food, utensils, and cookware from
the oven, storage drawer or warming drawer
(if equipped). Remove oven racks unless oth-
erwise instructed.
Do not clean the oven door gasket. The door
gasket is essential for a good seal. Care should
be taken not to rub, damage, or move the
gasket.
Do not use oven cleaners. No commercial oven
cleaner or oven liner protective coating of any
kind should be used in or around any part of
the appliance.
Use the self clean cycle to clean only the parts
listed in this manual.
Some birds are extremely sensitive to the
fumes given o during the self clean cycle of
any oven. Move birds to another well-ventilated
room.
Save these instruction for future reference
10
IMPORTANT SAFETY INSTRUCTIONS
WARNING
California Residents: for cancer and reproduc-
tive harm information, visit
www.P65Warnings.ca.gov
IMPORTANT INSTRUCTIONS FOR SER-
VICE AND MAINTENANCE
Do not repair or replace any part of the appli-
ance unless specically recommended in the
manuals. All other servicing should be done
only by a qualied technician. This reduces the
risk of personal injury and damage to the appli-
ance.
Always contact your dealer, distributor, service
agent, or manufacturer about problems or con-
ditions you do not understand.
Ask your dealer to recommend a qualied tech-
nician and an authorized repair service. Know
how to disconnect the power to the appliance
at the circuit breaker or fuse box in case of an
emergency.
Remove the oven door from any unused oven if
it is to be stored or discarded.
Do not touch a hot oven light bulb with a damp
cloth. Doing so could cause the bulb to break.
Handle halogen lights (if equipped) with paper
towels or soft gloves. Disconnect the appliance
or shut o the power to the appliance before
removing and replacing the bulb.
11
COOKING RECOMMENDATIONS
Bakeware
The material of bakeware aects how evenly and quickly it transfers heat from the pan to the food.
Material Attributes Recommendation
Shiny metal bakeware
Shiny, aluminum, and non-coat-
ed bakeware is the best for even
heating. It is suitable for all baked
goods.
Recommended cooking temperatures
and times are based on shiny metal
bakeware.
Dark metal bakeware
Dark bakeware cooks hotter than
shiny bakeware.
Reduce the cooking temperature by
25° F
(13-14° C) when using dark bakeware.
Glass bakeware
Glass bakeware cooks hotter
than shiny bakeware.
Glass is convenient, as the same
piece of bakeware can be used
for cooking, serving, and storing
food.
Reduce the cooking temperature by
25° F
(13-14° C) when using glass bakeware.
Insulated bakeware
Insulated bakeware cooks cooler
than shiny bakeware.
Insulated bakeware is designed
for baking in gas ovens.
Reduce the cooking temperature by
25° F
(13-14° C) when using glass bakeware.
COOKING RECOMMENDATIONS
12
COOKING RECOMMENDATIONS
Cooking Conditions
Conditions in your kitchen can aect the performance of your appliance when cooking food.
Conditions
Attributes Recommendation
Aging cookware As pans age and become
discolored, cooking times may
need to be reduced slightly.
If food is too dark or overcooked, use the
minimum cook time in the recipe or packag-
ing.
If food is too light or undercooked, use the
middle to maximum cook time in the recipe
or packaging.
High altitude Air is drier and air pressure is
lower.
Water boils at a lower tem-
perature, and liquids evapo-
rate faster.
Foods may take longer to
bake.
Doughs may rise faster.
Adjust cooking temperature, cooking time, or
recipes as needed.
Increase amount of liquid in baking recipes.
Increase cook time on cooktop. Cover dishes
to reduce evaporation.
Increase bake time or oven temperature.
Reduce amount of baking soda or baking
powder in recipe. Reduce rising time or
punch down dough and allow it to rise twice.
Cooking Results
Small adjustments may fix a problem with food not being as done as you like or more done than you like.
Problems
Recommendation
Food too light Use the middle to maximum cook time recommended on packaging or recipe.
Food too dark Use the minimum cook time recommended on packaging or recipe.
Cooking Tips
Use these additional tips to get the best results from your appliance.
Cooking
Recommendation
Baking
Rack placement Follow the instructions in “Setting Oven Controls” on starting on page 13.
When using only one rack, place the rack so the food is in the center of the
oven.
Preheat Fully preheat the oven before baking items like cookies, cakes, biscuits and
breads. Insert food immediately after the beep.
Checking food Use the window and oven light when checking food. Opening the door may
reduce baking performance.
Quick Bake Quick bake is the best function to use for baking on multiple racks. For best
performance, see “Convection Bake” on page 18.
Food placement Allow at least 2 inches (5 cm) of space between bakeware for proper air cir-
culation.
13
COOKING RECOMMENDATIONS
Cooking
Recommendation
Broiling / Roasting
Broiling pan For best results when broiling, use a broil pan with a broil pan insert de-
signed to drain the fat from the food, help avoid spatter, and reduce smok-
ing. The broiler pan will catch grease spills, and the insert helps prevent
grease splatters.
If a broiler pan and insert are not supplied with this appliance, they may be
purchased from Frigidaire.com.
Convection Cooking
Convection attributes Convection cooking uses a fan to circulate hot air around the oven and
food. It browns food more evenly and reduces hot spots in the oven.
Convection saves time when using multiple racks or cooking several food
items at once.
Quick bake Reduce cooking temperature by 25° F (13-14° C) from the recipe unless the
recipe is written for convection baking.
Preheat the oven for best results.
14
BEFORE SETTING SURFACE CONTROLS
Assembly of the Burner Caps
Make sure that all of the surface burner caps and
surface burner grates are installed correctly and at
the correct locations.
1. Remove all packing material from the cooktop
area.
2. Make sure burner caps are properly placed on
the surface burners.
3. Unpack the burner grates and position them on
the cooktop.
4. Discard all packing material..
On round-style burners, the burner cap lip (Figure
1) should fit snug into the center of the burner head
and rest level. Refer to Figure 1 for correct and in-
correct burner cap placement.
Burner cap lip
Burner cap
Burner head
Burner cap
Burner head
Figure 1: Burner caps and burner heads
Figure 1: Cap placement
CAUTION
Do not allow spills, food, cleaning agents, or
any other material to enter the gas orifice
holder opening.
Always keep the burner caps and burner
heads in place whenever the surface burners
are in use.
Never place flammable items on the cooktop.
Once in place, you may check the fit by gently slid-
ing the burner cap from side to side (Figure 2) to
be sure it is centered and firmly seated. When the
burner cap lip makes contact inside the center of
the burner head you will be able to hear the burner
cap click
Figure 2: Gently move cap for proper placement
IMPORTANT
Please note that the burner cap should not move
o the center of the burner head when sliding
from side to side.
Check and be sure that all oval-style burner
caps (some models) are correctly in place on
oval burner heads.
Do not use the surface burners without the
burner caps properly installed. Improperly
seated burner caps may prevent burners from
lighting or cause uneven flame and heating.
Missing pieces or improper installation may
lead to spills, burns, or damage to your range
and cookware.
Never place flammable items on the cooktop.
Gas surface burner types
The cooktop is equipped with gas surface burners
with dierent BTU ratings. The ability to heat food
quickly and in large amounts increases as the burn-
er size increases.
Small burners are best used for low-flame heat-
ing of small amounts of food.
Standard burners can be used for most surface
cooking needs.
The largest burner is best used for bringing
large quantities of liquid rapidly up to tem-
perature or when preparing larger quantities
of food. The large burner is located at the right
front position on the cooktop.
Regardless of size, always select cookware that
is suitable for the amount and type of food being
prepared. Select a burner and set the flame size
appropriately for the pan. Never allow flames to
extend beyond the outer edge of the pan.
15
BEFORE SETTING SURFACE CONTROLS
Using Proper Cookware
The size and type of cookware used will influence
the heat setting needed for best cooking results.
Be sure to follow the recommendations for using
proper cookware as illustrated in “Figure 3: Testing
cookware” and “Figure 4: Proper cookware”.
Figure 3: Testing cookware
Check for flatness by ro-
tating a ruler across the
bottom of the cookware
(see “Figure 3: Testing
cookware”). Cookware
should have flat bot-
toms that make good
contact with the entire
surface of the heating
element.
•F
lat bottom and straight
sides.
•T
ight fitting lids.
•W
eight of handle does
not tilt pan. Pan is well
balanced
.
•P
an sizes match the
amount of food to be
prepared and the size
of the surface element.
•M
ade of material that
conducts heat well.
•E
asy to clean.
•A
lways match pot
diameter to element
size.
•C
urved and warped pans.
•Cookware larger than
element by more than
one-half inch or 12mm.
•Heavy handle tilts pan.
•Pan is much smaller
than the element.
Cookware Material Types
The cookware material determines how evenly and
quickly heat is transferred from the surface ele-
ment to the pan bottom. The most popular materi-
als available are:
Aluminum - Excellent heat conductor. Some
types of food will cause it to darken (Anodized
aluminum cookware resists staining and pit-
ting).
Copper - Excellent heat conductor but discol-
ors easily (see Aluminum).
Stainless - Slow heat conductor with uneven
cooking results. Durable, easy to clean, and
resists staining.
Cast Iron - A slow heat conductor, but will re-
tain heat very well. Cooks evenly once cooking
temperature is reached.
Porcelain-enamel on metal - Heating character-
istics will vary depending on base material.
Glass - Slow heat conductor.
IMPORTANT
Do not place empty aluminum, glass, or porce-
lain-enamel coated cookware on the element.
The melting point of cookware made with these
materials may be reached quickly, especially if left
empty. If the cookware melts it will damage the
cooktop. Follow all the cookware manufacturers
recommendations for use and care of cookware.
IMPORTANT
NEVER place or straddle a cooking utensil over
two dierent surface cooking areas at the same
time. Incorrect use may damage the cooktop.
Figure 4: Proper cookware
16
BEFORE SETTING SURFACE CONTROLS
Install Burner Grates
To install burner grates, place the grates flat-side
down and align them into the cooktop recess..
Figure 5: Gently move cap for proper placement
Gas surface burner types
The cooktop is equipped with gas surface burners
with dierent BTU ratings. The ability to heat food
quickly and in large amounts increases as the burn-
er size increases.
Small burners are best used for low-flame heat-
ing of small amounts of food.
Standard burners can be used for most surface
cooking needs.
The largest burner is best used for bringing
large quantities of liquid rapidly up to tem-
perature or when preparing larger quantities
of food. The large burner is located at the right
front position on the cooktop.
Regardless of size, always select cookware that
is suitable for the amount and type of food being
prepared. Select a burner and set the flame size
appropriately for the pan. Never allow flames to
extend beyond the outer edge of the pan.
IMPORTANT
Make sure the burner grates are properly
placed on the cooktop before using the sur-
face burners (Figure 5). The grates are de-
signed to rest inside the recess on the cook-
top.
Grates should rest flush against each other
and against the sides of the recess.
Do not line the area underneath the grates or
any part of the cooktop with aluminum foil or
with any other lining.
17
SETTING SURFACE CONTROLS
Setting surface controls
The ability to heat food quickly and in large vol-
umes increases as the burner size increases. Your
gas appliance may be equipped with many dier-
ent sized surface burners.
It is important to select cookware that is suitable
for the amount and type of food being prepared.
Select a burner and flame size appropriate for the
cookware size.
The standard size burner or burners may be
used for most surface cooking needs.
Small burners are best used for low-flame heat-
ing of small amounts of food.
Large burners are best for bringing large quan-
tities of liquid to temperature or heating larger
quantities of food.
Setting a surface burner:
1. Place cooking utensil on center of surface
burner grate. Be sure the cooking utensil rests
stable on the burner grate.
2. Push the burners surface control knob in and
turn counterclockwise out of the OFF position
(Figure 6).
3. Release the surface control knob and rotate to
the LITE position ( ). Visually check that the
burner has a steady gas flame.
4. Once the surface burner has a flame, push the
surface control knob in and turn counterclock-
wise to the desired flame size setting. Adjust
the flame as needed using the knob markings.
Figure 6: Surface control knob
CAUTION
Do not place flammable items such as plastic
wrappings, spoon holders, or plastic salt and
pepper shakers on the cooktop when it is in use.
These items could melt or ignite. Potholders, tow-
els, or wooden spoons could catch fire if placed
too close to the surface burners.
NOTE
When setting a surface control knob to the lite
position, all of the electronic surface ignitors will
spark at the same time. However, only the surface
burner you are setting will ignite.
In the event of an electrical power outage, the
surface burners may be lit manually. To light a
surface burner, hold a lit match to the burner
head, then slowly turn the surface control knob
to lite. Once the burner ignites, push in and turn
knob out of lite then to the desired flame setting.
Use caution when lighting surface burners man-
ually.
18
SETTING SURFACE CONTROLS
Set proper burner flame size
The color of the flame is the key to proper burner
adjustment. A good flame is clear, blue and hardly
visible in a well-lighted room. Each cone of flame
should be steady and sharp. Adjust or clean the
burner if flame is yellow-orange.
For most cooking: start on the highest setting and
then turn to a lower setting to complete the pro-
cess. Use the recommendations below as a guide
for determining proper flame size for various types
of cooking (Table 1).
For deep fat frying: use a thermometer and adjust
the surface knob accordingly. If the fat is too cool,
the food will absorb the fat and be greasy. If the
fat is too hot, the food will brown so quickly that
the center will be under-cooked. Do not attempt to
deep fat fry too much food at once as the food will
neither brown nor cook properly.
Flame size Type of cooking
High flame Start most foods; bring water
to a boil; pan broiling
Medium flame Maintain a slow boil; thicken
sauces, gravies; steaming
Low flame Keep foods cooking; poaching;
stewing
These settings are based on medium-weight met-
al or aluminum pans with lids. Settings may vary
when using other types of pans.
Table 1: Recommended flame settings for cook-
ing
CAUTION
Never extend the flame beyond the outer edge of
the cooking utensil. A higher flame wastes en-
ergy, and increases your risk of being burned by
the flame (Figure 2).
Figure 7: Proper burner flame
19
SETTING SURFACE CONTROLS
Cooking with a griddle (some models)
Figure 8: Griddle
The griddle is a versatile accessory that is perfect
for cooking foods that require large flat surfaces
such as pancakes, French toast, grilled sandwiches,
bacon, and also for cooking dierent foods at the
same time.
After use, let the griddle cool before washing. Hand
wash with hot soapy water. Do not soak. Dry thor-
oughly. Do not put a griddle in a dishwasher.
If you would like to purchase a griddle, you can
order one from Frigidaire.com.
Using the griddle:
Place the griddle securely on top of the burner
grates. Preheat the griddle for 5 minutes on medi-
um to medium low setting. Slow preheat ensures
even heat distribution during the cooking process.
DO NOT preheat the griddle on HI setting. Preheat-
ing on HI may warp the griddle and prevent even
heat distribution.
Home Canning
Be sure to read and observe all the following points
when home canning with your appliance. Check
with the USDA (United States Department of Agri-
culture) Web site and be sure to read all the infor-
mation they have available as well as follow their
recommendations for home canning procedures.
Use only a completely flat bottom canner with
no ridges that radiate from the bottom cen-
ter when home canning. Heat is spread more
evenly when the bottom surface is flat. Use a
straight-edge to check canner bottom.
Make sure the diameter of the canner does
not exceed 1 inch beyond the surface element
markings or burner.
It is recommended to use smaller diameter can-
ners on electric coil and ceramic glass cooktops
and to center canners on the burner grates.
Start with hot tap water to bring water to boil
more quickly.
Use the highest heat setting when first bringing
the water to a boil. Once boiling is achieved,
reduce heat to lowest possible setting to main-
tain that boil.
Use tested recipes and follow instructions care-
fully. Check with your local Cooperative Agri-
cultural Extension Service or a manufacturer of
glass jars for the latest canning information.
It is best to can small amounts and light loads.
Do not leave water bath or pressure canners on
high heat for an extended amount of time.
20
BEFORE SETTING OVEN CONTROLS
Types of Oven Rack
Figure 9: Oven vent
Flat oven racks may be used for most cooking
needs and may be placed in most oven rack
positions.
at
oven rack
Removing, Replacing, and Arranging Flat
or Offset Oven Racks
Always arrange the oven racks when the oven is
cool.
To remove - Pull the oven rack straight forward un-
til it reaches the stop position. Lift up front of oven
rack slightly and slide out.
To replace - Place the oven rack on the rack guides
on both sides of oven walls. Tilt the front of oven
rack upward slightly and slide the oven rack back
into place. Be sure oven racks are level before us-
ing.
Oven Vent Location
The oven is vented as shown below. When the oven is
on, warm air is released through the vent. This venting is
necessary for proper air circulation in the oven and good
baking results. Do not block oven vent. Never close o
the openings with aluminium foil or any other material.
Steam or moisture may appear near the oven vent. This
is normal.
Figure 10: Oven rack types
CAUTION
Always use pot holders or oven mitts when using
the oven. When cooking, the oven interior, oven
exterior, oven racks, and cooktop will become
very hot which can cause burns.
Remove all oven racks before starting a self clean
cycle. If oven racks are left inside the oven during
a cleaning cycle, the slide ability of the oven
racks may be damaged and all of the oven racks
will lose their shiny finish.
To prevent possible damage to the oven, do not
attempt to close the oven door until all the oven
racks are fully positioned back inside the oven
cavity.
WARNING
Protective Liners — Do not use aluminum foil
or any other material or liners to line the oven
bottom, walls, racks or any other part of the
range. Doing so will alter the heat distribution,
produce poor baking results, and possibly cause
permanent damage to the oven interior. Improp-
er installation of these liners may result in risk of
electric shock or fire. During self clean, tempera-
tures in the oven will be hot enough to melt foil.
  • Page 1 1
  • Page 2 2
  • Page 3 3
  • Page 4 4
  • Page 5 5
  • Page 6 6
  • Page 7 7
  • Page 8 8
  • Page 9 9
  • Page 10 10
  • Page 11 11
  • Page 12 12
  • Page 13 13
  • Page 14 14
  • Page 15 15
  • Page 16 16
  • Page 17 17
  • Page 18 18
  • Page 19 19
  • Page 20 20
  • Page 21 21
  • Page 22 22
  • Page 23 23
  • Page 24 24
  • Page 25 25
  • Page 26 26
  • Page 27 27
  • Page 28 28
  • Page 29 29
  • Page 30 30
  • Page 31 31
  • Page 32 32
  • Page 33 33
  • Page 34 34
  • Page 35 35
  • Page 36 36
  • Page 37 37
  • Page 38 38
  • Page 39 39
  • Page 40 40
  • Page 41 41
  • Page 42 42
  • Page 43 43
  • Page 44 44

Frigidaire 988377 User guide

Category
Microwaves
Type
User guide

Ask a question and I''ll find the answer in the document

Finding information in a document is now easier with AI