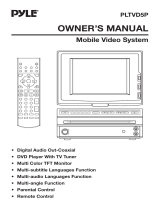
ASA Electronics DV352 User manual
- Category
- CD players
- Type
- User manual

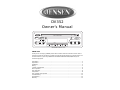
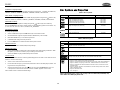
DVD / CD / MP3 PLAYER
MUTE
IR
VIDEO IN 2 L AUDIO IN 2 R
VOL
SEL
MODE
DV352
Owner’s Manual
Thank You!
Thank you for choosing a JENSEN product. We’ve tried to make the instructions in this owner’s
manual clear and easy to follow. If you take a few minutes to look through it, you’ll learn how to use
all of the features of your new JENSEN DV352 Mobile Multimedia DVD/CD/MP3 Player for
maximum enjoyment.
Introduction .....................................................................................................................................2
Preparation...................................................................................................................................... 2
Installation...................................................................................................................................... 3
Wiring.............................................................................................................................................. 5
Controls and Indicators................................................................................................................... 6
Basic Operation.............................................................................................................................. 8
Disc Operation ................................................................................................................................ 8
Setup Menu....................................................................................................................................11
Disc Symbols and Properties........................................................................................................ 13
Troubleshooting ............................................................................................................................ 14
Specifications................................................................................................................................ 15
Warranty........................................................................................................................................ 15
www.ASAElectronics.com

2
DV352
Introduction
Congratulations on your purchase of the JENSEN DV352 Mobile Multimedia DVD/CD/MP3 Player.
Features
• High temperature deck and OPU
• Slot type drive
• Front and rear AV jacks for system expansion
• Din size with mounting brackets included
• LCD display with blue back lighting
• Blue back lit buttons
• Dolby digital sound
• IR remote control included
• 12 volt operation
• Compatible with PAL and NTSC DVD (Video CD)
• Single LSI chip integrates all major DVD playback circuit functions including MPEG2 decoder,
video D/A converter and audio decoders
• L/R stereo analog audio outputs for connection to existing head unit aux inputs
• Composite video output
Precautions
• Use the Proper Power Supply.
This product is designed to operate with a 12 volt DC, negative ground battery system (the
regular system in a North American car).
• Protect the Disc Mechanism.
Avoid inserting any foreign objects into the slot of this player. Failure to observe this may
cause malfunction due to the precise mechanism of this unit.
• Use Authorized Service Centers.
Do not attempt to disassemble or adjust this precision product; contact a professional for
assistance.
• Avoid Moisture.
To reduce the risk of fire or electric shock, do not expose this equipment to rain or moisture.
• Use Recommended Accessories:
TO REDUCE THE RISK OF FIRE OR ELECTRIC SHOCK AND ANNOYING INTERFER-
ENCE, USE ONLY THE RECOMMENDED ACCESSORIES.
CAUTION: This mobile DVD player is a Class I laser product that uses a visible/invisible
laser beam which could cause hazardous radiation exposure if improperly directed. Be
sure to operate the mobile DVD player as instructed. Use of controls or adjustments or
performance of procedures other than those specified herein may result in hazardous
radiation exposure. Do not open covers and do not attempt to repair the unit yourself. Refer
servicing to qualified personnel.
Preparation
It’s a good idea to read all of the instructions before beginning the installation. We recommend
having your JENSEN DV352 installed by a reputable installation shop.
Tools and Supplies
You will need these tools and supplies to install your DV352:
• Torx type, flat-head and Philips screwdrivers
• Wire cutters and strippers
• Tools to remove existing radio (screwdriver, socket wrench set or other tools)
• Electrical tape
• Crimping tool
• Volt meter/test light
• Crimp connections
• 18 gauge wire for power connections
• 16 – 18 gauge speaker wire
Disconnecting the Battery
To prevent a short circuit, be sure to turn off the ignition and remove the negative (-) battery cable
prior to installation.
NOTE: If the DV352 is to be installed in a car equipped with an on-board drive or navigation
computer, do not disconnect the battery cable. If the cable is disconnected, the computer
memory may be lost. Under these conditions, use extra caution during installation to avoid
causing a short circuit.

3
DV352
Installation
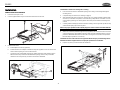
DIN Front-Mount Installation
1. Remove the transport screws.
2. Use the supplied release keys to remove the half-sleeve from the unit.
3. Install the half-sleeve.
a. Install adapter if necessary (optional).
b. Install half-sleeve into adapter or dashboard using the supplied screws. Do not force the
sleeve into the opening or cause it to bend or bow.
c. Locate the series of bend tabs along the top, bottom and sides of the mounting sleeve.
With the sleeve fully inserted into the dashboard opening, bend as many of the tabs
outward as necessary to firmly secure the sleeve to the dashboard.
CAUTION! Be careful not to damage the car wiring.
4. Place the unit in front of the dashboard opening so the wiring can be brought through the
mounting sleeve.
5. Complete wiring connections (see “Wiring” on page 5).
6. After completing the wiring connections, turn the unit on to confirm operation (ignition switch
must be on). If unit does not operate, recheck all wiring until problem is corrected. Once the
unit is properly operating, turn off the ignition switch and proceed with final mounting of the
chassis.
7. Carefully slide the DVD player into the half-sleeve making sure it is right-side-up until it is fully
seated and the spring clips lock it into place.
NOTE: For proper operation of the CD/DVD player, the chassis must be mounted within 30°
of horizontal. Make sure the unit is mounted within this limitation.
8. Attach one end of the perforated support strap (supplied) to the screw stud on the rear of the
chassis using the hex nut provided. Fasten the other end of the perforated strap to a secure
part of the dashboard either above or below the unit using the screw and hex nut provided.
Bend the strap to position it as necessary.
CAUTION! The rear of the unit must be supported with the strap to prevent damage to the
dashboard from the weight of the unit or improper operation due to vibration.
9. Replace any items you removed from the dashboard.
1
2
DV
D
/
C
D
/
M
P
3
P
L
A
Y
E
R
M
U
T
E
IR
VIDE
O
IN
2
L
AUD
IO
IN
2
R
V
O
L
S
E
L
M
O
D
E
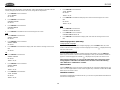
3a
3b
3c
Install Half-Sleeve
8
9
5
DV
D
/
C
D
/
M
P
3
P
L
A
Y
E
R
M
U
T
E
IR
VIDEO IN 2 L AUDIO IN 2 R
V
O
L
SEL
M
ODE
4
DIN Front-Mount Installation

4
DV352
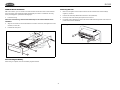
DIN Rear-Mount Installation
With some vehicles, you can use the screw holes located on both sides of the unit to fasten the
unit to the factory radio mounting brackets supplied with your vehicle. To install this unit using
factory mounting plates, perform the following steps:
1. Remove trim ring.
NOTE: The outer trim ring, sleeve and the metal strap are not used for DIN rear-mount
installation.
2. Align the screw holes on the bracket with the screw holes on the unit, then tighten the screws
(5x5mm) on each side.
3. Reinstall the dash panel.
Reconnecting the Battery
When wiring is complete, reconnect the battery negative terminal.
Removing the Unit
1. Make sure the ignition is turned off, then disconnect the cable from the vehicle battery’s
negative (-) terminal.
2. Remove the metal strap attached the back of the unit (if attached).
3. Lift the top of the outer trim ring then pull it out to remove it.
4. Insert both of the supplied keys into the slots at the middle left and right sides of the unit, then
pull the unit out of the dashboard.
3
1
2
DV
D
/
C
D
/
M
P
3
P
L
A
Y
E
R
M
U
T
E
IR
VIDEO IN 2 L AUDIO IN 2 R
V
O
L
SEL
M
ODE
DIN Rear-Mount Installation
DVD / CD / MP3 PLAYER
MUTE
IR
V
ID
E
O
IN
2
L
A
U
D
IO
IN
2
R
VOL
S
E
L
M
O
D
E
Removing the Unit

5
DV352
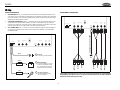
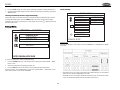
Wiring
Power Connections
1. GROUND WIRE (black) – Securely fasten the Ground wire to a grounded metal part of the
car’s chassis. If you cannot find an existing bolt or screw to fasten it to, drill a hole in the metal
and secure it with a screw. To ensure a good ground, remove any paint or grease from areas
where the wire will contact the surface.
2. CONSTANT POWER WIRE (yellow) – Connect the 12V PLUS constant power wire to a live
12 volt wire in the vehicle. Before making a connection, check that the wire you intend to
connect it to is always live, even when the car’s ignition is turned off. If a live wire is not found,
route the wire to the car’s fuse block and connect it to a live circuit there.
3. ACC POWER WIRE (red) – Connect to a +12 volt circuit that is only live when the ignition is
on. The best connection point is at the car’s fuse block at the “RADIO” or “ACCESSORY”
identified terminals.
Audio/Video Connections
NOTE: When replacing a fuse, be sure to use correct type and amperage to avoid damaging
the DVD player. The DV352 uses one 3 amp and one 0.5 amp ACG fuse, located in the black
filter boxes in-line with the power wires.
VIDEO 1
AUDIO INPUT 1
LR
DC12VIN DC12VOUT
+
INPUT
AUDIO OUT
LR
VIDEO
OUT1
VIDEO
OUT2
REMOTE
+
Black
Yellow
Red
3A
0.5A
Ground
Connect to ground terminal.
Memory/Battery
Connect to battery or 12 volt
power source that is always
live. The radio will not work
if this wire is not connected.
Accessory/Ignition
Connect to existing radio
wire or radio fuse.
1
2
3
VIDEO 1
AUDIO INPUT 1
LR
DC12VIN DC12VOUT
+
INPUT
AUDIO OUT
LR
VIDEO
OUT1
VIDEO
OUT2
REMOTE
REMOTE CONTROL RECEIVER
YELLOW
WHITE
RED
WHITE
RED
YELLOW
YELLOW

6
DV352
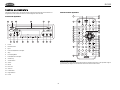
Controls and Indicators
The buttons located on the unit and the remote controls that perform the same function are
assigned the same number for reference on the diagrams and in the text.
Front Panel Operation
1. Power
2. Infrared Sensor
3. Eject
4. Fast Forward/Advance Chapter
5. Stop
6. Pause/Play/Mute
7. Rewind/Previous Chapter
8. Volume Up
9. Volume Down
10. Select
11. Mode
12. Disc Slot
13. Video In
14. Left Audio In
15. Right Audio In
16. Reset
Remote Control Operation
Using the Remote Control
Point the remote control towards the player front face remote sensor IR (2). The operation angle is
approximately 30 degrees in each direction of the front of the remote sensor.
DVD / CD / MP3 PLAYER
MUTE
IR
VIDEO IN 2 L AUDIO IN 2 R
VOL
SEL
MODE
3
8
1
13
2
10
121611
9
6
7
4
5
14 15
DISPLAY
PROGRAM
MUTE
EJECT
MODE
SHUFFLE
REPEAT
A-B
SUBTITLE
ANGLE
MENU
SETUP
ZOOM
RESUME
P/N
OK
AUDIO
TITLE
EQ
SEL
VOLUME
TRACK
GOTO
PBC
SLOW
12
3
4
56
78
9
0
POWER
17
1
21
19
5
20
24
27
28
31
32
36
37
38
39
34
35
7
4
9
8
33
10
30
29
26
25
23
22
11
3
6
18

7
DV352
Remote Control Functions Changing the Battery
The remote control uses a CR2025 3V button cell lithium battery. The battery compartment is
located on the back of the remote control near the bottom edge. To replace the battery:
1. Open the battery compartment cover.
2. Insert the new battery. Make sure that the positive and negative terminals of the battery are
oriented as indicated.
3. Close the cover.
Ref # Button Function
1
/POWER
Turn the unit ON or OFF
3
/EJECT
Eject the disc
4
/TRACK
Skip to the next track/chapter
5 Stop disc playback
6
/MUTE
Play/pause the disc (for disc play mode) and to mute the sound (for AV IN mode)
7
/TRACK
Go to previous track/chapter
8
/VOLUME
Increase the volume level
9
/VOLUME
Decrease the volume level
10 SEL Select the desired adjustment mode. Press VOL+/- to change settings
11 MODE Change between disc (DVD/VCD/CD/MP3) play mode and AV IN mode
17 DISPLAY Display statistical disc information during playback
18 PROGRAM Play tracks in programed order (MP3/CD)
19 SHUFFLE Play tracks in random order (NOT for DVD)
20 REPEAT Repeat current track/chapter
21 A-B Repeat selected passage continuously
22 SUBTITLE Change the SUBTITLE language on multi-subtitle language DVD discs
23 ANGLE Change the viewing angle on multi-angle DVD discs
24 MENU Display the root menu stored on DVD discs
25 SETUP Display the SETUP menu
26 ZOOM Increase the picture size
27 RESUME Resume play from stopping point
28 P/N Switch between PAL mode, NTSC mode and AUTO mode
29
, , ,
Select items left/right and ahead/back in menu mode
30 OK Confirm selection of track/chapter
31 AUDIO Change the AUDIO sound track on multi-audio sound track DVD discs. Change the sound mode of
VCD discs
32 TITLE Display the TITLE menu stored on DVD disc
33 EQ Select the equalization mode, such as FLAT, CLAS, POP, ROCK
34
/TRACK
Search in reverse rapidly
35
/TRACK
Search forward rapidly
36 0-9 Enter track/chapter number directly. Use GOTO to search.
37 GOTO Used with numeric buttons to search disc
38 PBC Switch between PBC ON and PBC OFF on VCD discs
39 SLOW Change to slow playback motion (VCD/DVD)

8
DV352
Basic Operation
Turning the Unit On/Off
Press the POWER button (1) on the front panel or remote control to turn the unit on/off.
Inserting a Disc
Insert a disc, label side up, into the disc slot (12). The player will start playback automatically.
Ejecting a Disc
Press the EJECT button (3) to eject the disc from the slot. The unit does not have to be on to eject
a disc.
NOTE: Do not drive with an ejected disc in the slot.
Audio Control
Volume
Press the VOL button (8) to increase the volume, or the VOL button (9) to decrease the
volume.
Mute
Press the MUTE button (6) to silence the audio. Press MUTE again to resume audio.
Press the SEL button (10) on the front panel or remote control to select the desired audio
adjustment mode. The adjustment mode will change in the following order:
Setting the Clock
Press and hold the DISPLAY button (17) on the remote until the clock display flashes, then
release. Next, press (29) or (7) to adjust the hour and (29) or (4) to adjust the minutes.
Continue changing the hour to move between AM and PM.
Mode
Press the MODE button (11) on the front panel or remote control to switch between disc (DVD/
CVCD/CD/MP3) mode, AV IN1, and AV IN2 mode.
Equalization
Press the EQ button (33) on the remote control to activate the equalization function. Continue
pressing the EQ button to choose between the three equalizer modes (Clas, Pop and Rock) or to
turn the equalizer function off.
Reset
The RESET button (16) is located on the front of the unit. You should engage the RESET button
only in the following situations:
• After initial installation when all wiring is complete
• If all function buttons become inoperable
• If an error symbol appears on the display
To reset the unit, use a ballpoint pen or a thin metal object to depress the RESET button.
AV In Operation
You can connect another audio/video system to the unit through the AV IN terminals on the back
(AV1 INPUT) or front panel (AV2 INPUT) of the unit. Once the device is connected, press the
MODE button (11) on the front panel or remote control to select “AV IN1” or “AV IN2” mode.
Disc Operation
Stopping Play
• Press the stop button (5) on the front panel or remote control to stop disc play. Press the
button (6) to resume normal playback.
• Press the stop button (5) on the front panel or remote control twice to stop the playback and
return to the initial chapter.
Moving Through Chapters/Tracks
Press the button (4) on the unit or remote control to advance to the next chapter/track.
Press the button (7) on the unit or remote control to move to the previous chapter/track.
Fast Forward/Fast Reverse
Press the button (35) or button (29) on the remote control to fast forward. Keep pressing and
releasing the button to increase the rate from “2X” to “4X”, “6X”, and “8X”. Press the button (6)
to return to regular play. Press and hold to fast-forward to a specific location, then release to begin
playback from that point.
Press the button (34) or button (29) on the remote control to fast reverse. Keep pressing and
releasing the button to increase the rate from “2X” to “4X”, “6X”, and “8X”. Press the button (6) to
return to regular play. Press and hold to fast-reverse to a specific location, then release to begin
playback from that point.
Slow Motion Play
Press the SLOW button (39) on the remote control during play to activate slow motion playback.
Each time the button is pressed, the speed changes as follows.
Bass Press SEL until “BAS” appears in the display. Press the volume buttons to adjust the Bass from +06 to -06.
Treble Press SEL until “TRE” appears in the display. Press the volume buttons to adjust the Treble from +06 to -06.
Balance Press SEL until “BAL” appears in the display. Press the volume buttons to adjust the Balance from 12L to 12R.

9
DV352
• DVD: PLAY > SF 2X > SF 4X > SF 8X > SR 2X > SR 4X > SR 8X > PLAY
• VCD: PLAY > SF 1X > SF 2X > SF 3X > STEP BWD
Pausing Playback
Press the button (6) on the unit or the button on the remote control during playback to
temporarily stop playback. To return to normal playback, press the button again.
Repeating Playback
Press the REPEAT button (20) on the remote control to select the repeat mode as follows:
DVD: CHAPTER REPEAT ON > TITLE REPEAT ON > REPEAT OFF
VCD/CD: REP-ONE > REP-ALL > REPEAT OFF
• Select REP-ONE to continuously repeat the current chapter/track.
• Select REP-ALL to continuously repeat all chapters/tracks on the current disc. After playing
the last chapter/track, the unit will stop and display the elapsed time.
NOTE: The REPEAT feature does not support VCD 2.0 (with PBC ON).
PBC (Play Back Control) (VCD Only)
For VCDs with play back functionality, play back control (PBC) provides additional controls for
VCD playback.
Press the PBC button (38) on remote control to toggle the PBC function “On”/”Off”. Once PBC is
on, playback starts from track one of the play list.
Zooming
The Zoom function allows you to increase the picture size. Press the ZOOM button (26) on the
remote control to toggle from 1.5 scale to 2.0 scale to 3.0 scale. When the scale is 3.0X, press
ZOOM again to cancel the Zoom function.
During Zoom mode, press the arrow (
, , , buttons) (29) or / buttons (34, 35) to move the
picture up, down, left, or right.
Random Play (CD/MP3/VCD Only)
Press the SHUFFLE button (19) on the remote control to select and play tracks in random order.
The display will show “SHUFFLE ON”. Press the button to begin the shuffled playback. Press
the SHUFFLE button again to turn SHUFFLE off.
Sectional Repeat Function (A-B)
Use the A-B function to define a specific area of a disc to repeat.
• Press the A-B button (21) on the remote control to set the start point (ARPT) of the repeated
section.
• Press the A-B button again once you reach the desired end point (BRPT) of the repeated
section. The selected portion of the DVD will now repeat continuously.
• Press the A-B button again to cancel the A-B section setting and stop repeat play.
Goto Search
During DVD or VCD playback, perform the following steps to use the GOTO feature to access a
specific location on a disc:
Title/Chapter Search
1. Press the GOTO button (37) once to search for a specific title/chapter. The following
message appears on the display: TITLE 01/01 CHAPTER 01/10.
2. Use the numeric buttons (36) on the remote control to enter the desired title/chapter number,
then press the OK button (30).
Time Search
1. Press the GOTO button (37) twice to search for a specific time. The following message
appears on the display: TITLE 01/01 TIME -- : --: --.
2. Use the numeric buttons (36) on the remote control to enter the desired title/chapter number,
then press the OK button (30).
PBC On (CD/VCD)
1. Press the GOTO button (37) once to enter the exact time. The following message appears on
the display: GO TO -- : --.
2. Use the numeric buttons (36) on the remote control to enter the time, then press the OK
button (30).
Playing in Programmed Order (CD/MP3/VCD with PBC OFF)
1. With play stopped, press the PROGRAM button (18) and the screen will display “PROGRAM
P00:00”.
2. Press the numeric button(s) (36) on the remote control to play the corresponding track in the
selection order. For example: press 4 to play track 4 first. “PROGRAM P01:04” appears on
the display. Press 6 and “PROGRAM P02:06” appears.
3. If you want to complete program setting, press the button (6) on the unit or the button
on the remote control to play the tracks in programmed order.
4. To stop programming tracks, press the button (5), then press the PROGRAM button to
start the AUTO PLAY function.
On-Screen Display Function
Press the DISPLAY button (17) during playback to display the contents of the current disc on the
screen.
DVD
1. Press DISPLAY for the first time:
TITLE 01/03 CHAPTER 002/025
00:02:25

10
DV352
Title Number, Total Title Number, Chapter Number, Total Chapter Number of this Title of the disc
currently being played will be shown on the screen, along with the elapsed time.
2. Press DISPLAY for the second time:
TITLE REMAIN
01:46:58
3. Press DISPLAY for the third time:
CHAPTER ELAPSED
00:00:24
4. Press DISPLAY for the fourth time:
CHAPTER REMAIN
00:01:39
5. Press DISPLAY for the fifth time to clear the message on the screen.
VCD
1. Press DISPLAY for the first time:
SINGLE ELAPSED
00:00:25
2. Press DISPLAY for the second time:
SINGLE REMAIN
00:03:15
3. Press DISPLAY for the third time to display “OFF” then clear the message on the screen:
OFF
00:00:25
CD
1. Press DISPLAY for the first time:
SINGLE ELAPSED
00:00:25
TRACK: 01/14
2. Press DISPLAY for the second time:
SINGLE REMAIN
00:03:15
TRACK: 01/14
3. Press DISPLAY for the third time:
TOTAL ELAPSED
00:00:25
TRACK: 01/14
4. Press DISPLAY for the fourth time:
TOTAL REMAIN
00:40:35
TRACK: 01/14
5. Press DISPLAY for the fifth time to display “OFF” then clear the message on the screen.
OFF
00:40:35
TRACK: 01/14
MP3
1. Press DISPLAY for the first time:
CHAPTER ELAPSED 00:00:25
2. Press DISPLAY for the second time:
CHAPTER REMAIN 00:04:25
3. Press DISPLAY for the third time to display “OFF” then clear the message on the screen.
OFF
Multi-Language Discs (DVD Only)
Changing Audio Language
If you are watching a disc recorded in multiple languages, press the AUDIO button (31) on the
remote control to choose a language. If no other languages are recorded, is displayed in the top
left corner of the screen.
Changing Subtitle Language
If you are watching a disc recorded in multiple languages with subtitles, press the SUBTITLE
button (22) on the remote control to choose the language in which you would like the subtitles to
appear. If no other languages are available, is displayed in the top left corner of the screen.
NOTE: During VCD playback you can press the AUDIO button (31) on the remote control
during playback to switch the sound between mono and stereo sound in the following
order: MONO LEFT > MONO RIGHT > STEREO.
Menu Function
Press the MENU button (24) on the remote control while the disc is playing to display the disc root
menu. You can navigate with the remote control navigation keys and select a feature with the OK
button (30) on the remote control.
Title Menu Function
If the DVD has multiple titles recorded on the disc, you can select a specific title from the title menu
from which to start playback.

11
DV352
1. Press the TITLE button (32) on the remote control during playback to display the title menu.
2. Select the preferred title using the remote control arrow keys (29) and confirm by pressing the
OK (30) button.
Viewing an Alternate Picture Angle (DVD Only)
Some DVDs contain scenes that have been shot simultaneously from different angles. For discs
recorded with multiple angles, press the ANGLE button (23) on the remote control to toggle
available angles of the on-screen image. If no other angles are recorded, is displayed in the top
left corner of the screen.
Setup Menu
To access the Setup menu, perform the following steps:
1. Press the SETUP button (25) on the remote control to display the “SETUP MENU - - MAIN
PAGE” screen.
2. Select the preferred item using the / buttons (29).
3. Press the OK button (30) on the remote control to display the selected submenu.
From any submenu, select “MAIN PAGE” to return to the “SETUP MENU - - MAIN PAGE” screen.
Select “EXIT SETUP” to close the SETUP MENU.
General Setup
Aspect Ratio
Select the “TV DISPLAY” menu option to select the “NORMAL/PS”, “NORMAL/LB” or “WIDE”
aspect ratio.
• Normal/PS (For 4:3 TV): Image is played back in the PAN SCAN style. (If connected to a
wide-screen TV, the left and right edges are cut off.)
• Normal/LB (For 4:3 TV): Image is played back in letter box style. (If connected to a wide-
screen TV, black bands appear at the top and bottom of the screen.)
SETUP MENU - - MAIN PAGE
GENERAL SETUP
AUDIO SETUP
PREFERENCES
EXIT SETUP
GOTO GENERAL SETUP PAGE
SETUP MENU - - MAIN PAGE
GENERAL SETUP
AUDIO SETUP
PREFERENCES
EXIT SETUP
GOTO GENERAL SETUP PAGE
- - GENERAL PAGE - -
TV DISPLAY
PIC MODE
ANGLE MARK
CAPTIONS
GENERAL SETUP
OSD LANG
MAIN PAGE
SCREEN SAVER
NORMAL/PS
NORMAL/LB
WIDE
T
T

12
DV352
• Wide (For 16:9 TV): Select this option when a wide-screen TV set is connected.
PIC Mode Setup
• Select “AUTO” to allow the player to select the best setting for each disc.
• Select “HI-RES” for the best possible image resolution.
• Select “N-FLICKER” when the image has noise or distortion.
ANGLE MARK Display Setup
When set to ON while a multi-angle DVD disc is playing, the angle mark ( ) appears on the
screen. When set to “OFF”, the mark does not appear.
CAPTIONS Setup
Set the CAPTIONS feature to “ON” to show captions (such as the actor’s dialogue) when a DVD
disc is playing. Set the feature to “OFF” if you do not want captions to appear.
SCR SAVER Setup
Turn the SCR SAVER function “ON” or “OFF”.
OSD LANG Type Setup
Select the preferred OSD (On Screen Display) language using the / buttons (29).
Audio Setup
LPCM OUTPUT
Set the LPCM (Line Pulse Code Modulation) OUTPUT to LPCM 48K or LPCM 96K. The higher the
sampling frequency is, the better the output audio quality.
Preferences
TV TYPE Setup
This player can play discs recorded in either PAL or NTSC format.
• Select “NTSC” when the unit is connected to an NTSC TV.
• Select “PAL” when the unit is connected to a PAL TV.
• Select “AUTO” to allow the player to adjust the format according to the DVD disc format.
AUDIO Language Setup
Select one of the following preferred AUDIO soundtrack options using the the / buttons (29):
ENGLISH, FRENCH, SPANISH, CHINESE, JAPANESE, GERMAN, ITALIAN, PORTUGUESE.
- - AUDIO SETUP - -
LPCM OUTPUT
MAIN PAGE
AUDIO RELATED
LPCM 48K
LPCM 96K
- - PREFERENCES PAGE - -
TV TYPE
AUDIO
SUBTITLE
PARENTAL
SET PREFERENCES
DISC MENU
DEFAULTS
PASSWORD
AUTO
NTSC
PAL
T
T
SMART NAV
BACK TO MAIN PAGE
SMART NAV
LOGO
MAIN PAGE

13
DV352
SUBTITLE Language Setup
Select one of the following preferred SUBTITLE options using the the / buttons (29): ENGLISH,
FRENCH, SPANISH, CHINESE, JAPANESE, GERMAN, ITALIAN, PORTUGUESE.
DISC MENU Language Setup
Select one of the following preferred DISC MENU language options using the the / buttons (29):
ENGLISH, FRENCH, SPANISH, CHINESE, JAPANESE, GERMAN, ITALIAN, PORTUGUESE.
PARENTAL Settings
Select a suitable parental guidance setting using the the / buttons (29), then confirm by
pressing the OK button (30) on the remote control. The parental rating options are as follows: 1 G,
2, 3 PG, 4 PG 13, 5 6 PG-R, 7 NC-17, 8 ADULT, NO_PARENTAL.
PASSWORD Change
To change the password:
1. Select “CHANGE” then press the OK button (30) on the remote control.
2. OLD PASSWORD: Type the old password (the default factory code is 3308).
3. NEW PASSWORD: Key in a 4 character password.
4. CONFIRM PWD: Retype the new password.
5. Press the OK button to confirm and return to the previous menu.
DEFAULTS Reset
Select “RESET” to revert to default (initial) factory settings.
SMART NAV Menu
• Select “WITH MENU” to display the smart navigation menu while playing an MP3 disc. With
this option, you can select a track to play according to the menu hint.
• Select “NO MENU” to play an MP3 directly when inserted.
Custom LOGO
You can use this feature to add a custom logo that will appear on the video screen when the unit is
turned on. To add a custom logo:
1. Select “CUST LOGO” from the LOGO menu.
1. Insert a disc with the logo, in JPEG format, into the disc drive on the DVD player. (NOTE: The
logo must be in the JPEG format.)
2. Select the desired picture, press the
button (6), then press the TITLE button (32). The
current picture is stored in the unit and “LOGO IS COPIED” appears on the screen.
Select “ORIG LOGO” to return the default image.
Disc Symbols and Properties
NOTE: The following types of discs will not play in this unit: DVD-ROM, DVD-RAM, CDV,
CD-G. DVD-R discs WILL play in this unit.
Table 1: Disc Properties
Symbol 12cm Disc Properties Max Play Time
Single side single layer (DVD-5)
Single side double layer (DVD-9)
Double side single layer (DVD-10)
Double side double layer (DVD-18)
(MPEG 2 Method)
133 minutes
242 minutes
266 minutes
484 minutes
Single side single layer (Video CD)
(MPEG 1 Method)
74 minutes
Single side single layer 74 minutes
Single side single layer 74 minutes
Table 2: DVD Disc Symbols
Symbol Meaning
Number of voice languages recorded. The number inside the icon indicates the number lan-
guages on the disc (maximum of 8).
Number of subtitle languages available on the disc (maximum of 32).
Number of angles provided (maximum of 9).
Aspect ratios available. “LB” stands for Letter Box and “PS” stands for Pan/Scan. In the
example on the left, the 16:9 video can be converted to Letter Box video.
Indicates the region code where the disc can be played.
• Region 1: USA, Canada, East Pacific Ocean Islands
• Region 2: Japan, Western Europe, Northern Europe, Egypt, South Africa, Middle East
• Region 3: Taiwan, Hong Kong, South Korea, Thailand, Indonesia, South-East Asia
• Region 4: Australia, New Zealand, Middle and South America, South Pacific Ocean
Islands/Oceania
• Region 5: Russia, Mongolia, India, Middle Asia, Eastern Europe, North Korea, North
Africa, North-West Asia
• Region 6: Mainland China
• ALL: All regions

14
DV352
TROUBLESHOOTING
Care and Maintenance
• Use only a clean silicone cloth and neutral detergent to clean the front panel or monitor. A
rough cloth and non-neutral detergent (such as alcohol) may result in scratching or discolora-
tion.
• Do not get water or cleaning fluids on the unit.
• If the temperature inside the player gets too hot, a protective circuit automatically stops play
of the disc. If this occurs, allow the unit to cool before operating the player again.
• Never insert anything other than a 5” (12 cm) compact disc into the player as the mechanism
can be damaged by foreign objects.
• Do not attempt to use a 3” (8 cm) CD-Single disc in this unit, either with or without an adaptor,
as damage to the player and/or disc may occur. Such damage is not covered by the Warranty
on this product.
• The ventilation should not be impeded by covering the ventilation openings with items such
as newspapers, table-cloths, curtains, etc.
• The DVD player may not operate properly in extreme hot or cold. If such conditions occur,
allow the interior of the vehicle to reach a normal temperature before using player.
• When the vehicle warms up during cold weather or under damp conditions, condensation
may appear on the LCD panel. Should this occur, the screen will not operate properly until the
moisture has evaporated.
• We suggest you use a cleaning disc in this unit more frequently than in the unit in your home
due to the environmental conditions of the vehicle.
Problem Cause Corrective Action
Unit will not power on Radio Fuse blown Install new fuse with correct rating
Car battery fuse blown Install new fuse with correct rating
Illegal operation Press the RESET button located in the bottom right corner of the front panel
Remote control does not function Battery depleted Replace battery with new one
Battery installed incorrectly Remove battery and install correctly
Poor sound quality or distortion Pirated disc is in use Use original copy
Unit resets itself when engine is off Incorrect connection between ACC and positive battery
wire
Check wiring and correct
Cannot insert disc Disc already inside unit Eject current disc and insert new one
Disc does not play back Disc is warped or scratched Use disc in good condition
Disc is dirty or wet Clean disc with soft cloth
Laser pickup is dirty Clean laser pickup with cleaning disc
Incompatible disc is used Use compatible disc
Disc region code is not compatible with unit Use disc with proper region code
Disc is inserted upside down Insert disc with label side up
Image blurred, distorted, or dark Disc is illegally copied Use original disc
PBC cannot be used during VCD playback PBC is not available on the disc
No repeat or searching while playing VCD PBC is on Turn PBC off

15
DV352
Specifications
Supply Voltage: 12V DC (11V-15V), test voltage 14.4V, negative ground
Current Consumption: Less than 2A
Signal System: Composite video 1.0Vp-p 75Ù
Discs Played:
1. DVD-VIDEO disc
• 5” (12 cm) single-sided, single-layer
• 5” (12 cm) single-sided, double-layer
2. Compact disc (CD-DA/CD-R/CD-RW/MP3)
3. 5” (12 cm) VIDEO CD
Audio Output Level: 10kÙ (2 ch 2.0 Vrms)
Audio Signal Output:
• Frequency response: 20Hz~20kHz
• S/N ratio: 80dB(JIS)
• Wow and Flutter below measurable limits
Limited Warranty
90 Day / 12 Month Limited Warranty
AUDIOVOX SPECIALIZED APPLICATIONS, LLC (the Company) warrants to the original retail
purchaser of this product that should this product or any part thereof, under normal use and
conditions, be proven defective in material or workmanship within 90 days from the date of original
purchase, such defect(s) will be repaired or replaced (at the Company's option) without charge for
parts and repair labor. After the initial 90 day period and for a period of 12 months from the date of
the original purchase, the Company will supply at no charge a replacement for any defective
part(s).
To obtain repair or replacement within the terms of this warranty, the end user should contact the
O.E.M. The product is to be delivered to the OEM or original place of purchase, with proof of
warranty coverage (e.g. dated bill of sale, and serial number of the unit, and vin#), specification of
defect(s), transportation prepaid, to an approved warranty station. This warranty does not extend
to the elimination of externally generated static or noise, to the correction of antenna problems, to
costs incurred for removal or reinstallation of the product, or to damage to any tapes, cd's, dvd's,
speakers, accessories, or electrical systems. This warranty does not apply to any product or part
thereof which, in the opinion of the Company, has been damaged through alteration, improper
installation, mishandling, misuse, neglect, or accident. THE EXTENT OF THE COMPANY'S
LIABILITY UNDER THIS WARRANTY IS LIMITED TO THE REPAIR OR REPLACEMENT
PROVIDED ABOVE, AND, IN NO EVENT, SHALL THE COMPANY'S LIABILITY EXCEED THE
PURCHASE PRICE PAID BY THE PURCHASER FOR THE PRODUCT.
This warranty is in lieu of all other express warranties or liabilities. ANY IMPLIED WARRANTIES,
INCLUDING ANY IMPLIED WARRANTY OF MERCHANTABILITY, SHALL BE LIMITED TO THE
DURATION OF THIS WARRANTY. ANY ACTION FOR BREECH OF ANY WARRANTY
HEREUNDER INCLUDING ANY IMPLIED WARRANTY OF MERCHANTABILITY MUST BE
BROUGHT WITHIN A PERIOD OF 30 DAYS FROM THE DATE OF ORIGINAL PURCHASE. IN
NO CASE SHALL THE COMPANY BE LIABLE FOR ANY CONSEQUENTIAL OR INCIDENTAL
DAMAGES FOR BREECH OF THIS OR ANY OTHER WARRANTY, EXPRESS OR IMPLIED
WHATSOEVER. No person or representative is authorized to assume for the Company any
liability other that expressed herein in connection with the sale of this product.
Some states do not allow limitations on how long an implied warranty lasts or the exclusion or
limitation of incidental or consequential damages so the above limitations or exclusions may not
apply to you. This warranty gives you specific legal rights and you may also have other rights
which vary from state to state.
-
 1
1
-
 2
2
-
 3
3
-
 4
4
-
 5
5
-
 6
6
-
 7
7
-
 8
8
-
 9
9
-
 10
10
-
 11
11
-
 12
12
-
 13
13
-
 14
14
-
 15
15


ASA Electronics DV352 User manual
- Category
- CD players
- Type
- User manual
Ask a question and I''ll find the answer in the document
Finding information in a document is now easier with AI
Related papers
Other documents
-
Jensen VOD85 - DVD Player With LCD Monitor User manual
-
 PYLE Audio PLDVD92 User manual
-
 PYLE Audio PLTVD7P User manual
-
 PYLE Audio Car Video System PLTVD5P User manual
-
Rosen CS300DVD Owner's manual
-
 PYLE Audio PLDVD140 User manual
-
 PYLE Audio PLDVD130 User manual
-
 PYLE Audio PLDVD65IN User manual
-
 PYLE Audio PLMDR7 User manual
-
Radio Shack PLRDVD7 User manual


