ZeeVee ZyPerMX User manual
- Category
- Supplementary music equipment
- Type
- User manual

User Manual
January 2019
ZyPerMX
Video Encoder

ii
Important Safety Instructions. Save These Instructions.
WARNING: When using electronic products, basic precautions should always be followed,
including:
1. Keep these instructions.
2. Heed all warnings.
3. Follow all instructions.
4. Do not use this apparatus near water.
5. Clean only with a dry cloth.
6. Do not block any ventilation openings. Install in accordance with the manufacturer’s instructions.
7. Do not install or place this product near any heat sources such as radiators, heat registers, stoves,
or other apparatus (including ampliers) that produce heat.
8. Do not defeat the safety purpose of the polarized or grounding-type plug. A polarized plug has two
blades with one wider than the other. A grounding type plug has two blades and a third grounding
prong. The wide blade or the third prong are provided for your safety. If the provided plug does not
t into your outlet, consult an electrician for replacement of the obsolete outlet.
9. Power cord must be accessible to allow fro the removal of the power from the unit.
10. Protect the power cord from being walked on or pinched, particularly at plugs,
convenience receptacles, and the point where they exit from the apparatus.
11. Unplug this apparatus during lightning storms or when unused for long periods of time.
12. Only use attachments/accessories specied by the manufacturer.
13. Refer all servicing to qualied service personnel. Servicing is required when the
apparatus has been damaged in any way, such as power-supply cord or plug is
damaged, liquid has been spilled or objects have fallen into the apparatus,
the apparatus has been exposed to rain or moisture, does not operate normally,
or has been dropped.
14. WARNING: To reduce the risk of re or electric shock do not place this apparatus in a position
where it is exposed to dripping or splashing liquids, rain, moisture, or excessively high humidity.
Objects containing liquid shall not be placed in proximity to the unit such that they present a risk of
spillage onto the apparatus.
FCC Compliance and Advisory Statement: This hardware device complies with Part 15 of the FCC
rules. Operation is subject to the following two conditions: 1) this device may not cause harmful interfer-
ence, and 2) this device must accept any interference received including interference that may cause
undesired operation. This equipment has been tested and found to comply with the limits for a Class A
digital device, pursuant to Part 15 of the FCC Rules. These limits are designed to provide reasonable
protection against harmful interference in a commercial installation. This equipment generates, uses,
and can radiate radio frequency energy and, if not installed or used in accordance with the instruc-
tions, may cause harmful interference to radio communications. However there is no guarantee that
interference will not occur in a particular installation. If this equipment does cause harmful interference
to radio or television reception, which can be determined by turning the equipment off and on, the user
is encouraged to try to correct the interference by one or more of the following measures: 1) reorient or
relocate the receiving antenna; 2) increase the separation between the equipment and the receiver; 3)
connect the equipment to an outlet on a circuit different from that to which the receiver is connected; 4)
consult the dealer or an experienced radio/TV technician for help. Any changes or modications not ex-
pressly approved by the party responsible for compliance could void the user’s authority to operate the
equipment. Where shielded interface cables have been provided with the product or specied additional
components or accessories elsewhere dened to be used with the installation of the product, they must
be used in order to ensure compliance with FCC regulations.
INSTRUCTIONS PERTAINING TO A RISK OF FIRE, ELECTRIC SHOCK, OR INJURY TO PERSONS
Safety Instructions
FCC Statement

Features
● Input: One standard HDMI 1.3 input
○ Resolutions from common Standard Denition, through all resolutions including 1080p60, up
to and including1920x1200 @ 60Hz.
● Standards-based H.264/MPEG-4 AVC video compression.
○ High-prole H.264/MPEG-4 AVC compression standard in real-time.
○ Adjustable video bandwidth targets from 2 Mbps through 20 Mbps.
○ Assignable Program Number and Short Channel Name inserted in encoded stream.
○ Output resolution can track input resolution, or be xed at a static size.
● Audio input as component of HDMI input.
○ LPCM, AAC, MPEG1 Layer 2 inputs formats all supported.
○ Fixed programmable data rate LPCM supported.
○ Variable AAC audio compression supported.
● Output: one standard 10/100/1000Base-T Ethernet port.
● Output stream can be set to UDP or RTP using either unicast or multicast addressing.
● UDP video stream can be decoded by any number of Ethernet attached output devices.
○ PC / Mac, VLC, IP Set Top Box, IPSTB-enabled television, or custom appliance.
● Maestro Web GUI browser management of unit.
● Custom, downloadable idle screen for active display when no input is present.
● Bonjour protocol supported for automatic discovery of ZyPerMX on network.
● Power-over-Ethernet (PoE) supported allowing for ZyPerMX to be powered by an appropriately
capable switch or power injector.
● Software upgradable through the Maestro web management application.
● Rack-mountable 1U, half rack width metal enclosure input/output resolutions up to 1080p and
1920 x 1200 @ 60 Hz
iii
Features and Package Contents
What’s In The Box
Here’s what you can expect to nd when you open the package:
1 x ZyPerMX
1 x Power Adapter
2 x Mounting Ears

Table of Contents
1 Getting Started
Panel Descriptions ................................................................................................1
Front View .....................................................................................................1
Rear View ......................................................................................................1
Installation .............................................................................................................2
Basic Connections .........................................................................................2
Connecting to the ZyPerMX .........................................................................2
Using Bonjour Discovery ..............................................................................2
Sample Application Diagram ........................................................................3
2 Basic Operation
The Maestro Web Interface ..................................................................................4
Logging In ......................................................................................................4
Network Conguration..................................................................................5
IP Stream Conguration ...............................................................................7
Adjusting Audio and Video Settings ..........................................................10
Displaying Device Information ...................................................................13
Changing the Device Name ........................................................................14
Resetting the ZyPerMX ...............................................................................15
Rebooting the ZyPerMX .............................................................................16
Setting the Password .................................................................................. 17
Recovering a Lost Password ......................................................................18
Updating the Firmware ...............................................................................19
Using Custom Screens and Icons ..............................................................20
The Support Page .......................................................................................22
3 Appendix
Specications ......................................................................................................25
FAQ ......................................................................................................................27
Warranty ..............................................................................................................29
iv

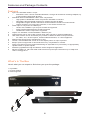
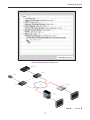
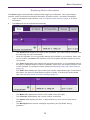
Panel Descriptions
Front View
ID Name Description
1 POWER This LED indicator glows bright blue when
the ZyPerMX is powered.
2 STATUS This LED glows bright blue when the
System Boot Process is complete and the
ZyPerMX unit is functioning normally.
High Performance
Video Encoder
IP Streaming Output
ZyPerMX
POWER STATUS
High Performance
Video Encoder
IP Streaming Output
ZyPerMX
POWER
MEDIA INPUT
HDMI In
up to 1080p
+12VDC 1.0A
reset
Ethernet (POE)
10/100/1000
TRANSPORT
1
2
1
1 Getting Started
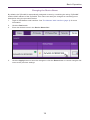
Rear View
ID Name Description
1 POWER Connect the included 12V DC power
supply to this power receptacle.
2 Reset Press and hold this button for
approximately 5 seconds, then release,
to reset the ZyPerMX encoder to
factory-default settings. See Resetting
the ZyPerMX (page 15) for more
iniformation.
3 HDMI In Connect an HDMI cable from this port to
the HD video source.
4 TRANSPORT Connect an Ethernet cable from this port to
a switch on the Local Area Network.
High Performance
Video Encoder
IP Streaming Output
ZyPerMX
POWER STATUS
High Performance
Video Encoder
IP Streaming Output
ZyPerMX
POWER
MEDIA INPUT
HDMI In
up to 1080p
+12VDC 1.0A
reset
Ethernet (POE)
10/100/1000
TRANSPORT
1
32 4

Getting Started
2
Installation
Basic Connections
1. Connect an HDMI cable from the HDMI In port on the ZyPerMX to an HD video source.
2. Connect an Ethernet cable from the TRANSPORT connector, on the rear panel of the
ZyPerMX, to a LAN or directly to the PC.
3. Connect the included 12 V DC power supply to the POWER connector on the rear panel of
the ZyPerMX.
Connecting to the ZyPerMX
By default, each ZyPerMX encoder uses a static IP address of 192.168.1.10. In order to
connect to the unit, and depending upon your network setup, it may be necessary to adjust the IP
settings of the computer so that it can connect to the ZyPerMX.
For example, if the computer being used to connect to the ZyPerMX has an IP address of
10.5.64.223, then it will not be able to connect because 192.168.1.10 is within a different
subnet. In order to connect to the ZyPerMX, temporarily change the IP address of the computer
to something like 192.168.1.x, where x can be any number except 10.
Once the computer is recongured, launch a browser, and enter the IP address of
192.168.1.10 in the address bar to display the ZyPerMX Maestro web interface.
See Logging In (page 4) for more information on logging in to the Maestro web interface.
See Network Conguration (page 5) for details on setting DHCP and static IP addresses.
Using Bonjour Discovery
The Bonjour zero-conguration (zeroconf) service provides a simple method for automatically
detecting and displaying services and devices on a Local Area Network.
This service can be used on both OS X and Windows platforms.
1. Download a Bonjour browsing application.
2. Launch the Bonjour application. The example below shows the Bonjour Browser
for OS X.
3. Click the Workgroup Manager section to expand it.
4. Each ZyPerMX device will be displayed, along with the MAC address.
5. Click the arrow next to the ZyPerMX unit to expand it and display the IP address.
6. Launch a web browser, and enter the IP address of the ZyPerMX unit to display the
ZyPerMX Maestro web interface.
7. See Logging In (page 4) for more information on logging in to the Maestro web interface.

3
Getting Started
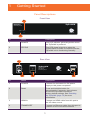
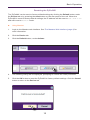
Sample Application Diagram
HDMI Ethernet
Set Top Box
Computer
ZyperMX
ZyperMX
Bluray Player
Camera
LAN

4
2 Basic Operation
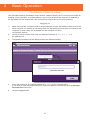
The Maestro Web Interface
The ZyPerMX features the Maestro web interface. Maestro allows you to control and manage all
features of the ZyPerMX. To access Maestro, open a web browser and enter the IP address of
the ZyPerMX into the address bar. We recommend using Firefox or Chrome browsers.
Logging In
1. Make sure that the computer used to access Maestro and the ZyPerMX encoder are on the
same network. If a network is not being used, the ZyPerMX can be directly connected to the
computer. In both cases, the ZyPerMX and the computer must be
on the same subnet.
2. Launch the web browser and enter the default IP address of 192.168.1.10 in
the address bar.
3. The Maestro interface will be displayed with the password dialog.
4. Enter the password. The default password is admin and is case-sensitive.
If you wish to have the password stored, next time Maestro is launched, click the Remem-
ber Password check box.
5. Click the Login button.

5
Basic Operation
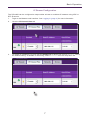
Network Conguration
1. Login to the Maestro web interface. See the previous page for more information.
2. Click the Network tab.
3. The current network settings will be displayed.
4. Click the drop-down list, under Addr Type, to select the desired network mode.
The default setting for Addr Type is Static and uses an IP address of 192.168.1.10.
Once the ZyPerMX is aproperly congured, click the “lightbulb” icon, at any
time, to physically identify the ZyPerMX on the network. This will cause the
Status LED indicator on the front panel to ash rapidly for about 10 seconds.

6
Basic Operation
5. Locate the Addr Type eld:
► If this eld is set to DHCP, then all network parameters are assigned
automatically, providing there is a DHCP server connected to the network.
► If the Addr Type is set to Static, then follow steps 6 - 9.
6. Enter the IP address in the IP Address eld. When a value is changed, within a eld, a green
check mark will appear next to the eld.
7. Enter the subnet mask in the Mask eld.
8. Enter the gateway address in the Gateway eld.
9. Click the Apply button to commit the changes. To discard recent changes, click the Reset
button.

7
Basic Operation
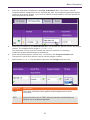
IP Stream Conguration
The ZyPerMX can be congured to output either unicast or multicast IP streams using UDP or
RTP protocols.
1. Login to the Maestro web interface. See Logging In (page 4) for more information.
2. Click the IP Channel Plan tab.
3. To enable IP streaming, be sure that the Enabled drop-down box is set to Enable. This is
the default setting. To disable IP streaming, select Disable from the drop-down list.

8
Basic Operation
4. Enter the destination IP address in the Dest. IP Address eld. If you enter a valid IP
multicast address (range 224.0.0.0 to 239.255.255.255), any endpoint registered with that
multicast receives the stream. If you enter a valid IP unicast address, only that specic ad-
dress receives the IP stream.
5. Enter the port number in the Dest. IP Port eld. The arrows can also be used to set the port
number. The supported port range is 1025 to 65534.
The destination IP port must not conict with other IP protocols. If necessary,
contact the System Administrator for assistance.
6. Enter the desired program number from 1 to 65535 in the Program Number eld.
The spinner controls may also be used to set the program number.
7. Select either UDP or RTP for the stream type from the TS Type drop-down list.
TS Type Description
UDP Uses less overhead; lacks packet acknowledgement or error
correction.
RTP Protocol built on top of UDP; delivers real-time multimedia and
detects out of sequence packets.

9
Basic Operation
8. Enter a description of the content in the Short Name eld. Often, the viewing client will
display the short channel name when tuning to different streams. The short name cannot
exceed 60 characters in length. Letters, numbers, and spaces are permitted.
9. Enter a description of the content in the Long Name eld. The long name cannot exceed 60
characters in length. Letters, numbers, and spaces are permitted.
10. Click the Output Resolution drop-down list to select the desired output resolution.
The following resolutions are supported:
Note that if Auto is selected, the resolution of the encoded output stream will match the
resolution of the input video stream.
11. Click the Apply button to save the changes or click the Reset button to discard any
changes.

10
Basic Operation
Adjusting Audio and Video Settings
The ZyperMX Video Encoder employs Variable Bit Rate (VBR) encoding when transmitting IP
streams. Specifying the “target” and “maximum” bit rate for both audio and video will dene the
limits of IP stream transmission, without overloading the network bandwidth.
1. Login to the Maestro web interface. See Logging In (page 4) for more information.
2. Click the AV Encode tab.
3. Click the Video Mode drop-down list to select the video mode. Test can be used to evalu-
ate different HDMI video sources. However, in production environments, make sure that the
Video Mode is set to Normal.
4. Enter the desired “target” video bit rate (in kilobits per second) in the Target Video
Bitrate eld. The spinner controls can also be used to set the value. The supported range is
from 2000 to 30000.

11
The Target Video Bitrate denes the bit rate at which you want the ZyPerMX to try
and use, as a relative average.
Both STB and PC devices will vary in their ability to handle different bit rates. The ZyPer
MXe STB will handle approximately 8000 kilobits / second. Laptops can handle anywhere
from 2000 kilobits / second to a 10000 kilobits / second. It is recommended to set this value
to 6000. The value can then be adjusted depending upon the capability of the endpoint.
5. Click the Audio Encode drop-down list and select the audio encoding method.
Type Description
LPCM LPCM is a two-channel uncompressed (“lossless”) audio format
and should be used when bandwidth is not limited at the STB or PC
endpoint. Multichannel HDMI audio is downmixed to two-channel
audio.
AAC AAC is a multichannel compressed (“lossy”) audio format that should
be used when multichannel HDMI audio is desired on the decoder
endpoint. Due to the lower bandwidth required by AAC, this may be
a better choice in bandwidth limited systems.
6. Click the Target Audio Bitrate drop-down list and select the desired “target”
audio bit rate.
The Target Audio Bitrate denes the audio bit rate at which you want the ZyPerMX
to try and use, as a relative average.
The default setting is 240 kilobits/sec which provides broadcast-quality IP streams
and is more than acceptable for most STB and PC devices. The Target Audio Bitrate
should only be reduced when a minimal audio stream is required.
In most cases, this will not be necessary.
Basic Operation

12
Basic Operation
7. Click the Apply button to save the changes or click the Reset button to discard
any changes.

Displaying Device Information
The Status page is automatically displayed after logging in to Maestro. This page displays
network, video and audio input/output information, rmware version, and status messages.
1. Login to the Maestro web interface. See The Maestro Web Interface (page 4) for more
information.
2. The Status tab will be selected automatically.
• The System eld displays the name of the ZyPerMX. This name can be changed. See
the next page for more information.
• Click the “lightbulb” icon to physically identify the ZyPerMX on the network. When this
icon is clicked, the Status LED indicator on the front panel will ash rapidly for about
10 seconds.
• The Video eld displays the video input and output resolution. In the illustration above,
the input is 1080p60 and the output is 1080p60. Video input and output resolution can-
not be changed. To change the video bitrate see Adjusting Audio and Video Settings
(page 15).
• The Audio eld displays the input audio type and the output audio type. In the illustra-
tion above, the input is LPCM and the output is LPCM. To change the output audio
type, see Adjusting Audio and Video Settings (page 10).
•
•
•
•
• The Model eld displays the name of the model of the ZyPerMX.
• The Firmware eld displays the current version of rmware.
• The Uptime eld displays the time, in days and hours, since the unit was last re-
booted.
• The Messages eld receives messages reported by the ZyPerMX, during
operation.
13
Basic Operation

Changing the Device Name
By default, the ZyPerMX is automatically assigned a name by combining the string “ZyPerMX”
and the MAC address of the ZyPerMX. This name can easily be changed to something more
descriptive using the procedure below.
1. Login to the Maestro web interface. See The Maestro Web Interface (page 4) for more
information.
2. Click the Device tab.
3. Enter the desired name in the Device Name eld.
4. Click the Apply button to save the changes or click the Reset button to cancel changes and
revert to the previous settings.
14
Basic Operation

15
Basic Operation
Resetting the ZyPerMX
The ZyPerMX can be reset to factory-default settings by clicking the Default button under
the Device tab or by pressing the reset button on the rear panel of the unit. When the
ZyPerMX is reset to factory-default settings, the IP address will be reset to 192.168.1.10
and will be set to Static mode.
► Using Maestro
1. Login to the Maestro web interface. See The Maestro Web Interface (page 4) for
more information.
2. Click the Device tab.
3. Click the Default button, under Actions.
4. The following dialog will be displayed, prompting to conrm the reset procedure.
5. Click the OK button to reset the ZyPerMX to factory-default settings. Click the Cancel
button to return to the Device tab.

16
Basic Operation
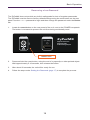
► Using the reset button
1. Locate the reset button on the rear panel of the unit, next to the POWER receptacle.
The button is recessed to prevent the unit from being accidentally reset.
2. Press and hold the reset button, using the end of a paperclip or other pointed object.
Wait approximately 5-10 seconds, then release the button.
3. After about 60 seconds, the unit will be ready for use.
Rebooting the ZyPerMX
The ZyPerMX can be rebooted using Maestro Rebooting the unit does not reset the
ZyPerMX to factory-default settings.
1. Login to the Maestro web interface. See The Maestro Web Interface (page 4) for
more information.
2. Click the Device tab.
3. Click the Reboot button, under Actions.
High Performance
Video Encoder
IP Streaming Output
ZyPerMX
POWER STATUS
High Performance
Video Encoder
IP Streaming Output
ZyPerMX
POWER
MEDIA INPUT
HDMI In
up to 1080p
+12VDC 1.0A
reset
Ethernet (POE)
10/100/1000
TRANSPORT
reset button
Page is loading ...
Page is loading ...
Page is loading ...
Page is loading ...
Page is loading ...
Page is loading ...
Page is loading ...
Page is loading ...
Page is loading ...
Page is loading ...
Page is loading ...
Page is loading ...
Page is loading ...
Page is loading ...
Page is loading ...
-
 1
1
-
 2
2
-
 3
3
-
 4
4
-
 5
5
-
 6
6
-
 7
7
-
 8
8
-
 9
9
-
 10
10
-
 11
11
-
 12
12
-
 13
13
-
 14
14
-
 15
15
-
 16
16
-
 17
17
-
 18
18
-
 19
19
-
 20
20
-
 21
21
-
 22
22
-
 23
23
-
 24
24
-
 25
25
-
 26
26
-
 27
27
-
 28
28
-
 29
29
-
 30
30
-
 31
31
-
 32
32
-
 33
33
-
 34
34
-
 35
35


ZeeVee ZyPerMX User manual
- Category
- Supplementary music equipment
- Type
- User manual
Ask a question and I''ll find the answer in the document
Finding information in a document is now easier with AI
Related papers
-
ZeeVee ZyPerMX4 User manual
-
-
-
-
-
-
-
-
-
Other documents
-
 epiphan Networked VGA Grid User manual
-
Clear-Com Production Maestro Pro Quick start guide
-
Atlona AT-OMNI-512 Owner's manual
-
 TBS TBS2603SE NDI Quick Start
-
Epiphan Video Standalone VGA Grid User guide
-
Atlona AT-OMNI-521 Owner's manual
-
-
-
Sencore OmniHub 6/16 User manual
-

