Page is loading ...

Before operating your vacuum cleaner,
please read these instructions completely.
Avant d’utiliser l’appareil, il est recommandé
de lire attentivement ce manuel.
Antes de usar su aspiradora, lea
completamente estas instrucciones por favor.
Operating Instructions
Manuel d’utilisation
Instrucciones de operación
COMMERCIAL VACUUM CLEANER
Aspirateur commercial
Commercial aspiradora
MC-V413
Printed in Mexico
ACØ1ZCWVZØØØ Imprimé au Mexique
CØ1ZCWVØØØØØ
Impreso en Mexico
PANASONIC CONSUMER ELECTRONICS COMPANY
DIVISION OF PANASONIC CORPORATION OF NORTH AMERICA
One Panasonic Way
Secaucus, New Jersey 07094
World Wide Web Address
http://www.panasonic.com
If your Panasonic Vacuum Cleaner needs service, look in the yellow pages of the telephone book under
HOME APPLIANCE SERVICE for your nearest Panasonic Services Company (“PASC”) Factory Servicenter,
or PASC authorized Servicenter, or call, 1-800-211-PANA (7262) toll free to find a convenient servicenter. DO
NOT send the product to the Executive or Regional Sales offices.They are NOT equipped to make repairs.
If you ship the product
Carefully pack and send it prepaid, adequately insured and preferably in the original carton. Attach a
postage-paid letter to the outside of the carton, which contains a description of your complaint. DO NO
T
send the product to the Executive or Regional Sales Offices.They are NOT equipped to make repairs.
Cuando necesita servicio
WHAT TO DO WHEN SERVICE IS NEEDED
Si su aspiradora Panasonic necesita servicio, busque el Centro de Servicio Panasonic o un Centro de Servicio
PASC autorizado más cercano bajo "Servicio de Eléctrodomésticos" en las páginas amarillas de la guía de
teléfonos o llame gratis al 1-800-211-PANA (7262) para encontrar un centro de servicio conveniente. No mande el
producto a las Executive o Regional Sales Offices.No están equipadas para arreglar estos productos.
Si manda el producto
Empaquete con cuidado en el cartón original si posible y mándelo prepagado y con seguro suficiente. Ponga una
carta con sellos en la que describe su problema con el producto en el exterior del cartón. No mande el producto a
las Executive o Regional Sales Offices.No están equipadas para arreglar estos productos.
WARRANTY SERVICE
For product operation and information assistance, please contact your Dealer or our Customer Care Centre at:
Telephone #: (905) 624-5505 Fax #: (905) 238-2360 Web: www.panasonic.ca
For product repairs, please contact one of the following:
• Your Dealer who will inform you of an authorized Servicentre nearest you.
• Our Customer Care Centre at (905) 624-5505 or www.panasonic.ca
• A Panasonic Factory Servicentre listed on warranty page.
RÉPARATION SOUS GARANTIE
Pour de l'aide sur le fonctionnement de l'appareil ou pour toute demande d'information, veuillez contacter votre détaillant
ou notre service à la clientèle au :
N° de téléphone : (905) 624-5505 N° de télécopieur : (905) 238-2360 Site Internet : www.panasonic.ca
Pour la réparation des appareils, veuillez consulter :
• votre détaillant, lequel pourra vous renseigner sur le centre de service agréé le plus près de votre domicile ;
• notre service à la clientèle au (905) 624-5505 ou www.panasonic.ca ;
• un de nos centres de service indiqué sur la page de garantie.
What to do when service is needed
Service après-vente
(Canada)
PANAMEX COMPANY
DIVISION OF PANASONIC CORPORATION OF NORTH AMERICA
One Panasonic Way
Secaucus, New Jersey 07094
World Wide Web Address
http://www.panasonic.com
- 48 -

- 47 -
Notes, Remarques,
Notas
Please read IMPORTANT SAFETY INSTRUCTIONS on page 5 before
use. Read and understand all instructions.
TO OUR VALUED CUSTOMER
We are very pleased to welcome you to the Panasonic family of products.Thank you for
purchasing this product. Our intent is that you become one of our many satisfied customers.
Proper assembly and safe use of your vacuum cleaner are your responsibilities.Your vacuum
cleaner is intended only for commercial use.The cleaner should be stored in a dry, indoor
area. Read the Operating Instructions carefully for important use and safety information.
Special care is required when vacuuming certain types of carpet or floor covering. Al
ways
check the carpet or floor covering manufacturer's recommended cleaning instructions before
vacuuming.
PLEASE PAY CLOSE ATTENTION TO ALL
WARNING AND CAUTION STATEMENTS.
CONSUMER INFORMATION
© 2005 Panasonic Home Appliances of America
Division of Panasonic Corporation of North America. All rights reserved.
WARNING
TO AVOID ELECTRICAL SHOCK
Never vacuum damp or wet surfaces or liquids.
DO NOT store machine outdoors.
Replace worn or frayed power cord immediately.
Unplug from outlet when not in use and before servicing.
TO AVOID ACCIDENTS
Except for hand-held cleaners, keep machine on floor - not chairs, tables, steps, stairs, etc.
Store machine promptly after each use to prevent accidents such as tripping over power cord or machine.
Use machine and accessories only in a manner intended by the manufacturer.
The use of an extension cord is not recommended.
WARNING
WARNING statements are designed to alert you to the
possibility of personal injury, loss of human life, and/or
damage to the vacuum cleaner and/or personal
property if the instructions given are not followed.
CAUTION statements are designed to alert you to the
possibility of damage to the vacuum cleaner and/or
personal property if the instructions given are not
followed.
CAUTION
- 2 -

- 5 -- 44 -
Garantía
La garantía límite de la aspiradora
comercial Panasonic
Panasonic Home and Commercial Products Company (referido como garante) arreglará
este producto gratis con las piezas nuevas o restauradas en los Estados Unidos o en
Puerto Rico por un (1) año de la fecha de compra original en caso de un defecto en las
materias o en el montaje del producto.
Esta garantía límite e
xcluye ambos el labor y las piezas para lo siguiente: las bol-
sas para polvo, los filtros, las correas, las bombillas, los cepillos para agitador, y las
pilas (si están incluídas).
En los Estados Unidos puede llevar o mandar este producto por correo para darle servi-
cio durante el período de garantía. Consulte el Servicenter Directory para un Panasonic
Services Company (PASC) Factory Servicenter o llame al 1-888-350-9590, o póngase
en contacro con su distribudor vendedor. En Puerto Rico puede llevar o mandar por
correo este producto durante el período de garantía por llamar al número de teléfono
local de la Panasonic Sales Company en el Servicenter Directory.
Se ofrece únicamente la garantía al comprador original. Se necesitan el recibo de com-
pra u otra prueba de la fecha de compra para obtener asistencia incluída en la garantía.
Esta garantía incluye únicamente los defectos en materias o en el montaje que ocurre
durante el uso normal y no incluye los daños causados por transporte o problemas que
son causados por los productos que no son Panasonic o problemas que resultan en los
accidentes, el mal uso, el abuso el descuido, manejo malo, la aplicación mala,
alteración, modificación de este producto, la sobretensión en la corriente eléctrica, el
voltaje inadecuado, daño resultado por los rayos, o el arreglado por alguien que no está
autorizado por Panasonic, o los daños resultados por los actos de Dios.
Límites y e
xclusiones:
No hay garantías espresadas excepto las descritas arriba. El garante no será respons-
able de los daños incidentales o consiguientes resultados del uso de este producto o
violación de esta garantía.Todas las garantías expresadas o implícitas incluso las
garantías de comercio y del propósito particular están limitadas por el período de
garantía descrito arriba.
Algunos estados no permiten el límite o la exclusión de daños incidentales o consigu-
ientes ni límite del tiempo de la garantía por eso los límites o exclusiones descritos arri-
ba no le son aplicables a usted.
Esta garantía le da ciertos derechos legales y es posible que usted tenga otros dere-
chos que varían de estado a estado. Si un problema con este problema ocurre durante
o después del período de la garantía, puede informarse en su tienda o a su Centro de
Servicio. Si el problema no se resuelve a su satisfacción, escriba al Customer
Satisfaction Center en la dirección incluída en la última página de este manual.
When using your vacuum cleaner, basic precautions should always be followed,
including the following:
Read all instructions in this manual before assembling or using your vacuum cleaner.
WARNING
To reduce the risk of fire, electrical shock, injury:
To reduce the risk of fire, electrical shock, injury:
1. DO NOT leave vacuum cleaner when plugged in. Unplug from outlet when not
in use and before servicing.
2. To reduce the risk of fire or electric shock - DO NOT use outdoors or on wet
surfaces.
3. DO NOT allow to be used as a toy. Close attention is necessary when used
by or near children.
4. Use only as described in this manual. Use only manufacturer's recommended
tools.
5. DO NOT use with damaged cord or plug. If vacuum cleaner is not working as
it should, has been dropped, damaged, left outdoors, or dropped into water,
return it to an authorized Panasonic Servicenter.
6. DO NOT pull or carry by cord, use cord as a handle, close door on cord, or
pull cord around sharp edges or corners. DO NOT run vacuum cleaner over
cord. Keep cord away from heated surfaces.
7. DO NOT unplug by pulling on cord.To unplug, grasp the plug, not the cord.
8. DO NOT handle plug or vacuum cleaner with wet hands.
9. DO NOT put any objects into openings. DO NOT use with any opening
blocked;keep free of dust, lint, hair, and anything that may reduce air flow.
10.Keep hair, loose clothing, fingers, and all parts of body away from openings
and moving parts.
11.DO NOT pick up anything that is burning or smoking, such as cigarettes,
matches, or hot ashes.
12.DO NOT use without dust bag and/or filters in place.
13.Turn off all controls before unplugging.
14.Use extra care when cleaning on stairs.
15.DO NOT use cleaner to pick up flammable or combustible liquids such as
gasoline or use in areas where they may be present.
16.DO NOT operate cleaner without belt cover properly installed.
SAVE THESE INSTRUCTIONS
Note: Before you plug in your Panasonic vacuum cleaner, make sure that the voltage
indicated on the rating plate located at the back of the vacuum cleaner is the same as your
local supply.
IMPORTANT SAFETY INSTRUCTIONS

- 8 -
- 41 -
TABLE OF CONTENTS
CONSUMER INFORMATION............................................................................................. 2
IMPORTANT SAFETY INSTRUCTIONS ............................................................................5
GROUNDING INSTRUCTIONS.........................................................................................10
PARTS IDENTIFICATION................................................................................................ 12
FEATURE CHART.............................................................................................................13
ASSEMBLY ..................................................................................................................... 14
Attaching Handle........................................................................................................ 14
FEATURES...................................................................................................................... 16
Automatic Self Adjusting Nozzle.............................................................................. 16
Edge Cleaning ............................................................................................................ 16
Motor Protector .......................................................................................................... 16
TO OPERATE CLEANER................................................................................................. 18
ON-OFF Switch........................................................................................................... 18
Handle Adjustments................................................................................................... 18
ROUTINE CARE OF CLEANER..................................................................................... 20
Cleaning Secondary Filter Screen..............................................................................20
Replacing HEPA Exhaust Filter...................................................................................22
Dust Bin Cleaning ............................................................................................24, 26, 28
Primary Filter Removal and Cleaning.........................................................................28
Removing and Installing Lower Plate.........................................................................30
Replacing Belt...............................................................................................................32
Cleaning Agitator..........................................................................................................34
Replacing Agitator........................................................................................................34
Agitator Assembly........................................................................................................34
Removing Clogs...........................................................................................................36
BEFORE REQUESTING SERVICE.................................................................................. 38
WARRANTY............................................................................................................... 41, 42
WHAT TO DO WHEN SERVICE IS NEEDED .................................................................. 48
WARRANTY
Panasonic Commercial Vacuum Cleaner
Limited Warranty
Panasonic Home and Commercial Products Company (referred to as “the warrantor”)
will repair this product with new or refurbished parts free of charge, in the U.S.A. or
Puerto Rico, for one (1) year from the date of original purchase, in the event of a defect
in materials or workmanship.
This Limited
Warranty Excludes both Labor and Parts for the following items: dis-
posable dust bags, filters, belts, light bulbs, agitator brushes and batteries (if supplied).
Carry-in or mail-in service in the U.S.A. can be obtained during the warranty period by
contacting a Panasonic Services Company (PASC) Factory Servicenter listed in the
Servicenter Directory, or by calling toll free, 1-888-350-9590, or by contacting your sell-
ing distributor. Carry-in or mail-in service in Puerto Rico can be obtained during the war-
ranty period by calling the local Panasonic Sales Company telephone number listed in
the Servicenter Directory.
This warranty is extended only to the original purchaser. A purchase receipt or other
proof of date of original purchase will be required before warranty performance is ren-
dered.
This warranty only covers failures due to defects in materials and workmanship which
occur during normal use and does not cover damages which occur in shipment, or fail-
ures which are caused by products not supplied by the warrantor, or failures which
result from accident, misuse, abuse, neglect, mishandling, misapplication, faulty installa-
tion, improper operation or maintenance, alteration, modification, power line surge,
improper voltage supply, lightning damage, or service by anyone other than a Panasonic
Authorized Servicenter, or damage that is attributable to acts of God.
LIMITS AND EXCLUSIONS
:
There are no express warranties except as listed above.
THE WARRANTOR SHALL NOT BE LIABLE FOR INCIDENTAL OR CONSEQUENTIAL
DAMAGES RESULTING FROM THE USE OF THIS PRODUCT, OR ARISING OUT OF
ANY BREACH OF THIS WARRANTY. ALL EXPRESS AND IMPLIED WARRANTIES,
INCLUDING THE WARRANTIES OF MERCHANTABILITY AND FITNESS FOR A PAR-
TICULAR PURPOSE, ARE LIMITED TO THE APPLICABLE WARRANTY PERIOD SET
FORTH ABOVE.
Some states do not allow the exclusion or limitation of incidental or consequential dam-
ages, or limitations on how long an implied warranty lasts, so the above exclusions or
limitations may not apply to you.
This warranty gives you specific legal rights and you may also have other rights which
vary from state to state. If a problem with this product develops during or after the war-
ranty period, you may contact your dealer or Servicenter. If the problem is not handled
to your satisfaction, then write to the Customer Satisfaction Center at the listed address
on the back cover.

- 10 - - 39 -
Problème Cause possible Solution possible
L’aspirateur 1. Le cordon d’alimentation 1. Brancher le cordon d’alimentation.
ne fonctionne est débranché. Mettre l’interrupteur à la position
pas. « ON ».
2. L’interrupteur est à la position 2. Mettre l’interrupteur à la position
« OFF ». « ON ».
3. Le disjoncteur s’est déclenché 3. Réenclencher le disjoncteur
ou un fusible a sauté. ou remplacer le fusible.
L’aspirateur 1. Bac à poussière rempli ou obstrué. 1. Nettoyer le bac à poussière.
offre un piètre
rendement. 2. La courroie est brisée. 2. Remplacer la courroie.
3. Le tuyau ou la tête d’aspiration 3. Dégager l’obstruction.
est obstrué.
4. Le tuyau n’est pas inséré à fond. 4. Insérer le tuyau correctement.
5. Les brosses sont usées. 5. Remplacer l’agitateur.
6. Le tuyau est troué. 6. Remplacer le tuyau.
7. Filtres sales. 7. Nettoyer/remplacer les filtres.
Guide de dépannage
AVERTISSEMENT
Risque de chocs électriques ou lésions corporelles.
Débrancher avant d’entretenir ou de nettoyer l’appareil. L’omission de débrancher pourrait
provoquer des chocs électriques ou des lésions corporelles du fait que l’aspirateur se
mettrait soudainement en marche.
Se reporter au tableau ci-dessous pour résoudre tout problème mineur
éventuel. Confier toute réparation à un technicien qualifié.
GROUNDING INSTRUCTIONS
This vacuum cleaner must be grounded. If it
should malfunction or breakdown, grounding
provides a path of least resistance for elec-
tric current to reduce the risk of electric
shock.This vacuum cleaner is equipped with
a cord having an equipment-grounding con-
ductor and grounding plug.The plug must be
plugged into an appropriate outlet that is
properly installed and grounded in accor-
dance with all local codes and ordinances.
DANGER
Improper connection of the equipment-
grounding conductor can result in a risk of
electric shock. Check with a qualified electri-
cian or service person if you are in doubt as
to whether the outlet is properly grounded.
Do not modify the plug provided with the
vacuum cleaner – if it will not fit the outlet,
have a proper outlet installed by a qualified
electrician.
This vacuum cleaner is for use on a nominal
120-volt circuit, and has a grounding plug
that looks like the plug illustrated in Figure
A. Make sure that this vacuum cleaner is
connected to an outlet having the same con-
figuration as the plug.
No adapter should be used with this vacuum
cleaner.
Note: Before you plug in your commercial
vacuum cleaner, make sure that the volt-
age indicated on the rating plate located at
the back of the vacuum cleaner is the
same as your local supply.
Grounded
Outlet
Prise avec contact
de mise à la terre
Enchufe a
tierra
Grounding Pin
Contact de mise
à la terre
Clavija a tierra
Figure A

- 36 - - 13 -
Power
Motor Protector
Height Adjust Cord Length
120V AC (60Hz)
Yes Auto 50 Ft. (15.25m)
FEATURE CHART
Diagrama de características
Tableau des caractéristiques
Voltaje
Protector de Adjust de nivel
Extensión
motor
de cordón
120V AC (60Hz)
Si Auto 15,25 m (50 pi)
Alimentation Protecteur Réglage de la Cordon
du moteur hauteur des brosses d’alimentation
120 V c.a. (60 Hz)
Oui Auto 15,25 m (50 pi)
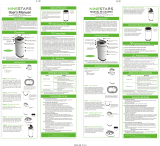
The hose located on the back of the
vacuum cleaner carries the dirt from the
nozzle up to the dust bin. If the hose
should become clogged:
➢➢
Unplug vacuum.
➢➢
Remove hose from suction inlet by
twisting and pulling downward.
➢➢
Clear any obstructions.
➢➢
Remove lower plate.
➢➢
Remove hose from nozzle by lifting
straight up.
➢➢
Inspect hose end and clear any
obstructions.
➢➢
Reinstall hose and lower plate.
Hose
Tuyau
Manguera
Suction Inlet
Entréed’aspiration
Abertura de
aspiration
Hose
Tuyau
Manguera
Hose Fitting
Conexión
para manguera
Raccord du tuyau
Removing Clogs

- 16 -
- 33 -
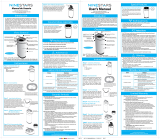
Motor Protector
➢➢
Edge cleaning feature enables
improved cleaning of carpets near
walls and furniture.
➢➢
Automatically opens to provide
cooling air to the motor when a clog
occurs or when dust bin needs
emptying.
➢➢
Motor protector may open when
using tools.
➢➢
If motor protector opens, the vacuum
will make a slightly different sound.
Note: Do not block motor protector.
FEATURES
Edge Cleaning
Motor Protector
Protecteur du
moteur
Protector del
motor
Automatic Self Adjusting Nozzle
➢➢
The nozzle of your upright vacuum
cleaner automatically adjusts to any
carpet pile height.
➢➢
Feature allows nozzle to float evenly
over carpet pile surfaces.
➢➢
No manual adjustments required.
Shallow
Pile Carpet
Moquette à
poils courts
Alfombra de
pelo corto
Deep Pile
Carpet
Alfombra de
pelo largo
Moquette à
poils longs
Nozzle
Tête d'aspiration
Boquilla
Pivot Point
Point
d’articulation
Botónde
liberación
Cambio de la correa
Remplacement de la courroie
➢ Cambie la correa cuando ocurra un olor
de goma que quema causado por un
patinaje excesivo.
➢ Quite la base inferior.
➢ Levante la cubierta de la correa
posterior y quite el embalaje de fieltro.
➢ Al levantar con cuidado quite el
agitador.
➢ Quite la correa gastada o rota.
➢ Limpieza del agitador.
➢ Envuelva la correa nueva (Type UB8
solamente) en el eje del motor y la
polea de cepillo, véase el diagrama
para envolver la correa.
➢ Reinstale el agitador en las ranuras del
compartimento de la boquilla.
➢ Cierre la cubierta de la corea posterior y
instale otra vez el embalaje fieltro.
➢ Después de instalar el agitador, ruede a
mano para que asegure que la correa
no esté torcida ni apretada y que
rueden libremente todas las piezas
rodantes.
➢ Reinstale la base inferior.
➢ Remplacer la courroie dès qu'une odeur
de caoutchouc brûlé se dégage, odeur
causée par le glissement excessif de la
courroie.
➢ Retirer la plaque inférieure.
➢ Soulever le couvercle arrière de la
courroie et retirer la cale en feutre.
➢ Retirer l’agitateur en le soulevant avec
précaution.
➢ Retirer la courroie brisée ou usée.
➢ Nettoyer l'agitateur.
➢ Enrouler la nouvelle courroie (de type
UB8 seulement) autour de l’arbre du
moteur et de la poulie de l’agitateur,
comme le montre l’illustration.
➢ Remettre l’agitateur en place dans les
ouvertures de la tête d’aspiration.
➢ Refermer le couvercle arrière de la
courroie et remettre la cale en feutre.
➢ Une fois l’agitateur en place, le faire
tourner avec la main pour s’assurer que
la courroie n’est pas tordue et que
toutes les pièces mobiles tournent
librement.
➢ Remettre la plaque inférieure en place.

- 31 -
- 18 -
1)
➢➢
Step on handle release pedal to
change handle position.
3)
➢➢
Move vacuum to middle position for
normal use.
2)
➢➢
Move vacuum to upright position for
storage and use.
Handle Adjustments
TO OPERATE CLEANER
ON-OFF Switch
➢➢
Ensure ON-OFF switch is OFF.
➢➢
Plug the power cord into 120V outlet.
➢➢
ON position turns vacuum on.
➢➢
OFF position turns vacuum off.
ON-OFF Switch
Interrupteur
Control On-Off
Cambair y insertar de la base inferior
Enlèvement et installation de la
plaque inférieure
➢ Siempre coloque un papel debajo de la
boquilla para proteger el suelo cada vez
se quita la base inferior.
➢ Coloque el mango en la posición vertical
y vuelque la aspiradora para exponer la
base inferior.
➢ Para liberar la place inferior, apriete
hacia adentro los dos (2) pestillos como
se muestra.
➢ Quite la base inferior y quite los
residuos que exista en el área de la
correa.
➢ Para reinstalar la base inferior,
enganche el extremo delantero de la
base inferior en las ranuras en el
montaje delantero de la boquilla.
➢ Asegúrese de que las alambres estén
dirigidas bien y no estén apretadas.
➢ Apriete la placa inferior luego empuje
hacia afuera los dos (2) pestillos.
➢ Lors de l’enlèvement de la plaque,
protéger le plancher en plaçant du
papier sous la tête d’aspiration.
➢ Mettre le manche à sa position verticale
et retourner l’aspirateur afin d’exposer
son dessous.
➢ Libérer la plaque inférieure en appuyant
sur les deux (2) taquets comme le
montre l’illustration.
➢ Retirer la plaque inférieure et tout résidu
se trouvant autour de la courroie.
➢ Remettre la plaque inférieure en
accrochant son devant dans les fentes
avant de la tête d’aspiration.
➢ S’assurer que tous les fils sont à leur
place et qu’aucun ne soit coincé.
➢ Appuyer sur la plaque inférieure puis
pousser les deux (2) taquets vers
l’extérieur.
AVERTISSEMENT
Risque de chocs électriques ou de lésions
corporelles.
Débrancher avant d’entretenir ou de nettoyer l’appa-
reil. L’omission de débrancher pourrait provoquer des
chocs électriques ou des lésions corporelles du fait
que l’aspirateur se mettrait soudainement en marche.
ADVERTENCIA
Peligro de choque eléctrico y lesión personal.
Desconecte la aspiradora antes de darle servicio
o limpiarla. De lo contrario podría producirse un
choque eléctrico o causar lesión personal si la
aspiradora arranca de repente.

ROUTINE CARE OF CLEANER
Performing the following tasks will keep your new Panasonic vacuum cleaner operating at
peak performance levels and will ensure these high levels for years to come. Check the
BEFORE REQUESTING SERVICE section in this manual for recommendations on performing
some of these tasks to help solve various problems that may occur.
Cleaning Secondary Filter Screen
➢➢
Check secondary filter screen
frequently and clean when dirty.
➢➢
Remove the dust bin as outlined in the
DUST BIN CLEANING section.
➢➢
To clean filter screen wipe screen with
a dry cloth.
NOTE: Filter screen is not removable.
➢➢
Replace the dust bin as outined in the
DUST BIN CLEANING section.
Secondary
Filter
Filtre
secondaire
Limpieza del
filtro secundario
- 20 -
Cambiando/Limpiando filtros
Retrait et nettoyage du filtre primaire
➢ Vérifier fréquemment le filtre primaire et
nettoyer lorsqu'il est sale.
➢ Retirer l'ensemble du bac à poussière
tel qu'indiqué dans la section
« Nettoyage du bac à poussière » et
vider le contenu.
➢ S'assurer que le bac à poussière est
propre avant de retirer le filtre.
➢ Saisir le filtre, tourner vers la gauche et
retirer.
➢ Le filtre peut être nettoyé en le tapant
sur une surface ferme ou en le rinçant
sous un robinet. Ne rincer qu'à l'eau
claire, ne jamais utiliser ni détergent, ni
savon. Permettre au filtre de sécher au
moins 24 heures avant de le remettre
dans le bac à poussière.
➢ Lorsque le nettoyage du filtre ne
restaure plus pleinement la
performance de l'aspirateur, le filtre
devra être remplacé.
➢ Chequee el filtro primario
frecuentemente y límpielo cuando está
sucio.
➢ Quite el montaje del compartimiento del
polvo conforme a la sección de la
LIMPIEZA del COMPARTIMIENTO del
POLVO y al contenido vacío del
compartimiento del polvo.
➢ Cerciórese de que el compartimiento
del polvo está limpio antes de que se
quite el filtro.
➢ Agarre la rejilla del filtro, gírela contra el
sentido de las agujas del reloj y
levántelo hacia afuera.
➢ El filtro puede limpiarse golpeandolo
sobre una superficie firme o
enjuagandolo bajo una llave de agua.
Enjuagar con agua solamente, no
utilizar detergente o jabón. Dejar que el
filtro se seque por 24 horas antes de
ponevlo de regreso en la aspirdora.
➢ Una vez que haya limpiado el filtro, y la
aspiradora no alcanza la potencia
maxima de succión, nesecitara
reemplazar el filtro.
7)
➢
Placez de nouveau le bac dans
l'aspirateur en insérant d'abord la partie
inférieure et penchez vers l'arrière avec la
manette surélevée.
8)
➢
Abaissez la manette du bac afin de
bloquer en place le bac.
7)
➢
Ponga el cubo de la basura de vuelta
adentro de la aspiradora insertando el fondo
primero e inclinando atrás con la manija del
cubo de la basura levantada.
8)
➢
Baje la manija del cubo de la basura para
ajustar el cubo de la basura en su lugar
- 29 -

- 22 -
4)
➢ Pour vider le bac à poussière tourner
son couvercle dans le sens inverse des
aiguilles d’une montre, selon les
indications sur le couvercle, et soulever.
5)
➢ Verser le contenu du bac dans une
poubelle.
4)
➢ Para vaciar el cubo de la basura rote el
montaje de la tapa del conasto de
basura contra las agujas del reloj como
está indicado en la tapa y levántela
hacia afuera.
5)
➢ Vacíe el contenido del cubo de la
basura adentro del tarro de basura.
Nettoyage du bac à poussière
Limpiando el cubo de la basura
6)
➢ Coloque la tapa del canasto de basura
sobre el canasto de basura.Alinee las
marcas como se muestra bajo Abierto
(Para Vaciar). Rote la tapa en sentido
de las agujas del reloj presionando
hacia abajo hasta alinear las marcas
como se muestra arriba de Cerrado
(Para Usar).
- 27 -
Exhaust Filter Cover
Couvercle du filtre
d'échappement
Cubierta de filtro
de salida
Exhaust Filter
Filtre d’évacuation
Filtre de salida
Replacing HEPA Exhaust Filter
➢➢
The HEPA exhaust filter removes dirt
from recirculated air.
➢➢
Check filter after emptying dust bin.
Replace when dirty.
➢➢
To remove, pull out on both sides of
the exhaust filter cover.
➢➢
Grasp the exhaust filter and pull out
to remove.
➢➢
Ensure foam edge of the filter is
facing towards the vacuum cleaner
when placing filter into dust
compartment. Push only on filter
frame.
➢➢
Replace exhaust filter cover by
snapping into place.
* Filter cannot be cleaned and should
be replaced at least once each year
.
6)
➢ Remettre le couvercle du bac à
poussière sur le bac à poussière en
alignant les repères marqués sur le
couvercle et le bac, selon l'illustration ci-
contre à gauche Ouvert (pour vider).
Tourner le couvercle dans le sens des
aiguilles d'une montre, tout en appuyant
vers le bas, de manière que les repères
s'alignent, comme indiqué dans
l’illustration ci-contre à gauche Fermé
(pour utiliser).

- 24 -
3)
➢➢
Remove any clogs that might be
located in the dust bin port or the
secondary filter.
Dust Bin Cleaning
1)
➢➢
Lift dust bin handle located at the top
of the dust bin.
Dust Bin Release
Handle
Manette de libération du
bac à poussière
Manija de soltar el
cubo de la basura
2)
➢➢
Pull the handle forward and lift dust
bin up and out of the vacuum
cleaner.
Secondary
Filter
Filtre secondaire
Limpieza del
filtro secundario
Dust Bin
Port
Trappe de
bac à poussière
Portillo del
cubo de la
basura
Always empty the dust bin when dirt level reaches the “MAX FILL” line.
3)
➢ Remueva cualquier obstáculo que
pueda estar localizado en la entrada del
cubo de la basura o en el filtro
secundario.
Nettoyage du bac à poussière
1)
➢ Levante la manija del cubo de la basura
ubicada al tope del cubo de la basura.
2)
➢ Tire de la manija hacia adelante y
levante el cubo de la basura hacia
arriba y afuera de la aspiradora.
2)
➢ Tirer la poignée vers soi, soulever le
bac à poussière et le retirer de
l'aspirateur.
1)
➢ Soulever la poignée se trouvant sur la
partie supérieure du bac à poussière.
Limpiando el cubo de la basura
Veillez à toujours vider le bac à poussière
lorsque le niveau de poussière atteint la
ligne "MAX FILL".
Siempre vacíe el cubo de la basura cuando el
nivel de basura alcanza la línea "MAX FILL."
- 25 -
WARNING
Always unplug power cord from electrical outlet before performing any service on
vacuum cleaner.
ADVERTENCIA
Siempre desconecte el cordón électrico antes de
reparar alguna parte de la aspiradora.
AVERTISSEMENT
Débrancher le cordon électrique de la prise
de courant avant d'entretenir l'appareil.
3)
➢ Retirer toute obstruction qui pourrait se
trouver au niveau de la trappe du bac à
poussière ou dans le filtre secondaire.

- 23 -
4)
➢➢
To empty dust bin rotate dust bin lid
assembly counter-clockwise as
indicated on the lid and lift off.
5)
➢➢
Pour dust bin contents into a trash
container.
Dust Bin Cleaning
➢ Ce filtre HEPA a pour but d'épurer l'air
recyclé de la poussière.
➢ Vérifier le filtre lorsque le bac à
poussière est vidé. Le remplacer au
besoin.
➢ Retirer le couvercle du filtre en tirant sur
ses deux côtés.
➢ Enlever le filtre en le tirant.
➢ S'assurer que le bord en mousse du
filtre soit face à l'aspirateur lors de la
mise en place du filtre dans le logement
du filtre.Pousser seulement sur
l'armature du filtre.
➢ Remettre le couvercle du filtre en place
en l'enclenchant en position.
* Ce filtre ne peut être nettoyé et doit être
remplacé au moins une fois par an.
Remplacement du filtre d’évacuation
HEPA
➢ El filtro de escape HEPA quita el polvo
del aire reciclado.
➢ Revise el filtro al instalar una nueva
bolsa de polvo.
➢ Para sacar, hale hacia afuera por ambos
lados de la cubierta del filtro de escape.
➢ Tome el filtro de salida y tire hacia
afuera para sacarlo.
➢ Asegure que el borde gris mire a lo lejos
del operador y reemplace el filtro
adentrodel compartimiento del polvo.
➢ Reemplace la cubierta del filtro de
escape ajustándola en su lugar.
*No se puede limpiar el filtro y se debe
cambiarlo a lo menos una vez cada año.
Cambo del filtro de escape HEPA
Open (For Emptying)
Ouvert
Cerrado (Para usar)
(pour vider)
Closed
(For Use)
Fermé
Abierto
(Para vaciar)
(pour utiliser)
Turn This Direction To
Open For Emptying
Tourner dans ce sens pour
vider le bac à poussière
Torne en esta dirección
para abrir y vaciar
L
O
C
K
E
D
A
L
I
G
N
A
R
R
O
W
S
T
U
R
N
T
O
L
O
C
K
L
O
C
K
E
D
A
L
I
G
N
A
R
R
O
W
S
T
U
R
N
T
O
L
O
C
K
Closed (For Use)
Fermé (pour utiliser)
Cerrado (para usar)
Open
(For Emptying)
Ouvert
(pour vider)
Abierto
(Para vaciar)
Turn This Direction
To Close For Usage
Tourner dans ce sens
pour fermer le bac à
poussière
Torne en esta dirección
para cerrar y usar
6)
➢➢
Place dust bin lid assembly back
onto top of dust bin. Align lid marks
with bin marks as shown in
Open
(For Emptying)
. Rotate lid clockwise
while pressing downward so that
marks align as shown in
Closed (For
Use)
.
- 26 -

- 21 -
Siguiendo las instrucciones dadas, su nueva
aspiradora Panasonic funcionará al nivel máximo
y continuará funcionando por mucho años en el
futuro. Lea la sección “Antes de pedir servicio” en
este manual para las recomendaciones para
arreglar unos problemas que puedan ocurrir.
Cuidado de rutina de la aspiradora
Entretien de l’aspirateur
Les tâches décrites ci-dessous vous permettront
de tirer un rendement optimal de votre aspirateur
de longues années durant.Se reporter au
“Guide de dépannage” pour les mesures à
prendre en cas de problèmes.
Pour nettoyer le filtre secondaire
Limpieza del segundo filtro
de goma espuma
➢
Revisar frecuentemente el filtro
secundario y limpiarlo cuando esté sucio.
➢
Remueva el cubo para basura como en la
ilustración en la sección de LIMPIEZA
DEL CUBO PARA BASURA.
➢
Para limpiar la cubierta del filtro, limpiela
con un trapo seco.
NOTA: La cubierta del filtro es removible.
➢
Reemplace el cubo de basura como en la
ilustración en la sección de LIMPIEZA
DEL CUBO PARA BASURA.
Filter
Filtre
Filtro
Filter Cover
Couvercle
du filtre
Cubierta
del filtro
Locking Tab
Languette de
rétention
Tabulación
el bloquear
Slot
Fente
Ranura
Remove
Enlever
Quite
Replace
Remplacer
Reemplace
Primary Filter Removal and Cleaning
➢➢
Check primary filter frequently and
clean when dirty.
➢➢
Remove the dust bin assembly as
outlined in the DUST BIN CLEANING
section and empty contents of dust
bin.
➢➢
Make sure dust bin is empty before
filter is removed.
➢➢
Grasp primary filter, rotate counter-
clockwise and lift out.
➢➢
The filter may be cleaned by tapping
it on a firm surface or by rinsing it
under a faucet. Rinse with water only
if needed, do not use detergent or
soap. Allow filter to dry 24 hours
before putting it back into the dust
bin.
➢➢
When the cleaning of the filter no
longer restores vacuum suction to
full power you need to replace the
filter.
Dust Bin
Handle
Manette de
libération du
bac à
poussière
Manija de
soltar el cubo
de la basura
Dust Bin
Bac à
poussière
Cubo de
la basura
7)
➢➢
Place dust bin back into vacuum
cleaner by inserting the bottom first
and tilt back with the dust bin handle
raised.
8)
➢➢
Push forward and lower the dust bin
handle to lock dust bin in place.
- 28 -
➢ Vérifier à l’occasion le filtre secondaire,
et le nettoyer lorsqu’il est sale.
➢ Retirer le bac à poussière tel que
détaillé dans la section de « Nettoyage
du bac à poussière ».
➢ Nettoyer le filtre secondaire à l'aide d'un
chiffon sec.
Remarque: Le filtre secondaire ne peut
être retiré.
➢ Remettre le bac tel que décrit dans la
section de « Nettoyage du bac à
poussière ».

- 19 -
Ajustes del mango
1)
➢ Pise en el pedal de liberación del
mango para cambiar la posición del
mango.
1)
➢ Avec le pied, appuyer sur la pédale de
réglage de l’inclinaison du manche pour
mettre le manche à la position désirée.
Réglage de l’inclinaison du manche
2)
➢
Mueva la aspiradora a la posición
vertical para el amenace y el uso de las
herramientas.
3)
➢ Mueva la aspiradora a la posición
mediana para el uso normal.
3)
➢ La position à l’angle s’utilise pour le
nettoyage normal.
2)
➢ Sélectionner la position verticale lors de
l’utilisation des accessoires ou le
rangement de l’aspirateur.
Para operar la aspiradora
Fonctionnement
➢
Asegúrese de que el control ON-OFF
esté en la posición OFF.
➢ Enchufe el cordón eléctrico en una
toma de pared de 120 V.
➢ La posición ON enciende la aspiradora.
➢ La posición OFF apaga la aspiradora
.
➢ S’assurer que l’interrupteur est à la
position « OFF ».
➢ Brancher le cordon d’alimentation dans
une prise secteur de 120 V.
➢ Pour mettre l’aspirateur en marche,
mettre l’interrupteur à la position « ON ».
➢ Pour couper le contact, mettre
l’interrupteur à la position « OFF ».
Interrupteur
Control ON-OFF
- 30 -
Removing and Installing Lower Plate
➢➢
Always place paper under nozzle
whenever lower plate is removed to
protect floor.
➢➢
Place handle in down position and
turn vacuum over to expose lower
plate.
➢➢
Release lower plate by pressing two
(2) latches inward as shown.
➢➢
Remove lower plate and remove any
residue that may exist in belt area.
➢➢
Reinstall lower plate by hooking front
end of lower plate into slots on front
of nozzle housing.
➢➢
Make sure all wires are routed
properly and not pinched.
➢➢
Press lower plate into place then
push two (2) latches outward.
Latches
Taquets
Lengüetas
Lower Plate
Plaque inférieure
Base inferior
Rear Belt
Cover
Couvre-
courroie
arrière
Cubierta de
la correa
trasera
WARNING Electrical Shock or Personal Injury Hazard
Disconnect the electrical supply before servicing or cleaning the unit. Failure to
do so could result in electrical shock or personal injury from cleaner suddenly
starting.

- 17 -
Limpieza para orillas
Nettoyage latéral
➢ Use la característica de limpieza para
orillas para aspirar con facilidad cerca
de las paredes y los muebles.
➢ Cette caractéristique facilite le
nettoyage de moquettes le long des
plinthes ou des meubles.
➢ Se abre automáticamente para proveer
el aire fresco al motor cuando hay unos
residuos o cuando es necesario
cambiar la bolsa de polvo.
➢ Es posible que el protector del motor se
abra cuando se usan las herramientas
➢ Si se abre el protector del motor, la
aspiradora hará un sonido poquito
diferente.
Nota: No obstruye el protector de motor.
Protector de motor
Protecteur du moteur
➢ La soupape s'ouvre automatiquement
pour refroidir le moteur en cas
d'obstruction ou lorsque le bac à
poussière est plein.
➢ La soupape peut s’ouvrir aussi lors de
l’utilisation des accessoires.
➢ Si la soupape devait s'ouvrir, le bruit
normalement émis par l'aspirateur sera
quelque peu différent.
Remarque: Ne pas bloquer le protecteur
du moteur.
Características
Caractéristiques
Boquilla de ajuste automático
Tête d’aspiration autoréglable
➢ La boquilla de su aspiradora vertical se
ajusta automáticamente a la altura de
cualquier pelo de alfombra.
➢ La característica permite que la
boquilla flote fácilmente en las
superficies del pelo de alfombra.
➢ No se requieren los ajustes manuales.
➢ Cet aspirateur incorpore un dispositif
qui règle automatiquement la hauteur
des brosses selon la longueur des
fibres de la moquette.
➢ L’aspirateur peut donc passer facilement
d’une moquette à l’autre.
➢ Aucun réglage par l’utilisateur n’est
requis.
Replacing Belt
+
+
Lift Agitator Up
Soulever l’agitateur
Unidad del agitador
Felt Packing
Cale en feutre
Empaquetadura
de filtro
Rear Belt
Cover
Couvre-
courroie
arrière
Cubierta
de la correa
trasera
Install New Belt
Poser la nouvelle courroie
Instalacióndelacorrea
Motor Shaft
Arbre
d’entraînement
du moteur
Eje del motor
➢➢
Replace belt whenever a burning
rubber smell caused by excessive
slippage occurs.
➢➢
Remove lower plate.
➢➢
Lift rear belt cover and remove felt
packing.
➢➢
Remove agitator by carefully lifting
out.
➢➢
Remove worn or broken belt.
➢➢
Clean agitator.
➢➢
Loop new belt (Type UB8 only)
around motor shaft and agitator
pulley; see illustration for correct belt
routing.
➢➢
Reinstall agitator back into nozzle
housing grooves.
➢➢
Close rear belt cover and reinstall felt
packing.
➢➢
After reinstalling the agitator, turn it
by hand to make sure that belt is not
twisted or pinched and that all
rotating parts turn freely.
➢➢
Reinstall lower plate.
+
+
Groove
Ouverture
Ranura
End Cap
Bouchon
Tapa del extremo
- 32 -

1)
➢ Ne brancher qu’une fois l’assemblage
terminé.
➢ Retirer la vis du manche.
➢ Insérer le manche.
➢ Insérer la vis.
➢ Serrer la vis.
2)
➢ Insérer le cordon d’alimentation à
l’intérieur du crochet.
3)
➢ Enrouler le cordon autour du crochet.
➢ Fixer la fiche au cordon d’alimentation à
l’aide de son agrafe.
Colocación del mango
Montaje
Assemblage
Montage du manche
1)
➢ No enchufe hasta que el montaje esté
completo.
➢ Quite el tornillo del mango.
➢ Meta el mango con los sujetadores del
cordón en la parte posterior de la
aspiradora.
➢ Instale el tornillo.
➢ Apriete el tornillo.
2)
➢ Empuje el cordón eléctrico hacia el
soporte del cordón.
3)
➢ Envuelva el cordón eléctrico alrededor
de los sujetadores del cordón.
➢ Asegure la clavija en el cordón eléctrico.
- 15 -
Cleaning Agitator
➢➢
Clean agitator after every five uses
and every time the belt is replaced.
➢➢
Remove lower plate.
➢➢
Cut off any carpet pile and lint
entangled around agitator with a pair
of scissors.
➢➢
Remove agitator.
➢➢
Remove any string or debris located
on the end caps or agitator shaft.
➢➢
Reinstall agitator and lower plate.
Replacing Agitator
➢➢
When the bristles on the agitator are
worn so that they do not touch a card
held across the lower plate, the
agitator should be replaced.
➢➢
Remove lower plate and agitator.
➢➢
Position belt over belt pulley on the
new brush unit.
➢➢
Reinstall agitator and lower plate.
Card
Carte
Tarjeta
Brush Unit
End Cap
Belt Pulley
End Cap
Agitator Assembly
- 34 -

- 36 - - 13 -
Power
Motor Protector
Height Adjust Cord Length
120V AC (60Hz)
Yes Auto 50 Ft. (15.25m)
FEATURE CHART
Diagrama de características
Tableau des caractéristiques
Voltaje
Protector de Adjust de nivel
Extensión
motor
de cordón
120V AC (60Hz)
Si Auto 15,25 m (50 pi)
Alimentation Protecteur Réglage de la Cordon
du moteur hauteur des brosses d’alimentation
120 V c.a. (60 Hz)
Oui Auto 15,25 m (50 pi)
The hose located on the back of the
vacuum cleaner carries the dirt from the
nozzle up to the dust bin. If the hose
should become clogged:
➢➢
Unplug vacuum.
➢➢
Remove hose from suction inlet by
twisting and pulling downward.
➢➢
Clear any obstructions.
➢➢
Remove lower plate.
➢➢
Remove hose from nozzle by lifting
straight up.
➢➢
Inspect hose end and clear any
obstructions.
➢➢
Reinstall hose and lower plate.
Hose
Tuyau
Manguera
Suction Inlet
Entréed’aspiration
Abertura de
aspiration
Hose
Tuyau
Manguera
Hose Fitting
Conexión
para manguera
Raccord du tuyau
Removing Clogs

- 11 -- 38 -
BEFORE REQUESTING SERVICE
WARNING
Electric Shock or Personal Injury Hazard.
Disconnect the electrical supply before servicing or cleaning the unit. Failure to do
so could result in electric shock or personal injury from cleaner suddenly starting.
Review this chart to find do-it-yourself solutions for minor performance
problems. Any service needed, other than those described in these
Operating Instructions, should be performed by an authorized service
representative.
PROBLEM POSSIBLE CAUSE POSSIBLE SOLUTION
Cleaner 1. Unplugged at wall outlet. 1. Plug in firmly. Push ON-OFF
will not run. switch to On.
2. ON-OFF switch not turned on. 2. Push ON-OFF switch to ON.
3. Tripped circuit breaker/blown 3. Reset circuit breaker or replace
fuse at household service panel. fuse.
Poor job of dirt 1. Full or clogged dust bin. 1. Clean dust bin.
pickup.
2. Broken belt. 2. Replace belt.
3. Clogged hose or nozzle. 3. Clean hose or nozzle area.
4. Hose not inserted fully. 4. Insert hose.
5. Worn agitator. 5. Replace agitator.
6. Hole in hose. 6. Replace hose.
7. Dirty filters. 7. Clean/Change filters.
Instructiones para hacer
conexión a tierra
Mise à la terre
Cet aspirateur doit être branché dans une
prise de courant avec retour à la terre. En
cas de panne ou d’anomalie, le retour à la
terre assure une voie de passage à faible
résistance pour le courant électrique,
réduisant ainsi les risques de décharge. Cet
appareil est muni d’un cordon d’alimentation
avec un fil de terre et une fiche à trois lames.
La fiche doit être branchée dans une prise
secteur appropriée, installée et munie d’un
retour à la terre conformément aux
réglementations et codes d’électricité locaux
en vigueur.
AVERTISSEMENT
Le branchement impropre du conducteur de
retour à la terre peut entraîner un risque de
décharge électrique. En cas de doute,
consulter un électricien ou un technicien de
service qualifié. Ne pas modifier la fiche du
cordon d’alimentation; si elle ne convient pas
à la prise de courant, faire remplacer cette
dernière par un électricien qualifié.
L’aspirateur fonctionne sur une alimentation
secteur d’une tension nominale de
120 V avec prise de terre semblable à celle
illustrée (Figure A). Ne brancher l’aspirateur
que dans une prise secteur de même
configuration que la fiche.
Ne jamais utiliser d’adaptateur pour le
branchement de l’appareil.
Remarque: Avant de brancher l'aspirateur,
vérifier que la tension du secteur
corresponde à celle de l'appareil, indiquée
sur la plaque signalétique à l'arrière de
l'appareil.
Esta aspiradora tiene que estar haciendo
conexión a tierra. Si la aspiradora malfun-
ciona o descompone, la toma a tierra provee
un paso de la menor resìstencia para la cor-
riente de electricidad para reducir el riesgo
del choque eléctrico. Esta aspiradora está
equipada con un conductor a tierra y
enchufes a tierra. El enchufe tiene que estar
enchufado en un enchufe apropiado que está
instalado apropiadamante y hecho conexión
a tierra de conformidad con los códigos y
ordenanzas locales.
ADVERTENCIA
Se puede resultar el riesgo del choque eléc-
trico con la conexción inadecuada del equipo
de la toma a tierra. Consulte a un electrista
certificado o a un dependiente en un centro
de servicio si tiene dudas de que el enchufe
esté conecado adecuadamente. No modi-
fique el enchufe provisto de la aspiradora –
no cabrá en el enchufe en la pared, haga
instalar un enchufe adecuado en la pared
por un electrista competente.
Esta aspiradora está hecha para el circuito
nominal de voltio 120 y tiene una toma a tier-
ra que parece como el enchufe ilustrado en
aspiradora esté conectada a un enchufe en
la pared que tenga la misma configuración
como el enchufe en la aspiradora.
No use un adaptador con esta aspiradora.
Nota: Antes de conectar su aspiradora
Panasonic, asegúrese de que el voltaje
indicado en el voltímetro en la parte poste-
rior de la aspiradora sea del mismo voltaje
que el de su casa.

- 8 -
- 41 -
TABLE OF CONTENTS
CONSUMER INFORMATION............................................................................................. 2
IMPORTANT SAFETY INSTRUCTIONS ............................................................................5
GROUNDING INSTRUCTIONS.........................................................................................10
PARTS IDENTIFICATION................................................................................................ 12
FEATURE CHART.............................................................................................................13
ASSEMBLY ..................................................................................................................... 14
Attaching Handle........................................................................................................ 14
FEATURES...................................................................................................................... 16
Automatic Self Adjusting Nozzle.............................................................................. 16
Edge Cleaning ............................................................................................................ 16
Motor Protector .......................................................................................................... 16
TO OPERATE CLEANER................................................................................................. 18
ON-OFF Switch........................................................................................................... 18
Handle Adjustments................................................................................................... 18
ROUTINE CARE OF CLEANER..................................................................................... 20
Cleaning Secondary Filter Screen..............................................................................20
Replacing HEPA Exhaust Filter...................................................................................22
Dust Bin Cleaning ............................................................................................24, 26, 28
Primary Filter Removal and Cleaning.........................................................................28
Removing and Installing Lower Plate.........................................................................30
Replacing Belt...............................................................................................................32
Cleaning Agitator..........................................................................................................34
Replacing Agitator........................................................................................................34
Agitator Assembly........................................................................................................34
Removing Clogs...........................................................................................................36
BEFORE REQUESTING SERVICE.................................................................................. 38
WARRANTY............................................................................................................... 41, 42
WHAT TO DO WHEN SERVICE IS NEEDED .................................................................. 48
WARRANTY
Panasonic Commercial Vacuum Cleaner
Limited Warranty
Panasonic Home and Commercial Products Company (referred to as “the warrantor”)
will repair this product with new or refurbished parts free of charge, in the U.S.A. or
Puerto Rico, for one (1) year from the date of original purchase, in the event of a defect
in materials or workmanship.
This Limited
Warranty Excludes both Labor and Parts for the following items: dis-
posable dust bags, filters, belts, light bulbs, agitator brushes and batteries (if supplied).
Carry-in or mail-in service in the U.S.A. can be obtained during the warranty period by
contacting a Panasonic Services Company (PASC) Factory Servicenter listed in the
Servicenter Directory, or by calling toll free, 1-888-350-9590, or by contacting your sell-
ing distributor. Carry-in or mail-in service in Puerto Rico can be obtained during the war-
ranty period by calling the local Panasonic Sales Company telephone number listed in
the Servicenter Directory.
This warranty is extended only to the original purchaser. A purchase receipt or other
proof of date of original purchase will be required before warranty performance is ren-
dered.
This warranty only covers failures due to defects in materials and workmanship which
occur during normal use and does not cover damages which occur in shipment, or fail-
ures which are caused by products not supplied by the warrantor, or failures which
result from accident, misuse, abuse, neglect, mishandling, misapplication, faulty installa-
tion, improper operation or maintenance, alteration, modification, power line surge,
improper voltage supply, lightning damage, or service by anyone other than a Panasonic
Authorized Servicenter, or damage that is attributable to acts of God.
LIMITS AND EXCLUSIONS
:
There are no express warranties except as listed above.
THE WARRANTOR SHALL NOT BE LIABLE FOR INCIDENTAL OR CONSEQUENTIAL
DAMAGES RESULTING FROM THE USE OF THIS PRODUCT, OR ARISING OUT OF
ANY BREACH OF THIS WARRANTY. ALL EXPRESS AND IMPLIED WARRANTIES,
INCLUDING THE WARRANTIES OF MERCHANTABILITY AND FITNESS FOR A PAR-
TICULAR PURPOSE, ARE LIMITED TO THE APPLICABLE WARRANTY PERIOD SET
FORTH ABOVE.
Some states do not allow the exclusion or limitation of incidental or consequential dam-
ages, or limitations on how long an implied warranty lasts, so the above exclusions or
limitations may not apply to you.
This warranty gives you specific legal rights and you may also have other rights which
vary from state to state. If a problem with this product develops during or after the war-
ranty period, you may contact your dealer or Servicenter. If the problem is not handled
to your satisfaction, then write to the Customer Satisfaction Center at the listed address
on the back cover.

- 7 -- 42 -
Instrucciones importantes de seguridad
Cuando use su aspiradora, precauciones básicas deben seguirse siempre,
incluyendo las siguientes:
Lea todas las instrucciones en este manual antes de armar o usar su aspiradora.
ADVERTENCIA
Para reducir el riesgo de incendio, choque eléctrico o lesión corporal:
1. No abandone la aspiradora cuando está conectada.Desconéctela cuando no la está
usando y antes de darle servicio.
2. Para reducir el riesgo de incendio o choque eléctrico no use la aspiradora al aire libre
ni sobre las superficies mojadas.
3. No permita que los niños jueguen con la aspiradora.Se requiere tener mayor cuidado
cuando sea usada en la proximidad de niños o por niños.
4. Use la aspiradora únicamente en la manera descrita en este manual.Use únicamente
con los accesorios recomendados por la fábrica.
5. No use la aspiradora si el cordón eléctrico o el enchufe está dañado.Si la aspiradora
no está funcionando adecuadamente o si se ha le caído, está dañada, ha estado
expuesta a la intemperie o si se le ha caído al agua, devuélvala a un Centro de
Servicio de Panasonic autorizado.
6. No hale ni transporte la aspiradora por el cordón; no use el cordón como mango;no
cierre puertas sobre el cordón; no hale el cordón sobre rebordes agudos ni esquinas;
no pase la aspiradora sobre el cordón.Mantenga el cordón alejado de superficies
calientes.
7. No desconecte la aspiradora tirando del cordón eléctrico. Para desconectarla, hale el
enchufe, no el cordón.
8. No toque la aspiradora ni el enchufe con las manos mojadas.
9. No coloque objetos en las aberturas.No use la aspiradora si alguna abertura está
bloqueada;manténgala libre de polvo, pelusa, cabellos, o cualquier cosa que puede
disminuir el flujo de aire.
10. Mantenga el cabello, la ropa suelta, los dedos y todas las partes del cuerpo alejados
de las aberturas y piezas mecánicas.
11. No use la aspiradora para levantar objetos que se está quemando o emitiendo humo,
como cigarrillos, cerillos o cenizas calientes.
12. No use la aspiradora sin tener insertados la bolsa para polvo y/o los filtros.
13. Antes de desconectar la aspiradora, apáguela siempre.
14. Tenga mucho cuidado cuando usa la aspiradora sobre los escalones.
15. No use la aspiradora para aspirar líquidos inflamables o combustibles como gasolina
ni la use en lugares donde éstos podrían estar presentes.
16. No opere la aspiradora sin la cubierta de la correa propiamente instalada.
Guarde estas instrucciones
Nota: Antes de conectar su aspiradora Panasonic, asegúrese de que el votaje indicado en
el voltímetro en la parte posterior de la aspiradora sea del mismo voltaje que el de su
casa.
WARRANTY
Panasonic Canada Inc.
5770 Ambler Drive, Mississauga, Ontario L4W 2T3
PANASONIC PRODUCT - LIMITED WARRANTY
Panasonic Canada Inc. warrants this product to be free from defects in material and workmanship
and agrees to remedy any such defect for a period as stated below from the date of original
purchase.
Commercial Vacuum Cleaner - Ninety (90) days parts and labour
LIMIT
ATIONS AND EXCLUSIONS
This warranty does not apply to products purchased outside Canada or to any product which has
been improperly installed, subjected to usage for which the product was not designed, misused or
abused, damaged during shipping, or which has been altered or repaired in any way that affects the
reliability or detracts from the performance. Parts such as disposable dust bags, filters, belts, light
bulbs and agitator brushes are also excluded from coverage under this warranty.
This warranty is extended to the original end user purchaser only. A purchase receipt or other proof
of date of original purchase is required before warranty service is performed.
THIS EXPRESS, LIMITED WARRANTY IS IN LIEU OF ALL OTHER WARRANTIES, EXPRESS OR
IMPLIED, INCLUDING ANY IMPLIED WARRANTIES OF MERCHANTABILITY AND FITNESS FOR A
PARTICULAR PURPOSE.
IN NO EVENT WILL PANASONIC CANADA INC. BE LIABLE FOR ANY SPECIAL, INDIRECT OR
CONSEQUENTIAL DAMAGES.
In certain instances, some jurisdictions do not allow the exclusion or limitation of incidental or conse-
quential damages, or the exclusion of implied warranties, so the above limitations and exclusions
may not be applicable.
WARRANTY SERVICE
FOR PRODUCT OPERATION ASSISTANCE, please contact:
Our Customer Care Centre: Telephone #: (905) 624-5505
1-800 #: 1-800-561-5505
Fax #: (905) 238-2360
Email link:"Contact Us" on www.panasonic.ca
FOR PRODUCT REPAIRS, please locate your nearest Authorized Servicentre at www.panasonic.ca :
Link : "ServicentresTM locator" under "Customer support"
Panasonic Factory Service:
V
ancouver Toronto
Panasonic Canada Inc. Panasonic Canada Inc.
12111 Riverside Way 5770 Ambler Drive
Richmond BC V6W 1K8 Mississauga ON L4W 2T3
Tel: (604) 278-4211 Tel: (905) 624-8447
Fax: (604) 278-5627 Fax: (905) 238-2418
IF YOU SHIP THE PRODUCT TO A SERVICENTRE
Carefully pack and send prepaid, adequately insured and preferably in the original carton.
Include details of the defect claimed, and proof of date of original purchase.
Para reducir el riesgo de incendio,
choque eléctrico, lesiones:
/