Page is loading ...

Read all instructions BEFORE assembly and USE of product.
KEEP INSTRUCTIONS FOR FUTURE USE.
Lea todas las instrucciones ANTES de armar y USAR el producto.
CONSERVE LAS INSTRUCCIONES PARA USO FUTURO.
Lisez toutes les instructions du manuel AVANT l’assemblage
ou L’UTILISATION de ce produit. CONSERVEZ CES
INSTRUCTIONS POUR RÉFÉRENCE ULTÉRIEURE.
ST03XXXA
Gravity Fold Stroller
Instruction Manual
Manual de Instrucciones
Manuel d’instruction
ST03XXXA_3L_070720_SP
WARRANTY
DO NOT RETURN YOUR PRODUCT TO THE STORE. PLEASE CONTACT BABY TREND
FOR REPLACEMENT PARTS, SERVICE AND REPAIR.
The Baby Trend
®
warranty covers workmanship defects within the rst 180 days of
purchase. Any product which has been subjected to misuse, abuse, abnormal use,
excessive wear and tear, improper assembly, negligence, environmental exposure, alteration
or accident, or has had its serial number altered or removed invalidates all claims against
the manufacturer. Any damage to property during installation is the sole responsibility of the
end user. The Customer Service Department can be contacted at 1 (800) 328-7363 Monday
through Friday between 8:00am and 4:30pm (PST). Return Authorizations are required prior
to returning product(s) to Baby Trend
®
. Warranty only valid in North America.
GARANTIA
NO DEVUELVA SU PRODUCTO A LA TIENDA. POR FAVOR CONTACTE A BABY TREND
PARA PIEZAS DE REPUESTO, SERVICIO Y REPARACION.
La garantía de Baby Trend
®
cubre defectos de fábrica dentro de los primeros 180 días de
la compra.Cualquier producto que haya sido sometido a uso indebido, abuso, uso anormal,
desgaste excesivo, montaje incorrecto, negligencia, exposición ambiental, alteración o
accidente, o que ha tenido su número de serie alterado o removido anula todos los reclamos
contra el fabricante. Cualquier daño a la propiedad durante la instalación es de la exclusiva
responsabilidad del usuario nal. El Departamento de Servicio al Cliente puede ser
contactado a 1 (800) 328-7363 Lunes a viernes entre 8:00am y 4:30pm (PST).Un numero
de autorizacion es requerido antes de la devolución de los producto(s) a Baby Trend
®
.
Garantia válida sólo en América del Norte.
1-800-328-7363
(8:00am ~ 4:30pm PST)
www.babytrend.com
Baby Trend, Inc.
13048 Valley Blvd.
Fontana CA 92335

2
WARNING
Copyright © 2020, Baby Trend Inc., All Rights Reserved. Todos los derechos reservados. Tous droits réservés.
1
Copyright © 2020, Baby Trend Inc., All Rights Reserved. Todos los derechos reservados. Tous droits réservés.
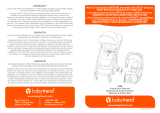
PARTS
1
Check that you have all the parts for this model
before assembling the stroller.
Compact Stroller
Rear WheelsFront Wheels
Carry / Tote bag
WARNING: Please follow all of these
instructions to ensure the safety of your child. Keep
these instructions for future reference.
WARNING: Failure to follow these instructions
could result in serious injury or death. Avoid serious
injury from falling or sliding out, always use the safety
harness and ensure that the children are properly
positioned according to these instructions.
WARNING: Never leave children unattended.
WARNING: Care must be taken when folding
and unfolding the stroller to prevent nger entrapment.
• CAUTION: This stroller is designed for one child only. Use with more than
one child may cause an unbalanced condition which can injure/harm your
child.
• Purses, shopping bags, parcels, diaper bags or accessory items may
change the balance of the stroller and cause a hazardous, unstable
condition.
•
The maximum weight that can be carried in the storage basket is 5 lbs (2.26 kg).
Excessive weight may cause a hazardous unstable condition to exist.
• Be certain the stroller is completely opened and locked in place before
allowing a child near the stroller.
•
The maximum weight capacity of this stroller is 45 lbs (20.41 kg) or 40 inches
(101.6 cm). Additional weight will cause excessive wear and stress on the
stroller and may cause a hazardous unstable condition to exist.
• NEVER use the stroller on stairways or escalators.
• NEVER use the stroller with roller skates, in-line skates, skateboards or
bicycles.
• NEVER allow your stroller to be used as a toy.
• To clean use only mild household soap or detergent and warm water on a
sponge or clean cloth.
• Check your stroller for loose screws, worn parts, torn material or stitching
on a regular basis. Replace or repair parts as needed.
• Discontinue use of stroller should it malfunction or become damaged.
* Wheels style may vary.
Bumper Bar
Sac de transport / fourre-tou

4
ASSEMBLY
Copyright © 2020, Baby Trend Inc., All Rights Reserved. Todos los derechos reservados. Tous droits réservés.
3
WARNING
Copyright © 2020, Baby Trend Inc., All Rights Reserved. Todos los derechos reservados. Tous droits réservés.
TO UNFOLD STROLLER
WARNING: Care must be taken
when unfolding the stroller to prevent
nger entrapment.
CAUTION: Do not allow children
near stroller while unfolding.
Unfold stroller as described in the following
section :
IMPORTANT! To ensure safe operation of your
product, please follow these instructions carefully.
Please keep these instructions for future reference.
IMPORTANT! Before assembly and each use,
inspect this product for damaged hardware, loose
joints, missing parts or sharp edges. NEVER use if
any parts are missing or broken.
IMPORTANT! Adult assembly is required.
Fig. 1a
Fig. 1c
Fig. 1b
"Click"
1) • Release the fold latch by pulling
it outward (Fig. 1a). Pull upward
on the stroller handle until the
frame locks (Fig. 1b).
NOTE: The frame clicks into
position when fully extended.
The frame must lock (Fig. 1c).

5
6
ASSEMBLY ASSEMBLY
Copyright © 2020, Baby Trend Inc., All Rights Reserved. Todos los derechos reservados. Tous droits réservés.
Copyright © 2020, Baby Trend Inc., All Rights Reserved. Todos los derechos reservados. Tous droits réservés.
CANOPY
4) • To open the canopy: push
forward on the front edge of the
canopy while holding the rear of
canopy in place (Fig. 4a).
• To fold the canopy: pull
backwards on the front edge
(Fig. 4b).
REMOVABLE BUMPER BAR
WARNING: Do not
use bumper bar to carry
stroller with child inside.
FALL HAZARD:
Bumper bar is not designed
to support a car seat,
stroller may become
unstable.
5) • Attach the bumper bar by lining
up anchors with the slots on
the seat. Push until it clicks into
place (Fig. 5a).
NOTE: The bumper bar must be
securely attached before using
this product.
• To access the child seat, press
both buttons and pull out both
sides to remove the bumper bar
(Fig. 5b).
FRONT WHEELS
To attach the wheels, unfold
stroller as described in the
following section:
2) • Lean the stroller backwards
and push each front wheel
assembly into the front wheel
housing until they lock into
place (Fig. 2).
NOTE: Pull on the wheel
assembly to ensure that it
is securely attached to the
stroller.
REAR WHEELS
3) • Lean the stroller forward and
press the rear wheel post into
the rear frame hub until it clicks
into place. Repeat for the other
side (Fig. 3).
NOTE: Pull on the rear wheel
to ensure that it is securely
attached to the stroller.
Fig. 2
Fig. 4a
Fig. 4b
Fig. 5a
Fig. 5b
Fig. 3
visor
optional

7
8
ASSEMBLY ASSEMBLY
Copyright © 2020, Baby Trend Inc., All Rights Reserved. Todos los derechos reservados. Tous droits réservés.
Copyright © 2020, Baby Trend Inc., All Rights Reserved. Todos los derechos reservados. Tous droits réservés.
STORAGE BASKET
8) • The storage basket is accessed
from the stroller rear underneath
the seat (Fig. 8).
NOTE: Placing the seat in the
upright position (Fig. 6a), may
help better access the storage
basket.
ACCESSING THE WINDOW
9) • Use the hook and loop fasteners
to open and close the view
window (Fig. 9).
SEATBACK POSITIONING
6) • To put seat into the upright
position, press the clip ends
together, hold the hoop to
push the clip up and buckle
the top straps (Fig. 6a).
NOTE: The upright position
should be used only for a
child that is at least 6 months
old. Always re-adjust the
safety harness, including
the shoulder belts when
repositioning the seatback.
• To recline the seat, release
the top buckle, press the clip
ends together and pull it down
(Fig. 6b).
ADJUSTING THE LEG SUPPORT
7) • Lift to raise the leg support
(Fig. 7a). To lower, pull the
release bar underneath the
leg support (Fig. 7b).
Fig. 6a
Fig. 6b
Fig. 8
Fig. 9
Fig. 7a Fig. 7b

9
10
SAFETY SAFETY
Copyright © 2020, Baby Trend Inc., All Rights Reserved. Todos los derechos reservados. Tous droits réservés.
Copyright © 2020, Baby Trend Inc., All Rights Reserved. Todos los derechos reservados. Tous droits réservés.
9
10) • To engage brakes, apply light
downward pressure to rotate
the brake lever located on the
frame behind the rear wheel.
The stroller may require slight
forward or rearward movement
in order to line up the teeth
on the brake with each wheel
brake cluster (Fig. 10a).
NOTE: Gently attempt to roll
the stroller forward to check
that the stroller will not move.
If applied correctrly the stroller
will not roll.
• To release, gently rotate up on
the brake lever (Fig. 10b).
Copyright © 2018, Baby Trend Inc., All Rights Reserved. Todos los derechos reservados. Tous droits réservés.
TO SECURE THE CHILD
WARNING: Avoid
serious injury from falling
or sliding out. Always
use the safety harness.
STRANGULATION
HAZARD: Child can
strangle in loose straps. Never
leave child in seat when straps
are loose or undone.
11) • BUCKLE TYPE A: Carefully place
the child in the stroller seat and
bring the safety harness around
the child’s waist and over the
shoulders. Place the crotch strap
between the child’s legs. Connect
the shoulder strap with the waist
strap together as seen in Step A
(Fig. 11a). Connect to the buckle on
the crotch strap as seen in Step B
(Fig 11b).
• Repeat on the opposing side to fully
join all the 5-point harness straps
together (Fig. 11c).
• Use the adjustable buckles to set
the height of the shoulder straps
and a comfortable t on the waist
(Fig. 11d).
BRAKES
WARNING: Always
set brakes when the stroller
is not being pushed so
that the stroller will not roll
away. NEVER leave stroller
unattended on a hill or incline
as the stroller may slide down
the hill.
Fig. 10a
Fig. 10b
Fig. 11d
Fig. 11c
Fig. 11b
Fig. 11a
A.
B.
B.
A.
Shoulder
Strap
Waist
Strap
Crotch
Strap
BUCKLE TYPE A

11
12
SAFETY SAFETY
Copyright © 2020, Baby Trend Inc., All Rights Reserved. Todos los derechos reservados. Tous droits réservés.
Copyright © 2020, Baby Trend Inc., All Rights Reserved. Todos los derechos reservados. Tous droits réservés.
• BUCKLE TYPE B: To secure the
child, place the safety harness
around the child’s waist and
over the shoulders. Place the
crotch strap between the child’s
legs. Insert the male end of
each shoulder/waist belt into the
crotch buckle. Tighten all buckles
to the proper t for the child
(Fig. 11e).
TO RELEASE THE CHILD
12) • Push button on center clasp, the
harness buckles will pop free
(Fig. 12).
TO ADJUST THE HARNESS
13) • Select the position that
places the shoulder strap
level with, or below, the
top of the child’s shoulders
(Fig. 13a).
Fig. 13a
Adjust to child’s shoulder
• Adjust the harness by pulling the anchor in or out through the
adjustment slots (Fig. 13b).
NOTE: May require you to grip and pull the anchor through
the slots. Always ensure the anchor is at against the seat
backrest (Fig. 13c).
Fig. 13b Fig. 13c
Front Side Back Side
BUCKLE TYPE B
BUCKLE TYPE BBUCKLE TYPE A
Adjust for a snug t
Fig. 12
Center ClaspCenter Clasp
Fig. 11e

13
14
FOLD / UNFOLD
FOLD / UNFOLD
Copyright © 2020, Baby Trend Inc., All Rights Reserved. Todos los derechos reservados. Tous droits réservés.
Copyright © 2020, Baby Trend Inc., All Rights Reserved. Todos los derechos reservados. Tous droits réservés.
• Folded Stroller Carry Option 1:
Carry the stroller from the bumper
bar (Fig. 14e).
NOTE: Ensure the bumper bar is
completely attached. Only for use
when the stroller is folded.
• Folded Stroller Carry Option 2:
Carry the stroller from the rear
leg. Always grab the leg from the
center of the tubing (Fig. 14f).
NOTE: Only for use when the
stroller is folded.
• IMPORTANT: To avoid nger
injury, do not carry the stroller
from any other areas.
TO FOLD STROLLER
WARNING: Care
must be taken when
folding the stroller to
prevent nger entrapment.
CAUTION: Do not
allow children near stroller
while folding.
14) • Pull stroller backward several
inches to rotate the front
wheels to the front (Fig. 14a).
• Push in the large center button
and rotate the handle forward
(Fig. 14b) while pushing
forward and downward on the
stroller handle until the frame
locks (Fig. 14c).
• Ensure the fold latch clicks and
secures the stroller closed
(Fig. 14d).
NOTE: May require lifting up
the sliding tab.
Fig. 14a
Fig. 14e
Fig. 14f
Fig. 14b
Fig. 14c
OPTION 1.
Bumper bar
OPTION 2.
Rear Leg Center
Sliding
tab
Fig. 14d

16
OPERATION
Copyright © 2020, Baby Trend Inc., All Rights Reserved. Todos los derechos reservados. Tous droits réservés.
15
FOLD / UNFOLD
Copyright © 2020, Baby Trend Inc., All Rights Reserved. Todos los derechos reservados. Tous droits réservés.
Copyright © 2020, Baby Trend Inc., All Rights Reserved. Todos los derechos reservados. Tous droits réservés.
Fig. 15b Fig. 15c
"Click"
Fig. 15a
TO UNFOLD STROLLER
WARNING: Care
must be taken when unfolding
the stroller to prevent nger
entrapment.
CAUTION: Do not allow
children near stroller while
unfolding.
15) • Release the fold latch by pulling it
outward (Fig. 15a).
• Using the handle lift upward on the
stroller handle until the frame locks
(Fig. 15b).
NOTE: The frame clicks into position
when fully extended. The frame must
lock (Fig. 15c).
CARRY BAG / TOTE BAG
WARNING:
STRANGULATION HAZARD!
Children have strangled in
loose straps. Never leave
child unattended when
straps are loose or undone.
16) • Stretch the elastic opening of the
tote bag, and place the stroller
into the carry bag. Ensure that
you put the stroller in wheels
rst. Tighten or losen the cording
with the adjuster tab (Fig. 16).
SHOULDER STRAPS
17) • After setting the stroller neatly
into the tote bag, locate the
strap. Adjust the length as
desired with the adjuster buckle
(Fig. 17a). Always use the strap
when carrying the stroller in the
tote bag.
• Use the bag for transporting
the stroller or for storing away
the stroller.
NOTE: The strap on the tote bag
is intended to be used on the
shoulder (Fig. 17b). Store away
the bag when not in use.
Fig. 16
Fig. 17b
Fig. 17a
Tightgen
Carry with bumper bar

17
18
MAINTENANCE MAINTENANCE
Copyright © 2020, Baby Trend Inc., All Rights Reserved. Todos los derechos reservados. Tous droits réservés.
Copyright © 2020, Baby Trend Inc., All Rights Reserved. Todos los derechos reservados. Tous droits réservés.
FRONT WHEEL RELEASE
18) • NOTE: Remove the wheels for
storage or replacement: Press
the release latch and pull the
wheels out (Fig. 18).
REAR WHEEL RELEASE
19) • NOTE: Remove the wheels for
storage or replacement: Press
the release latch and pull the
wheels out (Fig. 19).
SEAT FABRIC SNAP BUTTTONS
20) • Check both sides of the seat
fabric to ensure it is properly
attached.
NOTE: If assembly needed,
press the snap buttons on the
fabric onto the snap buttons on
the frame (Fig. 20).
Fig. 18
Fig. 19
Fig. 20
SEAT FABRIC SUPPORT
21) • Underneath the seat, ensure that
the straps are both pulled tightly
and always attached with the
hook and loop fasteners
(Fig. 21).
Fig. 21

19
20
MAINTENANCE MAINTENANCE
Copyright © 2020, Baby Trend Inc., All Rights Reserved. Todos los derechos reservados. Tous droits réservés.
Copyright © 2020, Baby Trend Inc., All Rights Reserved. Todos los derechos reservados. Tous droits réservés.
CANOPY FABRIC
22) • If assembly needed, attach all the hook and loop fasteners.
Attach the long fasters on both canopy sides. Then attach the
two small ones on the lower canopy sides. Lastly attach the two
small ones on the back of the canopy to the seat back (Fig. 22).
Fig. 22
HARNESS COVERS
23) • If assembly needed, insert
the harness covers through
the strap (Fig. 23).
CARE AND MAINTENANCE
• Cleaning Seat Pad: Spot clean only
- Surface wash small spots with mild
solution of soap and water. Rinse with
water to remove soap solution. Wipe or
air dry.
• Cleaning Stroller: Surface wash
stroller frame, plastic parts and fabric
with mild solution of soap and water.
Wipe surfaces with water to remove
soap solution. Wipe or air dry.
• Check your stroller for loose screws,
worn parts, torn material or stitching on
a regular basis. Replace or repair parts
as needed.
Fig. 23

22
ADVERTENCIA
Copyright © 2020, Baby Trend Inc., All Rights Reserved. Todos los derechos reservados. Tous droits réservés.
21
PIEZAS
Copyright © 2020, Baby Trend Inc., All Rights Reserved. Todos los derechos reservados. Tous droits réservés. Copyright © 2018, Baby Trend Inc., All Rights Reserved. Todos los derechos reservados. Tous droits réservés.
Verique que tenga todas las piezas para este
modelo antes de montar el carrito.
* Los estilos de las ruedas pueden variar.
Carriola compacta
Ruedas traserasRuedas delanteras
Bolso de guardado
Barra Frontal
ADVERTENCIA: Por favor, siga todas estas
instrucciones para garantizar la seguridad de su hijo.
Conserve estas instrucciones para referencia futura.
ADVERTENCIA: El incumplimiento de
estas instrucciones podría ocasionar una lesión
grave o la muerte. Evite lesiones graves por caídas
o resbalones. Siempre use el arnés de seguridad
y asegúrese de que los niños estén ubicados
correctamente de acuerdo a estas instrucciones.
ADVERTENCIA:
Nunca pierda de vista a los
niños.
ADVERTENCIA: Se debe ser prudente al
plegar y desplegar el carrito para evitar que queden
dedos atrapados.
• PRECAUCIÓN: Este carrito está diseñado
para un niño solamente. El uso con más de un niño podría
provocar inestabilidad y lesionar o dañar a su hijo.
• PRECAUCIÓN:
Este carrito está diseñado para un niño solamente. El uso
con más de un niño podría provocar inestabilidad y lesionar o dañar a su
niño.
•
Los bolsos, bolsas de compras, paquetes, bolsas de pañales o artículos
accesorios podrían cambiar el equilibrio del carrito y una condición de
inestabilidad peligrosa.
•
El peso máximo que se puede llevar en la canasta de almacenamiento es
de 5 libras (2.26 kg). El exceso de peso podría ocasionar una inestabilidad
peligrosa.
• Procure que el carrito esté completamente abierto y bien trabado antes de
permitir que un niño se acerque al mismo.
• La capacidad máxima de peso de este carrito es de
45
libras (20.41 kg) o
40 pulgadas (101.6 cm). El peso adicional causará un desgaste y tensión
excesivos en el carrito y podrían provocar una inestabilidad peligrosa.
• NUNCA use el carrito en escaleras mecánicas o comunes.
• NUNCA use el carrito con patines de ruedas, patines en línea,
monopatines o bicicletas.
• NUNCA permita el uso de su carrito como un juguete.
• Para limpiarlo, use solamente jabón doméstico o detergente suaves y
agua tibia en una esponja o trapo limpio.
• Verique con frecuencia que su carrito no tenga tornillos sueltos, piezas
gastadas, materiales o costuras rasgados. Reemplace o repare las piezas
conforme sea necesario.
• Deje de usar el carrito si presenta fallas o daños.

MONTAJE
Copyright © 2020, Baby Trend Inc., All Rights Reserved. Todos los derechos reservados. Tous droits réservés.
23
ADVERTENCIA
Copyright © 2020, Baby Trend Inc., All Rights Reserved. Todos los derechos reservados. Tous droits réservés.
¡IMPORTANTE! Para asegurar el
funcionamiento seguro de su carrito, siga
estas instrucciones cuidadosamente. Por
favor, conserve estas instrucciones para
referencia futura.
¡IMPORTANTE! Antes del montaje y
de cada uso, inspeccione el producto
para detectar daños en el equipo, uniones
sueltas, piezas faltantes o bordes losos.
NUNCA use el carrito con piezas faltantes
o rotas.
¡IMPORTANTE! Se requiere el montaje
por parte de un adulto.
PARA DESPLEGAR EL CARRITO
ADVERTENCIA: Se debe ser prudente
al desplegar el carrito para evitar que queden dedos
atrapados.
PRECAUCIÓN: No permita que los niños se
acerquen al carrito mientras lo despliega.
24
Copyright © 2018, Baby Trend Inc., All Rights Reserved. Todos los derechos reservados. Tous droits réservés.
Despliegue el carrito como se
describe en la siguiente sección:
1) • Libere el pestillo jalando de él
hacia afuera (Fig. 1a). Empuje el
mango de la silla de bebé hacia
arriba hasta que la estructura se
trabe (Fig. 1b).
NOTA: El armazón se traba
cuando está completamente
extendido. El armazón debe
trabarse (Fig. 1c).
Fig. 1a
Fig. 1c
Fig. 1b
"Clic"

25
26
MONTAJE MONTAJE
Copyright © 2020, Baby Trend Inc., All Rights Reserved. Todos los derechos reservados. Tous droits réservés.
Copyright © 2020, Baby Trend Inc., All Rights Reserved. Todos los derechos reservados. Tous droits réservés.
5) • Coloque la barra frontal alineando los
anclajes con las ranuras de la sillita.
Empuje hasta que encaje (Fig. 5a).
NOTA: la barra frontal debe estar sujeta
de manera segura antes de poder usar
el producto.
• Para acceder al asiento para niños,
presione ambos botones y tire hacia
fuera de ambos lados para retirar la
barra parachoques (Fig. 5b).
RUEDAS DELANTERAS
Para colocar las Ruedas Delanteras,
despliegue el carrito como se describe en
la siguiente sección:
2) • Incline el carrito hacia atrás
y empuje cada montaje de
la rueda delantera hacia
la arandela de la rueda
delantera hasta que se traben
(Fig. 2a). Repita el mismo
procedimiento
NOTA: Tire del montaje de la
rueda para cerciorarse de que
esté sujeto de manera segura
al carrito.
RUEDAS TRASERAS
3) • Incline el carrito hacia delante
y presione el poste de la
rueda trasera dentro del
cubo del armazón trasero
hasta que se trabe y haga
clic (Fig. 3). Repita el mismo
procedimiento del otro lado.
NOTA: Tire de la rueda
trasera para cerciorarse de
que esté sujeta de manera
segura al carrito.
Fig. 2
CUBIERTA
4) • Para abrir la cubierta: empuje hacia
delante el borde delantero de la cubierta
mientras sostiene la parte trasera de la
misma en su sitio (Fig. 4a).
• Para plegar la cubierta: empuje hacia
atrás el borde delantero (Fig. 4b).
Fig. 4a
Fig. 4b
Fig. 5a
Fig. 5b
Visera
Opcional
BARRA DE PARACHOQUES EXTRAÍBLE
ADVERTENCIA: No
use la barra frontal para trasladar
el cochecito para estando el
niño adentro.
RIESGO DE CAIDA:
La barra parachoques no está
diseñada para soportar una sillita
de bebé para automóviles, el
carrito podría volverse inestable.
Fig. 3

27
28
MONTAJE MONTAJE
Copyright © 2020, Baby Trend Inc., All Rights Reserved. Todos los derechos reservados. Tous droits réservés.
Copyright © 2020, Baby Trend Inc., All Rights Reserved. Todos los derechos reservados. Tous droits réservés.
AJUSTE DEL SOPORTE PARA LAS PIERNAS
7) • Levante para elevar el soporte de las piernas (Fig. 7a).
Para bajar la posición, tire de la barra de liberación que se
encuentra debajo del soporte para las piernas (Fig. 7b).
6) • Para poner el asiento en la
posición vertical, presione los
extremos de lapresilla juntos,
sostenga el aro y empuje hacia
arriba, abroche las correas
superiores (Fig 6a).
NOTA: La posición erguida se
debe usar únicamente para
un niño de al menos 6 meses.
Al reposicionar el respaldo,
siempre vuelva a ajustar el arnés
de seguridad, incluyendo los
cinturones del hombro.
• Para reclinar el asiento, libere
la hebilla superior, presione los
extremos de la presilla juntos y tire
hacia abajo (Fig. 6b).
PARA AJUSTAR EL ASIENTO
Fig. 6a
Fig. 6b
Fig. 7a Fig. 7b
LA CANASTA
8) • A la canasta de almacenamiento
se accede desde la parte trasera
del carrito, debajo del asiento
(Fig. 8).
NOTA: Colocar el asiento en la
posición erguida (Fig. 6a), puede
ayudar a acceder mejor a la
canasta de almacenamiento.
ACCESO A LA VENTANA
9) • Use los sujetadores de gancho
y lazo para abrir y cerrar la
ventana visora (Fig. 9).
Fig. 8
Fig. 9

29
30
SEGURIDAD SEGURIDAD
Copyright © 2020, Baby Trend Inc., All Rights Reserved. Todos los derechos reservados. Tous droits réservés.
Copyright © 2020, Baby Trend Inc., All Rights Reserved. Todos los derechos reservados. Tous droits réservés.
PARA ASEGURAR AL NIÑO
ADVERTENCIA:
Evite lesiones graves por caídas
o resbalones. Siempre use el
arnés de seguridad.
PELIGRO DE
ESTRANGULAMIENTO:
El niño se puede estrangular
con las correas sueltas. Nunca
deje al niño en el asiento cuando
las correas estén sueltas o sin
terminar de colocar.
11) • TIPO DE HEBILLA - A: Coloque
cuidadosamente al niño en el
asiento del carrito y pase el arnés de
seguridad por la cintura del niño y
por encima de los hombros. Coloque
la correa de la entrepierna entre las
piernas del niño. Conecte la cinta que
se encuentra a la altura del hombro
con la que se encuentra a la altura de
la cintura, como se ve en el paso A
(Fig. 11a). Conecte con la hebilla de
la cinta que se encuentra a la altura
de la entrepierna, como se ve en el
paso B (Fig. 11b).
• Repita el proceso del lado opuesto
para unir los 5 puntos de las cintas
del arnés (Fig. 11c).
• Use las hebillas ajustables para jar
la altura de las correas del hombro y
un ajuste cómodo en la cintura
(Fig. 11d).
Fig. 10a
Fig. 10b
FRENOS
ADVERTENCIA:
Siempre aplique los frenos
cuando el carrito no esté
siendo empujado, para
impedir que ruede fuera de su
alcance. Nunca deje el carrito
desatendido en una colina
o pendiente, ya que podría
deslizarse pendiente abajo.
10) • Para colocar los frenos, presione
levemente hacia abajo para hacer
girar la palanca de freno ubicada
en el marco detrás de la rueda
trasera. Puede ser necesario
mover la silla de bebé hacia
adelante o hacia atrás de manera
sutil para alinear los dientes del
freno con el espacio para freno
de cada rueda (Fig. 10a).
NOTA: De manera sutil, intente
mover la silla de bebé hacia
adelante para vericar que no sea
posible hacerlo.
• Para soltarlos, gire suavemente la
palanca del freno (Fig. 10b).
Fig. 11d
Fig. 11c
Fig. 11b
Fig. 11a
A.
B.
B.
A.
Correa del
hombro
Correa de
la cintura
Correa de la
entrepierna
TIPO DE HEBILLA - A

31
32
SEGURIDAD SEGURIDAD
Copyright © 2020, Baby Trend Inc., All Rights Reserved. Todos los derechos reservados. Tous droits réservés.
Copyright © 2020, Baby Trend Inc., All Rights Reserved. Todos los derechos reservados. Tous droits réservés.
• TIPO DE HEBILLA - B: Para
asegurar al niño, coloque el
arnés de seguridad alrededor
de la cintura del niño y sobre
los hombros. Coloque la correa
de la entrepierna entre las
piernas del niño. Introduzca el
extremo macho del cinturón de
cada hombro o de la cintura
en la hebilla de la correa de
la entrepierna. Apriete todas
las hebillas para ajustarlas
adecuadamente para el niño
(Fig. 11e).
PARA SOLTARLAS AL NIÑO
12) • Presione el botón en la presilla
central para destrabar las
hebillas del arnés (Fig. 12).
Regule para lograr un buen ajuste
Fig. 11e
TIPO DE HEBILLA - BTIPO DE HEBILLA - A
Fig. 12
Presilla central
PARA AJUSTAR EL ARNÉS
13) • Ajuste el arnés de modo que
esté ceñido alrededor de la
cintura del niño y por encima
de sus hombros (Fig. 13a).
Fig. 13a
Fig. 13b Fig. 13c
Ajuste de los hombros del niño
• Para ajustar el arnés, tire del anclaje hacia dentro o fuera por
las ranuras de ajuste (Fig. 13b).
NOTA: Es posible que tenga que agarrar y tirar del anclaje por
las ranuras. Siempre asegúrese de que el anclaje esté plano
contra el respaldo del asiento (Fig. 13c).
Lado frontal Lado posterior
Presilla central
TIPO DE HEBILLA - B

33
34
PLEGAR / DESPLEGAR PLEGAR / DESPLEGAR
Copyright © 2020, Baby Trend Inc., All Rights Reserved. Todos los derechos reservados. Tous droits réservés.
Copyright © 2020, Baby Trend Inc., All Rights Reserved. Todos los derechos reservados. Tous droits réservés.
• Opción 1 para el traslado del
carrito plegado: Traslade el
carrito tomándolo desde la barra
parachoques (Fig. 14e).
NOTA: Asegúrese de que la barra
parachoques esté completamente
sujeta. Solo para usar cuando el
carrito esté plegado.
• Opción 2 para el traslado del
carrito plegado: Traslade el carrito
tomándolo desde la pata trasera.
Siempre tome la pata desde el
centro de los tubos (Fig. 14f).
NOTA: Solo para usar cuando el
carrito esté plegado.
• IMPORTANTE: Para evitar lesiones
en los dedos, no traslade el carrito
tomándolo desde ninguna otra área.
PARA PLEGAR EL CARRITO
ADVERTENCIA:
Se debe ser prudente al
plegar el carrito para evitar
que queden dedos atrapados.
PRECAUCIÓN:
No permita que los niños se
acerquen al carrito mientras
lo pliega.
14) • Tire del carrito hacia atrás
varias pulgadas para girar las
ruedas delanteras hacia el frente
(Fig. 14a).
• Oprima el botón central grande
y rote esa parte del manubrio
hacia delante (Fig. 14b) mientras
empuja el manubrio del carrito
hacia delante y abajo hasta que el
armazón se trabe (Fig. 14c).
• Asegúrese de que el pestillo para
plegar haga clic y asegure el
carrito (Fig. 14d).
NOTA: Podría tener que levantar
la lengüeta corrediza.
Fig. 14a
Fig. 14b
Fig. 14c
Fig. 14e
Fig. 14f
Opción 1.
Barra parachoques
Opción 2.
Centro de la pata trasera
lengüeta
corrediza
Fig. 14d

36
FUNCIONAMIENTO
Copyright © 2020, Baby Trend Inc., All Rights Reserved. Todos los derechos reservados. Tous droits réservés.
35
PLEGAR / DESPLEGAR
Copyright © 2020, Baby Trend Inc., All Rights Reserved. Todos los derechos reservados. Tous droits réservés.
PARA DESPLEGAR EL CARRITO
ADVERTENCIA: Se
debe ser prudente al desplegar el
carrito para evitar que queden dedos
atrapados.
PRECAUCIÓN: No permita
que los niños se acerquen al carrito
mientras lo despliega.
15) • Libere el pestillo jalando de él hacia
afuera (Fig. 15a).
• Usando el mango levante hacia arriba
en la manija del cochecito hasta que el
marco se bloquee (Fig. 15b).
NOTA: El armazón se traba cuando
está completamente extendido. El
armazón debe trabarse (Fig. 15c).
Fig. 15b Fig. 15c
"Clic"
Fig. 15a
BOLSO DE GUARDADO
ADVERTENCIA:
¡PELIGRO DE
ESTRANGULAMIENTO!
Algunos niños se han
estrangulado con correas
sueltas. NUNCA deje al niño
sin supervisión si las correas
están sueltas o desatadas.
16) • Extienda la abertura elástica del
bolso de guardado y coloque el
carrito adentro. Asegúrese de
colocar las ruedas del carrito
primero. Ajuste o aoje las
cuerdas con el regulador
(Fig. 16).
CORREAS DE HOMBRO
17) • Después de colocar el carrito
prolijamente dentro del bolso
de guardado, localice la correa.
Ajuste la longitud deseada con
el broche de ajuste(Fig. 17a).
Siempre use la correa cuando
lleve la carriola en la bolsa
de mano.
• Use la bolsa para transportar
la carriola o para guardar la
carriola.
NOTA: La correa en la bolsa
de mano está diseñada para
usarse en el hombro (Fig. 17b).
Guarde la bolsa cuándo no esté
en uso.
Fig. 16
Fig. 17b
Fig. 17a
Tightgen
Tomándolo con la
barra parachoques

37
38
MANTENIMIENTO MANTENIMIENTO
Copyright © 2020, Baby Trend Inc., All Rights Reserved. Todos los derechos reservados. Tous droits réservés.
Copyright © 2020, Baby Trend Inc., All Rights Reserved. Todos los derechos reservados. Tous droits réservés.
FLIBERACIÓN DE LAS RUEDAS
DELANTERAS
18) • NOTA: Retire las ruedas para su
almacenamiento o reemplazo:
presione el pestillo de liberación
y tire de las ruedas hacia fuera
(Fig. 18).
LIBERACIÓN DE LAS RUEDAS
TRASERAS
19) • NOTA: Retire las ruedas para su
almacenamiento o reemplazo:
presione el pestillo de liberación
y tire de las ruedas hacia fuera
(Fig. 19).
BOTONES A PRESIÓN EN
LA TELA DEL ASIENTO
20) • Verique ambos lados de la tela
del asiento para asegurarse de
que estén correctamente sujetos.
NOTA: Si necesita colocarla,
presione los botones de la tela
en los botones del armazón
(Fig. 20).
Fig. 18
Fig. 19
Fig. 20
APOYO DE LA TELA DEL ASIENTO
21) • Debajo del asiento, asegúrese
de que ambas correas estén bien
tirantes y siempre sujetas con
los sujetadores de gancho y lazo
(Fig. 21).
Fig. 21
/