Philips 50PL9220D User manual

Category
Projection TVs
Type
User manual

This manual is also suitable for

User Manual
50PL9126D
50PL9220D
For Customer Use /
À l’usage du client /
Para Uso del Cliente
AE: Enter below the Serial No. which is located on the rear
of the cabinet. Retain this information for future reference.
FR: Entrez ci-dessous le numéro de série qui se trouve à
l’arrière du boîtier du dispositif. Conservez ces informations
pour référence ultérieure.
ES: Escriba a continuación el de serie, el cual se
encuentra en la parte posterior del gabinete. Guarde esta
información para referencia futura.
Model / Modèle / Modelo : ____________________________
Serial / Série / Serie: _________________________________
www.philips.com/usasupport
or call
1-888-PHILIPS (744-5477)
while with your product
(and Model / Serial number)
Quick Use Guide Inside!
Guide d’usage Rapide Inclus!
¡Guía de Uso Rápido Incluida!
English
Guía del usuario
Manuel de l’utilisateur
Philips vous remercie de
votre conance.
Besoin d'une aide
rapide?
Les Guide d'utilisation rapide et
Manuel de l'utilisateur regorgent
d'astuces destinées à simplier
l'utilisation de votre produit Philips.
Toutefois, si vous ne parvenez
pas à résoudre votre problème,
vous pouvez accéder à
notre aide en ligne à l'adresse
www.philips.com/usasupport
ou formez le
1-800-661-6162 (Francophone)
1-888-PHILIPS (744-5477)
(English speaking)
Veillez à avoir votre produit à
portée de main
(et model / serial nombre)
ARRÊT
Gracias por escoger Philips
¿Necesita ayuda
inmediata?
Lea primero la Guía de uso rápido o el
Manual del usuario, en donde
e
ncontrará
consejos que le ayudarán a disfrutar
plenamente de su producto Philips.
Si después de leerlo aún necesita ayuda,
consulte nuestro servicio de
asistencia en línea en
www.philips.com/usasupport
o llame al teléfono
1-888-PHILIPS (744-5477)
y tenga a mano el producto
(y número de modelo / serie)
ALTO
!
How to make the optimal connection
(only RF cable is provided, for the rest of the cables, please consult your consumer electronics dealer for availability)
Comment réaliser une bonne connexion
(seulement le câble RF est inclus, pour le reste des câbles, de faveur consultez avec son distributeur d’appareils électroniques)
Cómo realizar la mejor conexión
(solo el cable RF está incluído, para el resto de los cables, favor consulte con su distribuidor de aparatos electrónicos)
Supérieure
HDMI
L’interface HDMI (High-Definition
Multimedia Interface) propose une
connexion décompressée au-
dio/vidéo entièrement numérique.
HDMI propose l’ultime connexion
(Veuillez utiliser un câble HDMI
certifié).
Excellente
Entrée vidéo composant
Fournit une qualité d’image
supérieure en séparant les signaux
de luminance vert, bleu et rouge.
Utilisée généralement avec les câbles
audio rouge/blanc.
Remarque: l’entrée vidéo composant
aparaît sur le tableau de connexions
comme YPbPr.
Bonne
S-Vidéo
Fournit une meilleure image que
les connexions RF et composite.
Utilisée avec les câbles audio rouge/
blanc.
De base
Audio/Vidéo
Composite
Câbles vidéo (jaune) et audio (rouge/
blanc) séparés fournissant une con
-
nexion de base à partir du boîtier de
connexion et autres dispositifs.
Remarque: La couleur des entrées
audio peut varier, par ex. rouge/blanc
ou rouge/noir.
RF
Fournit une connexion de base pour
l’antenne ou le service et la vidéo.
Best
HDMI
High-Definition Multimedia Inter-
face provides an uncompressed,
all-digital audio/video connec-
tion. HDMI provides the ultimate
connection (Please use a certified
HDMI cable).
Better
Component Video
input
Provides superior picture quality
by separating the green, blue and
red luminance signals. Typically
used with red/white audio cables.
Good
S-Video
Supplies a better picture than
RF and Composite connections.
Used with red/white audio
cables.
Basic
Composite Audio/
Video
Separate video (yellow) and audio
(red/white) cables that provide a
basic connection from the cable
box and other devices.
Note: The color of audio inputs
may differ, e.g. red/white or
red/black.
RF
Provides a basic connection for
antenna or cable. Provides both
audio and video.
La mejor
HDMI
La interfaz multimedia de alta
definición (HDMI, por sus siglas en
inglés) proporciona una conexión de
audio/video completamente digital
sin comprimir. La HDMI propor
-
ciona la mejor conexión (Sírvase
utilizar un cable HDMI certificado).
Mejor
Entrada de video
componente
Proporciona calidad de imagen
superior al separar las señales de
luminancia verde, azul y roja. Se usa
normalmente con cables de audio
rojo/blanco.
Nota: La entrada de video compo-
nente se muestra en el panel de
conexión como YPbPr.
Buena
S-Video
Brinda una mejor imagen que las
conexiones RF y compuestas. Se
usa con cables de audio rojo/blanco.
Básica
Audio/Video
Compuesto
Cables de video (amarillo) y audio
(rojo/blanco), que proporcionan una
conexión básica de la caja de cable y
otros dispositivos.
Nota: El color de las entradas de au-
dio puede diferir, por ej., rojo/blanco
o rojo/negro.
RF
Proporciona una conexión de
antena o cable básica. Suministra
audio y video.
1
AE: Set-Top Box to TV
FR: Boîtier de décodage
vers téléviseur
ES: De la caja superior
o caja de cable al TV
HDMI
RF
CABLE/
ANTENNA
HDMI
Y
Pb
VIDEO
R
C
Details refer to page 21.
/Détails, consultez la page 21.
/Para detalles, consulte la pag. 21.
OR/OU/O
2
AE: DVD Player/Recorder to TV
FR: Lecteur DVD/Enregistreur
DVD vers téléviseur
ES: Del reproductor o grabador
de DVD al TV
Details refer to page 21.
/Détails, consultez la page 21.
/Para detalles, consulte la pag. 21.
HDMI
3
AE: DVD Player or Recorder to TV
FR: Lecteur DVD ou Enregistreur
vers téléviseur
ES: Del reproductor o
grabador de DVD al TV
Component Video Input
/Entrée vidéo composant
/Entrada de video
componente
Details refer to page 21.
/Détails, consultez la page 21.
/Para detalles, consulte la pag. 21.
4
AE: DVD Player/Recorder/VCR
to TV
FR: Lecteur DVD/Enregistreur
DVD/Magnétoscope vers
téléviseur
ES: Del reproductor/grabador de
DVD/VCR al TV
Details refer to page 22.
/Détails, consultez la page 22.
/Para detalles, consulte la pag. 22.
S-Video
/S-Vidéo
/S-Video
C
5
AE: DVD Player/Recorder/VCR
to TV
FR: Lecteur DVD/Enregistreur
DVD/Magnétoscope vers le
téléviseur
ES: Del reproductor/grabador de
DVD/VCR al TV
Details refer to page 22.
/Détails, consultez la page 22.
/Para detalles, consulte la pag. 22.
C
Composite Audio-video
/Audio-Vidéo composite
/Audio-Video compuesto
6
AE: Video Camera /Games
Console to TV
FR: Caméra vidéo/Console de
jeux vers téléviseur
ES: De la cámara de video/
Consola de juegos al TV
Details refer to page 22.
/Détails, consultez la page 22.
/Para detalles, consulte la pag. 22.
Composite Audio-video
/Audio-Vidéo composite
/Audio-Video compuesto
7
AE: Audio to Hi-fi System (Digital)
FR: Audio vers chaîne haute fidélité (Numérique)
ES: Audio al sistema Hi-fi (Digital)
Details refer to page 23.
/Détails, consultez la page 23.
/Para detalles, consulte la pag. 23.
SPDIF
1
A Guide to Digital TV. . . . . . . . . . . . . . . . . . . . . . . . . . . . . . . . . . . . . . . . . . 2
Preparation . . . . . . . . . . . . . . . . . . . . . . . . . . . . . . . . . . . . . . . . . . . . . . . . . .
2
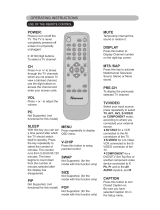
Use of the remote control. . . . . . . . . . . . . . . . . . . . . . . . . . . . . . . . . . . . . .
5
Control Buttons on the TV . . . . . . . . . . . . . . . . . . . . . . . . . . . . . . . . . . . . .
6
My Content . . . . . . . . . . . . . . . . . . . . . . . . . . . . . . . . . . . . . . . . . . . . . . . . . .
6
Installation. . . . . . . . . . . . . . . . . . . . . . . . . . . . . . . . . . . . . . . . . . . . . . . . . . .
7
Select the menu language . . . . . . . . . . . . . . . . . . . . . . . . . . . . . . . . . . . . . . . . . . . .
7
Store TV channels . . . . . . . . . . . . . . . . . . . . . . . . . . . . . . . . . . . . . . . . . . . . . . . . . .
7
Weak channel installation . . . . . . . . . . . . . . . . . . . . . . . . . . . . . . . . . . . . . . . . . . .
8
Software upgrade
. . . . . . . . . . . . . . . . . . . . . . . . . . . . . . . . . . . . . . . . . . . . . . . . . . 8
To use the menus . . . . . . . . . . . . . . . . . . . . . . . . . . . . . . . . . . . . . . . . . . . . .
9
Introduction . . . . . . . . . . . . . . . . . . . . . . . . . . . . . . . . . . . . . . . . . . . . . . . . . . . . . .
9
How to navigate through the Settings menus
. . . . . . . . . . . . . . . . . . . . . . . . . . . . 9
Demo . . . . . . . . . . . . . . . . . . . . . . . . . . . . . . . . . . . . . . . . . . . . . . . . . . . . . . .
9
Setup menu. . . . . . . . . . . . . . . . . . . . . . . . . . . . . . . . . . . . . . . . . . . . . . . . . 10
Preferences
. . . . . . . . . . . . . . . . . . . . . . . . . . . . . . . . . . . . . . . . . . . . . . . . . . . . . . 10
Source
. . . . . . . . . . . . . . . . . . . . . . . . . . . . . . . . . . . . . . . . . . . . . . . . . . . . . . . . . . 13
Clock . . . . . . . . . . . . . . . . . . . . . . . . . . . . . . . . . . . . . . . . . . . . . . . . . . . . . . . . . . 13
TV menu . . . . . . . . . . . . . . . . . . . . . . . . . . . . . . . . . . . . . . . . . . . . . . . . . . . 14
Picture menu
. . . . . . . . . . . . . . . . . . . . . . . . . . . . . . . . . . . . . . . . . . . . . . . . . . . . . . . . 14
Sound menu . . . . . . . . . . . . . . . . . . . . . . . . . . . . . . . . . . . . . . . . . . . . . . . . . . . . .
15
Features menu . . . . . . . . . . . . . . . . . . . . . . . . . . . . . . . . . . . . . . . . . . . . . . . . . . .
16
Channels menu
. . . . . . . . . . . . . . . . . . . . . . . . . . . . . . . . . . . . . . . . . . . . . . . . . . . 17
Picture Formats . . . . . . . . . . . . . . . . . . . . . . . . . . . . . . . . . . . . . . . . . . . . . . . . . .
20
Connect Accessory Devices . . . . . . . . . . . . . . . . . . . . . . . . . . . . . . . . . . . . 21
DVD Player/Recorder to TV . . . . . . . . . . . . . . . . . . . . . . . . . . . . . . . . . . . . . . . .
21
DVD Player/Recorder/VCR to TV . . . . . . . . . . . . . . . . . . . . . . . . . . . . . . . . . . . .
22
Video Camera/Games Console to TV . . . . . . . . . . . . . . . . . . . . . . . . . . . . . . . . .
22
Audio to Hi-fi System (Digital)
. . . . . . . . . . . . . . . . . . . . . . . . . . . . . . . . . . . . . . . 23
To select connected devices and audio and video functions . . . . . . . . . . 23
Multimedia Browser . . . . . . . . . . . . . . . . . . . . . . . . . . . . . . . . . . . . . . . . . . 24
Troubleshooting Tips . . . . . . . . . . . . . . . . . . . . . . . . . . . . . . . . . . . . . . . . . 26
Glossary. . . . . . . . . . . . . . . . . . . . . . . . . . . . . . . . . . . . . . . . . . . . . . . . . . . . 28
Care and Cleaning . . . . . . . . . . . . . . . . . . . . . . . . . . . . . . . . . . . . . . . . . . . 29
Specifications . . . . . . . . . . . . . . . . . . . . . . . . . . . . . . . . . . . . . . . . . . . . . . . 30
Annex 1 - Philips TV software upgrade with portable memory . . . . . . . 31
Philips Limited Warranty . . . . . . . . . . . . . . . . . . . . . . . . . . . . . . . . . . . . . . 33
R End of life directives
Philips is paying a lot of attention to produce
environmentally-friendly products in green focal
areas. Your new TV contains materials which
can be recycled and reused. At the end of
its life specialized companies can dismantle
the discarded TV to concentrate the reusable
materials and to minimize the amount of
materials to be disposed off.
Please ensure you dispose off your old TV
according to local regulations.
Care of the screen
See Care and Cleaning, p. 29.
Contents
Recycling
The materials used in your set are either
reusable or can be recycled.
To minimise environmental waste,specialist
companies collect used
appliances and dismantle them after
retrieving any materials that can be used
again (ask your dealer for further details).
Manufactured under license from Dolby Laboratories.
‘Dolby’ and the double-D symbol are trademarks of Dolby Laboratories.
DLP® and the DLP logo are registered trademarks of Texas Instruments.
Active Control, Auto Picture, Auto Sound are trademarks of Philips Consumer Electronics Company. © 2001 Philips Consumer Electronics.
As an Energy Star® Partner, Philips
Consumer Electronics has determined this
product meets the Energy Star® guidelines
for energy efficiency. Energy Star® is a
U.S. registered mark. Using products with
Energy Star® label can save energy. Saving
energy reduces air pollution and lowers
utility bills.
2
Do not insert the power plug in a wall socket before all
connections are made.
The major benefit of this DLP® projection television is its large viewing
screen. To see the large screen at its best, test various locations in the
room to find the optimal spot for viewing.
Be sure to allow a minimum of 15 cm of space around the TV.
To avoid cabinet warping, cabinet colour changes, and increased chance of
set failure, do not place the TV where temperatures can become excessively
hot for example, in direct sunlight or near a heating appliance.
Magnetic fields, such as those of external speakers, may cause the picture
to distort if the speakers are placed too close to the television. Move the
magnetic field source away from the TV until there is no picture distortion.
Preparation
What is Digital Light Processing® (DLP)?
Digital Light Processing® is the world’s only all-digital display chip and a key ingredient in the best digital projectors available
today. DLP® technology uses an optical semiconductor to recreate source material with fidelity analog systems cannot match.
What is Digital Television (DTV)?
Digital Television (DTV) is a relatively new type of broadcasting that promises to transform television viewing into a whole new
experience. Digital technology is used to capture images and sound to deliver a better picture quality. DTV technology is also
capable of multicasting and interactive capabilities.
There are many levels of digital television quality. The most common are:
Standard Definition TV (SDTV)
SDTV is the basic level of quality display and resolution for both analog and digital. Transmission of SDTV can be in the
traditional (4:3) or widescreen (16:9) format.
Enhanced Definition TV (EDTV)
EDTV is better in picture quality than analog television. The formats for EDTV are 480p widescreen (16:9) or traditional (4:3).
EDTV is in the middle range quality between SDTV and HDTV.
High Definition TV (HDTV)
HDTV has the highest quality for digital broadcast formats. Its resolution is widescreen format (16:9). Combined with digitally
enhanced sound technology, HDTV sets new standards for sound and picture quality in television.
DTV is by far a more flexible and efficient technology than the analog broadcast system. Analog broadcasts can only provide
one program at a time. Digital television can broadcast a high definition program or more than one standard definition
program at the same time.
Guide to Digital Light Processing® and Digital TV
3
Watching Cable TV programs that
don’t require the cable box
Since you’ve connected the cable TV signal
directly to the TV’s tuner, you can also watch the
unscrambled programs by simply tuning to the
desired channel. You must first use Autoprogram,
however, to store channels in the TV’s memory.
See page 7.
Note: This connection will supply stereo sound to the
TV if it is being broadcast by the station you are
watching.
C
ABL
E
Connections to the TV
Your integrated digital TV automatically decodes and displays the four basic DTV
picture resolution standards.
- SDTV (Standard Definition TV) are broadcast as 480i (480-line interlaced) or 480p
(480-line progressive scan) video.
- HDTV (High-Definition TV) are broadcast either in the 1080i or 720p formats,
always with a widescreen picture.
Note: Progressive scan video (p) is more like that you see in a movie theater. Images are
much more distinct and free of flicker, and motion is smoother.
Next to analog NTSC broadcast reception, your TV has an integrated High Definition
TV tuner which receives, decodes and displays terrestrial ATSC and unscrambled
cable (QAM) signals.
HDTV quality is only reproduced when a broadcaster or cable provider broadcasts
HDTV signals.
Note: Ask your broadcaster or cable box provider to transmit/enable HD content to your
home.
There are 2 ways to get HDTV content:
- via cable,
- via antenna.
Note: This drawing is used wherever you can connect cable or antenna.
Via Cable
Connect the cable TV signal to the CABLE/ANTENNA jack at the bottom of
the TV. See page 7 for details on using "Autoprogram" to store channels in the TV’s
memory.
Note: this connection will supply stereo sound to the TV if it is being broadcast by the station
you are watching.
& Cable box with RF IN/OUT
Connect the incoming cable TV signal to the cable
IN jack 1 on the back of the
cable box.
Connect a coaxial cable (not supplied) from the TO TV
jack on the back of the
cable box to the CABLE/ANTENNA
jack 2 at the bottom of the TV.
Note: Your cable box may have a different label for the TO TV jack, such as
OUTPUT or OUT.
Set the OUTPUT CH switch
3 of the cable box to CH 3 or 4 (whichever is
correct for your cable box), then tune the TV to the corresponding channel.
Once tuned, change channels at the cable box, not the TV.
Note: This connection will not supply stereo sound to the TV. The reason is that the RF
output on a cable box - labeled TO TV,
OUT or OUTPUT for example - will not send
a stereo signal to the tuner (VHF/UHF) input on a TV.
é Cable box with A/V outputs
Connect the incoming cable TV signal 1 to a signal splitter (not supplied). The
signal splitter enables you to avoid having to use the TO TV jack on the back of
the cable box. This jack will not supply stereo sound to the TV.
Note: Your cable box may have a different label for the TO TV jack, such as
OUTPUT or OUT.
Connect a coaxial cable (not supplied) to a connector on the signal splitter and to
the CABLE/ANTENNA jack 2 on the TV.
Connect another coaxial cable (not supplied) to a connector on the signal splitter
and to the cable
IN jack 3 on the back of the cable box.
Connect A/V cables (not supplied) to the
VIDEO and AUDIO L and R outputs
on the back of the cable box and to the AV2 video (labeled
VIDEO) and
AUDIO (labeled
L and R) jacks 4 on the back of the TV.
To view programs from your cable box, first press the AV button on the remote
control.
Press the cursor down or up buttons until the AV2 signal source is selected.
Press the
OK button to confirm your selection. The AV2 input source becomes
current for the viewing of cable TV programs through your cable box.
Note: If your cable box Audio/Video outputs will not supply video and stereo audio to the
TV, you will need to make the connection shown above in the example “Cable box with
RF IN/OUT
”.
&
é
4
Cable box with S-Video, component video (YPbPr)
or HDMI connectors
See Connect Accessory Devices, p. 22-23.
Via Antenna
Via antenna you can watch whatever DTV programs being broadcast in your area
for free.
If you’re not sure what HDTV programming is available in your area, contact your
local content provider or your local electronics store retailer.
Broadcasters are in the middle of a transition from analog to digital TV. This means
that a given broadcaster will have two channels on the air, one analog and one
digital.
Connect the incoming antenna signal to the CABLE/ANTENNA jack at the
bottom of the TV. See page 7 for details on using Autoprogram to store channels
in the TV’s memory.
Note: This connection will supply stereo sound to the TV if it is being broadcast by the
station you are watching.
Direct Broadcast Satellite (DBS)
Satellite systems offer many of the same premium channels as cable systems, and
often at a lower price. To get these channels, you’ll need to install a small dish
antenna outside.
There are 2 main DBS systems: DirecTV & DishNetwork. These systems require
separate, proprietary set top receiver boxes to decode their signals and send them
to your digital TV set. These boxes may include a digital TV tuner for off-air DTV
broadcasts.
Satellite broadcasters also provide major local channels, depending on the market
in which you live.
DBS also provides service in areas not covered by cable because they are in rural
areas or other areas not passed by a cable line.
DBS also allows you to watch pay-per-view events.
Setting up the TV
Connect all your accessory devices. See p. 22-24.
Refer to the bottom of the set for the correct operation voltage. Insert the
power cord in the wall socket.
Consult your local dealer if your mains supply is different. To prevent damaging the
power cord which could cause a fire or electric shock, do not place the TV on the
cord.
Setting up the remote control
Insert the 2 batteries supplied. Be sure the (+) and (-) ends of the batteries line
up correctly (inside of case is marked.)
The batteries supplied do not contain the heavy metals mercury and cadmium. Please
check on how to dispose of exhausted batteries according to local regulations.
Turn the TV on
From main supply:
Ensure that the main supply is turned on.
A blue indicator light on the front of the TV lights up.
When the TV is turned on by the main supply, the blue indicator light will blink for
45 seconds. This is the lamp's start-up period. When the light goes off, press the
POWER button on the remote control or power switch
. to turn on the TV.
From standby:
Press the POWER button on the remote control.
5
POWER button
Press to turn on/off the TV from or to
standby mode.
Note: When the TV is turned on by the main
supply, the blue indicator light will blink for
45 seconds. This is the lamp’s start-up period.
When the light goes off, press the POWER
button on the remote control or power switch
. to turn on the TV.
AV button
Press this button repeatedly to select
AV1, AV2, AV3,
HDMI, SIDE or TV
when in TV mode, according to where you
connected the accessory devices
(p. 21-23).
and button
Multimedia browser functional buttons
(p.24).
DEMO button
Demo menu on/off. See p. 9.
CLOCK button
On/off and Time display (for max. 10
minutes)
(Color) buttons
When functions attached to the color
buttons, the color buttons are shown on
screen.
button
No function.
MENU button
Settings menu on/off, see p. 9.
VOL +/– button
Press + or - to adjust the volume.
A/CH
Press to alternate between the currently
viewed channel and the previously view
ed
channel.
Note: For most buttons pressing a button once will activate the function. Pressing a second time will de-activate it.
When a button enables multiple options, a small list will be shown. Press repeatedly to select the next item in the list. The list will be removed automatically
after 6 seconds or press
OK to remove immediately.
Use of the remote control
* The quality and accuracy of the
information on the information
banner are transmitted from broad-
casters. You may see a difference in
broadcast time if the broadcaster is
from a different time zone area.
FORMAT
Press this button to display a list of
available display formats (depending on
the receiving signal). Refer to the section
on "Picture Formats" (p.20)
MY CONTENT button
"My Content" menu on/off, see p. 6.
*INFO
Display information: Press to display
(when available) information about the
selected TV channel and program or
accessory device.
OK - to activate a setting
- to display the list of channels stored
(according to the selection made in
the Installation mode (Antenna or
Cable), p. 7.
≤≥<> (cursor) buttons
Press the cursor buttons up/down,
left/right to navigate through the menus.
CH +/– Channel selection button
- To browse through the TV channels or
sources stored in the preferred channel
list (see p. 19).
- To select between Antenna or Cable TV
channels, first make your selection in the
Settings menu, see, p. 7.
Note: You don’t have to start the installation
again once you have searched for and stored
the available TV channels.
MUTE button
To turn on/off sound.
0 to 9 (NUMERIC) buttons
To select TV channels or enter values in
the on-screen menu. For single channel
entries, press the numbered button for
the channel you desire. The TV will pause
for a second or two before changing to
the chosen channel.
button
To enter values for minor channels e.g.
36.4
6
Should your remote be lost or broken you can still change some of the basic
settings with the buttons on your TV.
Press the power switch
. to switch the TV on.
Press:
• the
VOLUME +
or
button to adjust the volume;
• the
CHANNEL
or
button to select the TV channels or sources.
The MENU button can be used to summon the Settings menu without the
remote control.
Use:
the VOLUME +
or
button to select left/right menu items and the CHANNEL
or
button to select up/down menu items;
• the
MENU button to confirm your selection.
Note:
If the lamp indicator is red, this means that the lamp has failed.
If the temperature indicator is red, this means that the internal temperature is too
high.
Refer to the "Troubleshooting Tips" on p. 28 for steps you could take.
At power off, the power standby button flashes quickly for 10 seconds (at which you
could switch TV on again via power button on the remote control or TV), flashes slowly
for approximately 50 seconds and then turns off.
Control Buttons on the TV
The My Content menu (and the underlying Multimedia browser) is intended to
contain all content, services, applications you are interested to consume.
& Press the MY CONTENT button to activate.
é Press the cursor up/down to move the highlight up and down in the list of
menu items.
Press the cursor right to go deeper into the structure.
• Television:
TV channels leading to the list of TV channels; the left panel will contain
the analog channel numbers, the one-part channel numbers and the major
channel numbers in case of two-part digital channels. The right panel will
contain the available subchannels associated with the major channel that is
currently highlighted on the left panel. If there are no subchannels associated
with the currently selected channel in the left panel, the right panel will
remain empty.
• Multimedia
Contains the locally connected devices on which content (pictures, audio
files) is stored. See Multimedia browser, p. 24.
My Content
7
Tips:
When you have locked TV channels while initiating autoprogram, a message appears asking to enter your PIN code in order to complete autoprogramming.
When interrupted, the updated channel information is retained as well as the old channel information that were not updated.
Background autoprogramming occurs only when the TV is turned on.
Channel information of an ATSC channel is updated only for the ATSC channel currently tuned.
If an NTSC channel is tuned, then in Background Autoprogramming the TV will scan all the possible ATSC frequencies and update information.
Weak channel installation : This allows you to manually tune weak ATSC channels in order to adjust the antenna and thus optimize signal quality for that
channel. (See Installation menu, Weak channel installation, p. 8.)
Once you have searched for the available Antenna as well as the Cable TV channels, they are stored in the memory.
& Select Autoprogram in the Installation menu.
é Use the cursor right button to enter the Autoprogram menu.
Press the OK.
Select Cable or Antenna in the Installation mode.
When
Antenna is selected, the TV will detect antenna signals and will
search for antenna TV (NTSC and ATSC) channels available in your local
area.
When Cable is selected, the TV will detect cable company supplied signals
and will search for cable TV (NTSC, ATSC, QAM modulated) channels
available in your area.
Make sure you complete registration with your cable TV provider and
connection of equipment.
( Press the green button Next” on the remote control.
Note: All channels must be unlocked in order to autoprogram. If requested, enter
your PIN code to unlock all channels. See section on Menu preferences under
Settings, TV menu.
§ Press the green button Start” to start autoprogramming.
The menu screen disappears and the progress of autoprogramming is
displayed. The progress bar indicates the number of analog and digital TV
channels found.
When Autoprogramming is complete, a message appears confirming the
completion. Press the red button "Finish" and the screen returns to the
Installation menu.
& Press the MENU button on the remote control.
é Use the cursor down button to select Installation in the Settings menu.
Use the cursor right button to enter the Installation menu.
Select Language and enter the list of available languages with the cursor
right button.
( Select your language with the cursor up/down buttons and press OK to
confirm your selection.
§ Proceed with the Installation menu.
Store the TV channels
Select the menu language
Installation
Installation 4 Language 3
English
Francais
Settings
Software upgrade
Espanol
Autoprogram
Weak channel installation
Language
Press the cursor right to select your menu language.
Installation mode
Please select your
installation mode.
Television installation
Cable
Antenna
Previous
Next
Television installation
You can now start automatic installation. This
procedure can take more than half an hour.
Previous
Start
First time installation
Note: The first time (and only the first time) you turn on your set you see an installation introduction screen. The Installation procedure consists of a
series of screens that guide you through the process.
& After an introduction screen, you are asked to select a language of the TV’s on-screen-menus. (The text of the header and the info on screen
continuously change language.)
é Press the cursor up/down to highlight your language.
Press the OK button.
Follow the on-screen instructions to proceed.
Note: Once you completed the initial installation procedure you can access the screens from the Settings menu. See p. 9.
8
Digital Channel selection delay
Due to the tuning complexity of subchannel digital
programming, the time to select and view a digital
channel may take slightly longer than what the viewer
is normally accustomed to (as compared to analog
channel programs).
Digital channel broadcasts contain program and
system data information that must be processed
before the channel selection can be displayed.
Channel tuning
Available channels:
- Cable (analog NTSC or digital QAM): max. from 1 to 135
- Antenna (analog NTSC or digital ATSC): max. from 2 to 69
If a tuned channel is not yet in the master channel map, the TV will attempt
to tune the channel and it will be added to the map.
If the channel is not acquired, a message will appear that the channel is not
available.
When you tune an audio-only digital subchannel, a display appears with the
message Audio only.
Subchannel selections
The new standards employed with digital broadcasting make it possible to receive
multiple program channels under a single major channel number which can be
selected by pressing the digit remote control direct-access channel number entry.
Tip:
After the installation of the TV channels has been done, always make a selection
in the Installation menu between Antenna or Cable whether you want to watch
Antenna TV channels or Cable TV channels.
If you make use of a signal splitter do not forget to put the switch in the
corresponding position.
Weak channel installation
This enables you to do a weak ATSC digital channel installation. This is only
available for TV channels installed via an antenna connection (see section on
Preparation, under Antenna).
& If a certain channel you expect to see is not tuned or is weak, you can install
it manually. Call your local broadcasting station to check what channel is
being transmitted to.
é
Select that channel in the displayed list of TV channels (in the antenna mode).
The signal strength is displayed and updated continuously as you rotate the
antenna.
Software upgrade
This menu allows you to upgrade your TV software using a USB device.
USB upgrade
It is possible to initiate an upgrade procedure from a USB portable memory.
The memory device must be stored with the appropriate upgrade image (and
structure) which can be found on the www.philips.com/usasupport website.
How to upload a new software version on your portable memory device, see
Annex 1, under Philips TV software upgrade with portable memory.
Channel search completed.
Finish
Digital channels found : 0
Analog channels found : 3
Te
levision installation
Installation Weak channel installation
2
3
Settings
Software upgrade
4
5
Language
Autoprogram
Weak channel installation
6
7
8
9
4
This allows you to maximize the signal quality of weak channels by
manually rotating the antenna.
Installation 4 Software upgrade 2
Current software info
Local upgrades/app...
Settings
Weak channel installation
Language
Autoprogram
Software upgrade
This allows you to upgrade new TV software if available.
9
How to navigate through the Settings menus
The Settings menu allows you to access and change settings and preferences.
& Press the MENU button on the remote control to call up the Settings
menu.
- On the left panel the highlight can be set on a menu item with the cursor
up/down button.
The right panel shows the content of the highlighted menu item in the left
panel.
Note: Sometimes not all the menu items are visible on the screen. The numbers
at the top of the menus indicate the number of items on the menu. Use the
cursor down button to reveal all items.
- Use the cursor right button to enter the right panel.
The contents of the right panel are displayed on the left panel and the
right panel shows the contents of the newly highlighted items in the left
panel.
Note: In some cases it is important that the picture can be viewed while
adjusting the settings. This means when the highlight bar is on the right panel,
the other menu items are hidden. When the cursor left key is pressed again,
the hidden menu items re-appear and the highlight bar is displayed on the left
panel.
é Press the cursor left button to go one menu level up again.
- Press the
OK button on the highlighted item to activate and to exit the
menu.
- Press the
MENU button again to exit the Settings menu.
Note: You can exit the menu by pressing one of the color buttons (if present)
referring to certain actions which may be executed.
Introduction
A lot of guiding instructions, help texts and messages will be displayed on your TV when using the menus or when trying to execute an action.
Please, follow the instructions and read the help text which are being displayed on the specific item highlighted.
The color buttons refer to different actions which may be executed depending on the activated device. Press the corresponding color button
on the remote control to perform the required action.
To use the menus
Settings 5 TV 4
Picture
Sound
Demo
Fe
atures
Channels
Setup
Installation
TV
Exit
This gives you an overview of the menus you can select.
Auto picture
Contrast
Settings
Channels
Brightness
Color
Sound
Features
Picture
Sharpness
Color temperature
Digital processing
Dynamic contrast
The picture menu contains the settings that affect the quality of the picture.
Picture 13
TV 4
The Demo menu gives you an idea of the features that come with the
television set.
& Select Demo in the Settings menu or press the DEMO button. Press the
cursor right button to enter Demo mode.
é Highlight a desired demo with the cursor up/down buttons.
Press OK button to start playing the highlighted demo.
Press the green button to automatically run all demos in sequence.
Note: The selected demo is played continuously until you press the DEMO button.
Press the red button to stop the auto run function.
Press the red button again to exit the demo and to return to TV mode.
Demo
Pixel Plus
Active Control
Exit
Installation
TV
Demo
Setup
This menu demonstrates TV feature.
Settings 5 Demo 2
10
This menu is used to control the settings of special TV functions, features and
accessory devices.
The Preferences menu allows you to change settings that will be accessed
only occasionally.
The Source menu allows you to select a source.
The Clock menu allows you to use your TV as a clock. This setup is
necessary for the correct working of the Lock after feature.
Preferences
& Press the MENU button.
é Select Setup with the cursor down button and press the cursor right
button to select the
Preferences menu.
Press the cursor right button again to select Picture/sound preferences.
Press the cursor right button again to enter the Picture/sound
preferences menu.
Picture/sound preferences
Auto surround
Sometimes the broadcaster may transmit special signals for Surround
sound encoded programs. The TV automatically switches to the best
surround sound mode when
Auto surround is turned On.
Features preferences
Caption service
This allows you to select the closed caption service levels of analog
broadcasting to be displayed.
Closed captioning allows you to read the voice content of television
programs on the TV screen. Designed to help the hearing impaired, this
feature uses on-screen ‘text boxes’ to show dialogue and conversations
while the TV program is in progress. Captions will appear on the screen
during captioned broadcasts.
Setup menu
The captions are not necessarily always correct in spelling and grammar. Not
all TV programs and product commercials are made for broadcast with Closed
Caption information included. Refer to your area’s TV program listings for the TV
channels and schedule of Closed Caption shows. The captioned programs are
usually noted in the TV listings with service marks such as ‘CC’.
Preferences
Source
Demo
Clock
Convergence
TV
Installation
Setup
Exit
Settings 5 Setup 4
Settings
This menu is used to control settings of special TVfunctions,
features and accessory devices.
Picture/sound prefe...
Fe
atures preferences
Convergence
Menu preferences
Reset AV
settings
Clock
Preferences
Source
Setup 4 Preferences 4
Settings
This contains items that can set or adjust various special TV
functions.
Auto surround
Settings | Setup
Reset AV settings
Menu preferences
Picture/sound prefere...
Features preferences
Preferences 4 Picture/sound prefere... 1
This menu allows you to setup or to select some picture and
sound related setting preferences.
Caption service
Reset AV settings
Menu preferences
Features preferences
Picture/sound prefere...
Digital caption ser
vice
Digital caption options
Settings | Setup
Preferences 4 Features preferences 3
This menu allows you to setup or to select some feature
related setting preferences.
11
& Select Caption service.
é Press the cursor right button.
Select the desired Caption service:
• CC-1, CC-2, CC-3, CC-4
Dialogue (and descriptions) for the action on the captioned TV program
shows on screen.
Usually CC 1 is the most frequently used. CC 2 may be used for alternate
languages if they are being transmitted.
• T-1, T-2, T-3 or T-4
Often used for channel guide, schedules, bulletin board information for
Closed captioned programs, news, weather information or stock market
reports.
Not all Captioned services are necessarily being used by a TV channel during
the transmission of a closed caption program.
Note: This television provides display of television closed captioning conforming with
the EIA-608 standard and in accordance with Sections 15.119 of the FCC rules.
Digital caption service
This allows you to configure the way you choose to view the digital captioning.
Select one of the digital service channels made available by the caption provider.
There are 6 standard services. Service 1 is designated as the Primary Caption
Service. This service contains the verbatim, or near-verbatim captions for the
primary language being spoken in the accompanying program audio.
Service 2 is designated as the Secondary Language Service. This service contains
captions in a secondary language which are translations of the captions in the
primary Caption Service. The other service subchannels are not pre-assigned. It
is up to the discretion of the individual caption provider to utilize the remaining
service channels.
Digital caption options
This allows you to modify how digital captions are displayed on your TV.
Select from the following options to change the visual characteristics of your
TV’s digital captioning.
Reset to default
Select this option to reset the digital caption options back to the captions
provider default settings.
Press
OK to confirm.
Size
Select this option to choose the size of of caption display according to your
own preference.
Select
Default (Automatic), Small, Standard or Large and press OK
to confirm.
Style
Select this option to select the font style of caption display according to
your own preference. Select from
Default, Monospaced serif, Serif,
Monospaced sans serif, Sans serif,
Casual, Cursive or Small caps...
Text
Select this option to choose the text color or the opacity of the text box
of caption display according to your own preference.
Select a color and one of the opacity options.
Background
Select this option to choose the character background color or one of
the background opacity options of caption display according to your own
preference.
Select a color and one of the opacity options.
To display the transmitted CC-CS-text on the screen according to your chosen
CC or CS service, use the Closed captions option in the Feature menu. This
text can either be permanently displayed (assuming that the service is available
in the broadcast) or only when mute is active.
& Select Features in the TV Settings menu.
é Press the cursor right to enter the features menu.
Select the menu items with the cursor up/down and adjust the settings with the
cursor left/right.
Press the cursor right after having selected Closed captions.
( Select On, Off or On during mute.
Digital caption service
Digital caption options
CC-1
CC-2
CC-3
CC-4
Settings | Setup | Preferences
T-
1
T-2
T-
3
T-
4
Caption service
Features preferences 3
Caption service 8
You can choose the Closed captions service level to be displayed.
Digital caption options
CS-2
CS-3
CS-4
Caption service
CS-5
CS-6
CS-1
Digital caption service
Features preferences 3 Digital caption service 6
Settings | Setup | Preferences
This allows you to select one of the digital service channels made
available by the individual caption provider.
Digital caption service
Reset to default
Size
Style
Text
Caption service
Background
Digital caption options
Features preferences 3 Digital caption options 5
Settings | Setup | Preferences
These options allow you to select a variety of character font representa-
tions, text color and sizes and other attributes.
Picture
Closed captions
Sleeptimer
TV
Features
Sound
Channels
TV 4 Features 2
Settings
The features menu gives you control over special, additional
functions.
Sleeptimer
Off
On
Closed captions
On during mute
Features 2 Closed captions 3
Settings | TV
This displays the transmitted CC-text on the TV screen according
to your chosen CC service. This text can either be permanently
displayed, or only when mute is active.
12
Tips:
Emergency Alert Signalling is not possible:
- when content browsing;
- with analogue video sources.
- You always have the possibility to remove the message from the
screen.
- The message display will overlap whatever menu element or other
message is on the screen.
Caution! If you have forgotten your PIN!
& Select Change PIN in the Menu preferences menu and
press the cursor right.
é Press the cursor right to enter the overriding PIN code
0-7-1-1.
Press the cursor again and enter a new personal 4-digit
PIN code. The previous code is erased and the new PIN-
code is stored.
Menu preferences
On Screen display
& Select OSD.
é Press the cursor right button to select Normal or Minimum.
Normal to activate the continuous display of the channel number (for max.
10 minutes) and extended display of TV channel and program information
on screen. E.g. information on the main or auxiliary program, input signal
quality of connected accessory devices, the display format, sound mode,
availability of Closed Caption service, the audio language, the rating,
sleeptimer setup.
Minimum to activate the display of reduced channel information.
Note: When Closed Captions is turned on, continuous display of the channel
number and clock is not possible.
Show emergency alerts (EAS)
This allows you to select the alert priority level of the information
disseminated by the cable operator. The standard SCTE18 defines an
Emergency Alert signalling method for use by cable TV systems to signal
emergencies to digital devices such as digital set-top boxes, digital TVs and
digital VCRs.
The Emergency alert signalling scheme defined in the standard allows a
cable operator to disseminate emergency alert information related to state
and local-level emergencies and warnings in a cost-effective and efficient way,
while minimizing disruption of programming.
An Emergency alert message will have one of the following priorities:
Low,
Medium, High or Maximum.
The Emergency alert message with priority
High or Maximum will always
be presented. Low or
Medium will be present or ignored depending on
the selected setting.
Caution! When the TV clock is undefined (See section on Clock), the Emergency
Alerts will be ignored.
The Emergency Alert message display will contain following information:
- The Emergency Alert text
- The start time + date
- The end time + date.
& Select Show Emergency Alerts in the Menu preferences menu.
é Press the cursor right button and select one of the Emergency alerts
options:
- Always, when you always want the Emergency alert messages to be
displayed when available;
- Skip low priority, when you want the messages with low level to be
ignored;
- Skip low/medium priority, when you only want the messages with high
priority to be displayed.
Set/Change PIN
& Select Set or Change PIN with the cursor down button.
é If no PIN-code exists, the menu item is set to Set PIN. Follow the
instructions on screen.
If a PIN-code has previously been entered, the menu item is set to Change
PIN. Follow the instructions on screen.
All number combinations from 0000 to 9999 are valid numbers.
The Menu preferences menu reappears with a message confirming that
the PIN has been created.
Reset AV settings
This function allows you to reset most of the picture and sound settings to
their predefined factory states.
& Select Reset AV settings with the cursor down button.
é Press the cursor right button.
Press OK button to erase settings and reset them to their default values.
-
Features preferences
OSD
Show emergency al...
Change PIN
Picture/sound prefere...
Reset AV settings
Menu preferences
Preferences 4 Menu preferences 3
Settings | Setup
This menu allows you to setup or to select some menu
related setting preferences.
Always
Skip low priority
Change PIN
OSD
Skip medium/low pri...
Show emergency alerts
Settings | Setup | Preferences
You can select the display of the volume bar and a reduced or an
extended on screen display of program and channel information.
Menu preferences 3 Show emergency al... 3
Show emergency alerts
Normal
Minimum
Change PIN
OSD
Settings | Setup | Preferences
You can select the display of the volume bar and a reduced or an
extended on screen display of program and channel information.
Preferences 3 OSD 2
Menu preferences
Picture/sound prefere...
Start now
Features preferences
Reset AV settings
Settings | Setup
This resets the picture and sound settings to their predened
factory values, but maintains the channel installation settings.
Preferences 4 Reset AV settings
  • Page 1 1
  • Page 2 2
  • Page 3 3
  • Page 4 4
  • Page 5 5
  • Page 6 6
  • Page 7 7
  • Page 8 8
  • Page 9 9
  • Page 10 10
  • Page 11 11
  • Page 12 12
  • Page 13 13
  • Page 14 14
  • Page 15 15
  • Page 16 16
  • Page 17 17
  • Page 18 18
  • Page 19 19
  • Page 20 20
  • Page 21 21
  • Page 22 22
  • Page 23 23
  • Page 24 24
  • Page 25 25
  • Page 26 26
  • Page 27 27
  • Page 28 28
  • Page 29 29
  • Page 30 30
  • Page 31 31
  • Page 32 32
  • Page 33 33
  • Page 34 34
  • Page 35 35
  • Page 36 36
  • Page 37 37
  • Page 38 38
  • Page 39 39
  • Page 40 40
  • Page 41 41
  • Page 42 42

Philips 50PL9220D User manual

Category
Projection TVs
Type
User manual
This manual is also suitable for

Ask a question and I''ll find the answer in the document

Finding information in a document is now easier with AI