Page is loading ...

12
series BG-231
4800129
WARRANTY
Thank you for purchasing this quality Babylove product from our exclusive range
of baby products.
We are co
dent that you will appreciate its many highlights including durability
and reliability.
Your new product has been manufactured to comply with the Australian
Standard ASTM F977 and comes with a 12 month warranty.
Please keep this instruction manual for future reference.
Distributed by Nursery Elegance Pty Ltd
ACN 122 443 387
Unit 10, 339 Williamstown Road
Port Melbourne VIC 3207, Australia
PHONE 1300 131 477
WEB - www.babylove.com.au
EMAI
• Due to our continuing program of development, we reserves the right
• Due to the variations in the style and design of our products the illustrations
used in this instruction booklet are generic.
KEEP THESE INSTRUCTIONS FOR FUTURE REFERENCE
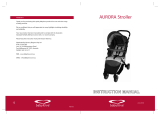
JAZZ Baby Walker

www.babylove.com.au www.babylove.com.au
11

www.babylove.com.au www.babylove.com.au
10 03
A. 1 x Walker Frame
B. 1xSeat
C. 4 x Swivel Wheels
D.
E.
1 x Activity Centre Tray
A.
B.
C.
D.
E.
CARE AND MAINTENANCE
PARTS LIST
8 x Grip Pads

www.babylove.com.au www.babylove.com.au
A.
NOTE: Clean grip pads regularly, using warm water
NOTE: For easier assembly, turn the frame upside down.
with a household soap or mild detergent to maintain
stopping performance.
A. Turn walker right side up.
B. Position one hand on either corner of the tray, while
holding the base down with the other hand.
C.
ASSEMBLY - WHEELS & GRIP PADS
Wheels - Insert the end of the wheel posts all the way
into the holes located at each corner of the walker base
using moderate forc
e. Insert all 4 wheels.
B.
Grip Pads - Insert the 8 Grip pads into the holes located
around the base. Push all the way in.
OPEN/RAISE WALKER SEAT
There are three height adjusting positions. Lift the tray
slowly while holding down the base until you hear the
tray lock into the rst/lowest position. (If raised past
the rst/lowest position then see step 6B/C to lower it.)
B.
A1.
C.
04
09
A2.B1.B2.

www.babylove.com.au www.babylove.com.au
A. The seat needs to be attached to the seat moulding. There
are 3 attachment points at the front and 6 around the top
section.
B. Position the seat into the seat moulding.
C. Attach the seat to the front section rst. Locate the plastic
pins into the keyholes and slide down until locked into
position. Pull down by the fabric if a little tight to make sure
all 3 plastic pins are securely locked.
D. To attach the top seat section to the seat moulding. Align the
square hole in the seat fabric over the square hole in the seat
moulding.
Now locate the plastic clip attached to the backrest support
and press it through the holes until it locks into the seat
moulding.
Now continue to insert the remaining clips into and around
the rear of the seat moulding.
Pull up on the fabric seat to make sure all the clips are
engaged. If not press them until locked into position.
SEAT ASSEMBLY
08
05
NOTE: The child must be removed from the walker
before releasing the lock to lower the walker, to avoid
injury. Be sure to follow these instructions carefully to
avoid the top tray falling down onto your hand.
A. Remove the child from the walker.
B. Locate the safety lock button underneath the tray.
C. Place one hand on the base. Turn the safety lock button
anti clockwise. Now push up on the front of the button so
it rotates upward. Hold the button in this position and
lower the seat down.
6. CLOSE/LOWER AND ADJUST WALKER HEIGHT
B.
To adjust the seat height from highest to lowest of
three positions :
D. Before completely lowering down, take care of your hand
position and make sure you have enough space.
D.
A. Remove the child from the walker.
B. Position one hand on the safety lock button located
underneath and centre of tray and the other hand on
either corner of the tray.
C. Turn the safety lock button anti clockwise and slowly
push and hold the button up and the tray will begin
to lower. Let go of the lock and allow the the tray to
lock into a lower position. Press down lightly on the
upper tray to conrm it is locked into place.
B.
C2.
C1.
C2.
D4.
D3.
C1.
D2.
D1.
A.

www.babylove.com.au www.babylove.com.au
B. To t the batteries , turn the toy car over, undo the battery
cover screw and remove the cover. Fit 2 AA batteries in the
direction shown. (Check that the batteries are tted correctly
by pushing the coloured button on top of the car. If no music
sounds, check battery installation.) Replace the battery cover
and secure with the screw.
A. To attach the activity toys. Align each toy with the holes in
tray. Press each plastic base into the hole until it locks into
place. Pull up on the toy to make sure they are locked into
position.
C.
To attach the CAR to the toy tray. Note the Tray orientation
in the image. Make sure the locking arm is on the left. To
attach, align the yellow extension at the front of the CAR
with the opening in the toy tray. Push the extension into
the tray. Push down on the CAR and slide the locking arm
to the right. The CAR should now be locked onto the toy tray.
D.
To remove the CAR from the toy tray, slide the locking arm
to the left and remove the CAR. The CAR also comes with
an accessory strap. It can be attached to other nursery or
furniture items.
D1.
B1.
A.
ACTIVITY CENTRE TRAY ASSEMBLY
D2.
NOTE: You will need 2 x AA batteries to operate the CAR
lights and music sounds.
WARNING: Non-rechargeable batteries are not to be
recharged. Adult supervision is required when charging
rechargeable batteries. Used and new or dierent types of
batteries should not be mixed. Remove the batteries as
soon as they become exhausted. Supply terminals for
batteries are not to be short circuited.
06
07
4.
A. You will notice two white plastic tabs inserted into the tray
moulding. Also two cavities on the underside of the toy tray.
These are to lock the toy tray to the main seat moulding.
B. Place the assembled toy tray onto the seat moulding so it
sits at on the surface.
C. Hold the toy tray down with one hand and with the other
hand locate each plastic tab on the underside of the seat
moulding. One at a time, push them up and into the toy tray
cavity, then rotate the tabs to the right so they lock the toy
tray onto the main seat moulding. To remove the toy tray,
reverse the procedure.
TO FIT & REMOVE THE TOY TRAY FROM THE SEAT MOULDING
5.
A.
B1.B3.
ACTIVITY CENTRE TRAY ASSEMBLY... continued
B2.
C2.
C1.
B2.
C3.
/