Page is loading ...
fold here fold here fold here fold here fold here fold here
OPERATION / DRINKS
GUIDE TO THE APPLIANCE / PREPARING FOR USE
MAKING DRINKS
Touch display
12:00
Miele
Long coffeeCoffeeEspressoRistretto
Profiles
Coffee drinks
-Ristretto is a strong, concen-
trated espresso. It is prepared
with the same amount of coffee
as for an espresso but with a lot
less water.
-Espresso is a strong aromatic
coffee with a thick, hazelnut
brown-coloured froth – known
as the crema – on top.
-Coffee differs from espresso in
the increased amount of water
and the roast of the beans.
-Long coffee is a coffee with
considerably more water.
-Long black is made with hot
water and two shots of es-
presso.
-Caffè Americano consists of
espresso and hot water. The es-
presso is made first, then the
hot water is dispensed into the
cup.
Coffee drinks made with
milk
-Cappuccinoconsists of ap-
prox. 2thirds milk froth and
1third espresso.
-Latte macchiato consists of
1third each of hot milk, milk
froth and espresso.
-Caffè latte consists of es-
presso and hot milk.
-Cappuccino italiano has the
same proportions of milk froth
and espresso as a cappuccino.
The difference is that the es-
presso is added first and then
the milk froth.
-Espresso macchiato is an es-
presso with a small amount of
milk froth on top.
-Flat white is a special variety of
cappuccino that contains signi-
ficantly more espresso than milk
froth for an intensive coffee
aroma.
-Café au lait is a French style of
coffee consisting of coffee and
milk froth. Café au lait is usually
served in a bowl.
Tea drinks
(hot water at the optimum temper-
ature)
- White tea
- Japanese tea
- Green tea
- Herbal tea
- Fruit tea
- Black tea
-Chai Latte is a tea speciality
with milk.
Other drinks
- Hot milk
- Milk froth
- Hot water
- Warm water
Pot function
(3 to 8cups can be selected)
- Coffee pot
- Teapot for all types of tea
Selecting / Accessing a
menu
Touch the entry or value you want in the display.
Scrolling Swipe across the screen. To do this, place your finger on the touch display and
swipe it in the direction you want.
Exiting a menu level Touch. Alternatively, touch the higher-level menu name within the menu path.
Entries made before this which have not been confirmed withOK will not be saved.
Entering numbers You can enter numbers by swiping and touching the roller or via the numerical
keypad.
Roller:
Swipe the roller up or down until the value you want is displayed centrally in orange.
Confirm withOK.
Numerical keypad:
Touch the centrally displayed orange value and keep your finger on it until the nu-
merical keypad appears.
Select the value you want: as soon as you enter a valid value, OK turns green. Use
the arrow to delete the last entered number.
Confirm withOK.
Entering letters Names are entered using a keyboard. It is best to select short names.
Touch the desired letters or characters.
Touch Save.
Displaying the context
menu
When you are in certain menus, a context menu can be displayed, e.g. for configur-
ing drinks.
For instance, you can touch the name of a drink and keep your finger on it until the
context menu opens.
To close the context menu, touch an area of the display located outside of the menu
window.
Show help Context-sensitive help is available for certain functions. Help is shown in the display.
TouchHelp to display information in text and pictures.
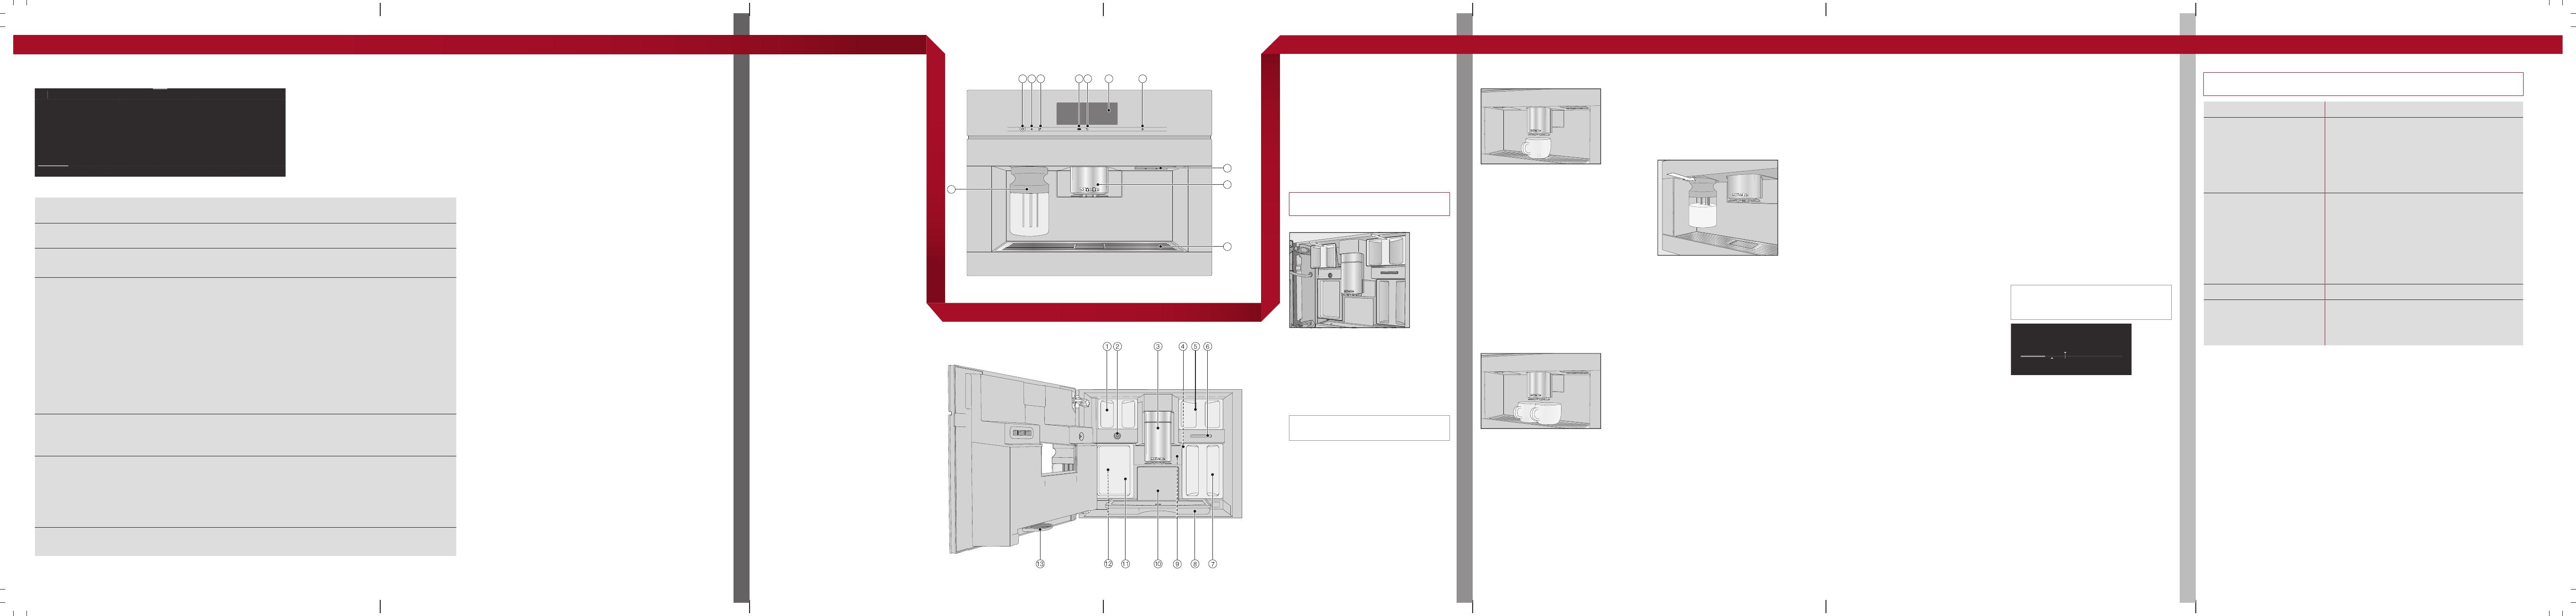
Exterior view
aOn/Offbutton
bOptical interface (for the Miele
Customer Service Department
only)
cMobileStart sensor
dMovement sensor
e“Back” sensor
fTouch display
g“Light” sensor
hFan outlet
iHeight-adjustable central spout
with lighting
jDrip tray cover
kMilk flask
1 2 3 4 5 6 7
8
9
10
11
Interior view
aBean containers (Type A and Type C)
bMilk valve
cHeight-adjustable central spout
with lighting
dGrinder setting
eBean container (Type B)
fFan outlet
gWater container
hDrip tray with lid
iBrew unit
jWaste container
kMaintenance container
lReceptacles for cleaning and de-
scaling cartridges (including ad-
apters)
mDrip tray
Filling the water container
Open the appliance door.
Pull the water container forwards to re-
move it.
Fill the water container with fresh, cold
drinking water up to the max.mark.
Push the water container back into the
coffee machine and close the appliance
door.
Filling the bean containers
Only put roasted coffee beans in the bean
containers.
Open the appliance door.
Pull the bean containers out and take off
the lids.
Fill the bean containers with coffee beans
and put the lids back on the bean con-
tainers to seal them.
Push the bean containers all the way
back into the coffee machine.
Close the appliance door.
See the operating instructions for more in-
formation on the bean system.
Making a drink
Place a cup under the central spout.
Select a drink.
Cancelling a drink
Press Stop or Cancel.
DoubleShot
Select the DoubleShot function if you
would like a particularly strong and aromatic
coffee. In this case, more coffee beans will
be ground and brewed halfway through the
brewing process.
Touch while making your coffee.
Making two portions (sensor
control)
To fill 2cups at the same time:
Place a cup under each of the coffee dis-
pensers in the central spout.
Touch.
Select a drink.
Using the milk container
Milk is not cooled in the milk container.
Therefore, place the milk container in the
refrigerator if you are not going to use milk
for a while. Good milk froth can only be
made with cold milk (<10°C).
Fill the milk container with milk up to a
maximum of2cm below the rim.
Push the milk container back into the
coffee machine until it clicks into place.
You can now make drinks with milk.
Making tea
Hot water is heated to the optimum tem-
perature for different types of tea.
Place the tea filter or the tea bag in the
tea cup.
Place the tea cup under the central
spout.
Select the type of tea from the display.
Hot water will be dispensed into the cup.
Remove the tea filter or tea bag when the
desired brewing time has elapsed.
Tip: You can use the TeaTimer function to
start a minute minder when making tea (see
the operating instructions).
Pot function
You can make several cups of coffee or tea
one after the other automatically with the
Pot function (maximum of1litre). This can
make up to 8cups.
Preparing the pot
The drinks menu is displayed.
Place a sufficiently large container under
the central spout.
Select the pot function you want.
Select the number of cups you want
(3to8).
Follow the instructions in the display.
Expert mode
In Expert mode, you can allocate a bean
type temporarily and change the portion
size while the drink is being made. Expert
mode must be activated for this (in the pull-
down menu, the word Expert mode is high-
lighted in orange).
The setting will not be saved and will only
apply to the current drink.
Allocating bean containers temporarily
Touch the top edge of the screen and
open the pull-down menu.
Now select the bean container contain-
ing the beans you want to use for the
current drink.
To close the menu window, drag it back
up to the top.
Now start making the drink.
Changing the portion size
The portion size can only be changed
when the respective ingredient is being
processed while the drink is being made.
Dispensing
Touch the bar and adjust the indicator
(small triangle) as required.
Please observe the detailed information on cleaning and care in the operating instruc-
tions. Carefully clean the coffee machine regularly.
Recommended frequency What do I have to clean / maintain?
Daily
(at the end of the day)
- Milk container and lid
- Milk valve
- Water container
- Drip tray cover
- Drip tray and waste container
Once a week
(more often if heavily soiled)
- Central spout
- Cup rim sensor
- Interior cabinet
- Brew unit
- Drip tray
- Appliance front
Once a month - Bean containers
As and when required /
after prompt appears in dis-
play
- Milk pipework
- Degreasing the brew unit
- Descale the appliance
Cleaning by hand or in the dishwasher
Clean the following by hand only: The following parts are dish-
washer-safe:
- Stainless steel cover of the central
spout
- Brew unit
- Bean containers and lids
- Drip tray, lid and waste container
- Drip tray cover
- Central spout
(without stainless steel cover)
- Milk container and lid
- Cup rim sensor
- Drip tray
- Maintenance container
- Water container
Operation Drinks overview Description Preparing for use Making drinks
fold here fold here fold here fold here fold here fold here
en-GB M.-Nr. 11 203 981
CVA 7840, CVA 7845
fold here fold here fold here fold here fold here fold here
CLEANING AND CARE
COFFEE THE WAY YOU LIKE IT
SETTINGS
Cleaning and care Coffee the way you like it Settings
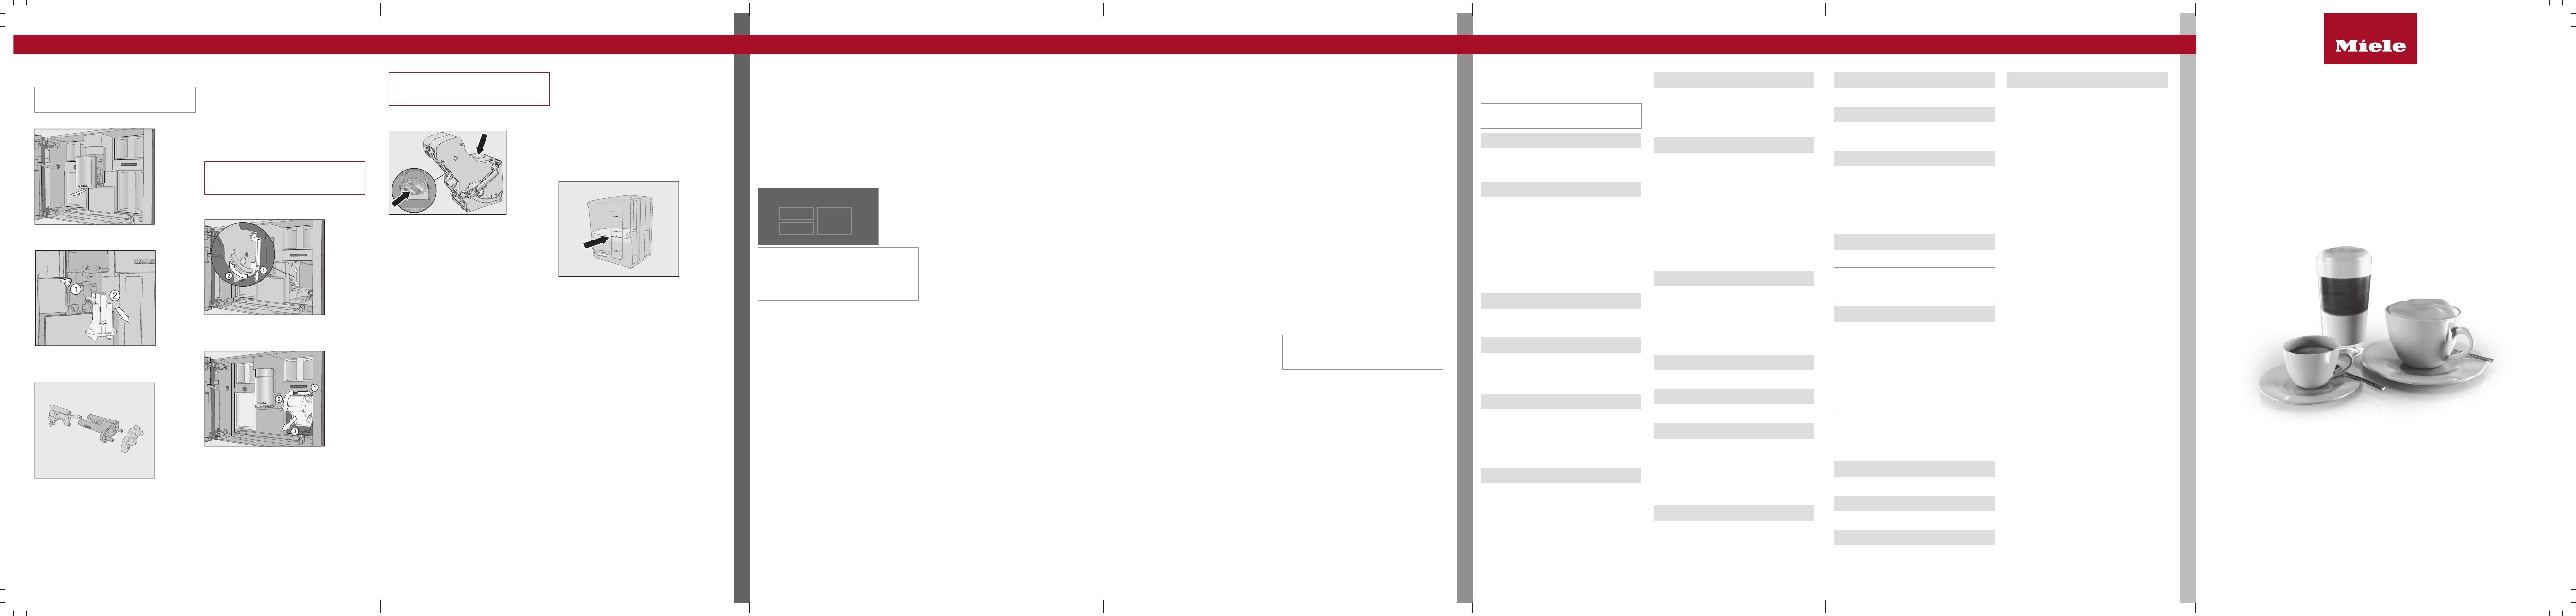
Cleaning the central spout
Clean the central spout’s stainless steel
cover by hand only.
Open the appliance door.
Remove the central spout’s stainless
steel cover and clean it.
Detach the milk pipework from the dis-
pensing unit. Pull the dispensing unit
down to remove it.
Take the dispensing unit apart, separat-
ing it into 3components.
Clean all parts thoroughly. Clean the sur-
faces of the central spout with a damp
cloth.
Fit the dispensing unit back together.
Push the dispensing unit back into the
central spout and replace the stainless
steel cover.
Confirm the message with OK.
Removing the brew unit and
cleaning it by hand
Only clean the brew unit by hand with
warm water. Do not use any cleaning
agents.
Open the appliance door and remove the
water container.
Press the button under the handle of the
brew unit and, whilst doing so, turn
the handle forwards.
First, pull the brew unit sideways and
then slide it out forwards. Tilt the brew
unit forwards.
When you have removed the brew unit,
do not change the position of the handle
on the brew unit.
Clean the brew unit by hand under
warm running water.
Wipe any remaining coffee off the filters
(see arrows).
Dry the funnel in the brew unit.
Carefully clean the inside of the coffee
machine.
Push the brew unit back into the coffee
machine.
Lock the brew unit. Press and hold the
button under the brew unit handle and,
whilst doing so, turn the handle to the
right.
Close the appliance door.
Follow the further instructions given in the
display.
The process is complete when rinsing has
finished.
“Descaling the appliance”
maintenance programme
You will need 2descaling tablets for the de-
scaling programme.
Descale the appliance will appear on the dis-
play.
TouchOK.
The maintenance programme will then start.
Follow the instructions in the display.
Fill the water container to the descaling
symbol with lukewarm water.
Drop 2descaling tablets in the water.
Push the water container back into the
machine.
Follow the further instructions given in the
display.
When Rinse out the water container, fill to
the descaling symbol and insert. Close the
door appears in the display, proceed as fol-
lows.
Remove the water container and rinse it
thoroughly with clean water. Fill the water
container to the descaling symbol with
fresh drinking water.
The descaling process is complete at the
end of the rinsing process.
Bean system
You can change the names for the types of
coffee bean and/or reallocate the types of
bean under Settings | Type of beans.
If you do not allocate a type of bean, you
will be asked what type of bean you want to
use for the coffee as you make it.
Renaming the type of beans
The 3bean containers are shown in the dis-
play as follows and are pre-named.
Type of beans
Type A Type B
Type C
If you are using the same type of beans in
two of or all the bean containers at the
same time (because you only use one
type of bean, for instance), make sure you
name them in the same way exactly.
Select Change name.
Enter the name you want and then touch
Save.
Allocating types of beans
If you have set up at least 1profile and at
least 1coffee drink, first select the profile.
Select Change allocation.
Tip: If you touch All drinks, you will highlight
all coffee drinks and you can deselect the
ones you do not want.
Drink parameters
You can set the quantity of coffee, the
brewing temperature and pre-brewing for
each drink individually.
Touch the drink you want and keep your
finger on it until the context menu opens.
Select Parameters.
Select Amount of coffee, Brew temperat-
ure, Pre-brewing or Type of beans.
Select the setting you want and
touchOK.
TouchOK again to save your changed
settings.
Portion size
You can adjust the portion size for all coffee
drinks, hot water, all types of tea and drinks
with milk.
Place a cup under the central spout.
Touch the drink you want and keep your
finger on it until the context menu opens.
Touch Portion size.
The drink will be made and Save will appear
in the display, as soon as the minimum dis-
pensing amount is reached.
When the container is filled to the desired
level, touch Save.
If you want to change the portion size for
coffee drinks made with milk or hot water,
the ingredients which make up the drink will
be saved one after the other while the drink
is being made.
Performance mode
You can select the appropriate mode to suit
your personal preferences under Settings |
Performance mode. The energy consump-
tion varies depending on the selected
mode.
-Eco mode: this is an energy-saving
mode.
-Barista mode: this mode is optimised
for espresso and coffee drinks.
-Latte mode: in this mode, milk-based
drinks can be prepared within a much
shorter space of time.
In addition, you can activate Party mode
for the occasional intensive use of the cof-
fee machine, e.g. for family get-togethers
(see the operating instructions).
Profiles
In addition to the Miele drinks menu (Miele
profile), you can create individual profiles to
cater for different tastes and preferences.
Creating a profile
Select Profiles and then Create profile.
The editor will open in the display.
Enter the name you want and then
touchSave.
The profile has been created. You can now
create a drink.
Editing profiles
Once you have created 1profile, you can
rename, delete or move profiles via the con-
text menu.
Setting when the profile should change
You can choose between the following op-
tions:
-Manual: the selected profile will remain
active until you select another one.
-After each use: the machine will revert
to the Miele profile whenever a drink is
dispensed.
Creating and editing drinks in a
profile
You can create new drinks based on exist-
ing drinks. A profile can contain a maximum
of 9drinks.
Start by accessing the profile you want
as follows: touch Profiles and select the
profile.
Touch Create drink and select a drink.
Change the portion size or drink para-
meters.
Preparation will begin and you can save the
portions of each ingredient as desired.
Enter a name for the new drink and
touchSave.
Once you have created some drinks, you
can edit these entries in the context
menu.
You can personalise your coffee machine
by adapting the factory default settings to
suit your requirements.
Factory default settings are marked in ital-
ics.
Language
- deutsch |...and other languages
- Location
Time of day
- Display: On | Off | Night dimming
- Clock type: Analogue |Digital
- Clock format: 24 h | 12 h (am/pm)
- Set
Tip: If you touch the time of day on the top
right of the display, you can set the time dir-
ectly.
Date
The date appears if the Time | Clock type |
Digital setting is selected.
Start screen
- Main menu | Drinks | Profiles | MyMiele
Select the menu that is displayed when the
coffee machine is switched on.
Timer
- Appliance timer: On at | Off at | Switch
off after (00:20)
- TeaTimer: Automatic | Manual
- Maintenance timer
Volume
- Buzzer tones
- Keypad tone
- Welcome melody: On | Off
Display
- Brightness
- Colour scheme: Bright | Dark
- QuickTouch: On | Off
Lighting
Coffee machine switched on: you can use
the sensor control to switch the light-
ing on or off at any time.
Coffee machine switched off: you can still
switch the lighting on or off whenever you
like, but you will need to select the follow-
ing settings first:
-Time | Display | On or Night dimming
(time of day is displayed)
-Display | QuickTouch | On
Info
- Number of drinks (Total drinks | Total
coffee drinks |...)
- No. of uses until Maintenance: Descale
the appliance | Degrease the brew unit
- Fill levels (of cartridges)
Fresh water (CVA7x45)
- On | Off
Altitude
0–250m, 251–500m,...
Performance mode
-Eco mode | Barista mode | Latte mode
| Party mode
Party mode is a Performance mode for
the occasional intensive use of the coffee
machine (see the operating instructions).
Water hardness
Set to 21°dH at the factory.
Automatic cleaning
- On | Off
Bean types
- Types A, B and C: Change name |
Change allocation
Proximity sensor
- Switch the light on: Appliance switched
on (On | Off) | Appliance switched off
(On | Off)
- Switch the appliance on: On | Off
- Acknowledge buzzer: On | Off
System lock
- On | Off
When the system lock is activated, the On
at timer and Movement sensor cannot be
selected.
Miele@home
- Set up | Deactivate / Activate | Connec-
tion status | Set up again
- Remote control (On | Off)
- SuperVision: SuperVision display (On |
Off), Display in standby (On | Off), Appli-
ance list
- RemoteUpdate (On | Off)
Some menu options only appear if
Miele@home has been set up and the cof-
fee machine is connected to a WiFi net-
work.
Software version
For the Customer Service Department
Legal information
- Open source licences
Showroom programme
- Demo mode: On | Off
Factory defaults
- Appliance settings
Language, Time, Date, Number of por-
tions, Miele@home settings, Profiles and
the corresponding drinks cannot be reset.
The Maintenance timer is reset to
2:00am.
- MyMiele Quick Start Guide
Coffee machine
These short instructions are not a substitute for the operating instructions supplied with
the machine. It is essential to familiarise yourself with the coffee machine before using it
for the first time. Please read the operating instructions carefully and pay particular
attention to the safety notes and warnings.
en-GB M.-Nr. 11 203 981 / 02
fold here fold here fold here fold here fold here fold here
/