Hozelock Cloud allows you easily manage your garden watering thanks to its smart features:
- Control your watering from anywhere, using the Hozelock Cloud app on your smartphone.
- Choose from three watering durations: 10, 30, or 60 minutes.
- A range test feature helps you ensure that the Cloud Controller is within range of the Hub.
- A battery level indicator lets you know when it's time to replace the batteries, and a failure prevention mode prevents the valve from opening if the batteries are too low.

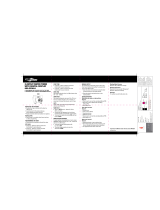
You can turn on the water controller at any time by pressing the Water Now
button.
Water now function
Press
Once 10 minutes watering
Press
Twice
30 minutes watering
Press
Three times
60 minutes watering
Press
Four times
Cancels Water Now
The LED light will come on to indicate you have turned the controller on and will
start to flash when the valve has opened. Depending on the mode selected the
lights will count down as the time lapses; So if you press the button 3 times to water
for 60 minutes, after the first 30 minutes the top light will stop flashing and the
bottom two lights will continue to flash.
If you decide to stop manual watering at any time simply press on the Water Now
button until all the green lights stop flashing. You will hear the motor operate the
internal valve turning the water off.
Note: To protect battery life the water controller can only be turned on and off a
maximum of 3 times in one minute.
How do I cancel an automatic watering operation
The button can also be used as a manual override to cancel any current
automatic watering operation that has started. The schedule will then resume.
Battery Level Check (Press And Hold Down The Water Now Button)
3x Green Lights Battery level is Excellent
2x Green Lights Battery level is Good
1x Green Light Battery level is ok but consider replacing them soon
1x Red Light Battery level is low - replace the batteries now
Failure prevention mode
A built in safety feature detects when the battery levels have dropped to a level
that could fail whilst the valve is open and result in wasting water. The safety mode
prevents the controller from turning on until the batteries have been replaced.
The LED indicator light will flash red when the failure prevention mode has been
activated. The Water Now function will also not operate until the batteries have
been replaced.
This product is not designed to be used in sub-zero (frost) temperatures.
During winter months drain any remaining water out of your timer and bring
it indoors until the next watering season.
Vous pouvez activer le contrôleur d’eau à tout moment en appuyant sur le bouton
Arroser maintenant
.
Fonction Arroser maintenant
Appuyez Une fois 10 minutes d’arrosage
Appuyez
Deux fois
30 minutes d’arrosage
Appuyez
Trois fois
60 minutes d’arrosage
Appuyez
Quatre fois
Annule Arroser maintenant
L’indicateur LED s’allume pour indiquer que vous avez activé le contrôleur et se met
à clignoter lorsque la vanne est ouverte.
Selon le mode sélectionné, les voyants décomptent le laps de temps écoulé. Donc,
si vous appuyez sur le bouton 3 fois pour arroser pendant 60 minutes, après les 30
premières minutes, le voyant supérieur cesse de clignoter et les deux voyants du bas
continuent de clignoter.
Si vous décidez à tout moment d’arrêter l’arrosage manuel, appuyez simplement
sur le bouton Arroser maintenant jusqu’à ce que tous les voyants verts cessent de
clignoter. Vous entendrez le moteur activer la vanne interne pour couper l’eau.
Remarque : Pour protéger la durée de vie des piles, le contrôleur d’eau ne peut être
activé et désactivé qu’un maximum de 3 fois par minute.
Annulation d’une opération d’arrosage automatique
Le bouton peut également être utilisé pour annuler manuellement toute
opération d’arrosage automatique qui a démarré. Le programme d’arrosage
reprend par la suite.
Vérification du niveau des piles
(Appuyez et maintenez enfoncé le bouton Arroser maintenant )
3 voyants verts Le niveau des piles est excellent
2 voyants verts Le niveau des piles est bon
1 voyant vert Le niveau des piles est correct, mais veillez à les remplacer bientôt
1 voyant rouge Le niveau des piles est faible, remplacez-les maintenant
Mode de prévention des pannes
Un dispositif de sécurité intégré détecte le moment où le niveau des piles chute
à un niveau pouvant entraîner une panne lorsque la vanne est ouverte, ce qui
entraînerait un gaspillage d’eau. Le mode de sécurité empêche le contrôleur de
s’activer jusqu’au remplacement des piles. L’indicateur LED clignote en rouge
lorsque le mode de prévention des pannes a été activé. La fonction Arroser
maintenant ne s’exécute pas non plus jusqu’au remplacement des piles.
Ce produit n’est pas conçu pour être utilisé à des températures négatives
(gel). Pendant les mois d’hiver, vidangez toute l’eau restante de votre
minuterie et rentrez-la à l’intérieur jusqu’à la prochaine saison d’arrosage.
Sie können den Bewässerungscontroller jederzeit aktivieren, indem Sie ein Mal auf die
Taste Jetzt wässern drücken.
Funktion Jetzt bewässern
Ein Mal
Drücken
10 Minuten bewässern
Zwei Mal
drücken
30 Minuten bewässern
Drei Mal
drücken
60 Minuten bewässern
Drei Mal
Vier Mal
Bricht die Funktion Jetzt bewässern ab
Die LED-Kontrollleuchte zeigt Ihnen an, dass Sie den Controller eingeschaltet haben.
Sie beginnt zu blinken, wenn sich das Ventil geöffnet hat. Je nach ausgewähltem
Modus zählen die Kontrollleuchten mit der verstreichenden Zeit herunter. Wenn Sie
also die Taste drei Mal drücken, um 60 Minuten lang zu bewässern, stoppt die obere
Kontrollleuchte und die unteren beiden Kontrollleuchten blinken weiterhin.
Wenn Sie die manuelle Bewässerung einstellen wollen, drücken Sie einfach zu
einem beliebigen Zeitpunkt die Taste Jetzt bewässern so lange, bis alle grünen
Kontrollleuchten aufgehört haben zu blinken. Sie hören wie der Motor das interne Ventil
betätigt, wodurch die Wasserzufuhr deaktiviert wird.
Hinweis: Um die Batterielebensdauer zu schützen, kann der Bewässerungscontroller nur
maximal drei Mal pro Minute ein- und ausgeschaltet werden.
Wie kann ich eine automatische Bewässerung abbrechen?
Die Taste kann auch als manuelle Übersteuerung dienen, um jede derzeit gestartete
automatische Bewässerung abzubrechen.
Danach wird der Bewässerungsplan wider aufgenommen.
Batterieladestandskontrolle
(Drücken Sie die Taste Jetzt bewässern und halten Sie sie gedrückt)
3 x gründe Kontrollleuchte Hervorragender Batteriestand
2 x grüne Kontrollleuchte Guter Batteriestand
1 x grüne Kontrollleuchte Ausreichender Batteriestand, die Batterien sollten
jedoch in Kürze ausgewechselt werden
1 x rote Kontrollleuchte Niedriger Batteriestand – Batterien jetzt auswechseln
Fehlerschutzmodus
Eine integrierte Sicherheitsvorkehrung erkennt, wenn die Batteriestände auf ein
Niveau gefallen sind, bei dem das Gerät bei geöffnetem Ventil ausfällt, was zu einer
Wasserverschwendung führt. Der Sicherheitsmodus verhindert, dass der Controller
aktiviert wird, bis die Batterien ersetzt wurden. Die LED-Kontrollleuchte blinkt rot, wenn
der Fehlerschutzmodus aktiviert wurde. Die Funktion Jetzt bewässern funktioniert
ebenfalls erst wieder, nachdem die Batterien ausgetauscht wurden.
Dieses Produkt ist nicht für die Verwendung unter Null (Gefriertemperaturen)
geeignet. Lassen Sie in den Wintermonaten alles Restwasser aus Ihrem Timer ab
und bewahren Sie ihn bis zur nächsten Bewässerungssaison drinnen auf.
Manual operation (Water Now)
Utilisation manuelle (arroser maintenant)
Manueller Betrieb (Jetzt bewässern)
2216
Cloud Controller
Hozelock Ltd.,
Midpoint Park, Birmingham, B76 1AB. England
www.hozelock.com
33916-002
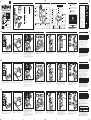
Contents • Contenu • Inhalt Cloud Controller Hozelock Hub
A
B
C
D
E
F
G
GB
Pair button
Pair button is for;
• Pairing
F
Bouton
d’appairage
Le bouton d’appairage est
pour :-
• L’appairage
D
„Verbinden“-Taste
Die „Verbinden“-Taste dient
zu folgendem Zweck:-
• Herstellen der Verbindung
GB
See the Quick Start Video
www.hozelock.com/cloudsupport
F
Voir la vidéo de démarrage rapide
www.hozelock.com/cloudsupport
D
Schauen Sie sich das kurze
Einführungsvideo an
www.hozelock.com/cloudsupport
GB
Wireless LED
Green or red
F
LED sans fil
Vert ou rouge
D
Drahtlos-LED
Grün oder rot
GB
Power LED
Green
F
LED d’ali mentation
Vert
D
Power-LED
Grün
GB
Network LED
Green
F
LED de réseau
Vert
D
Netzwerk-LED
Grün
GB
Ethernet socket
F
Prise Ethernet
D
Ethernet-Buchse
GB
5v Power socket
F
Prise d’alimentation 5v
D
5-V-Netzbuchse
GB
Water Now button
Water Now button is for;
• Water for 10, 30, 60 minutes
• Stop range test
• Battery level check
F
Bouton d’arrosage
Le bouton d’arrosage est pour :-
• L’arrosage pendant 10, 30, 60 mins
• Arrêter le test de distance
• Vérification du niveau de la pile
D
„Jetzt bewässern“-Taste
Die „Jetzt bewässern“-Taste dient zu
folgendem Zweck:-
• Bewässerung für 10,30,60 Minuten
• Reichweitenüberprüfung
abbrechen
• Batterieladestandskontrolle
GB
Pair button
Pair button is for;
• Pairing
• Range test
F
Bouton
d’appairage
Le bouton d’appairage est
pour :-
• L’appairage
• Le test de distance
D
„Verbinden“-Taste
Die „Verbinden“-Taste dient
zu folgendem Zweck:-
• Herstellen der Verbindung
• Reichweitentest
GB
LEDs
LEDs are for;
• Range test
• Water Now duration
• Battery level indicator
F
LEDs
Les LED sont pour :-
• Le test de distance
• Durée d’arrosage
• Indicateur du niveau de
batterie
D
LEDs
Die LEDs dienen zu
folgendem Zweck:-
• Reichweitentest
• Dauer der Bewässerung
• Batteriestandsanzeige
GB
A
21mm G½ (½”)
B
26.5mm G¾ (¾”)
C
33.3mm G1 (1”)
D
Cloud Controller
E
Hozelock Hub
F
Ethernet cable
G
Power supply
F
A
21mm G½ (½”)
B
26.5mm G¾ (¾”)
C
33.3mm G1 (1”)
D
Cloud Controller
E
Hozelock Hub
F
Câble Ethernet
G
Alimentation
électrique
D
A
21mm G½ (½”)
B
26.5mm G¾ (¾”)
C
33.3mm G1 (1”)
D
Cloud Controller
E
Hozelock Hub
F
Ethernet-Kabel
G
Stromversorgung
www.hozelock.com/cloudsupport
www.hozelock.com/cloudsupport
GB
See the Quick Start Video
F
Voir la vidéo de démarrage rapide
D
Schauen Sie sich das kurze Einführungsvideo an
NL
Zie de snelstartvideo
E
Vea el vídeo de inicio rápido
I
Visualizza il video di avvio rapido
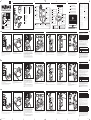
Position your Hub within 0.5m of your router. Plug the
Power Supply into your mains and connect to your Hub.
The Hub starts up, LEDs flash until only the Power LED remains permanently on. If
this doesn’t happen, check the Power Supply is plugged in and switched on at the
mains.
Positionnez votre Hub à 0,5 m de votre routeur. Branchez-le
à l’alimentation principale et connectez-vous à votre Hub.
Le Hub s’allume, les LED clignotent puis, seule la LED d’alimentation reste allumée.
Si tel n’est pas le cas, vérifiez que l’alimentation est branchée et allumée au niveau
de l’alimentation principale.
Stellen Sie Ihren Hub in einem Abstand von 0,5m zu Ihrem
Router auf. Schließen Sie das Netzteil am Stromnetz an und
verbinden Sie es mit Ihrem Hub.
Nach dem Einschalten des Hubs blinken die LEDs nur so lange, bis die Power-LED
dauerhaft leuchtet. Wenn dies nicht der Fall ist, prüfen Sie, ob das Netzteil an das
Stromnetz angeschlossen und eingeschaltet ist.
Connect the Hub to your home router using the Ethernet
cable supplied.
The Network LED should now be lit. If not check that both ends of the Ethernet
cable are plugged in and your router has internet access.
Connectez le Hub à votre routeur grâce au câble Ethernet
fourni.
La LED de réseau doit maintenant être allumée. Si tel n’est pas le cas, vérifiez que
les deux extrémités du câble Ethernet sont branchées et que votre routeur a accès
à internet.
Schließen Sie den Hub mit dem mitgelieferten Ethernet-
Kabel an Ihrem Home-Router an.
Die Netzwerk-LED sollte nun aufleuchten. Wenn dies nicht der Fall ist, prüfen Sie,
ob beide Enden des Ethernetkabels angeschlossen sind und Ihr Router mit dem
Internet verbunden ist.
Do not install batteries until you are ready to install the
Cloud Controller. Do not install the Cloud Controller on your
garden tap yet. Remove the front panel from the valve unit.
Install 2x AA 1.5v Lithium/Alkaline batteries into the back of
the front panel. Replace the controller front panel.
When batteries are installed the LEDs will flash until all 3 LEDs go out. The motor
will operate the internal valve. If you have installed flat batteries the ‘10’ LED will
flash red. You will not be able to operate the water timer until the batteries are
replaced with new ones. Replace batteries each season.
Ne pas installer les piles avant d’être prêt à installer le Cloud
Controller. Ne pas installer le Cloud Controller sur votre
robinet de jardin maintenant. Retirer le panneau avant de
la partie valve. Installez 2 piles AA 1.5v Lithium/Alcalines à
l’arrière du panneau avant. Replacez le panneau avant du
contrôleur.
Lorsque les piles sont installées les LED clignoteront puis s’éteindront toutes les 3.
Le moteur fera fonctionner la valve interne. Si vous avez inséré des piles vides la LED
“10” clignotera en rouge. Vous ne pourrez pas faire fonctionner le minuteur d’eau
avant que les piles ne soient remplacées par des nouvelles. Remplacez les piles à
chaque saison.
Setzen Sie erst Batterien ein, wenn Sie bereit für die
Installation des Cloud Controllers sind. Installieren Sie
den Cloud Controller noch nicht an Ihrem Wasserhahn im
Garten. Nehmen Sie die Frontplatte von der Ventileinheit
ab. Setzen Sie auf der Rückseite der Frontplatte zwei
AA 1.5v Lithium/Alkaline-Batterien ein. Bringen Sie die
Frontplatte des Controllers wieder an.
Nachdem Batterien eingesetzt wurden, blinken alle drei LEDs und erlöschen
anschließend. Das Motor steuert nun das interne Ventil. Wenn Sie leere Batterien
eingesetzt haben, blinkt die LED „10“ rot. Sie können die Bewässerungsuhr erst dann
in Betrieb nehmen, wenn die Batterien gegen neue ersetzt wurden. Tauschen Sie die
Batterien zu jeder Jahreszeit.
Download the App onto your smart phone and follow the
setup instructions in the app to pair the system.
For Apple iPhones the app is available from the Apple iTunes store. For Android
phones the app is available from the Google Play store.
Téléchargez l’Application sur votre smartphone et suivez les
instructions d’installation dans l’application pour appairer
le système.
Pour les iPhones Apple, l’application est disponible dans la boutique iTunes d’Apple.
Pour les téléphones Android, l’application est disponible dans la boutique Google
Play.
Laden Sie die App auf Ihr Smartphone herunter und
befolgen Sie die Setup-Anweisungen in der App, um eine
Verbindung mit dem System herzustellen.
Bei Apple iPhones kann die App über den Apple iTunes-Store heruntergeladen
werden. Bei Android-Smartphones kann die App über den Google Play-Store
heruntergeladen werden.
When you have completed the setup in the app install the
Controller on your tap. Check which adaptors are required
to fit the valve unit onto your outdoor tap.
A ½ inch BSP and a ¾ inch BSP thread adaptor are supplied.
Lorsque vous avez terminé l’installation de l’application,
installez le Contrôleur sur votre robinet. Vérifiez quels
adaptateurs sont nécessaires pour adapter l’unité de valve
à votre robinet d’extérieur.
Un adaptateur de fil de ½ pouce BSP et un autre de ¾ pouce BSP sont fournis.
Sobald Sie das Setup in der App abgeschlossen haben,
installieren Sie den Controller an Ihrem Wasserhahn. Prüfen
Sie, mit welchen Adaptern die Ventileinheit an Ihrem
Wasserhahn im Garten angebracht werden muss.
Ein ½- und ein ¾-Zoll-BSP-Gewindeadapter sind im Lieferumfang enthalten.
With the correct adapters in place, hold the Cloud Controller
up to the tap. Tighten firmly by hand to avoid leaks. Attach
your hose pipe to the hose connector and turn on your tap.
Do not use a spanner or other tool to tighten it up because this could cause damage
to the component threads.
Une fois les bons adaptateurs en place, maintenez le Cloud
Controller au niveau du robinet. Serrez manuellement et
fermement pour éviter les fuites. Attachez votre tuyau
d’arrosage au connecteur de tuyau puis ouvrez votre
robinet.
N’utilisez pas de clé ni aucun autre type d’outil pour serrer car cela pourrait
endommager les fils du composant.
Sobald die richtigen Adapter angebracht wurden, halten
Sie den Cloud Controller an den Wasserhahn. Ziehen
Sie die Vorrichtung per Hand fest, um Undichtigkeiten
zu vermeiden. Schließen Sie Ihren Schlauch an den
Schlauchanschluss an und drehen Sie den Wasserhahn auf.
Verwenden Sie zum Anziehen keinen Maulschlüssel oder sonstige Werkzeuge, da
dies zu Beschädigungen an den Gewinden führen kann.
It is important that your water timer is in radio reception
range of the Hub. You can test the signal strength by doing
a Range Test.
Up to 50m depending on obstacles between the Hozelock Hub and the Cloud
Controller. See the troubleshooting section on the Hozelock website for details of
how to do a range test. www.hozelock.com/cloudsupport
Il est important que votre Cloud Controller soit à distance
de réception radio du Hub. Vous pouvez tester la puissance
du signal en faisant un Test de distance
Jusqu’à 50m selon les obstructions entre le Hub Hozelock et le Cloud Controller.
Voir la section Assistance Cloud sur le site web de Hozelock pour de plus amples
informations sur comment réaliser un test de distance.
www.hozelock.com/cloudsupport
Es ist wichtig, dass sich Ihr Cloud Controller im
Empfangsbereich des Hubs befindet. Sie können die
Signalstärke mit einem Reichweitentest prüfen
Bis zu 50m abhängig von den Hindernissen zwischen Hozelock-Hub und Cloud
Controller. Im Abschnitt „Cloud Support“ auf der Website von Hozelock finden Sie
Informationen zur Durchführung eines Reichweitentests.
www.hozelock.com/cloudsupport
G½ (½”BSP)
G¾ (¾”BSP)
G1 (1”BSP)
G½ (½”BSP)
G¾ (¾”BSP)
G1 (1”BSP)
G½ (½”BSP)
G¾ (¾”BSP)
G1 (1”BSP)
GB
F
D
Inside your home
À l’intérieur
In Ihrem Haus
Outside your home
À l’extérieur
Außerhalb Ihres Hauses
2
2
2
3
3
3
4
4
4
7
7
7
5
5
5
6
6
6
Inside
Dedans
Innen
Outside
Dehors
Außen
Hub I.D.
Declaration of conformity to CE
Routeur non fourni
Keine Stromversorgung am Router
Router not supplied
1
1
1
0168
Hozelock Ltd declare that the following Electrically
Operated Water Valves:
• Cloud UK (2216 0000)
• Cloud EU (2216 1240)
Comply with:
• the Essential Health and Safety Requirements
of the Machinery Directive 2006/42/EC and its
amending directives.
• EMC Directive – 2014/30/EU
• RoHS Directive 2011/65/EU
and declare that the above models are in compliance with the
essential requirements and other relervant provisions of
• R&TTE Directive 1999/5/EC
and conforms to the following harmonised standards:
• HEALTH & SAFETY (Art. 3(1)(a)):
EN 60950-1:2006/A2:2013; EN 62479:2010;
EN 60730-2-8:2002+A1:2003, EN 60730-2-7:2010,
EN 60730-1:2011
• EMC (Art. 3(1)(b)): EN 301 489-1 V1.9.2:2011;
EN 301 489-3 V1.6.1 :2013; 60730-2-
8:2002+A1:2003,
EN 60730-2-7:2010, EN 60730-1:2011, EN 55022
:2010, EN 55024 :2010, EN 61000-3-2 :2014,
EN 61000-3-3 :2013
• SPECTRUM (Art. 3(2)): EN 300 220-2 V2.4.1 :2012
Supplementary information:
Notified body involved:
TUV SUD BABT, Octagon House, Segensworth Road,
Fareham, Hampshire, PO15 5RL , UK
Identification mark: 0168 (Notified Body number)
Date of Issue: 09/05/2016
Signed by: ...............................................................................................
Nick Iaciofano
Technical Director,
Hozelock Ltd. Midpoint Park, Sutton Coldfield,
Birmingham. B76 1AB. England.
Technical Data
Cloud Controller (outdoors)
Operating
Pressure
0.1 – 10 Bar
Operating
Temperature
0 - 55°C
Max. Water
Temperature
30°C
Battery Type
2x AA 1.5v Lithium/
Alkaline Batteries
Purpose of
Control
Electrically
operated water
valve
Mounting
Method
Surface mounting
Action Type Type 1
Pollution Degree 4
Hozelock Hub (indoors)
Operating
Temperature
2 - 45°C
2
Year guarantee
Ans de garantie
Jahre garantie
Jaar garantie
Años de garantia
Χρόνια εγγύηση
33916-002 CloudControllerInst-INT.indd 1 11/04/2016 12:54
Page is loading ...
-
 1
1
-
 2
2


Hozelock Cloud allows you easily manage your garden watering thanks to its smart features:
- Control your watering from anywhere, using the Hozelock Cloud app on your smartphone.
- Choose from three watering durations: 10, 30, or 60 minutes.
- A range test feature helps you ensure that the Cloud Controller is within range of the Hub.
- A battery level indicator lets you know when it's time to replace the batteries, and a failure prevention mode prevents the valve from opening if the batteries are too low.
Ask a question and I''ll find the answer in the document
Finding information in a document is now easier with AI
in other languages
- italiano: Hozelock Cloud Guida utente
- français: Hozelock Cloud Mode d'emploi
- español: Hozelock Cloud Guía del usuario
- Deutsch: Hozelock Cloud Benutzerhandbuch
- Nederlands: Hozelock Cloud Gebruikershandleiding
Related papers
-
Hozelock 2216 Cloud Controller Owner's manual
-
-
-
-
-
Hozelock 2826 Instruction Document
-
Hozelock Fast reel 40 m User guide
-
-
-
Other documents
-
Franke 0737296 Datasheet
-
Parkside 282463 Operation and Safety Notes
-
Diivoo WT-02 User manual
-
Brady BSP31 Quick start guide
-
Samsung WAM250 User manual
-
Rain Bird 1ZEHTMR Installation guide
-
-
Orbit Sunmate 62040 Installation and User Manual
-
 Yardworks 2-outlet Water Timer with Digital Display Quick Manual
-
