
The Smart Canner
™
Versatile • Simple • Safe
Use and Care Instructions
Browning…Steaming…
Pressure cooking…Canning…
The “SMART CANNER™”
does it with ease!
For your safety and continued enjoyment
of this product, always read the
instruction book carefully before using.
(Keep this book for future reference.)

IMPORTANT SAFEGUARDS
When using any electrical appliance basic safety precautions
should always be observed including the following:
• READ ALL INSTRUCTIONS.
• To protect against risk of electrical shock, do not put appliance in water or other liquid.
• Do not touch hot surfaces. Use handles, knobs or oven mitts.
• Close supervision is necessary when any appliance is used by or near children. This appliance is
not recommended for use by children.
• Unplug from outlet when not in use, before putting on or taking off parts, and before cleaning.
• Allow to cool before putting on or taking off parts.
• Avoid contact with moving parts.
• Never put the unit near a hot burner or in an oven.
• Do not operate the appliance for any other purpose than the intended use. Do Not use electrical
equipment with a damaged cord or plug or after the appliance malfunctions, is dropped or damaged
in any manner. Return unit to the nearest authorized service center for examination, repair, or
adjustment.
• Do not use outdoors.
• Do not let cord hang over edge of table or counter, contact sharp edges, or touch hot surfaces.
• Do not pull on the power cord to disconnect.
• Neverplugintheappliancewherewatermayoodthearea.
• Placetheapplianceonarmandstablesurface.
• Ensure that the appliance is not placed close to the edge of the table, worktop, etc. where it can be
pushed off or fall.
• Theuseofattachmentsnotrecommendedorsoldbythemanufacturermaycausere,electric
shock or injury.
• Never use abrasive cleaning agents or abrasive cloths when cleaning the unit.
• Only use the unit when completely assembled.
• Do not leave the appliance unattended while it is running.
• Beforeusingforthersttime,removeallpackagingandwashparts.
• This appliance has a polarized plug (one blade is wider than the other). To reduce the risk of electric
shock,thisplugwilltinapolarizedoutletonlyoneway.Iftheplugdoesnotttheoutletperfectly,
reversetheplug.Ifitshouldstillnott,contactaqualiedelectrician.Donotmodifytheplugin
any way.
• Prior to unplugging unit, turn power off.
• Do not place on or near hot gas, electric burner or in a heated oven.
• Extreme caution must be used when moving an appliance containing hot oil or other hot liquids.
• To disconnect, turn any control to “off”, then remove plug from wall outlet.
• CAUTION: Turn unit on and off using timer or On/Off button only.
WARNING

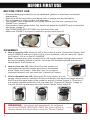
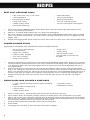
OVERVIEW OF COMPONENTS
FIGURE 1
1. Lid Handle
2. Lid
3. Black Pressure Limiting Valve (low altitudes)
4. Green Pressure Limiting Valve
(for use at elevations higher than 1,000 ft.
above sea level)
5. Body Handles
6. Stainless Steel Body
1
3
5
7
6
8
2
10
7. Control Panel
8. Lower Body Base
9. Canning Racks (tall and short)
10. Inner Pot (non-stick interior)
11. Steam Rack
12. Removable Silicone Gasket
13. Condensation Catcher
14. Power Cord
9
11
4
13
3
12
14
1

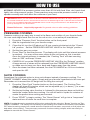
BEFORE FIRST USE
BEFORE FIRST USE
• Remove packaging materials such as cardboard, plastics or styrofoam and discard
appropriately.
• Wipe clean all the parts with a soft damp cloth or sponge and dry thoroughly.
• Do not immerse in water or place in dishwasher.
• TheGASKETsetsinbehindthewireguide.Beforeyourrstuse,gentlypullthe
GASKET out. (image 1)
• Handwashinwarmsoapywater.Dry,thenrmlypresstheGASKETbackinbehindthe
wire guide. (image 2)
• Slip CONDENSATION CATCHER onto the back of the unit.
• Make sure GASKET is properly installed in groove inside the LID.
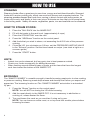
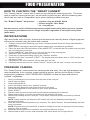
ASSEMBLY
1. How to open the LID: When the LID of the cooker is at the “Closed-Lid Position” hold
the LID HANDLE and turn it about 1/8 of a turn clockwise, until you reach the “Open-
Lid Position”. Lift up on the LID HANDLE.
Note: For brand new units, the seal of the LID may be slightly stronger than normal
andmaybeslightlydifculttounlock.OncetheLIDhasbeenopenedandclosed
several times, it will loosen up.
2. How to close the LID: When the LID of the cooker is in
vertical position hold the handle and close it downwards
at the “Open-Lid Position”. After that, turn it in a counter
clockwise direction until you reach the “Closed-Lid Position”.
3. How to dismantle the LID: When the LID of the cooker is in the
upright vertical position, hold the LID with both hands, and adjust the height between
the LID and the upper edge of the cooker to around 4 inches (image 3). Then turn it
in a counter clockwise direction until you reach the “Closed-Lid Position” (image 4).
Then lift the LID up and away from the “Smart Canner” body (image 5).
1
2
WARNING -
Hot steam will periodically be released
out of the STEAM RELEASE VENT. Be sure nothing is
directly above this area when using the “Smart Canner”.
3 5
4
2

HOW TO USE
4/5 RULE:NEVERllapressurecookermorethan4/5fullwithfood.Also,don’tpackfood
tightly into a the pressure cooker. These practices may cause the pressure cooker to not
operate correctly and it will affect the outcome of your food.
PRESSURE COOKING
Pressurecookingisaneasywaytosealintheavorandnutritionofyourfavoritefoods.
You can cook single foods like corn on the cob or rice, or an entire pot roast dinner.
1. Press the “Pressure Cook” function button on the front panel.
2. Add the ingredients from your favorite recipe.
3. Close the lid, turn the LID about an 1/8 turn counter clockwise into the “Closed-
Lid” position. Set the PRESSURE LIMITING VALVE to the “Airtight” position.
4. Set the time per your recipe.
5. Press “Start” to start the process. The display will circle until the internal pressure
is reached. You may notice some clicks as the unit heats up, this is normal.
Once the internal pressure is reached, the “Cooking Time” will start counting
down to “000” and beep 3 times.
6. CAREFULLY move the PRESSURE LIMITING VALVE to the “Exhaust” position.
A large amount of steam will be released from the PRESSURE LIMITING VALVE,
somakesuretokeepyourface,bodyandngersawayfromthesteam.
7. Once the steam has been released, turn the LID HANDLE an 1/8 turn clockwise
and open the LID.
SLOW COOKING
Sometimesit’sadesiredoptiontoslowcookdinnersinsteadofpressurecooking.The
“SMART CANNER” allows this option. Simply add your favorite ingredients to the inner pot.
Remembernottoexceedthe4/5heightruleforllingthecookpot.
1. Press the “Slow Cook” function button on the front panel. The Cooking Time
display will show 30 minutes, which can be adjusted up (+) or down (-), to a max
of 600 minutes (10 hours).
2. Set the top limiting valve function to “exhaust”so the pressure does not build up
inside the cooker while slow cooking. You will still seal in liquids for moisture to
create the perfect slow cooking environment.
3. Press “START” to begin cooking. The “Smart Canner” will go into a “keep warm”
state and turn off when the cook time is complete.
HINTS: Considerbrowningmeatsthatwillbeslowcookedrstbyusingthe“Brown”functiononThe
“SMART CANNER”. It is usually not necessary to add cooking oil or butter to the bottom of the INNER
POT when browning meats, but a small amount of liquids such as water, soup stock or fruit juices can
help when “slow cooking”. There are many resources for slow cooking recipes, which can easily be
adapted to use with the “Smart Canner”.
IMPORTANT: Before you start select the BLACK LIMITING PRESSURE VALVE for all usage unless you
are located at altitudes above 1,000 feet above sea level. At altitudes higher than 1,000 feet above sea level
always use the GREEN LIMITING PRESSURE VALVE. Avoid using metal utensils on the INNER POT, as
you may damage the non-stick surface.
Please Reference: http://nchfp.uga.edu/ for general rules on safe canning guidelines.
3

HOW TO USE
STEAMING
Steamingfoodsoffersagreatwaytosavetime,energyandnutritionalbenets.Steamed
foodsdon’trequirecookingoils,whichcansavebothmoneyandunwantedcalories.The
steaming
process keeps the foods from coming in direct contact with boiling water, so
foods cook evenly and gently in their own juices. Nutrients are less likely to be swept away
in the boiling water. Nearly all meats, vegetables, pasta, rice and seafood can be steamed.
HINTS:
• Instant rice can be steamed, but long grain rice is best pressure cooked.
• Check your foods occasionally for desired doneness.
• When cooking several different types of foods, put the items that have the longest
cook time toward the bottom of the INNER POT.
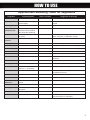
Approximate Steaming Times for Vegetables
Vegetable Size/Preparation Time in minutes Suggested seasonings
Artichokes Steam whole artichokes 25-40 min extra virgin olive oil and lemon zest
Asparagus Whole spears, thick spears
peeled lightly
7-13 min olive oil combined with lemon zest or sesame
seeds
Beans, green Whole beans 6-10 min garlic
Beets, small or
medium-sized
Whole, un-peeled beets
scrubbed clean; peel off
the skins after steaming
35-50 min fresh thyme
Broccoli Trimmed stalks split in half
ororets
5-7 min Extra-virgin olive oil, pumpkin seed oil, lemon
juice, lime juice, or balsamic vinegar
Brussels
sprouts
Whole, trimmed 8-15 min fresh thyme
Cabbage Cut in wedges 6-10 min Lemon or lime juice
Carrots Cut into ¼-inch thick slices 7-10 min honey combined with cinnamon or ginger
Carrots, baby Whole baby carrots 10-12 min honey combined with cinnamon or ginger
Cauliower Florets 5-10 min Lemon or lime juice
Corn on the cob Whole, husks removed 7-10 min chicken or vegetable stock
Okra Fresh whole okra, trimmed 6-8 min lemon/lime juice and parsley, or with sauteed
scallions
Onions, pearl Whole onions, peeled 8-12 min
Peas, green Fresh, shelled peas 2-4 min fresh herbs (such as mint) or lemon juice
Potatoes, all Peeled or scrubbed clean,
cut into ½ - inch slices
8-12 min fresh parsley, rosemary or dill
Potatoes, new Whole, scrubbed clean 15-20 min fresh parsley, rosemary or dill, or with
chopped red onions
Scallions Cut into ½ - inch slices 3-5 min
Spinach Cleaned, whole leaves 3-5 min olive oil and garlic, or sesame seeds
Squash,
butternut
Peeled and cut into 1- inch
cubes
7-10 min honey, lemon juice, and rosemary
Turnips Cut into ½ - inch cubes 8-12 min olive oil and fresh herbs
Turnip greens Cleaned and coarsely
chopped
4-6 min olive oil and garlic
Sweet potatoes Cut into large chunks 8-12 min honey and lemon juice
Zucchini Cut into 1 - inch slices 5-8 min olive oil, lemon/lime juice, and fresh herbs
(such as thyme or rosemary)
HOW TO STEAM FOODS:
1. Place the TALL RACK into the INNER POT.
2. Fill with hot water to the rack level. (approximately 4 cups)
3. Place the STEAM TRAY over the rack.
4. Press the “WB/Steam” function on the control panel.
5. Addfoodsthatyouwishtosteam,notexceedingthe4/5llruleofthepressure
cooking.
6. Close the LID, turn clockwise an 1/8 turn, set the PRESSURE LIMITING VALVE
to the “Exhaust” position. Set the timer based on recipe. (use chart at right as a
common guide)
7. Press the “START” button.
1. Press the “Brown” function on the control panel.
NOTE: You will NOT be closing the LID while browning.
2. Add the meat directly to the INNER POT. It is not necessary to add butter or
cookingoil,unlessdesiredforavor.
3. Turn and brown the meat as you would as if using an fry pan.
NOTE: You can brown an entire roast, or cut up meat into smaller pieces before
browning for stews.
BROWNING
The “SMART CANNER” is versatile enough to handle browning meats prior to slow cooking
orpressurecooking.Browningmeatshelpreleaseanddeveloptheavorsyouexpectand
appreciate. The browning function on The “SMART CANNER” acts similar to a standard
fry pan.
4

HOW TO USE
Approximate Steaming Times for Vegetables
Vegetable Size/Preparation Time in minutes Suggested seasonings
Artichokes Steam whole artichokes 25-40 min extra virgin olive oil and lemon zest
Asparagus Whole spears, thick spears
peeled lightly
7-13 min olive oil combined with lemon zest or sesame
seeds
Beans, green Whole beans 6-10 min garlic
Beets, small or
medium-sized
Whole, un-peeled beets
scrubbed clean; peel off
the skins after steaming
35-50 min fresh thyme
Broccoli Trimmed stalks split in half
ororets
5-7 min Extra-virgin olive oil, pumpkin seed oil, lemon
juice, lime juice, or balsamic vinegar
Brussels
sprouts
Whole, trimmed 8-15 min fresh thyme
Cabbage Cut in wedges 6-10 min Lemon or lime juice
Carrots Cut into ¼-inch thick slices 7-10 min honey combined with cinnamon or ginger
Carrots, baby Whole baby carrots 10-12 min honey combined with cinnamon or ginger
Cauliower Florets 5-10 min Lemon or lime juice
Corn on the cob Whole, husks removed 7-10 min chicken or vegetable stock
Okra Fresh whole okra, trimmed 6-8 min lemon/lime juice and parsley, or with sauteed
scallions
Onions, pearl Whole onions, peeled 8-12 min
Peas, green Fresh, shelled peas 2-4 min fresh herbs (such as mint) or lemon juice
Potatoes, all Peeled or scrubbed clean,
cut into ½ - inch slices
8-12 min fresh parsley, rosemary or dill
Potatoes, new Whole, scrubbed clean 15-20 min fresh parsley, rosemary or dill, or with
chopped red onions
Scallions Cut into ½ - inch slices 3-5 min
Spinach Cleaned, whole leaves 3-5 min olive oil and garlic, or sesame seeds
Squash,
butternut
Peeled and cut into 1- inch
cubes
7-10 min honey, lemon juice, and rosemary
Turnips Cut into ½ - inch cubes 8-12 min olive oil and fresh herbs
Turnip greens Cleaned and coarsely
chopped
4-6 min olive oil and garlic
Sweet potatoes Cut into large chunks 8-12 min honey and lemon juice
Zucchini Cut into 1 - inch slices 5-8 min olive oil, lemon/lime juice, and fresh herbs
(such as thyme or rosemary)
5

FOOD PRESERVATION
FOOD PRESERVATION
Ready to enjoy home canning with the “Smart Canner”?
Fewthingsaremoresatisfyingthanopeningajarofsomethingyou’vecannedyourself.
Homecanninghasalongandimportantlegacyforfamilies.You’llbeabletotake
advantageofmanybenetsbycanningyourownfruitsandvegetables.It’smorethan
justthegreattasteofproduceyou’vepreservedattheirpeak,it’sthehealthbenetsof
controllingwhatgoesinthefoodsyoueat.Plus,it’sasteptowardselfsufciency.Youcan
enjoy the taste of your garden all year! Home canned products make thoughtful and
healthy gifts.
The “Smart Canner” helps make the process easy and safe. Digital controls will make the
processeasier,evenforrsttimehomecanners.Theprocessofpressurecanningsafely
eliminatesandprotectsagainstunwantedmicroorganisms.We’veincludedsometipson
the basics of canning. Feel free to explore the many recipe resources available online or
through your local library. Join a club and learn even more.
BASIC CANNING TIPS
• We highly recommend that you familiarize yourself with the canning procedures,
the different acid levels of fresh foods and FDA guidelines that can be found on the
Internet. http://nchfp.uga.edu/
• There are a wide variety of products that can be successfully canned. However, not
every food item is suitable. Check for recipes before proceeding.
• Follow recipe directions carefully.
• Select jar sizes in servings that you and your family will be able to consume in a timely
manner. Make sure there are no small chips along the top of jars that would prevent
adequate sealing. With proper care, canning jars can be reused for many years.
NEVER ATTEMPT TO REUSE LIDS.
• Some handy items that you may normally need include saucepans, measuring cups
and measuring spoons, sharp kitchen knives, large spoons or ladles, cutting boards,
non-metallic spatula, funnels, jar lifters, oven gloves and clean rags. Also, adhesive
labelscanaddanicelooktoyournalproduct.
• Makesureallutensils,jarsandlidsarethoroughlycleanbeforenalcanning.It’sbest
to keep your newly cleaned jars warm to help reduce chance of breakage caused by
temperature changes when adding hot foods.
• “The “Smart Canner” can seal jars through both pressure canning and water bath
techniques—check with your recipe for suggested method.
• Follow guidelines for safety procedures from canning jar and lid manufactures. Never
use jars that are not designed for home canning.
6

FOOD PRESERVATION
HOW TO CAN WITH THE “SMART CANNER”
The ““Smart Canner” comes with 3 racks to use during the canning process. The short
rack is used for canning quart jars, the tall rack for pint size jars, and the steaming rack
which can be used as a separation layer when stacking smaller size jars.
The “Smart Canner” will process:
·
4 Quarts using the SHORT RACK
·
8 Pints using the TALL RACK
·
16 - 4 oz jelly jars.
Botulism spores must be killed at temperatures higher than boiling water (pressure canned)
or by extreme pH balance found in vinegar of pickled vegetables or sweet jams and jellies
(water bath).
WATER BATH/WB
Highacidfoodssuchasfruits,picklesandtomatoesarenaturallybetteratghtingspores
and may be canned using the water bath method.
1. Prepare your products following your recipe, following federal Food and Drug Administration
guidelines.
2. Place food in canning jars and hand tighten following jar manufacturer guidelines.
3. Place the short rack into the bottom of the INNER POT (or the tall rack for smaller size jars) and
setyourlledjarsontherack.
4. Fill the INNER POT with water to 1 inch over the top of the canning jars.
5. Select the “WB” function key on the control panel.
6. Close the lid, leave the limiting valve in the “exhaust” position
7. Set the “Cook Time” and press “START”. The display will count down time to “000” and the unit
will beep 3 times.
8. Carefully turn the LID clockwise 1/8 turn and open the LID.
9. Carefullyremovethejarsfrom“SmartCanner”;thejar’slidswill“pop”astheycoolandseal.
PRESSURE CANNING
The “Smart Canner” makes pressure canning safe and easy. You can high pressure can
most vegetables, fruits, sauces, meats and soup stocks, and so just be sure to follow
recipes and guidelines. LOW PRESSURE CANNING is ideal for jams and jellies or
“pickled” vegetables.
1. Placeyourlledjarstobecannedontotherackinthecookpot.
2. Add 4 cups hot water.
3. Close and lock the lid.
4. Leave the limiting valve in the “exhaust” position.
5. Select the High pressure cook button from the front panel.
6. Set the time required to cook based on your recipe guidelines.
7. Press “START”.
8. Dial will rotate several minutes until correct internal temperature is reached.
9. When steam begins to exit the top of the unit, the machine will beep.
10. Shift the top limiting valve to “air tight”. The process continues as the unit builds up internal
pressure.
NOTE: SafetyfeatureswillkeeptheLIDlockeduntilyouarenishedprocessingand
temperatures lower
11. Once the correct internal pressures are reached, The “Smart Canner” will automatically start the
timer countdown.
NOTE: Expect some minor amounts of steam to escape from the unit during the timed canning
process—this is normal.
12. When the canning process is complete, the machine will beep 3 times.
13. Wait at least an hour or more until automatic lock valve allows you to open the lid.
7

RECIPES
BEEF CHILI (PRESSURE COOK)
1. PressSmartCanner’sBROWNsetting.PressSTART.Brownmeatandseasoningswithoutthelidonthe
canner. Cook until meat is browned.
2. Add 10 oz. of canned diced tomatoes and 4 oz. diced green chili peppers.
3. Stir,cover&lockthe“SmartCanner”LID.PressSmartCanner’sPRESSURECOOKsetting.Adjust“Cooking
Time” to 25 minutes. Press START. The “Smart Canner” will beep 3 times when the cycle is complete and will
display “OFF”.
4. Garnish with chopped fresh cilantro and green onions. Serve with corn chips, sour cream and shredded cheese.
CANNED CHICKEN STOCK
(great use for the bones, skin and left-over meat of roasted chicken)
1. Put above ingredients into Smart Canner. Lock lid and press PRESURE COOK setting. Set time for 20 minutes.
The Smart Canner will beep 3 times when the cycle is complete and will display “OFF”. Release pressure and
cool. Strain and discard the bones and veggies. Place ice cubes in the broth; the fat will solidify and can be
removed/discarded.
2. Heat the canning lids. Pour the broth into pint canning jars. Wipe the tops of the jars, seal and hand tighten
rings on the canning jars. Place the jars on the tall rack of the Smart Canner and add enough water to a level of
about 1/3 of the height of the jars. Close and lock the Smart Canner lid. Press PRESURE COOK and set for 15
minutes. Press start. The Smart Canner will beep 3 times when the cycle is complete and will display “OFF”.
3. CarefullyremovethejarsfromSmartCanner;thejar’slidswill“pop”astheycoolandseal.Usewithin6
months.
SIMPLE SLOW COOK CHICKEN & DUMPLINGS
1. Place in “Smart Canner”. Press SLOW COOK and set time for 480 mins, (8 hours).
2. Open “Smart Canner” and stir stew, pressing chicken into smaller pieces. The chicken will be very tender.
3. Open1canofhome-stylerefrigeratorbuttermilkbiscuits.Rolleachbiscuitinourshapingthemintosausages
andcuttheminto4pieces.(Theourwillthickenthestew.)Addthebiscuitdumplingstothetopofthechicken
stew and gently push them down to be covered with the stew juice.
4. Close the Smart Canner lid and SLOW COOK & set time for 45 mins.
5. Press START.
6. The display will count down to “000” and beep 3 times when complete.
• 3 lbs. chuck roast, cut in 1- inch cubes
• 1 Tbls vegetable oil
• Salt and pepper to taste
• 1 large onion, diced
• 4 stalks of celery, diced
• 2 Tbls Italian Seasoning
• 2 Tbls chili powder
• 1/4 tsp cayenne pepper
• 1/2 tsp ground oregano
• 10 oz can of diced tomatoes
• 4 oz can of diced green chili peppers
• Left over bones, skin and meat
of roasted chicken
• 1 large onion, chopped
• 2 stalks of celery, chopped
• 1/2 C carrot, chopped
• 1/2 tsp of minced garlic
• 1/2 tsp cumin
• 1/2 tsp nutmeg
• Salt and pepper to taste
• Enough water to reach the “3/5”
full mark
• 1 - 1/2 lb. skinless, boneless chicken breasts, rinsed and
drained
• 2 cans of cream of chicken soup
• 3 carrots, diced
• 2 stalks of celery, diced
• 1 small onion, diced
• 2 Tablespoons of butter
8

RECIPES
• 2 Tbls chili powder
• 1/4 tsp cayenne pepper
• 1/2 tsp ground oregano
• 10 oz can of diced tomatoes
• 4 oz can of diced green chili peppers
• 1/2 tsp cumin
• 1/2 tsp nutmeg
• Salt and pepper to taste
• Enough water to reach the “3/5”
full mark
SLOW COOKED BAKED ZITI
1. Mix the 3 cheese in a small bowl.
2. Rinse the zita under cold water. Evenly space one layer of zita in the bottom of the Smart Canner.
3. Spread one jar of marinara sauce over the ziti.
4. Add half the cheese mixture and half the basil.
5. Repeat the layering.
6. Add the water, but do not stir.
7. Close and lock the lid. Press SLOW COOK and set time for 150 minutes. (2 ½ hours)
8. Press START. The display will circle until the correct temperature is reached. The unit is programmed to go into
a “keep warm” state as it slow cooks your meal.
9. The display will count down to “000” and beep 3 times when complete.
• 1 small onion, diced
• 2 Tablespoons of butter
• 1 lb. ziti
• (2) 25 oz. jars of marinara sauce
• 15 oz. ricotta cheese
• 1 cup shredded mozzarella cheese
• 1 cup grated Parmesan
• 2tablesspoonsfreshbasilleaves,nely
chopped
• 2/3 cups of water
BBQ RIBS
1. BrowntheribsintheSmartCookerrstbyfollowingthestepsonpage4.
2. Add the rest of the ingredients on top of the ribs. Close and lock the lid. Press PRESSURE COOK. Adjust
cooking time to 60 minutes. Press START. The display will change throughout the process and will beep 3
times when the process is done.Open 1 can of home-style refrigerator buttermilk biscuits. Roll each biscuit in
ourshapingthemintosausagesandcuttheminto4pieces.(Theourwillthickenthestew.)Addthebiscuit
dumplings to the top of the chicken stew and gently push them down to be covered with the stew juice.
3. Remove the ribs and place them on a foil lined pan. Cover with the remaining BBQ sauce. Broil for
approximately 10 minutes or until the BBQ sauce is browned to your liking.
• 3to4#’scountrystyleporkribs
• ¼ C apple cider vinegar
• 1 C beer (darker is better)
• 1 large onion sliced
• 2 teaspoons of minced garlic
• Your favorite BBQ sauce. (3/4C will be used in
the Smart Cooker with the ribs and the rest will be
used just before serving)
PRESSURE CANNING SALSA
1. Mix all ingredients, and pour into canning jars.
2. Heat the canning lids.
3. Wipe the tops of the jars, seal and hand tighten rings on canning jars.
4. Place jars on the tall rack and add enough water to a level of about 1/3 of the height of the jars. Close the lid
and slide it over to the lock position. Press Pressure Cook and adjust “Cooking Time” to 15 minutes.
5. Press START.
6. The Carey Smart Canner will beep 3 times when the cycle is complete and display “OFF”.
7. Carefully, remove the jars and set them aside to cool.
8. You will hear the lids “pop” as they seal.
• 12 cups (about 24 tomatoes) Roma
tomatoes, peeled, cored and chopped
• 3 green bell peppers, seeds removed and
chopped
• 2 large onions, chopped
• 5 or 6 large jalapeno peppers, stemmed,
seeded and chopped (leave the seeds in
for hotter salsa)
• 2 tablespoons salt
• 1 teaspoon black pepper
• 1 tablespoon garlic, minced
• ¾ cup lime or lemon juice
• 1 tablespoon sugar
9

© 2014 Chard International, P.O. Box 444, Two Rivers, WI 54241-0444 1-888-815-4252
Your product is warrantied for one year from date of purchase against all defects in material and
workmanship. Should your product prove defective within one year from date of purchase or
receipt, return the unit, freight prepaid, along with an explanation of the claim. Please package
your product carefully in its original box and packing material to avoid damage in transit. (We are
not responsible for any damage caused to the product in return shipment.) Under this warranty,
we undertake to repair or replace any parts found to be defective.
This warranty is only valid if the product is used solely for household purposes in accordance with
the instructions. This warranty is invalid if the unit is connected to an unsuitable electrical supply,
or dismantled or interfered with in any way or damaged through misuse.
Weaskthatyoukindlyllinthedetailsonyourwarrantycardandreturnitwithinoneweekfrom
date of purchase. Send warranty card to:
The Smart Canner
C/O CI
PO Box 444
Two Rivers, WI 54241-0444
WARRANTy
-
 1
1
-
 2
2
-
 3
3
-
 4
4
-
 5
5
-
 6
6
-
 7
7
-
 8
8
-
 9
9
-
 10
10
-
 11
11
-
 12
12


Ask a question and I''ll find the answer in the document
Finding information in a document is now easier with AI
Other documents
-
 LUBY GT606 User manual
-
 Cook's essentials K42027 User manual
-
Farberware Millenium FPC600 Use & Care Instructions Manual
-
 MegaChef 98599675M User guide
-
Presto Pressure Canner and Cooker User manual
-
-
Presto 01755 User manual
-
Presto 01781 Installation guide
-
Deni 9740 User manual
-


