Page is loading ...

2 www.aeg.com
CONTENTS
FOR PERFECT RESULTS
Thank you for choosing this AEG product. We have created it to give you impeccable
performance for many years, with innovative technologies that help make life simpler –
features you might not nd on ordinary appliances.
Please spend a few minutes reading to get the very best from it.
Visit our website to:
Receive advice, download our brochures, solve any anomaly and nd
information on technical support:
www.aeg.com
Register your product and receive a better service:
www.aeg.com/productregistration
Purchase accessories, consumables and original spare parts for your
appliance:
www.aeg.com/shop
CUSTOMER SERVICE AND MAINTENANCE
We recommend always using original spare parts.
Always have the following information at hand when you contact the authorised
Assistance Centre: Model, PNC and serial number.
You can nd the information on the rating plate.
Warning/Attention - Important safety information.
Information and general recommendations.
Environmental information.
Subject to change without notice.
1. SAFETY INFORMATION .................................................................................................... 3
2. SAFETY INSTRUCTIONS .................................................................................................. 4
3. PRODUCT DESCRIPTION ................................................................................................ 6
4. CONTROL PANEL ............................................................................................................. 6
5. BEFORE USING FOR THE FIRST TIME ........................................................................... 7
6. DAILY USE ......................................................................................................................... 7
7. CLEANING AND MAINTENANCE .................................................................................... 12
8. TROUBLESHOOTING ...................................................................................................... 13
9. ENVIRONMENTAL CONSIDERATIONS ......................................................................... 14

3ENGLISH
1. SAFETY INFORMATION
Carefully read the instructions before installing and
using the appliance. The manufacturer is not liable
for improper installation and use of the appliance that
may cause injuries and damage. Always keep the
instructions available for future reference.
1.1 Safety of children and vulnerable adults
• This appliance can be used by children aged 8
years and above and persons with reduced physical,
sensory or mental capabilities or lack of experience
and knowledge only if they are given supervision or
trained on how to use the appliance in a safe way and
understand the hazards involved.
• Children should not play with the appliance.
• Keep packaging materials away from children.
• Keep children and pets away from the appliance during
operation.
• Cleaning and maintenance should not be done by
children without supervision.
• Children under the age of 3 years must be ket away
unless constantly supervised.
1.2 Warnings on general safety
• Only qualied personnel can install the appliance and
replace the cables.
• Disconnect the appliance from the power supply before
carrying out any maintenance operation.
• Do not use steam cleaners to clean the appliance.
• Do not use abrasive detergents or metal scrapers to
clean the appliance.
• If the power cord is damaged it must be replaced by
the manufacturer, by an authorised technician or by a
qualied person to prevent hazardous situations.

4 www.aeg.com
2. SAFETY INSTRUCTIONS
2.1 Installation
CAUTION!
The appliance must be installed by
qualied personnel only.
• Remove the packaging material.
• Do not install or use the appliance if
damaged.
• Comply with the instructions supplied
with the appliance.
• Always pay attention when moving the
appliance. Always wear safety gloves.
• Do not turn the appliance upside down
or tilt it! This may cause oil to leak from
the pump and damage the equipment.
• Respect the minimum distance from
other appliances.
• Make sure the appliance is installed
and secured to a xed structure.
• The sides of the appliance must be
adjacent to other equipment or units
having the same height.
2.2 Electrical connection
CAUTION!
Risk of re and electric shock.
• All the electrical connections must be
made by a qualied electrician.
• The appliance must be earthed.
• Make sure that all the electrical data
shown on the data plate correspond
to those of the system. Otherwise,
contact an electrician.
• Always use an electrical outlet with a
correctly installed protective contact.
• Do not use multi-plug adapters or
extension cables.
• Make sure not to damage the mains
plug and the mains cable. If the power
cable must be replaced, this should be
carried out by our Assistance Centre.
• Shock protection devices must be
fastened in such a way that they
cannot be removed without tools.
• Connect the mains plug to the mains
socket only once installation has been
completed.
• Do not connect the mains plug if the
mains socket is loose.
• Do not pull the mains cable to
disconnect the appliance. Pull only the
mains plug.
• Use only suitable isolation devices:
circuit breakers, fuses (screw type
fuses must be removed from the fuse
holder), earth fault current releases
and relays.
• The electric system must be equipped
with an isolation device that allows
you to disconnect the appliance from
the mains at every pole. The isolation
device must have a contact opening
width of a minimum 3 mm.
• This appliance complies with the EEC
directives.

5ENGLISH
2.3 Use
CAUTION!
Risk of injury, burns, electric
shock or explosion.
• Do not touch the sealing bar after use.
Residual heat can cause burns.
• Use this appliance only in a household
environment.
• Do not modify the specications of this
appliance.
• Do not leave the appliance unattended
during operation.
• Turn the appliance o after use.
• Do not use the appliance with wet
hands or when it could come into
contact with water.
• Do not apply pressure on the drawer.
• Do not use the appliance as a work
surface or as a support surface.
• Avoid the presence of sparks or open
ames near the appliance when you
open the drawer.
Do not place or keep ammable liquids,
materials or objects on the appliance, or
inside or close to it.
CAUTION!
You may damage the appliance.
• Pay attention when you remove or
insert the accessories.
• Do not force the cover open during the
work cycle.
• Do not force the cover open during the
work cycle in the case of a power cut.
• Do not place any weight on the cover.
• Prevent any object from falling on
the cover! This can compromise the
integrity, causing cracks or damage.
2.4 Cleaning and maintenance
CAUTION!
There is a risk of injury, re or
damage.
• Before carrying out any maintenance
operation, turn the appliance o and
disconnect the plug from the mains
socket.
• Check that the appliance is cold.
2.5 Disposing of the appliance
CAUTION!
Risk of injury and choking.
• Disconnect the plug from the power
supply.
• Remove the mains cable and dispose
of it.
2.6 Technical Assistance
• Contact the authorised Assistance
Centre to repair the appliance.
• Only use original spare parts.

6 www.aeg.com
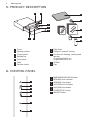
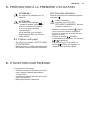
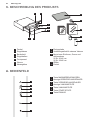
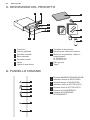
3. PRODUCT DESCRIPTION
1
Cover
2
Sealing cushion
3
Control panel
4
Sealing bar
5
Front panel
6
Tank
7
Suction nozzle
8
Filler plate
9
Fitting for external vacuum
10
Pouches for freezing, cooking and
storage
25 pouches 20x30 cm
25 pouches 25x35 cm
11
Oil lter
12
Cap
4. CONTROL PANEL
1
MARINADE/INFUSION button
2
SEALING time indicator
3
SEALING time button
4
VACUUM level indicator
5
VACUUM level button
6
START/STOP button
7
ON/OFF button
1
2
3
4
5
6
7
1
3
4
5
67
2
8
9
10
11
12

7ENGLISH
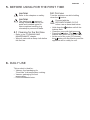
5. BEFORE USING FOR THE FIRST TIME
CAUTION!
Refer to the chapters on safety.
CAUTION!
The plastic cap
12
removed
during installation must be put
aside and installed again for
future machine handling (e.g.
relocated) to prevent oil leaks.
5.1 Cleaning for the rst time
• Refer to the “CLEANING AND
MAINTENANCE” chapter.
• Wipe all parts with a damp cloth before
the rst use.
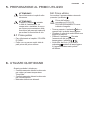
5.2 First use
Turn the appliance on while holding
down the button.
Proceed with the
RECONDITIONING CYCLE
before use as described below:
• Hold down the button until all the
buttons ash.
• Close the cover with light pressure.
• Press the button. The and
buttons ash while the program runs.
• At the end of the cycle (15 minutes)
the button will stop ashing and the
appliance will be ready for use.
6. DAILY USE
This product is ideal for:
• Vacuum food packaging for
“SousVide” low temperature cooking.
• Vacuum packaging for food
preservation.
• Food marinade/infusion.

8 www.aeg.com
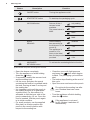
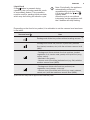
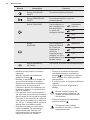
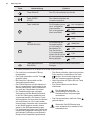
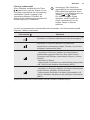
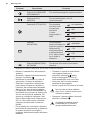
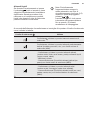
Button Description Function
ON/OFF button Turning the appliance on/o.
START/STOP button To start/stop the packaging cycle.
VACUUM button Set one of the 4
vacuum levels
available.
The preset value is
MAX.
only sealing
MIN.
MED.
MAX.
Button
SEALING
Set the sealing
time according to
the thickness of the
pouch
1)
.
The appliance is
preset to 2.5 s,
which is the ideal
time for the pouches
provided.
disabled
1.5 s
2.5 s
4.0 s
MARINADE/
INFUSION button
To activate the marinating/infusion function.
1)
The thicker the pouch, the longer the set time.
• Open the drawer completely.
• Turn the appliance on while holding
down the button.
• If necessary, modify the vacuum level
and the sealing time.
• Lift the cover and place the pouch
containing the food to be packed inside
the tank, leaving at least 2 cm beyond
the sealing bar.
• It is important not to soil the pouch in
the sealing area so as to guarantee
a perfect seal. For this reason it is
advisable to fold the inner side of the
pouch outwards by 4-5 cm. Once the
food is inserted, fold the pouch again
in its initial condition.
• For small products, use the supplied
ller plate, as it helps position the
pouch in the correct position with
respect to the sealing bar.
• Close the cover with light pressure
and press the button which begins
to ash. The packaging cycle will then
start.
• The button stops ashing at the end of
this cycle.
• Open the cover and remove the pouch.
Do not touch the sealing bar after
use. Residual heat can cause
burns.
• Turn the appliance o while holding
down the button.
If the appliance is not used
for 60 minutes it switches o
automatically.

9ENGLISH
Liquid food
If the button is pressed during
operation, the cycle stops and the pouch
is immediately sealed. This procedure
must be used for packing liquid products,
which may boil during the vacuum cycle.
Note: Periodically, the appliance
automatically performs a
reconditioning cycle (see Chap.
6.5) during which the and
buttons ash.
Allow the cycle to run without
intervening on the appliance until
the 2 buttons will stop ashing.
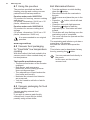
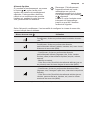
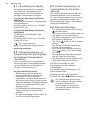
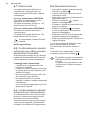
Depending on the food to be packed, it is advisable to set the vacuum level as shown
in the table:
Vacuum level
Use
Package and divide into portions without creating vacuum.
1)
Package and divide into portions of particularly delicate
food (salad, tomatoes, etc.) with the minimum vacuum level
(MIN).
- Package and divide delicate food into portions (cooked
vegetables, fruit, tender meat, pasta) and liquid food (soup,
cream, sauce).
- Marinate in the pouch.
- Vacuum cook (SousVide) delicate food (e.g. sh) with the
medium vacuum level (MED).
- Package and divide solid food into portions (raw
vegetables, hard cheese, cold cuts).
- Vacuum cook (SousVide) solid food (e.g. meat, potatoes,
carrots, etc.) with the maximum vacuum level (MAX).
1)
This function still produces light vacuum inside the pouch.

10 www.aeg.com
6.1 Using the pouches
The pouches provided are ideal for
freezing, storage and cooking vacuum
packed food at low temperatures.
Pouches order code: 902979704
50 pouches for freezing, vacuum cooking
and storage
(25 pieces, dimensions: 20x30 cm + 25
pieces, dimensions: 25x35 cm)
Pouches order code: 9029794014
50 pouches for vacuum cooking and
storage
(25 pieces, dimensions: 20x30 cm + 25
pieces, dimensions: 25x35 cm)
It is recommended to use original
pouches.
www.aeg.com/shop
6.2 Vacuum food packaging
for “SousVide” low temperature
cooking
With this method, the food sealed in the
vacuum pouch is then cooked slowly at
low temperature.
The benets provided are many:
• The avour and texture of the remains
unaltered.
• Both avour and aromas are
preserved, as the cooking process
does not disperse them.
• The reduced loss of liquid makes the
food softer and less dry.
• Nutrients like minerals and vitamins
are preserved.
• You don’t need to add oils or fats for
cooking.
6.3 Vacuum packaging for food
preservation
Vacuum packing extends food
preservation.
If you wish to vacuum pack freshly
cooked food, it must rst be chilled,
possibly using a blast chiller.
6.4 Marinades/infusion
• Turn the appliance on while holding
down the button.
• Place the food with the marinade in
the pan.
• Lift the cover and place the pan in the
tank.
• Press the button, which will start
to ash.
• Close the cover with light pressure.
• Press the button to start the
marinade cycle. This button will start
to ash.
• This button will stop ashing once the
marinating cycle is completed.
• The cover can then be opened and the
pan removed.
The marinating and infusion cycle has a
preset time of 8 minutes.
Increase the infusion and repeat the
cycle.
This infusion can be deactivated at any
time by pressing the button.
You can marinate food directly in
the pouch.
In this case, set the relevant
vacuum level.

11ENGLISH
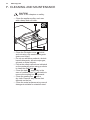
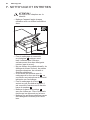
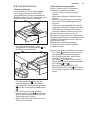
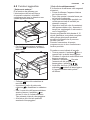
6.5 Additional functions
“External vacuum”
It is to be used to eliminate the air inside
special air-tight containers (not supplied
with this appliance).
9
• For the external vacuum, tighten the
tting
9
provided, inside the tank.
• Connect the container pipe to the
tting
9
.
• Set the maximum vacuum level and
disable the sealing .
• With the appliance cover open press
the button to start the packaging
cycle. This button will start to ash.
• The button stops ashing at the end of
this cycle.
“Reconditioning cycle”
This function is used in the following
situations:
• Before using the appliance for the rst
time.
• After extensive downtime.
• After having sealed products with high
humidity content (e.g. soups).
• When you notice a decrease in
appliance performance (e.g. more time
to vacuum or it does not vacuum at
all).
This program lasts about 15 minutes and
guarantees the complete cleaning of the
pump, removing any liquid emulsion that
might be found in the oil.
Do not seal any product while this
program is running.
Proceed as follows:
• Hold down the button until all the
buttons ash.
• Close the cover with light pressure.
• Press the button. The and
buttons ash while the program runs.
• At the end of the cycle (15 minutes)
the button will stop ashing and the
appliance will be ready for use.

12 www.aeg.com
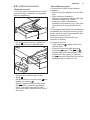
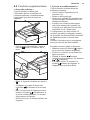
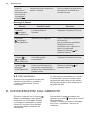
7. CLEANING AND MAINTENANCE
CAUTION!
Refer to the chapters on safety.
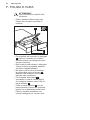
• Clean the appliance after each use
with a damp and soft cloth.
1
4
6
• Clean the Plexiglas cover
1
inside
and out using only neutral detergents
(water and soap).
• Do not use abrasive products, alcohol-
based detergents, abrasive sponges,
solvents or metal objects.
• Follow the safety instructions indicated
on the packaging when using products
to clean the steel tank
6
.
• Clean the tank
6
, especially in the
case of residue liquid, it is advisable to
remove the sealing bar
4
upwards.
• Clean the sealing bar
4
with a
dry cloth. Remove any residue that
deposits on the bar.
• Clean the metal surfaces using normal
detergents suitable for stainless steel.

13ENGLISH
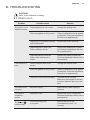
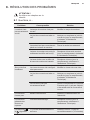
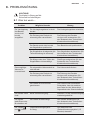
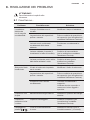
8. TROUBLESHOOTING
CAUTION!
Refer to the chapters on safety.
8.1 What to do if…
Problem Possible cause Solution
The pouch is not
sealed correctly.
The sealing time is not correct. Change the sealing time.
The cover gasket is dirty or worn. Clean or replace the cover gasket
(contact the Technical Assistance
Service for a replacement).
The pouch is not placed correctly
on the sealing bar.
Position the pouch correctly.
The sealing bar is worn (the
Teon coating is burnt).
Replace the sealing bar (contact
the Technical Assistance Service
for a replacement).
The blade placed under the
Teon of the sealing bar is
broken.
Replace the blade (contact the
Technical Assistance Service for a
replacement).
Final vacuum is
poor.
The set vacuum level is not
correct.
Change the vacuum level.
The cover gasket is dirty or worn. Clean or replace the cover gasket
(contact the Technical Assistance
Service for a replacement).
The cover is not closed correctly. Close the cover correctly.
Make sure that objects or dirt are
not found between the cover and
tank.
The cover does
not open.
No power supply. Wait until the power supply is
restored.
The cover is
cracked or
broken.
Damaged cover. Replace the cover (contact the
Technical Assistance Service for a
replacement).
The and
buttons ash.
“Reconditioning cycle”
in progress.
Wait for the end of the
“reconditioning cycle” (15
minutes).

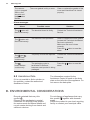
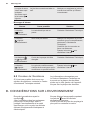
14 www.aeg.com
The vacuum
cycle is stopped
within a few
seconds and
the button
ashes.
The cover gasket is dirty or worn. Clean or replace the gasket of the
cover and check that it is closed
properly.
Alarm messages
Alarm Possible cause Solution
The button will
ash continuously.
The electrical board is faulty. Contact the Technical Assistance
Service.
The button will
ash continuously.
The vacuum is not produced. Clean or replace the cover gasket
(contact the Technical Assistance
Service to replace it).
Make sure the cover closes
correctly.
Press the button to reset the
alarm.
The and
buttons ash
continuously.
The pump oil must be replaced. Contact the Technical Assistance
Service.
The
button ashes
continuously.
The packaging cycle is
terminated in advance
because a wet product is being
packaged.
Press the button to reset the
alarm.
8.2 Assistance Data
If it is not possible to nd a solution to
the problem, contact the authorised
Assistance Centre.
The information required for the
Assistance Centre is found on the data
plate on the left side of the appliance. Do
not remove the data plate.
9. ENVIRONMENTAL CONSIDERATIONS
Recycle materials that carry this
symbol .
Dispose of the packaging in special
containers for recycling. Help protect
the environment and human health and
recycle waste deriving from electric and
electronic devices.
Do not dispose of appliances that carry
this symbol together with domestic
waste.
Return the product to your local recycling
facility or contact your municipal oce.
Page is loading ...
Page is loading ...
Page is loading ...
Page is loading ...
Page is loading ...
Page is loading ...
Page is loading ...
Page is loading ...
Page is loading ...
Page is loading ...
Page is loading ...
Page is loading ...
Page is loading ...
Page is loading ...
Page is loading ...
Page is loading ...
Page is loading ...
Page is loading ...
Page is loading ...
Page is loading ...
Page is loading ...
Page is loading ...
Page is loading ...
Page is loading ...
Page is loading ...
Page is loading ...
Page is loading ...
Page is loading ...
Page is loading ...
Page is loading ...
Page is loading ...
Page is loading ...
Page is loading ...
Page is loading ...
Page is loading ...
Page is loading ...
Page is loading ...
Page is loading ...
Page is loading ...
Page is loading ...
Page is loading ...
Page is loading ...
Page is loading ...
Page is loading ...
Page is loading ...

FM111223A
www.aeg.com/shop
-
 1
1
-
 2
2
-
 3
3
-
 4
4
-
 5
5
-
 6
6
-
 7
7
-
 8
8
-
 9
9
-
 10
10
-
 11
11
-
 12
12
-
 13
13
-
 14
14
-
 15
15
-
 16
16
-
 17
17
-
 18
18
-
 19
19
-
 20
20
-
 21
21
-
 22
22
-
 23
23
-
 24
24
-
 25
25
-
 26
26
-
 27
27
-
 28
28
-
 29
29
-
 30
30
-
 31
31
-
 32
32
-
 33
33
-
 34
34
-
 35
35
-
 36
36
-
 37
37
-
 38
38
-
 39
39
-
 40
40
-
 41
41
-
 42
42
-
 43
43
-
 44
44
-
 45
45
-
 46
46
-
 47
47
-
 48
48
-
 49
49
-
 50
50
-
 51
51
-
 52
52
-
 53
53
-
 54
54
-
 55
55
-
 56
56
-
 57
57
-
 58
58
-
 59
59
-
 60
60


Ask a question and I''ll find the answer in the document
Finding information in a document is now easier with AI
in other languages
- italiano: AEG KDK911423M Manuale utente
- français: AEG KDK911423M Manuel utilisateur
- Deutsch: AEG KDK911423M Benutzerhandbuch
Related papers
Other documents
-
Electrolux VAC140PLV User manual
-
-
Steba SV 200 PRO Owner's manual
-
-
-
-
Hendi 201428 Vacuum Chamber Packaging Machine Profi Line User manual
-
Haier HWO15NVD6XB1 User manual
-
Barazza 1CSFY Operating instructions
-
ROSIERES RVSD14 SV User manual