Page is loading ...

1-999-2321 DATE: 2/07
OWNER’S GUIDE
USE AND CARE MANUAL
RF42 & RF48 Series Industrial
Fan Evaporative Air Cooler
Safety
Installation
Start-up
Operation
Maintenance
Trouble Shooting
WARNING - TO REDUCE THE RISK OF FIRE, ELECTRIC
SHOCK, OR INJURY TO PERSONS, OBSERVE THE FOLLOWING.
INSTALLER: Please deliver this guide to owner.
Congratulations: You have purchased a product of superior performance and design, which
will give the best service when properly installed, operated and maintained.
This guide will provide you and your installer with the information needed to mount, operate,
inspect, maintain, and troubleshoot your Industrial Fan evaporative air cooler.
The first section, Installation and Start-Up, is especially for the installer. The second section, Regular Maintenance, contains operational and maintenance
instructions for the owner and/or maintenance operations personnel, while Troubleshooting includes information on commonly encountered problems.
Installation and Start-up
Introduction 2
Mounting requirements 2
Location and placement 2
Duct system 2
Air Exhausting 2
CONTENTS
Read all instructions carefully before installation.
Use only the fan motor and circulating pump
combinations marked on the Model Nameplate indicating
suitability for use in this model. Any other motors or
pumps cannot be substituted.
Installation work and electrical wiring must be done by
qualified person(s) in accordance with all applicable
codes and standards, including fire rated construction.
When cutting or drilling through a roof or ceiling, do not
damage electrical wiring or other concealed utilities
(water or gas lines, sewer lines, etc.).
Cooler motor, pump, cabinet and junction box must be
grounded in accordance with all local and national codes.
A ground wire must be used between the power supply
and the cooler.
Be sure that the cooler is connected to proper line voltage
stamped on the pump and fan motor specification plate.
NOTE: Improper voltage will void the pump and/or motor
warranties and may cause serious personal injury or
property damage.
Do not operate this fan motor with any solid-state speed
control device.
Always disconnect electrical power to unit before
working on or servicing cooler. More than one
disconnect switch will be required to de-energize the
equipment for servicing.
Do not remove inlet or access panels while cooler is
running, this may cause the fan motor to overload and
damage the motor windings.
NOTE:
Do not locate unit near exhaust or vent pipes as
odors or fumes may be drawn into cooler.
Use of anode devices, chemical additives or
treatments in this cooler will void the warranty.
Your warranty does not cover shipping damage.
Report all shipping damage at once to dealer or
carrier making the delivery.
For future reference, record the model, serial
numbers and installation date of your evaporative
cooler here:
Model #
Serial #
Install Date:
General inspection
Initial or Annual Start-up 5
Start-up Checklist 5
Cabinet Checklist 5
Maintenance
Cleaning 5
Electrical requirements 3
General wiring requirements 3
Belt adjustment 4
Overflow standpipe installation 4
Water line connections 4
Bleed off installation 4
Draining and touch-up 6
Lubrication 6
Changing cooler pads 6
Replacement parts 6
General Wiring Diagrams 7
Troubleshooting 8
U.L. Listed evaporative cooler for non-ducted, low static
pressure installations in industrial or warehouse applications.

2 Industrial Fan Evaporative Cooler - Use and Care Manual
INTRODUCTION
Read This Manual Completely Before Installing
Your Industrial Fan Evaporative Cooler.
Your evaporative cooler is a well crafted unit built using decades of
constant engineering research and product development to create an
efficient, reliable and economical to operate device. Your fan cooler
was thoroughly tested and inspected before leaving the factory; with
regular inspection and maintenance, it will serve as the heart of your
building's overall air-cooling system for many years.
This manual is your guide to proper installation procedures along with
information about reasonable care and maintenance that will ensure
safe, economical and trouble free cooling. Failure to follow these
instructions may damage your cooler, impair its operation, create the
potential for serious personal injury and/or void the warranty.
Read it carefully.
Don't attempt to perform any part of the installation described in this
manual unless you are fully qualified to do so.
CAUTION: All mechanical, plumbing and electrical
installations must comply with local and national building
and safety codes, and must be performed by qualified
personnel only.
Before attempting to install the cooler, confirm that the
following preparations have been made:
Verify that the supporting
surface is strong enough to
bear the weight of the cooler
when in use; remember that
when the system fills with
water, the cooler will be much
heavier than when dry.
Make sure you have adequate resources (cranes, safety
harnesses, rigging, etc.) for lifting the cooler into place.
Check the electric power supply to see that it matches the
requirements shown on the model and motor nameplates.
Verify that the supporting surface is level in all directions; this is
necessary to ensure proper distribution of water into the pad frame
troughs, maximizing cooling performance.
Confirm that any planned ductwork and electrical supply installation
needs comply with local and national codes.
Location
Industrial Fan evaporative air coolers are not designed to be
connected to a duct distribution system, they are designed for
connection to a straight drop duct and the use of a low restriction
diffuser for distribution of cooled air throughout an area. When these
fan coolers are used to cool large areas, such as factories,
warehouses or large covered areas, divide the total area and
strategically locate units of proper capacity in each area
Install coolers in a location where only fresh outside air can enter the
cooling system. Do not install coolers in closed-in areas, such as an
attic or storeroom, which restricts free air movement around and into
the cooler, or near vent pipes, kitchen exhaust, etc.; as obnoxious
odors or fumes may be drawn into unit.
.
NOTE: When coolers are installed within the jurisdiction of the City of
Los Angeles (C.O.L.A.) Building codes, it is required that any electrical
components (motors, pumps, motor starters, etc) used in a C.O.L.A.
installation shall be either:
1. Currently listed for its intended use as part of the cooling
system equipment by a City of Los Angeles recognized
electrical testing laboratory (i.e., UL , ETL, CSA, etc.), or
2. Currently approved for general use by the City of Los
Angeles Electrical Testing Laboratory.
Duct System
This fan cooler is designed for use in non-ducted applications, where
only a short vertical drop duct/plenum with or without a simple air
diffuser at the lower (discharge) opening. If the lowest discharge point
of the short duct is less than 10 feet above the floor, a guard or grille is
required. This short duct, which is tailored to fit the building, should be
designed, fabricated and installed by a competent HVAC sheet metal
contractor, preferably while building is under construction.
Air Exhausting
Evaporative coolers will function correctly only if there is a way for the
cooled air to exit the building. Windows, suitable vents or dampers,
doors or other exhaust openings at a point most distant from cooled air
inlet should be open to permit free movement of air out of the area
being cooled, and to avoid building up excessive pressure inside the
space. Proper location of these exhaust openings are important as
they guide flow of air through areas where cooling is desired.
To utilize the maximum capacity of your cooler and to help keep
insects, dust, dirt, etc out of the cooled space, the building/space
should be maintained at a slightly positive air pressure (airflow into the
building slightly more than leaving airflow). A general method for
determining how much exhaust opening (vents, doors or windows,
etc) is required for proper air exhausting is: 2 square feet of
unrestricted opening per 1,000 CFM, using the standard CFM ratings
listed for your cooler.
Model Number
700
900
RF42 Series
RF48 Series
Aprox.Operating
Weights (lbs.)

IMPORTANT:
This UL Listed Industrial Fan Evaporative Air Cooler requires the
use of two separate electrical power supply circuits to the unit:
Fan motor: (depending on model purchased)
The motor will be one of the following voltage combinations:
Single phase - 115/ 208- 230 Volt AC / 60 Hz or,
3 phase - 208- 230/ 460 Volt AC / 60 Hz
The factory installed motor is a multiple voltage motor that has been
pre-wired to the voltage indicated on the unit nameplate.
Circulating pumps: (two 115V pumps are factory supplied)
Single phase - 115 Volt AC / 60 Hz. The pump power supply circuit
must be a GFCI protected circuit. Consult with factory for wiring
requirements for other than 115V pumps.
Verify that the power supplied to the circulating pumps and fan motor
are the voltage and frequency (Hz) stamped on the unit nameplate.
NOTE: Improper motor voltage connections will void
motor warranties.
Electrical Ground
For maximum safety, make sure cooler cabinet, fan motor and
pump(s) are properly grounded to a suitable ground connection as
required by all local and national codes.
Safety Disconnect Switches
Each unit must have safety disconnect switches (motor circuit and
pump circuit) compatible with the installation location and installed in
accordance with the National Electric Code (N.E.C.), Article 430
and/or local codes. Each disconnect switch shall be a U.L. Listed
disconnect which breaks all ungrounded conductors that can carry
current to the unit.
Over-current (short circuit) Protection
Each unit must have over-current protection equipment intended to
protect all ungrounded pump and motor branch-circuit conductors,
motor control apparatus, pumps and motors against overcurrent due
to short circuits or ground faults. They shall have minimum enclosure
classifications compatible with the installation location and installed in
accordance with N.E.C., Articles 240 and 430. These devices shall be
U.L. Listed short circuit protection devices, sized and installed in
accordance with specifications as stated in N.E.C., Article 430.
Overload Protection
All pumps and single-phase motors available from Phoenix
Manufacturing, Inc. for use in Industrial Fan Evaporative Air Coolers
have integral thermal running and locked rotor overload protection as
required by the N.E.C.
All 3-phase motors require installation of properly sized and mounted
thermal running / locked rotor overload protection.
Branch circuit protection should be properly sized and installed by a
competent electrician in accordance with local and national code
requirements.
INSTALLATION
CAUTION: Disconnect all electrical power to the cooler
before attempting to install, open, or service your cooler.
More than one disconnect will be required to de-energize
the equipment for servicing. If the cooler is
thermostatically controlled, the thermostat may not be
used as the power supply disconnect, as it may reset and
start the unit unexpectedly.
Even while routinely inspecting or servicing the inside, the cooler can
be accidentally started. Keep all personnel away from the cooler and
electrical supply when you are working on it. Before servicing or
cleaning unit, switch power off at the service disconnects and lock the
disconnecting means to prevent power from being switched on
accidentally. When the service disconnects cannot be locked,
securely fasten a prominent warning device, such as a tag, to the
service disconnect or panel.
Unit Assembly
The unit is shipped with the fan and media modules assembled and
ready to hoist into place. Once the unit is in its final location, remove
the shipping tape from around the circulating pumps, install the float
valves, water lines, drain lines and connect the electrical systems .
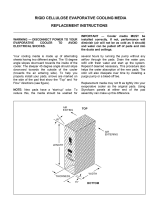
Hoisting
With the use of a spreader bar, the brackets that bolt the modules
together also provide a convenient means for lifting the cooler into
place. Assure that the hoisting equipment is of adequate capacity to
safely lift unit into place. Attach lifting means as shown below.
CAUTION: DO NOT HOIST ASSEMBLED COOLER IN A WAY THAT COULD
CAUSE THE LIFTING BRACKETS TO BEND.
Electric Power Supply / General Wiring Requirements
CAUTION: All electrical installations must comply with
local and national building & safety codes; all work must
be performed by qualified personnel only.
NOTE - References in this manual to: National Electric Code (N.E.C.),
local or national codes means that those items must comply with
applicable installation codes as specified by the building code
authority having jurisdiction at the installation location. It is the
installer's duty to comply with all requirements.
The motor Hp / full load current, voltage, phase, number of motor
speeds and the length of wire from the power supply to the motor are
all factors in determining the gauge of wire used in the circuit.
Industrial Fan Evaporative Cooler - Use and Care Manual 3

4 Industrial Fan Evaporative Cooler - Use and Care Manual
Motor Start Switch / Motor Starter
All motor applications require the use of Start/Stop switches
and/or motor starters of the proper current capacity.
In applications where a switch is deemed adequate to start the motor,
as defined by N.E.C., Article 430, the branch circuit shall be sized in
accordance with N.E.C., Articles 210 and 430. The enclosure for the
switch and its installation location shall comply with N.E.C.
requirements for the installation of the switch.
A motor starter with integral thermal (running and locked rotor)
overload protection is used to start/stop 3-phase motors. Motor starter
shall be sized in accordance with specifications stated in the N.E.C.,
Article 430. Starters mounted to the unit shall have a minimum NEMA
3R (raintight/rainproof) enclosure rating. Starters mounted remote to
the unit shall have a minimum enclosure classification compatible with
the location and installed in accordance with N.E.C., Article 430.
Pump Power Supply Circuit
The pump supply circuit shall be a GFCI protected circuit with
overcurrent (short circuit) protection of 15 AMP and have a minimum
of 600 volt rated, #14 AWG copper wire to the pump receptacle in the
junction box assembly. Conduit to the junction box shall be rain-tight
or liquid-tight, flexible metal conduit with a separate ground wire,
installed per N.E.C., Article 351. Use of a voltage transformer for the
pump power supply circuit is not recommended
Control Circuit Transformer
If required, a control circuit transformer shall be a N.E.C. Class 2
transformer of adequate capacity, installed and protected in
accordance to national and local codes.
Belt Adjustment
CAUTION: Disconnect all electrical power to the cooler
and insure that belt is not rotating before adjusting belt
tension.
CAUTION: Never operate unit with inlet or access panels
removed. This will result in an overloaded condition and
may damage the fan motor.
Correct belt tension and alignment is important, proper setup reduces
power consumption and prolongs life of belt and motor. When
installing or adjusting belt, loosen the motor plate mounting bolts and
adjust to proper tension (25 lbs).
Recirculating Pump
CAUTION: Do not allow pump to fall over and become
submerged; water will damage pump motor.
Remove shipping tape from around pumps, verify that they are
upright and mounted securely in place.
Install Overflow Standpipe / Drain Line
Install overflow drain bushing in bottom of each wet section as follows:
Slide rubber washer over drain bushing.
Push drain bushing through bottom pan,
assemble and tighten lock nut.
Screw plastic overflow standpipe into the
drain bushing and tighten snugly (hand
tight) to prevent leakage.
Connect a suitable drain line (copper /
PVC / garden hose) to drain bushing.
Never drain water onto a roof; mineral
build-up or damage to roof may occur.
NOTE: Drain water in accordance with local plumbing codes.
Connect Water Supply
CAUTION: All plumbing installations must comply with
local building and safety codes, and must be performed by
qualified personnel only.
NOTE: Coolers should not be connected to “soft” water systems. Soft
water will accelerate corrosion and decrease the effective life of pads
and cooler cabinet. Connect water line as follows:
A water supply valve should be installed at a convenient location,
to allow the water supply to be turned on and off for servicing or
winterizing. Minimum 3/8” diameter tubing should be used to
provide water to the cooler, larger tubing is recommended if the
distance from the valve to the cooler is greater than 100 feet, then
reduced to 3/8” at the unit.
Install float valve in the side panel of each wet section.
Connect tubing from water supply to float valve. Place
compression nut and ferrule over end of tubing, insert tube into
float valve then tighten compression nut to secure
Install Bleed-off
To minimize mineral scale “build-up”use the included bleed-off
assembly. Remove the cap from the bleed-off tee; insert the black
tubing and route the tubing through standpipe opening into the drain
line
bove the water level.
. To prevent siphoning of the water, make sure that the bleed-off
tee is a

Industrial Fan Evaporative Cooler - Use and Care Manual 5
Maintenance Schedule
Regular maintenance and periodic inspection is the key to long and
successful service from your Industrial Fan Cooler. The cooler should
receive major servicing at least once a year, more often if conditions
require (dusty environment, constant use, poor water quality, etc.) For
maximum cooling efficiency, long life and appearance, every two
months during operation, the cooler should be inspected and cleaned.
NOTE: Do Not Undercoat the Water Reservoir
Your cooler's water reservoir is finished with our Peblar XT®
appliance-type finish. It is so hard that asphalt-type cooler water pan
under-coatings will not stick to it. Undercoating will break free,
clogging the pump and water distribution system.
NOTE: Do not use cooler cleaners, cooler treatments, anodes or other
chemical additives in this evaporative cooler. Use of any additives or
water treatment other than the furnished bleed-off will void your
warranty and may impair the life of the cooler.
Before starting any maintenance operation, thoroughly read all
operating and maintenance instructions and observe all
cautions and warnings.
Cleaning
CAUTION: Never wash your cooler cabinet with a
garden hose; water may harm motor and pump or seep
through ductwork into building. Motors damaged by water
are NOT covered under warranty.
All foreign materials, mineral scale, hard water deposits, dirt, etc.
should be removed from pads, water pans and other components.
Your cooler's long lasting finish can be brought to like-new condition
by using warm water and a soft cloth.
NOTE: Avoid using scouring pads, steel wool or wire brushes, as
these will damage the finish and encourage corrosion.
Maintenance & Inspection
IMPORTANT: Before operating cooler at the beginning
of each cooling season, turn fan blade, cooler motor and
pump motor shafts by hand to make sure they turn freely.
Failure to do so may result in burning out motor.
Periodic inspection of your Industrial Fan Cooler will enhance the
chance for long, trouble-free service life. For maximum efficiency,
every two months during operation, or any time the cooler is opened,
the cooler should be inspected. Some suggested items to look for:
Check for leaks from drain lines, cabinet, etc.
Any dry spots or streaks on pads when pump is operating?
Are bolts, nuts and set screws still snug?
Are the bearings, etc., making any unusual noises?
Does the fan blade and motor turn freely?
Are the float levels set correctly?
Is water in the bottom pans clean?
Belt condition / tension / alignment OK?
Adjust Belt Tension
Each time you inspect your cooler, be sure to check belt tension on the
motor/fan assembly. Check belt condition and replace it if frays or
cracks appear. Check alignment of fan blade pulley with motor pulley
(see page 4 for detailed steps).
GENERAL INSPECTION
Initial Start-up or Annual Inspection
CAUTION: Disconnect all electrical power to the cooler
before attempting to install, open, or service your cooler.
More than one disconnect will be required to de-energize
the equipment for servicing. If the cooler is
thermostatically controlled, the thermostat is not to be
used as the power supply disconnect, as it may reset and
start the unit unexpectedly.
Before start-up the cooler for the first time, or at the beginning of each
cooling season, make sure that all required connections,
adjustments, etc. have been made. Verify that:
Cooler mounting is level; ductwork is sealed.
Cabinet is securely fastened to mounting.
Cooler cabinet is properly grounded. Electrical connections
are correctly made, safe and secure.
Motor, pump, drain, bleed-off, float valve, etc. are correctly
installed and fully functional.
Water line securely connected, turned on, no leaks noted.
Float adjusted for proper water level.
Pump impeller turns free and smooth. If in doubt, remove
impeller cover (see “Cleaning Pump”) and check rotation.
Fan blade, shaft, pulley and motor mounting bolts / setscrews
are tight.
Motor sheave / Fan blade pulley alignment okay; belt
correctly tensioned, fan blade turns freely.
Start-up Check List
CAUTION: Never operate cooler with inlet or access
panels removed. This will result in an overloaded
condition and may damage the fan motor.
To verify and check out the cooler installation on initial or annual start-
up, the following procedure should be followed.
Turn electrical supply to pump on.
Verify that pump starts and pads are evenly wet.
Open building exhaust / relief vents (windows, doors, etc.)
Turn electrical supply to fan motor on.
Observe that motor starts and runs, confirm air delivery.
Verify motor amperage does not exceed nameplate.
In case of trouble on any of these steps, refer to the Troubleshooting
Chart on
Cabinet Inspection Checklist
After initial start-up and for a few weeks afterwards, check for and/or
observe the following: Refer to the Troubleshooting Chart on f
necessary.
Leaks from water lines, drain lines, cabinet, etc.
Cooler pads: even wetting, no dry streaks.
Confirm water level depth setting is correct.
Verify full, even flow in water distribution system.
Fan blade / motor rotates freely, no unusual noises.
Belt condition / tension / alignment OK.
Check motor mounting, cabinet hardware, setscrews on pulleys,
fan blade are tight.
page 8.
page 8 i

6 Industrial Fan Evaporative Cooler - Use and Care Manual
Cleaning Water Pump & Hose
CAUTION: Disconnect all electrical power to the cooler
before attempting to install, open, or service your cooler.
More than one disconnect will be required to de-energize
the equipment for servicing. If the cooler is
thermostatically controlled, the thermostat is not to be
used as the power supply disconnect, as it may reset and
start the unit unexpectedly.
CAUTION: Do not allow pump to fall over and become
submerged; water will damage pump motor.
Clean water pump and hose assembly as follows:
Unplug pump cord, remove mounting bracket screw and
remove pump from cooler. Shake gently to remove water.
To prevent breakage, carefully release the five snap-out tabs
in order noted on base plate and remove impeller base plate
from the pump body.
Using a mild detergent solution and a soft cloth, clean
deposits from screen, around impeller and base plate.
Spin impeller to dislodge any remaining foreign material.
Remove any foreign material in the hose adapter (between
the pump and hose), or between the hose and the water
distributor assembly.
Rinse and reinstall impeller base plate.
Reinstall pump and reconnect pump cord.
Draining
Drain the cooler (with power off and pads removed) as follows:
Connect a drain hose to the drain fitting on the bottom of the
reservoir, if not already connected to drain line.
Remove overflow standpipe from the drain fitting.
Drain and clean reservoir (never drain water onto a roof,
mineral build-up or damage to roof may occur).
Touch-Up
The hardness, adhesion and smoothness of the internal and external
finish on your cooler makes it extremely unlikely that scratches or
chipping will occur. In the event that finish damage does occur, it
should be promptly repaired by the following procedures:
1. Sand the area around bare metal spots.
2. Prime and paint with a quality paint.
Do not use asphalt type cooler undercoat material in water
reservoir. Undercoat will break free, clogging the pump and
water distributor.
Lubrication
Motor Bearings
Some single phase motors used in Industrial Fan coolers have ports
for lubricating the motor and are oiled at the factory. If the need for
oiling is indicated, see individual motor nameplate for specific
instructions on re-lubricating the motor. Under normal use, these
motors require oiling about every 12 months of operation.
Do Not Over-Oil.
All other motors use ball bearings and are permanently lubricated and
do not require additional lubrication.
Fan Shaft Bearings / Pump Motor Bearings
Fan shaft bearings are sealed and do not require oiling.
The pump motor does not require lubrication.
Cleaning or Replacing Wet section Cooler Pads
CAUTION: Disconnect all electrical power to the cooler
before attempting to install, open, or service your cooler.
More than one disconnect will be required to de-energize
the equipment for servicing. If the cooler is
thermostatically controlled, the thermostat is not to be
used as the power supply disconnect, as it may reset and
start the unit unexpectedly.
The condition of your cooler pads should be checked at least once a
year; at the beginning of the season is best. However, your pads may
need to be checked more frequently, depending on local air and water
conditions. For instance, in areas where mineral content of the water
is high or the air is dusty, deposits may build up in the cooler pads,
restricting airflow. Clean or replace pads as follows:
1. Disconnect power from unit.
2. Remove pads from wet section cabinet as follows:
a. Remove inlet louver panels from cabinet.
b. Remove top pan from cabinet.
c. Remove water distributor cover and tube assembly.
d. Remove pads by tilting slightly forward and carefully lifting up
and out. If passages are clogged or pad is dirty, hose off inlet
face of pad. Light, gentle brushing of the inlet edges of the
pad with a stiff bristle brush (do not use a wire brush) will not
harm the pad and will remove more stubborn scaling.
e. If necessary, replace with new Aerocool pads, available only
from your Aerocool dealer. Aspen, expanded paper or other
types of evaporative cooling pads will not work and will void
your warranty.
3. Using a mild detergent, wash dirt and scale from the inside of the
wet section cabinet. Wire brushing is not recommended. If finish
is damaged or rusting is noted, repair as noted in the “Touch-Up”
section. Rinse with fresh water.
4. Reinstall pads, making sure they are positioned correctly
(painted stripe on pad placed to the bottom, facing outside).
5. Reinstall water distributor cover and tube assembly.
6. Reinstall top pan to wet section cabinet.
7. Reinstall inlet louver panels.
REPLACEMENT PARTS
When ordering replacement parts, always refer to the serial and
model number of your cooler. Use the part numbers listed in the
accompanying parts list, as illustrated in the diagrams for your model.

Industrial Fan Evaporative Cooler - Use and Care Manual 7
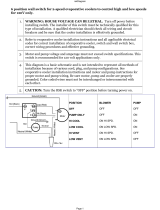
MOTOR AND PUMP CIRCUIT CONNECTIONS
FACTORY MOUNTED
MOTOR CONDUIT
FIELD ASSEMBLY REQUIRED FOR PUMP
RECEPTACLE BOX. USE FACTORY PROVIDED
JUNCTION BOX, 120V RECEPTACLE AND
WEATHER PROOF COVER, LOCATE AS SHOWN
AND WIRE PER SCHEMATIC (ABOVE).
FACTORY MOUNTED MOTOR WIRING BOX
MAKE POWER SUPPLY CONNECTIONS
AS REQUIRED PER WIRING SCHEMATIC (BELOW),
ATTACH PROVIDED GASKET AND COVER PLATE.
TO PUMP POWER SUPPLY -
CONDUIT AND FITTINGS
FIELD SUPPLIED
TO MOTOR POWER SUPPLY -
CONDUIT, FITTINGS AND
WIRENUTS FIELD SUPPLIED
PUMP CORDS - ROUTE
THROUGH PROVIDED CLIPS
ON FAN HOUSING TO
PREVENT CORD MOVEMENT
INSIDE VIEW - CENTER PANEL
OUTSIDE VIEW
CENTER PANEL

Troubleshooting:
The following guide is intended to help you diagnose and fix some of the most commonly encountered problems; by no means does this
guide cover all of the possible problems you may encounter. If you cannot diagnose and correct the problem, or if it persists, contact
qualified service personnel. All electrical work should be done by, or with the help of, a qualified electrician.
CORRECTIVE ACTION:
1. Check power supply
A. Replace fuse*
B. Reset breaker*
2. Adjust or replace belt
3. Replace motor or bearings
A. Adjust belt tension or replace
B. Replace bearings
C. Open relief vents to increase exhaust*
D. Call electrician
1. Open relief vents to increase exhaust
2. Clean or replace pads
3. Adjust belt tension or replace
1. Open relief vents to increase exhaust
2. Adjust to direct airflow as required
3. Check water distribution system
A. Clean or replace pads
B. Check water distributor system
C. Clean distributor holes
D. Clean or replace pump
E. Check for leaks and correct
F. Check float valve operation
G. Clean or replace bleed-off
H. Clean basket / screen
1. Adjust belt tension
2. Replace bearings
3. Adjust relief vents to increase exhaust*
4. Check and correct alignment
1. Adjust float
2. Replace float valve
3. Tighten standpipe (hand tight)
1. Replace bearings
2. Inspect fan assembly, replace if necessary
3. Inspect fan components, tighten
1. Inspect and adjust, replace as required
1. Open relief vents to increase exhaust
1. Drain, clean and flush reservoir
2. Check bleed-off, replace pads
3. Turn pump ON for several minutes
prior to starting cooler
PROBLEM / SYMPTOM:
Units fails to start or deliver air
Unit starts, air delivery
inadequate
Inadequate cooling
Motor cycles or fails to operate
Water draining from unit
Knocking or banging sound
Fan assembly shakes or rattles
Excessive humidity inside
Musty or unpleasant odor
POSSIBLE CAUSE:
1. No electrical power to unit
A. Fuse blown
B. Circuit breaker tripped
2. Belt loose or broken
3. Motor overloaded and/or frozen bearings
A. Belt too tight or broken
B. Fan blade bearings dry / frozen
C. Motor overloaded
D. Inadequate wiring, non-functional
breaker or motor starter
1. Lack of adequate air exhaust
2. Pads clogged (mineral accumulation)
3. Belt too loose
1. Inadequate exhaust from building
2. Air registers / diffusers improperly set
3. Inadequate water supply / pad not wet
A. Pads clogged (mineral accumulation)
B. Dry spots or streaks on pad
C. Distributor tube holes plugged
D. Pump not working
E. Loose connections in water system
F. Inadequate water in reservoir
G. Inadequate bleed-off (pads clogging)
H. Pump basket/screen clogged
1. Excessive belt tension
2. Fan blade shaft tight or frozen
3. Motor overloaded
4. Pulleys mis-aligned
1. Float arm improperly set
2. Seat in float valve leaking
3. Standpipe not tight
1. Bearings dry or worn-out
2. Rotating off-balance
3. Loose parts
1. Belt or pulley loose
1. Inadequate exhaust from building
1. Stale or stagnant water in cooler
2. Pads clogged or mildewed
3. Pads not completely wet before
starting fan motor
8 Industrial Fan Evaporative Cooler - Use and Care Manual
* - If condition persists, call electrican
/