13
Cooking Instructions
Guide for Cooking Seafood in Your Microwave
• Cook fish until it flakes easily with a fork.
• Place fish on a microwave-safe roasting rack in a microwave-safe dish.
• Use a tight cover to steam fish. A lighter cover of wax paper or paper towel
provides less steaming.
• Do not overcook fish; check it at minimum cooking time.Guide for
Cooking Eggs in Your Microwave
• Never cook eggs in the shell, and never warm hard-cooked eggs in the shell; they
can explode.
• Always pierce whole eggs to keep them from bursting.
• Cook eggs just until set; they become tough if overcooked.
Guide for Cooking Vegetables in Your Microwave
• Vegetables should be washed just before cooking. Often, no extra water is
needed. If dense vegetables such as potatoes, carrots and green beans are being
cooked, add about ¼ cup water.
• Small vegetables (sliced carrots, peas, lima beans, etc.) will cook faster than larger
ones.
• Whole vegetables, such as potatoes, acorn squash or corn on the cob, should be
arranged in a circle on the turntable before cooking. They will cook more evenly if
turned over after half the cooking time.
• Always place vegetables like asparagus and broccoli with the stem ends pointing
towards the edge of the dish and the tips toward the center.
• When cooking cut vegetables, always cover the dish with a lid or vented
microwavable plastic wrap.
• Whole, unpeeled vegetables such as potatoes, squash, eggplant, etc., should
have their skin pricked in several spots before cooking to prevent them from
bursting.
• For more even cooking, stir or rearrange whole vegetables halfway through the
cooking time.
• Generally, the denser the food, the longer the standing time. (Standing time refers
to the time necessary for dense, large foods and vegetables to finish cooking after
they come out of the oven.) A baked potato can stand on the counter for five
minutes before cooking is completed, while a dish of peas can be served
immediately.
Auto Defrosting Guide
• Follow the instructions below when defrosting different types of food.
Notes
Check foods when the oven signals. After the final stage, small sections may still be
icy; let them stand to continue thawing. Do not defrost until all ice crystals have thawed.
Shielding roasts and steaks with small pieces of foil prevents the edges from cooking
before the center of the food has defrosted. Use narrow, flat, smooth strips of aluminum
foil to cover the edges and thinner sections of the food.
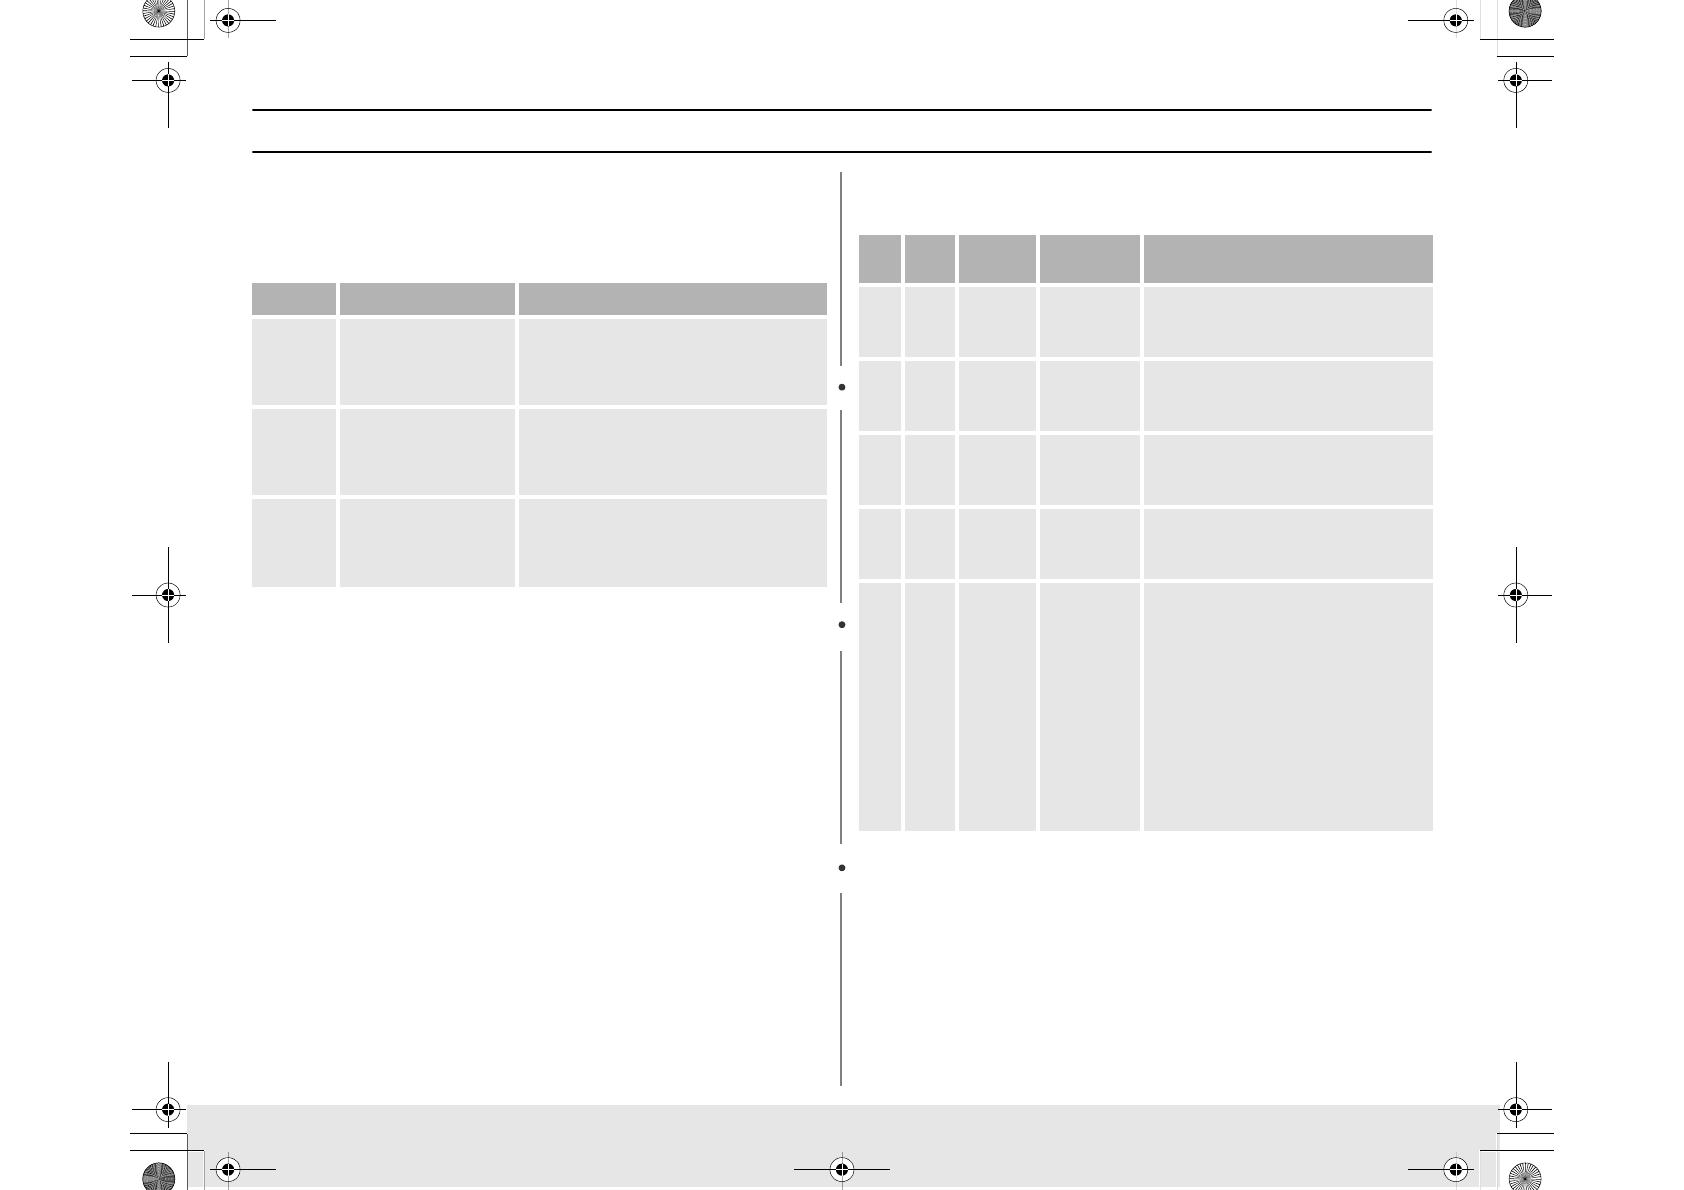
Food Cook Time/Power Level Directions
Steaks
Up to 0.7 kg
Cooking Time:
7-11 min. / 0.5 kg
Power Level:
Medium-
High(7).
Arrange steaks on roasting rack with meaty
portions towards the outside of rack. Cover with
wax paper. Turn over and rearrange when
cooking time is half up. Cook until fish flakes
easily with a fork. Let stand 3-5 min.
Fillets
Up to 0.7 kg
Cooking Time:
4-8 min. / 0.5 kg
Power Level
: Medium-
High(7).
Arrange fillets in a baking dish, turning any thin
pieces under Cover with wax paper. If over ½
inch thick, turn over and rearrange when
cooking time is half up. Cook until fish flakes
easily with a fork. Let stand 2-3 min.
Shrimp
Up to 0.7 kg
Cooking Time:
4-6½ min. / 0.5 kg
Power Level
: Medium-
High(7).
Arrange shrimp in a baking dish without
overlapping or layering. Cover with wax paper.
Cook until firm and opaque, stirring 2 or 3 times.
Let stand 5 min.
Code Item Weight
Initial
Temperature
Remarks
1
Meat
100-2000g 20-60 mins
Shield the sdges with aluminium foil. Turn the
meat over, when the over beeps. This
programme is suitable for beef, lamb, pork,
steaks, chops, minced meat.
2
Poultry
100-2000g 20-60 mins
Shield the leg and wing tios with aluminium
foil. Turn the poultry over, when the oven
beeps. This programme is suitable for whole
shicken as well as for chicken portions.
3
Fish
100-2000g 20-50 mins
Shield the tail of a whole fish with aluminium
foil. Turn the fish over, when the oven beeps.
This programme is suitable for whole fishes
as well as for fish fillets.
4
Sea
Food
100-2000g 20-50 mins
Shield the tail of a whole fish with aluminium
foil. Turn the fish over, when the oven beeps.
This programme is suitable for shrimp, prawn
shell fish, clarn.
5
Bread
Cake
100-700g 5-30 mins
Put bread on a piece of kitchen paper and
turn over, as soon as the oven beeps. Place
cake on a ceramic plate and if possible, turn
over, as soon as the oven beeps. (Oven
keeps operating and is stoppde, when you
open the door.)
This programme is suitable for all kinds of
bread, slicde or whole, as well as for bread
rolls and baguettes. Arrange bread rolls in a
circle.
This programme is suitable for all kinds of
yeast cake, biscuit, cheese cake and puff
pastry. It is not suitable for short/crust pastry,
fruit and cream cakes as well as for cake with
chocolate topping.
tl]XY[z{lnTWZY`YhluUGGwGXZGG~SGhG`SGYWW]GG[a\ZGwt


