Page is loading ...

© LINDY ELECTRONICS LIMITED & LINDY-ELEKTRONIK GMBH - FIRST EDITION (June 2005)
Cat.5 USB KVM Extender Lite
User Manual English
Benutzerhandbuch Deutsch
Manuel Utilisateur Français
Manuale d’uso Italiano
LINDY No. 32338
www.lindy.com

1
Product Information 2
User Manual 3
Benutzerhandbuch 6
Manuel Utilisateur 9
Manuale d’uso 12

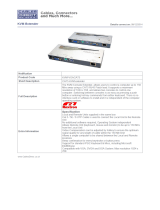
USB KVM Extender Lite
Product Information
Local Transmitter Unit
Remote Receiver Unit
RJ-45 Connection
Console
Connection
Ports
Computer/KVM Switch
Connection Ports
RJ-45
Connection
Power Adapter
Connection
Console VGA Port
Computer/KVM Switch
Connection Ports
VGA Tuning
Control
Console Keyboard
& Mouse Ports
2

User Manual English
Introduction
Thank you for purchasing the LINDY Cat.5 USB KVM Extender Lite. The USB KVM Extender
LITE allows you to control your PC, server or USB KVM switch from a USB keyboard, mouse
and VGA monitor at distances of up to approximately 150 metres (500 feet) away, using low
cost CAT5 or higher cable.
This extender supports USB mouse and keyboard operation only. It
does not support other USB signals!
The USB KVM Extender LITE consists of a Transmitter (Local) unit and a Receiver (Remote)
unit. The Transmitter connects to a computer or USB KVM switch. The Receiver unit is located
at a remote location and connects to a keyboard, monitor and mouse console.
The USB KVM Extender LITE offers all the features of a professional KVM extender. A
workstation can be connected to the Receiver unit allowing the operator to work on his
computer or remotely on the remote computer or KVM switch. Additionally, a local console can
be connected to the Transmitter unit for direct access to the KVM switch. Both local and remote
consoles can access the servers connected to the KVM switch simultaneously, governed by a
short timeout.
Using the USB KVM Extender LITE to remotely access a computer:
Up to 150m
Local Transmitter
Remote Receiver
Local Computer
onsole
Local Console
Remote
Operators PC
Remote C
Features
Provides a convenient and secure method of remotely locating workstations or
servers without compromising convenience and control
Supports USB keyboard/mouse and VGA monitor signals
Dual console operation – control your computer / KVM Switch from both local and
remote locations
Remote Receiver unit features a built-in KVM Switch – allowing control of a local PC
High-resolution video support: 1280 x 1024 @ 100m
800 x 600 @ 150m
Adjustable VGA Tuning control to improve video quality
Easy, user-friendly installation – no software required – the unit registers in the
device manager as a USB KVM device
Compatible with all major operating systems with USB support for KVM devices
Package Contents
Local Transmitter unit
Remote Receiver unit
12V DC, 1A Power Adapter (for the Remote Receiver unit)
2 x 2-in-1 KVM cable (USB & VGA)
This manual
3

User Manual English
Installation
Note: If you experience problems with mouse functionality, try using the same brand and
model of mouse on both local and remote units.
Make sure all of your computers and peripherals are switched OFF before proceeding with the
installation.
Local Transmitter Unit
1. Connect your keyboard, mouse and monitor to the Local Console ports on the Transmitter.
2. Using a 2-in-1 USB KVM cable, connect the ports labelled PC / KVM on the Transmitter
unit to the USB and video ports on your computer, or the USB and video control console
ports on your KVM switch.
3. Connect a CAT5 (or higher) network cable of appropriate length to the RJ-45 port
Remote Receiver Unit
1. Connect your USB keyboard, mouse and monitor to the ports on the Remote unit.
2. Using the supplied 2-in-1 KVM cable, connect the USB and video ports labelled LOCAL PC
to the USB and video ports on your local PC.
3. Connect a CAT5 (or higher) network cable to the RJ-45 port
4. Connect the power supply jack to the port on the Remote unit. Plug the power supply into
the mains
Powering up and checking the installation
1. Power on the PC connected to the Remote Receiver unit and then power on the PC / KVM
Switch installation connected to the Local Transmitter unit.
2. Check the display quality at the Remote Receiver console. Rotate the VGA Tuning control
to adjust the picture quality. If this does not provide a good enough picture quality you may
get better results with higher quality CAT6 network cable. The picture quality of any CAT5
Extender degrades with increasing cable length. Up to a resolution of 1280x1024@80Hz
and a cable length of 100m there should be no significant shadows, but a more or less
clear picture. For higher resolutions this distance is reduced. For lower resolutions the
picture quality may also be acceptable over longer cable lengths.
LED Status Indicators
Remote Receiver Unit
LED STATUS MEANING
LOCAL RED The console is switched to the local workstation PC
LOCAL
FLASHING
RED
The console is switched to the workstation, but the PC is turned off or
not connected.
REMOTE RED The console is switched to the remote computer / KVM Switch
REMOTE
FLASHING
RED
The console is switched to the remote computer / KVM Switch but the
computer(s) are not connected or are switched off.
Local Transmitter Unit
LED STATUS MEANING
POWER OFF No computer(s) or KVM switch connected to the Local Transmitter.
POWER RED Computer(s) or KVM switch connected to the Local Transmitter.
STATUS
FLASHING
RED
Flashes when there is local console keyboard/mouse activity.
STATUS OFF When there is no console keyboard/mouse activity this LED remains off.
4

User Manual English
Keyboard hotkey commands (Remote Receiver only)
Both consoles of the extender can have simultaneous access to the connected server or KVM
switch. Active keyboard and mouse access is governed by a short timeout period.
When you access from the local console of the Transmitter unit you can operate your USB KVM
switch using its regular keyboard hotkeys. When you use the remote console you have two
additional hotkeys that allow you to switch between your workstation and remote KVM access.
You can switch console control at the Remote Receiver unit from PC port (connected
workstation) to RJ-45 port (the PC / KVM switch connected to the Local Transmitter) using this
simple hotkey command:
Scroll
Lock
Scroll
Lock
C
+ +
= select ‘PC Port’ or ‘RJ-45 Port’ (Remote KVM access)
When switching, the appropriate LOCAL and REMOTE LED will light on the Remote unit. You
will also hear an audible confirmation. You can enable and disable this audible beeper using
this hotkey command:
Scroll
Lock
Scroll
Lock
Q
+ +
= Beeper ON/OFF
Troubleshooting
There are no LED’s illuminated on the Remote Receiver unit
Ensure that the AC Adapter is plugged into the mains and the jack is plugged into the
socket on the Remote Receiver.
Verify that the connected PC is switched on. Otherwise display problems may result.
There is no video signal displayed on the monitor
Check that the VGA cables and CAT5 cable are properly connected to the respective
ports on the Receiver and Transmitter units.
Ensure the VGA cables are correctly connected to the computers.
Make sure the computer is not in Stand-by mode or powered down.
Make sure the power adapter is connected to the Receiver
If you still can’t see a picture, try connecting with a shorter CAT5 patch cable to make sure
there is not a fault with the longer CAT5 cable.
The display is ‘foggy’ or unclear.
Check that the VGA cables are properly connected.
Try adjusting the VGA Tuning control as described in the Installation section
Ensure that the VGA resolution is not set too high for the length of Ethernet cable that is
used.
Try a higher specification or shorter length CAT6 cable
Try reducing the display resolution
If results are still not satisfactory please refer to the final remarks in the Installation section
5

Radio Frequency Energy, Certifications
CE Statement
This device complies with the European Regulations for Electromagnetic Compatibility (EMC) of
the European Union and it is equipped with the CE mark. This unit has to be used with high
quality shielded connection cables except for the Cat.5 connection cable.
FCC Statement
FCC Warning
This equipment has been tested and found to comply with the limits for a Class B Digital device,
pursuant to part 15 of the FCC Rules. These limits are designed to provide reasonable
protection against harmful interference in a residential installation. This equipment generates,
uses, and can radiate radio frequency energy and, if not installed and used in accordance with
the instructions, may cause harmful interference to radio communications. However, there is no
guarantee that interference will not occur in a particular installation. If this equipment does
cause harmful interference to radio or television reception, which can be determined by turning
the equipment off and on, the user is encouraged to try to correct the interference by one or
more of the following measures:
y Reorient or relocate the receiving antenna
y Increase the separation between the equipment and receiver
y Connect the equipment into an outlet on a circuit different from that to which the receiver is
connected
y Consult the dealer or an experienced technician for help
You are cautioned that changes or modifications not expressly approved by the party
responsible for compliance could void your authority to operate the equipment.
LINDY No. 32338
1
st
Edition June 2005
www.lindy.com
/