Page is loading ...


2
Titan Neo
product description
INTRODUCTION
Notes
Date of Purchase:
Model Number:
Serial Number:
Notes:
ii

Owner’s Manual
Thank You
INTRODUCTION
Congratulations on the purchase of your new Titan
Neo Sound System. You can be assured that the
Titan Neo was produced to high quality standards
and will fulfill all its specifications. TeachLogic
incorporated the latest state of the art technology,
employed the most advanced manufacturing
methodology and used only premium quality
components to assure years of reliable service.
We appreciate your confidence in TeachLogic by
your selection of our product. It is the intent of
TeachLogic to uphold that confidence by offering
you our direct assistance and customer support.
We hope you will take the time to review this manual
to familiarize yourself with product features and
guide you through its operation. This manual will
explain the control functions and how to operate
them. Also an explanation on how to setup and
use the system so you will gain maximum benefit
of the Titan Neo
The manual will conclude with recommended
storage, maintenance and troubleshooting
procedures.
Brian Van Waay
President
Contact
If you should encounter
some unresolved issue,
please contact TeachLogic
customer service
department for further
assistance.
1•800•588•0018
1•760 •631 •1283
www.teachlogic.com
iii

Certifications
TeachLogic systems are
manufactured using lead-
free processes and are
free of materials harmful
to the environment. They
conform to the most
stringent new European
guidelines for consumer
products (RoHS).
2
Titan Neo
product description
INTRODUCTION
Safety Instructions
Read Instructions
All safety and operation instructions should be
read before operating this TeachLogic product.
Retain Instructions
Safety and operating instructions should be kept
for future reference.
Water & Moisture
This product should not be operated near water
or excessively moist area.
Heat Environment
Do not subject this product to excessive heat
conditions.
Power Source
This product must be connected to an AC power
source per the voltage input specified and
marked on the power supply.
Power Cord Caution
Power cable should be routed clear of foot traffic
and supported clear of kinking or abrasion.
Object Protection
Locate the operating unit so it will not be subject-
ed to falling objects or water entry.
Proper Installation
Adhere to safe positioning to avoid falling,
dismounting, head clearance, or cord cable
obstruction
Internal Service
User should not attempt to service this product.
A qualified technician must accomplish all internal
service.
Electric Shock
Do not adapt or modify the AC power plug thus
lifting the earth ground connection.
Listed
Recycle—Do not dispose
of rechargeable batteries
in trash. Actually it is
unlawful to do so in CA,
NY & ME.
Contact: Earth911.com
1-800-CLEANUP
Save our resources and
don’t contaminate.
Go Green
Caution
iv

Owner’s Manual
Table of Contents
INTRODUCTION
Introduction .................................................................
Titan Neo Components & Operation
General Description .................................
Main Control / Input Panel ....................
DR-800 Auto Scan Receiver ................
DR-850 Dual Channel Receive ...........
BT-800 Bluetooth Wireless .................
CD-800S CD/MP3 Player ....................
CD/MP3 Remote Control .......................
TX-800 Transmitter Module .................
PA-810 Companion Speaker .................
DD-800 Digital Delay Module ..............
UR-96 BP Body-Pack Receiver ..........
Transmitter/Microphones
UT-96BP Body-Pack Transmitter .......
UT-96HH Handheld Transmitter .........
Battery Chargers ......................................................
Troubleshooting Microphones ...............................
Frequency Charts ...................................................
Specifications .............................................................
Accessories .............................................................
Warranty ......................................................................
i–7
8–10
11
12
13
14
15–16
17-19
20
21
21
22
23-25
26-27
28-29
30-32
33-36
37-39
40
41
v

2
6
Titan Neo
product description
INTRODUCTION
About RF Transmission
Through today’s technology and advanced
engineering, wireless microphones reproduce
excellent vocal quality and render very reliable
service. Thus today, the use of wireless
microphones is commonplace. The convenience of
no cumbersome cables and freedom of movement
has made the wireless microphone very convenient
to use.
However, it will helpful to be aware of some inherent
anomalies associated with wireless microphones.
RF is a radio signal being transmitted from the
microphone to a receiver in your sound system.
Note; there are thousands of RF signals being
transmitted through the air at all times. Therefore,
it is always possible that there may be another
signal being transmitted at or near the frequency
you have selected. This will cause interference
resulting in static, intermittent connection or
even complete blockage. Therefore, a change in
frequency selection will be necessary.
Extensive metal barriers (cyclone fences,
screen, steel reinforced walls, etc.) can reduce
signal strength, resulting in dropouts and poor
performance.
RF can transmit through solid surfaces in all
directions. The range can be in excess of 100 feet.
Therefore, be aware that what is said off stage will
be heard unless the transmitter is turned “off” or
microphone is muted.
The most troublesome problem with wireless
microphones is the result of weak batteries.
Typically, fresh alkaline batteries will provide 6 - 8
hours of service and rechargeable batteries 5 – 7
hours per charge.

7
Owner’s Manual
About the Titan Neo
INTRODUCTION
The Titan Neo is a compact portable sound system
for music playback and voice reinforcement. It is
powered by internal batteries and housed in a
rugged enclosure. The lightweight, compact size
makes the Titan Neo very versatile and practical
for use on all occasions, indoors or out.
The basic system is comprised of an efficient
50 watt power amplifier, a control panel and
a rechargeable battery power supply. The
control panel provides a battery level indicator,
microphone input with volume control, line input
with volume control, line output, master volume,
and bass and treble controls. The rechargeable
NiMH batteries provide 6–8 hours of use at
moderate sound level. Titan Neo can also be
plugged into AC for continuous use.
With the “Priority” function switch on the control
panel engaged, while playing music through the
system, the music volume will automatically be
lowered 15 dB when speaking into the microphone.
After speaking, the music will automatically restore
to the previous level.
The Titan Neo can be equipped with several
options. One or two wireless microphone receivers
can be installed; expanding its capability for use
with wireless microphones.
Either a CD/MP3 player for playback of CD / flash
drive or a digital MP3 only module can be installed.
A unique option, the wireless AirLink module,
will transmit the composite program from one
Titan Neo to another Titan Neo equipped with
a wireless microphone receiver—equivalent to
having a powered remote speaker without a cable
connection (multiple units can be used).
The Titan Neo is equipped with a neodymium bass
speaker that provides greater efficiency, better
sound quality, and lighter weight. Coupled with a
high frequency horn, the Titan Neo reproduces a
full range sound with crystal clear voice projection.

2
8
Titan Neo
product description
Titan Neo COMPONENTS & OPERATION
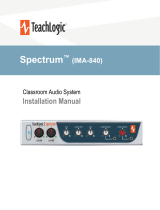
Titan Neo Rear
Optional DR-800 Receiver Modules
Optional CD/MP3 Player Module
Optional TX-800 Transmitter Module
Power Switch
Main Control Panel
Charge Indicator Light
110–240v AC Input
1
2
3
4
5
6
7
6
4
1
3
5
2
7

9
Owner’s Manual
Receiver Module for Wireless Microphone Model: DR-800
CD/MP3 Player Module with Remote Control Model: CD-800S
AirLink Transmitter Module Model: TX-800
Main Control Panel
Digital Time Delay Module Model: DD-800
Titan Neo COMPONENTS & OPERATION
The DR-800 module is a 96 channel UHF receiver (640 – 664 MHz). The auto
scan feature will automatically select a clear channel and lock on. However, the
user can override the auto and manually select a channel of choice. Two DR-
800 modules can be installed for dual wireless microphone operation.
In addition to being an anti shock CD / MP3 player it also features a USB Input
Port and SD/MMC Reader. The pitch can be increased or decreased 10 levels
up or down. Controls and functions include: Volume, Play/Pause, Stop/Eject,
FWD, Rev, FF, FB and folder select. A fully functional remote control with
Keypad provides remote operation of all functions.
For larger venues or audiences, the TX-800 transmitter module will broadcast a
composite program signal to companion units equipped with a DR-800 wireless
receiver. The companion systems can be located throughout the venue without
the need for speaker cables. The TX-800 will transmit all inputs including the
wireless microphones, CD player, and control panel inputs. Typical operating
range is 300–500 feet (line of sight).
The control panel provides the basic inputs and controls. Inputs include:
Balanced (XLR) or Unbalanced (¼" phone) Lo-z microphone Input, Dual Line
Input (RCA) with volume control, Dual Line Output (RCA), Mic. Volume Control,
Treble & Bass Controls, Master Volume Control, Battery Level Indicator, and
Voice Priority Switch.
Installed in Companion System only
The DD-800 module is a delay module that can store a signal received for
20–500 milliseconds, selectable in 2 millisecond increments. The program
signal is transmitted from the Titan Neo through the TX-800 AirLink Module to
the companion system equipped with the DD-800 delay module. The signal is
digitally stored in the DD-800 per the delay time selected and then released
through the companion sound system. Its purpose is to synchronize the sound
heard from the master Titan Neo with the sound from the companion system.
Typical application, when companion system is more than 50 feet away.

2
10
Titan Neo
Titan Neo COMPONENTS & OPERATION
Before Using the Titan Neo
Power Panel
Nickel Metal Hydride Battery (NiMH) (environmentally friendly)
Battery Care and Maintenance
It is best to plug the Titan Neo into an AC outlet and restore batteries to full
charge condition. Although the batteries were checked and fully charged prior
to shipment, NiMH batteries have a tendency to lose some charge when not
in use.
The power panel is located above the main control panel. Its houses the master
power switch. The internal light in the rocker switch will illuminate “red” when
powered “on”.
When either the AirLink (TX-800) or Digital Delay (DD-800) module is installed
in lieu of the power panel, the power switch is part of its panel.
The NiMH battery is the present day replacement of the (NiCd) Nickel Cadmium
battery. Its energy density is more than double that of Lead Acid and 40%
higher than NiCd batteries thus serving a longer performance per charge.
Relative to size, weight, and capacity; the NiMH battery is the best performing
and cost effective battery for portable applications. Typical life expectancy is
three to five years and will provide approximately 500 hundred full recycles.
Inherent to NiMH batteries, they are prone to self discharge while not in use.
Therefore, it is best to plug the Titan Neo into an AC outlet while in storage.
This will assure full useable charge and ready to use. The regulated power
supply of the Titan Neo will maintain a full charge and not overcharge the
batteries. Although the NiMH battery does not form a memory like the NiCd,
they can form a bit of a barrier at lower discharge levels. It is a good practice
to totally discharge and recharge the batteries once or twice a year to maintain
full service per cycle.
Four Level Battery Indicator
Top LED (Green) 80 – 100% Charge
Second LED (Green) 50 – 80% Charge
Third LED (Yellow) 20 – 50% Charge
Bottom LED (Red) 0 – 20% Charge

Titan Neo COMPONENTS & OPERATION
11
Owner’s Manual
Main Control Panel
Basic Operation Using a Cabled Microphone
The main control panel is the basic panel for all Titan Neos and Titan Neo
companions. It houses the master volume control, hardwired microphone
input, auxiliary input, record output, mic & line volume controls, tone controls
and the unique “Voice Priority” switch.
1. Plug in a cabled Lo-z microphone, either a 3-prong XLR or ¼” phone
connector.
2. With mic and master volume controls at zero, switch power “on”.
3. Battery level indicator should read “Green” indicating the useable battery
level.
4. Turn master volume to mid scale.
5. Slowly turn mic volume up while talking into microphone.
6. If additional volume is required, increase master volume.
7. Adjust tone controls.
• Treble boost improves voice projection, especially outdoors.
• Bass boost consumes more battery power.
8. To playback music, plug an external audio source such as an iPod or MP-3
player, into the dual RCA line input jacks.
9. With the audio source playing, adjust the volume to desired level.
10. Push in “Voice Priority” switch, “red” LED will light.
11. While audio source is playing, talk into microphone.
12. You will note: the volume of the playback will decrease 15 dB while you
speak into the microphone and will automatically return to previous volume
after announcement.
13. To record or feed a composite program to another system, plug into the
dual RCA line output jacks.
1 5 6 7 1092 3 4 8
Master Volume Control
Treble Control
Bass Control
Wired Mic. Volume Control
Dual Line Output (RCA)
Dual Line Input (RCA)
Line Input Volume Control
Cabled microphone input
• Balanced Lo-z (XLR)
• Unbalanced Lo-z (¼ phone)
Four Level Battery Indicator
Priority Override Switch
1
2
3
4
5
6
7
8
9
10

2
12
Titan Neo
Titan Neo COMPONENTS & OPERATION
DR-800 Auto Scan Receiver for Wireless Microphone
One or two auto scan receiver modules can be installed in the Titan Neo. Each
receiver has 96 selectable channels to assure interference-free operation and
is equipped with a diversity antenna for added sensitivity.
Operation
Auto Scan Receiver
1. Turn receiver “on”, turning volume/power switch clockwise to 12 o’clock.
2. The receiver will display the last channel previously selected.
3. To scan for a clear channel push the “Scan” button. The LCD screen will
display “SCAn” while searching for first available open channel/frequency.
The receiver will lock on and display the cleanest available channel.
4. Tune the transmitter frequency to match the displayed channel on the
receiver to begin operation.
Manual Tuning
1. Press and hold the “Up or Down” selector until the channel number blinks.
2. Press the “Up or Down” button until the desired channel is selected.
3. The receiver will stop blinking and lock into the selected channel.
Continue Tuning
1. The auto scan receiver is now ready to receive signal from a wireless
microphone for AirLink transmitter. Tune the transmitter frequency to match
the displayed channel on the receiver to begin operation.
2. When receiving a transmission signal, the A/B diversity antenna LED will
illuminate “Red or Green” indicating antenna selection.
3. RX indicator will illuminate “Blue”, indicating reception of signal from
transmitter.
4. AF indicator will flash “Green” when receiving an audio signal.
LCD Display: Ch. # or Freq. Readout
RF Reception: Diversity A/B Antenna (Red or Green)
Transmission Signal Present Indicator (Blue)
Flashing - Audio Level Being Received (Green)
Channel Scan
Channel “Up/Down” Selector
Receiver Module: “on/off” and Master Gain
1
2
3
4
5
6
7
2
1
3
6
4 75

13
Owner’s Manual
Titan Neo COMPONENTS & OPERATION
DR-850 Dual Channel RF Receiver for Wireless Microphone
UHF-Duo
SET
OFF CH.B
OFF CH.A
AB
03 04
1
2 3
4 5 6
One or two dual channel receiver modules can be installed in the Titan Neo.
Each receiver has 96 selectable channels to assure interference-free operation
and is equipped with a diversity antenna for added sensitivity.
LCD Display: Ch. # or Freq. Readout
Receiver Ch.A "on/off" and Master Gain
Receiver Ch.B "on/off" and Master Gain
Channel "Up" Selector
Channel "Down" Selector
Channel/Set Selector
1
2
3
4
5
6
Operation
Tuning single channel
1. Turn receiver Ch.A or Ch.B “on”, turning volume/power switch clockwise
to 12 o’clock.
2. The receiver will display the last channel previously selected.
3. To select a different channel press the "SET" selector until the light blinks.
Using the "UP / DOWN" buttons search for the desired channel. Press the
"SET" selector again until the light stops blinking.
4. Tune the transmitter frequency to match the displayed channel on the
receiver to begin operation. The receiver will display the signal strength
of the transmitter .
• Tuning two receivers
• With two receiver turned on, the SET switch operates as a mode switch.
• The first press controls functions on the "A" receiver.
• The next press controls functions on the "B" receiver.
• The next press sets the receivers to normal operate mode.
• Each consecutive press will repeat the cycle.
Dual Channel Receiver
• Tuning single receiver

2
14
Titan Neo
Titan Neo COMPONENTS & OPERATION
1. Adjust volume to desired level.
2. To skip forward a whole track press the next track button (>>|). To skip
backwards a whole track, press the previous track button (|<<). To search
through tracks, press and hold either of these buttons until you reach the
desired point in the track.
3. Repeat allows repeating of single songs or all songs. Shuffle plays tracks in
a random order.
4. To program specific tracks for playback press the track program button.
Select the song you wish to program on the disc using the next track (>>|)
and previous track buttons (|<<). Press repeat to enter the track into the
program. Repeat as necessary. To playback programmed tracks press the
play/pause button. Note: program will be reset whenever the track program
button is pressed.
5. For use with MP3 discs you can select folders of music on the CD. Press
the folder button and use the next track (>>|) and previous track buttons
(|<<) to select your desired folder. Note: this function searches the disc in
alphanumeric order.
Bluetooth pairing
1. Turn Bluetooth “on”, turning volume/power switch clockwise to 12 o’clock.
2. The receiver will highlight Bluetooth Logo indication power on.
3. PWR indicator will light.
4. Go to Settings on your Bluetooth device. Select Bluetooth from menu,
Search for "devices", Select "Portable PA". Receiver and transmitter will
begin pairing process.
5. LINK indicator will illuminate when pairing is complete.
Bluetooth
AF
LINK
OFF MAX
PWR
BT-800 Bluetooth Wireless Receiver Module
One BT-800 Bluetooth receiver module can be installed in one of the two
receiver slots at the top of the Titan Neo.
Operation
LCD Display: Bluetooth Readout
Receiver Module: “on/off” and Master Gain
Power Indicator
Transmission link Indicator
Audio input Indicator
1
2
3
4
5
2
1
345

15
Owner’s Manual
CD-800S Player
Titan Neo COMPONENTS & OPERATION
1. Adjust volume to desired level.
2. To skip forward a whole track press the next track button (>>|). To skip
backwards a whole track, press the previous track button (|<<). To search
through tracks, press and hold either of these buttons until you reach the
desired point in the track.
3. Repeat allows repeating of single songs or all songs. Shuffle plays tracks in
a random order.
4. To program specific tracks for playback press the track program button.
Select the song you wish to program on the disc using the next track (>>|)
and previous track buttons (|<<). Press repeat to enter the track into the
program. Repeat as necessary. To playback programmed tracks press the
play/pause button. Note: program will be reset whenever the track program
button is pressed.
5. For use with MP3 discs you can select folders of music on the CD. Press
the folder button and use the next track (>>|) and previous track buttons
(|<<) to select your desired folder. Note: this function searches the disc in
alphanumeric order.
This anti-shock CD/MP3 player allows playback of both standard CD’s and data
CD’s containing MP3 or WMA files.
POWER
USB
SB/USB FOLDER FB FB REV FWD
HI
NOR
LO
STOP/EJ
PLAY/
PAUSE
To operate, push the power button. Insert a CD into the CD slot and press play/
pause button.
For optimum performance
a professionally
manufactured CD should
be used. However, if you
are playing a CD/R, burn
music at the slowest rate
for best playback results.
Note

2
16
Titan Neo
product description
Titan Neo COMPONENTS & OPERATION
CD-800S Player Functions
POWER
• ON: Press Power to switch on the power.
• OFF: Press and hold Power to switch off the power.
LCD DISPLAY Displays CD status including track number and playing time.
SD/USB/CD Press this key to change USB, SD or CD mode.
FB Select fast backward. Then press “PLAY/PAUSE“ for normal playback.
FF Select fast forward. Then press “ PLAY / PAUSE“ for normal playback.
FOLDER Selects pre-programmed folders. Available when playing MP3
format files. Press FOLDER key again to advance to next folder.
REV Press to desired previous track number.
FWD Press to desired next track number.
PLAY/PAUSE Press once to play, press again to pause.
STOP/EJECT Press to stop playing, press again to eject disc.
Infrared window Picks up signal from the remote controller.
USB Connector Accepts USB Drive
SD Connector Accepts SD Card and MMC Card.
LO-PITCH To adjust slow-speed play. Press once, the screen will indicate
PH-01, press again, the screen will indicate PH-02. There are 10 steps of
speed variation.
HI–PITCH To adjust fast-speed play. Press once, the screen will indicate
PH-01, press again, the screen will indicate PH 02. There are 10 steps of
speed variation.
NOR–PITCH To adjust the speed to zero. Press NOR/PITCH key, the speed
will be zero back to normal play.
POWER
USB
SB/USB FOLDER FB FB REV FWD
HI
NOR
LO
STOP/EJ
PLAY/
PAUSE

17
Owner’s Manual
CD-800S LCD Display
Titan Neo COMPONENTS & OPERATION
CD When in CD mode, the display panel shows “Cd”.
USB When in USB mode, the display panel shows “USb”
SD When in SD mode, the display panel shows “Sd”
PLAY When in play mode, the display shows “ ”
PAUSE When paused, the display shows “ ”
REPEAT When repeatedly playing the single track, it shows “REPEAT 1”.
REPEAT ALL When all tracks are playing repeatedly, it shows “REPEAT ALL”.
REPEAT FOLDER When all tracks in a specific folder are playing repeatedly, it
shows “REPEAT FOLDER”.
SHUFFLE Will playback Random tracks.
MEMORY When playback programmed tracks.
PROGRAM Will program tracks.
Will continuously loop a track between selected point A and B.
Under the MP3 mode, it will appear the folder numbers.
Display the current playing track.
: Display the time for the current playing track.
VOLUME Turn to adjust & control the desired volume.
LOW
1
4
7
FOLDER
CD
USB/SD
2
5
A–B
8
0
NOR
PROG
EJECT
PITCH
RAN
REP
3
6
9
HIGH
Note
When using the remote
control, the remote should
be pointed toward the
face plate of the CD/
MP3 Player. The optimal
receiving distance is 10
feet.

18
Titan Neo
Titan Neo COMPONENTS & OPERATION
Playing CD-800S
Playing SD/MMC Card
Playing USB Drive
•This player will accept 4.75” (12 cm) discs like CD, CD-R, CD-RW, MP3,
USB and SD / MMC memory cards, but will not play CD-ROM / CD-I / CDV,
or 3” (8 cm) discs.
•The CD player will accept MPEG-3 ( MP3 ) and WMA format files.
•Insert a disc into disc slot with the playback side down, playback starts
automatically. Track number and playing time will be displayed.
•To pause playback or start normal playback, press PLAY/PAUSE or press
on the remote controller.
•Press REV, F.WD, or on the remote controller, to select previous or
next track. CD player will continue playback while displaying selected track.
•To stop playback, press STOP/EJECT or press once on the remote
controller.
•To eject CD press STOP/EJECT once to stop playback. Press again to eject
CD. Or press on remote controller.
•Press FB, FF or on the remote controller, to activate fast back or
fast forward until desired selection is located.
•Press LO, NOR, HI/PITCH or on the remote controller to adjust
low, normal and high playback pitch.
•Press FOLDER or on the remote controller, will select the next cata-
logue of tracks to be played.
•Insert SD Card or MMC Card into the insert hole of SD/MMC CARD in the
face plate. Push the card into the SD/MMC card slot. To remove the card,
please push the card to the bottom and then release. Please do not use force
to pull card out. Pulling the card will damage the card and/or machine.
•Press SD/USB/CD or SD/USB/CD on the remote controller. Select SD then
press PLAY/PAUSE or on the remote controller to play.
•Insert USB into the insert hole of USB in the face plate.
•Press SD/USB/CD or SD/USB/CD on the remote controller.
•Select USB then press PLAY/PAUSE or on the remote controller to play.
USB Input will not accept audio from iPod, iPad or iPhone. You may connect an mp3 from the
device headphone jack to the Titan RCA inputs
LOW NOR HIGH
1. Pull battery clip
2. Insert battery
3. Replace clip

19
Owner’s Manual
Titan Neo COMPONENTS & OPERATION
Remote Controller Functions
EJECT Press to stop playing and eject the disc.
can memorize a set of tracks for playback.
To Program a set of tracks:
1) Insert a disk into the CD player, press key one time.
2) Enter the folder and track number then press to confirm selection.
For example: To program track 23 then 42 then 19, Press 0 and 1 for
folder, the LCD will display “01”. Then press 2 and 3 for track number,
the LCD will display “23”. Then press to confirm selection, the LCD
will display “01 23:01”. This is Folder number 1, track number 23, first
selection to play.
Then press 4 and 2 for track number, the LCD will display “42 :02” for
track number and selection number 2. Then press to confirm selec-
tion, the LCD will display “01 42:02”.
This is Folder number 1, track number 42, second selection to play.
Then press 1 and 9 for track number, the LCD will display “19 :03” for
track number and selection number 3. Then press to confirm selec-
tion, the LCD will display “01 19:03”.
This is Folder number 1, track number 19, third selection to play.
3) Repeat this process until all desired tracks have been memorized.
4) When all selections have been memorized press
A random selection of tracks will play. Press and the LCD will display
“SHUFFLE”.
REPEAT MODE. While playing a CD, press once, the LCD will display
“REPEAT ALL”. Repeat All will repeat all tracks one time. Press again,
the LCD will display “REPEAT 1”. Repeat 1 will repeat all songs in that folder.
Press a third time, all repeats will be cancelled.
PROG
PROG
RAN RAN
REP REP
REP
REP
Replacing Remote Battery
1. Pull battery clip
2. Insert battery
3. Replace clip
The battery for the remote is (model CR2025 3V).

2
20
Titan Neo
product description
Titan Neo COMPONENTS & OPERATION
TX-800 Transmitter Module
1. On the AirLink unit turn the power switch/volume level control clockwise to
turn the transmitter on.
2. The LCD screen will display “ON” then revert to the factory default channel
(or the channel last selected).
3. To select a channel press the “SET” button until screen flashes. Using
the UP/DOWN frequency adjustment buttons you can select the desired
channel. Press "SET" again to lock-in channel.
4. On the slave unit turn the wireless receiver module on. Press “SET” and use
the UP/DOWN frequency adjustment buttons to set the unit to the same
channel as the master unit. Press the frequency set button again to lock in
your channel selection.
5. When transmitting audio from the master to slave unit the TX indicator will
light green. The AF indicator displays audio level (flashing yellow) when user
is speaking into the microphone or music is playing. Excessive audio level is
indicated by a (flashing red) light .
For larger venues or audiences, the addition of this module allows several units
to be used in the same area without the need for speaker or signal wiring. In
this application you have a master and as many slave units as required for the
venue. The wireless AirLink module is installed in the master unit, which then
transmits any audio signal (including wireless mic, CD player or wired mic) to
the slave units, which are fitted with a UHF wireless receiver.
LCD Display: Ch. # or Freq. Readout
RF Transmission Indicator (GREEN)
Audio Signal Present Indicator (YELLOW)
Flash-Audio Level Being Send (RED)
Channel "Set" Selector
Channel “Up/Down” Selector
Receiver Module: “on/off” and Master Gain
Titan Neo main Power Switch
1
2
3
4
5
6
7
8
2
1
3
6
4 75 8
/