Page is loading ...

Mico AP
Infant Car Seat
To be used only in rearward
facing position until the infant’s
shoulders reach marker
(approx. 6 months of age.)
IMPORTANT: KEEP THIS BOOKLET IN THE PLACE
PROVIDED ON THE CHILD RESTRAINT.

Warnings .............................................................................................................................. 3
Parts list .............................................................................................................................. 6
Vehicle information ........................................................................................................ 10
Location of anchor tting ............................................................................................. 10
Anchorage tting installation ........................................................................................ 11
Upper anchorage tting installation ............................................................................ 12
Correct vehicle position ............................................................................................... 15
Vehicle seat location ..................................................................................................... 16
Angle conguration for the seat .................................................................................. 17
Operation and adjustment ......................................................................................... 18
Shoulder height marker .............................................................................................. 18
Preparing infant seat to t your child ........................................................................ 19
Removing child from child restraint .......................................................................... 26
Adjusting handle ............................................................................................................ 26
Installation ....................................................................................................................... 27
Base rearward facing installation .............................................................................. 27
Lap sash / lap only base installation .......................................................................... 28
Installing base using locking clip .............................................................................. 30
Two-piece top tether strap tment ............................................................................. 31
Removing seat and detaching top tether strap .................................................... 32
Storing tether loop ........................................................................................................ 33
Storing instruction manual ........................................................................................ 34
Lower connectors installation ............................................................................ 35
Covers and accessories ........................................................................................... 44
Canopy use ...................................................................................................................... 45
Care and cleaning ........................................................................................................... 46
Remove seat cover for cleaning ................................................................................... 46
Cleaning buckle ............................................................................................................ 48
General maintenance ................................................................................................... 50
The next seat for your child ...................................................................................... 51
Guarantee ....................................................................................................................... 55
Table of Contents

3
Read and follow all of the installation instructions for maximum protection.
If you have any questions regarding the installation or use of this restraint,
please contact Dorel Australia or agent, or a child restraint tting station
authorised by the relevant transport authority, or in New Zealand, to consult
the agent for the vehicle.
GENERAL
• To be used only in a rearward-facing position until the infant’s shoulders reach
the shoulder height marker (approximately 6 months of age). Continue to use this
infant restraint until the child reaches this limit. Infants are at risk of serious injury
if they face forward too early.
• Use the restraint exactly as shown in the instructions.
• Supervision of children is needed because they may be able to undo the
buckles.
• DO NOT LEAVE CHILDREN UNATTENDED IN THE CAR.
• Do not alter or modify this restraint.
• Repairs must only be done by the manufacturer or agent.
• Do not allow the restraint to come into contact with polishes, oils, bleach and
other chemicals.
• Destroy the restraint if it has been in a severe crash, even if no damage is visible.
• DO NOT USE THIS RESTRAINT WITHOUT THE COVER.
• To ensure infant’s back is evenly supported, do not put more than one nappy on
the baby and make sure the nappy is not thickly folded at the back.
• DO NOT USE A REAR-FACING CHILD RESTRAINT WHERE AN AIRBAG IS
FITTED IN FRONT OF THE SEATING POSITION.
• Fittherestraintrmlytothecarseat.
• Fittheharnessrmlytothechild.
• A loose restraint or harness is dangerous.
• Do not harness an infant wrapped in a blanket or swaddled. Any blanket or wrap
must only be placed over the harness and infant.
WARNINGS

4
• Care and attention should always be given to ventilation and shading of the child.
• Seatbelt extenders are not recommended to be used if the seatbelt is not long
enough to secure the child restraint. If seatbelts are too short then advice should
besoughtfromachildrestrainttterandtheirrecommendationsbeconsidered
before using a seatbelt extender.
• Always secure the loose end of the top tether strap. Do not use the child restraint
where this strap may fall into a split in the seat back or off the side of the seat.
• ALWAYS ATTACH HOOK AND REMOVE SLACK.
• THIS RESTRAINT IS NOT SUITABLE FOR USE WHERE THE TOP TETHER
STRAP MAY FALL INTO A SPLIT IN THE SEAT BACK OR OFF THE SIDE OF THE
SEAT.
• THIS RESTRAINT MUST BE ATTACHED TO A CHILD RESTRAINT UPPER
ANCHORAGE POINT IN THE CAR. REFER TO CAR OWNER’S HANDBOOK FOR
LOCATION OF UPPER ANCHORAGE POINTS. REFER TO A CHILD RESTRAINT
FITTING STATION IF NO UPPER ANCHORAGE POINTS ARE IN THE MOTOR
CAR.
• Always check the measurements between the front of the seat back of the rear
seat and all front seats in the car in which the child restraint is intended to be
used,toensurethatthespaceissufcient.
• TO BE USED WITH A LAP-SASH/LAP-ONLY SEATBELT IN THE FRONT/BACK
OF MOST CARS WITH FORWARD FACING SEATS.
• The use of child restraints in the front seat may be restricted for children of
specicagesbylocallegislation.Pleasecheckwithyourlocallegislation
regarding any restriction for child restraint. If a car has two or more rows of
seats, children under four must not travel in the front seat. If all seats, other than
the front seats, are being used by children under seven years, children aged
between four and six years (inclusive) may travel in the front seat, provided they
use an approved child restraint or booster seat.
WARNINGS

5
• This child restraint is not approved for use with any connectors that connect to
the car’s ISOFIX low anchorages.
• Use of aftermarket accessories (i.e. items not provided in the box with the child
restraint), can reduce the safety provided by the child restraint and may cause
injury or death. For approved aftermarket accessories please refer to page 10.
• Please contact Dorel Australia Customer Service with any questions or concerns
(see page 44 for contact details).
WARNINGS
If your seat is tted with lower connectors please note the following additional
warnings:
• TO BE USED WITH A LAP-SASH / LAP-ONLY SEATBELT OR ISOFIX LOW
ANCHORAGES IN THE FRONT / BACK OF MOST CARS WITH FORWARD
FACING SEATS.
IMPORTANT:
Do not attach the lower attachment connectors of two separate child restraints to
the same ISOFIX low anchorages in your car.
Always attach the top tether strap to the child restraint upper anchorage in your
car.

6
1 Carry handle
2 Canopy
3 Instruction manual storage
(under the pad)
4 Lower connector strap
(iftted)
5 Lower connectors (x2)
(iftted)
6 Pretension adjusters (x2)
(iftted)
7 Harness tightening strap
8 Harness release lever
(underap)
9 Stroller release buttons (x2)
10 Air protect cell (x2)
Parts list
3
7
6
2
9
8
1
10
5
4

7
11 Storage pocket
(inside canopy)
12 Seat release lever
13 Seat shell
14 Base adjustment handle
(2 positions)
15 Handle adjustment buttons
(3 positions)
16 Loop tether strap
17 Top tether metal connector
18 Top tether storage pocket
19 Top tether attachment hook
20 Top tether adjuster
21 Anchor kit
Parts list
14
12
13
11
15
16
20
17
21
19
18

8
22 Infant head insert
23 Harness covers
24 Harness straps
25 Buckle
26 Buckle cover
27 Buckle strap
28 Splitter plate
29 Harness slots (x4)
30 Harness straps
Parts list
30
24
25
26
27
29
22
23
28

9
31 Stabilising bar
32 Locking bar
33 Base
34 Base belt path opening
Parts list
32
34
33
31

10
Vehicle information
Location of anchor tting
NOTE :
•Theanchorpointcanbefoundindifferentlocationsindifferentcars.The
illustration above shows possible locations of anchor points. Sometimes it is
ontheparcelshelfinsedans,andontheoorareainstationwagons,vansand
hatchbacks. Make sure that you do not confuse the luggage hook in the back
of a station wagon with anchor points. Refer to your owner’s manual.
•Anextensionstrapmaybeneededforvehicleswithoutaxedparcelshelf.
Extensionstrapsandextrattingsareavailablefromvariousstores.
Extension straps 300mm ref no. 014398 Extension straps 600mm ref no. 014399
Anchor bolt kit ref no. 014400 Locking clip ref no. 014401

11
Vehicle information
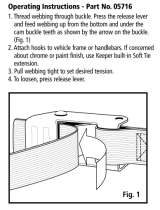
Anchorage tting installation
Child restraints must be used correctly to provide proper protection for your child.
The anchorage system on child restraint must be used in the correct way.
Anchorages in
vertical panel at
rear of vehicle
Floor mounted
anchorages
INSTALLATION
Figure 1.
Figure 2.
CORRECTINCORRECT
Make sure there is no
slack in the top strap
and the attachment
clip is upright in the
anchorage fitting.
The clip must not
lie flat on the
anchorage fitting.

12
FOR CARS FITTED WITH A CHILD RESTRAINT UPPER ANCHORAGE POINT
Locate the upper anchorage point behind the rear seating position (consult the car
owner’s handbook for the location of the upper anchorage point).
Removethethreadplugfromtheparcelshelf/oor/roofandinstalltheattachment
bolt as shown in Figure 1.
Vehicle information
Upper anchorage tting installation
CAUTION: DO NOT OVERTIGHTEN
THE ATTACHMENT BOLT. MAXIMUM
TORQUE 20 Nm.
Front of vehicle
Figure 1
Attachment bolt
Anchor fitting
Vehicle trim
Vehicle metal
structure
Spacer(s)
(if required)
Lock washer

13
Vehicle information
Upper anchorage ttings for sedans only
Centre line of
seating position
Front of vehicle
Attachment bolt
Anchor fitting
Vehicle trim
Vehicle metal
structure
Spacer(s)
(if required)
Reinforcing
washer
Lock washer
Nut
Figure 2
Figure 3

14
For sedans only
Drill a 9 mm diameter hole in the parcel shelf on the centre-line of the seating
position as shown in Figure 2. Install the anchor bolt as shown in Figure 3. It is
recommendedthatthisinstallationbecarriedoutbyachildrestraintttingstation
or licenced motor mechanic.
For vehicles other than sedans
InAustralia,consultyournearestchildrestraintttingstationortrafcauthorityfor
vehicleinspectiontondthebest,correctpositionfortheplacementoftheupper
anchorage point, and for the correct attachment bolt length and use of spacers. In
New Zealand, consult the agent for the vehicle.
WARNING: CHILD RESTRAINTS MUST NOT BE ATTACHED TO UNSOUND
METAL OR TO WOOD, OR SYNTHETIC STRUCTURES. WHEN DRILLING THE
9 mm HOLE DO NOT DRILL THROUGH FUEL LINES, FUEL TANKS, ELECTRICAL
WIRING, OR RADIO SPEAKERS. WEBBING STRAPS MUST BE PROTECTED
FROM SHARP CORNERS AND EDGES.
THE ANCHOR FITTING MUST BE USED ONLY AS DESCRIBED ABOVE. IT MUST
NOT BE HOOKED ONTO ANY OTHER OBJECT.
Vehicle information
Upper anchorage tting installation

15
CORRECT USE
CORRECT USE
INCORRECT USE
Vehicle information
Correct vehicle position

16
Some seating positions in your vehicle may NOT be safe for this safety seat. Some
vehicles do not have any seating positions that can be used safely with the seat.
If you are not sure where to place the infant seat in your vehicle, consult your
vehicle’s owner’s handbook.
Vehicle Seat Location Requirements
Children are safer when properly restrained in rear vehicle seating positions.
Whenever possible, secure the infant seat in the centre position of the seat directly
behind the front seats.
Vehicle information
Vehicle seat location
IMPROPER PLACEMENT OF THE SAFETY SEAT
INCREASES THE RISK OF SERIOUS INJURY OR DEATH.
Front of vehicle
410mm
m
m
NOTE :
Check the measurements between the front of the seat back of the rear seat and all
front seats in the car in which the child restraint is intended to be used, to ensure
thatthespaceissufcient.
WARNING
640

17
Vehicle information
Angle conguration for the seat
• DO NOT install convertible child restraints excessively reclined, ensure the
angle is no greater than 40°.
• DO NOT adjust harness or tether strap hardware such that it sits too close
to the occupant.
• Ensure that correct seatbelt path is used and that the restraint is installed
in the correct direction for rearward-facing application. Refer to page 19.
• DO NOT wrap baby in a blanket or swaddled as infant can be ejected and
killed in an accident.
• Ensure the harness ts the baby rmly.
• Ensure that any blanket or other covering may only be placed over the
harness after the harness is adjusted rmly.
• The infant’s legs and arms are not to be bound or wrapped together.
• Always adjust the height of the shoulder straps as the child grows.
40˚
• Position seat ensuring that the
angleisnogreaterthan40˚from
horizontal plane.
• Angular adjustment is achieved
by adjusting the base. Make sure
the line indicator is level to ground
(refer to page 19.)
WARNINGS

18
• To be used only in a rearward-facing position until the infant’s shoulders reach
the shoulder height marker (approximately 6 months of age).
• Continue to use this infant restraint until the child reaches this limit. Infants are at
risk of serious injury if they face forward too early. For information regarding the
next seat for your child, refer to page 49.
• The child restraint is not suitable for the child when the child’s shoulders are
above the shoulder height marker.
LABEL 1
The child restraint is not suitable for the
child when the child’s shoulders are above
the shoulder height maker.
Operation and adjustment
Shoulder height marker
NOTE :
• If the baby’s neck muscles are unable to support their head, then the child
should remain rear facing.
WARNINGS

19
You MUST make these adjustments
before you installing the child
restraint in the vehicle.
• Place the child restraint in the car and
see if seat is level to ground. The line
should run parallel to the seat.
• Adjust base if needed. Follow the steps
below.
• Remove the seat from the base by
squeezing the seat release lever, then lift
the seat up and off the base.
• Squeeze the base adjustment handle
and either lift or lower front of base to
the desired position.
Operation and adjustment
Preparing infant seat to t your child

20
• Align the slots on the side of child restraint
with the locking bars in the base.
• Pushdownrmlyonthecarryinghandle
and front of the child restraint will lock to
the base.
Listen for click.
• To loosen harness, push down and hold
on the harness release lever
(underap-see pg 6 feature 5).
• Pull on one harness strap or both harness
straps simultaneously while pressing down
on the harness release lever.
• Press red button to undo buckle.
• Pull buckle tongues out.
• Place harness straps over sides of child
restraint.
2
Operation and adjustment
Preparing infant seat to t your child (cont’d)
/