Page is loading ...
Page is loading ...

iii
This product conforms to the EMC Directive 89/336/EEC and the Low
Voltage Directive 73/23/EEC.
The complete Declaration of Conformity is available from Ohaus
Corporation.
Questo prodotto è conforme alla direttiva EMC 89/336/CEE e alla
Direttiva Bassa Tensione 73/23/CEE.
La dichiarazione di conformità completa è disponibile presso gli uffici
della Ohaus Corporation.
Este producto está en conformidad con la Directriz EMC 89/336/EEC
y con la Directriz para Bajo Voltaje 73/23/EEC.
La Declaración de Conformidad completa está disponible a través de
Ohaus Corporation.
Ce produit est conforme à la directive EMC 89/336/EEC et à la
directive de basse tension 73/23/EEC.
Vous pouvez obtenir une déclaration complète de la conformité
auprès de Ohaus Corporation.
Dieses Produkt entspricht der EMC-Richtlinie 89/336/EEC und der
Niederspannungsrichtlinie 73/23/EEC.
Die vollständige Konformitätserklärung ist bei der Ohaus Corporation
erhältlich.

iv
Disposal
In conformance with the European Directive 2002/96 EC on Waste Electrical and Elec-
tronic Equipment (WEEE) this device may not be disposed of in domestic waste. This also
applies to countries outside the EU, per their specific requirements.
Please dispose of this product in accordance with local regulations at the collecting point
specified for electrical and electronic equipment.
If you have any questions, please contact the responsible authority or the distributor from
which you purchased this device.
Should this device be passed on to other parties (for private or professional use), the
content of this regulation must also be related.
Thank you for your contribution to environmental protection.
Eliminación de residuos
De conformidad con las exigencias de la directiva europea 2002/96 CE sobre residuos de
aparatos eléctricos y electrónicos (RAEE), este equipo no puede eliminarse como basura
doméstica. Esta prohibición es asimismo válida para los países que no pertenecen a la
UE cuyas normativas nacionales en vigor así lo reflejan.
Elimine este producto, según las disposiciones locales, mediante el sistema de recogida
selectiva de aparatos eléctricos y electrónicos.
Si tiene alguna pregunta al respecto, diríjase a las autoridades responsables o al distri-
buidor que le proporcionó el equipo.
Si transfiere este equipo (por ejemplo, para la continuación de su uso con fines privados,
comerciales o industriales), deberá transferir con él esta disposición.
Muchas gracias por su contribución a la conservación medioambiental.
Elimination
En conformité avec les exigences de la directive européenne 2002/96 CE relative aux
déchets d‘équipements électriques et électroniques (DEEE), cet appareil ne doit pas être
éliminé avec les déchets ménagers. Logiquement, ceci est aussi valable pour les pays en
dehors de l’UE conformément aux règlementations nationales en vigueur.
Veuillez éliminer cet appareil conformément aux prescriptions locales dans un conteneur
séparé pour appareils électriques et électroniques.
Pour toute question, adressez-vous aux autorités compétentes ou au revendeur chez qui
vous avez acheté cet appareil.
En cas de remise de cet appareil (p. ex. pour une utilisation privée ou artisanale/industri-
elle), cette prescription doit être transmise en substance.
Merci pour votre contribution à la protection de l’environnement.
Page is loading ...

vi
FCC Note
This equipment has been tested and found to comply with the limits for a Class B digital device, pursuant
to Part 15 of the FCC Rules. These limits are designed to provide reasonable protection against harmful
interference in a residential installation. This equipment generates, uses and can radiate radio frequency
energy and, if not installed and used in accordance with the instructions, may cause harmful interference
to radio communications. However, there is no guarantee that interference will not occur in a particular
installation. If this equipment does cause harmful interference to radio or television reception, which can
be determined by turning the equipment off and on, the user is encouraged to try to correct the interfer-
ence by one or more of the following measures:
• Reorient or relocate the receiving antenna.
• Increase the separation between the equipment and receiver.
• Connect the equipment into an outlet on a circuit different from that to which the receiver is con-
nected.
• Consult the dealer or an experienced radio/TV technician for help
Industry Canada Note
This Class B digital apparatus complies with Canadian ICES-003.
Cet appareil numérique de la classe A est conforme à la norme NMB-003 du Canada.
EMC Australia / New Zealand: AS/NZS4251.1, AS/NZS4252.1
ISO 9001 Registration
In 1994, Ohaus Corporation, USA, was awarded a certificate of registration to ISO 9001 by Bureau Veri-
tus Quality International (BVQI), confirming that the Ohaus quality management system is compliant with
the ISO 9001 standard’s requirements. On May 15, 2003, Ohaus Corporation, USA, was re-registered to
the ISO 9001:2000 standard.
Registro ISO 9001
En 1994, Bureau Veritus Quality International (BVQI) le otorgó a Ohaus Corporation, EE.UU., un certifi-
cado de registro ISO 9001 el cual confirma que el sistema administrativo de calidad de Ohaus cumple
con los requerimientos del estándar ISO 9001. En mayo 15 del 2003, Ohaus Corporation, EE.UU., fue
registrada nuevamente al estándar ISO 9001:2000.
Enregistrement ISO 9001
En 1994, le Bureau Veritus Quality International (BVQI) a octroyé la certification d’enregistrement ISO
9001 à Ohaus Corporation, États-Unis d’Amérique, confirmant que le système de gestion de la qualité
Ohaus était conforme aux conditions normalisées de l’ISO 9001. Le 15 mai 2003, Ohaus Corporation,
États-Unis d’Amérique, a été ré-enregistrée à la norme ISO 9001:2000.
Registrierung nach ISO 9001
Im Jahr 1994 wurde der Ohaus Corporation, USA, ein Zertifikat der Registrierung nach ISO 9001 vom
Bureau Veritus Quality International (BVQI) verliehen, in dem bestätigt wird, dass das Ohaus-Qualitäts-
managementsystem den Anforderungen der Norm ISO 9001 entspricht. Am 15. Mai 2003 wurde die
Ohaus Corporation, USA, gemäß der Norm ISO 9001:2000 neu registriert.
Registrazione ISO 9001
Nel 1994, Ohaus Corporation, USA, ha ricevuto il certificato di registrazione ISO 9001 da Bureau Veritus
Quality International (BVQI), come conferma che il sistema di gestione della qualità Ohaus risponde alle
caratteristiche standard di ISO 9001. Il 15 Maggio 2003, Ohaus Corporation, USA, è stata riregistrata per
la normativa ISO 9001:2000.

SD SERIES BENCH SCALE EN-1
Ohaus SD Series Bench Scale
INSTRUCTION MANUAL
• The contents of this manual applies to all models of the SD Series Bench
Scale.
• Calibration weights are not provided with this product.
• For best results, use the product within the specified operating temperature
range.
• For best accuracy, perform your measurements in a clean environment, free
of electrostatic and magnetic fields, dust and dirt, moisture, vibration and air
currents.
• Use your SD Series Bench Scale with care, gently loading items to be weighed
on the center of the platform. Avoiding rough treatment will aid in extending
the life of your Scale.

EN-2 SD SERIES BENCH SCALE
Introduction
This manual covers operation for the Ohaus SD Series Bench Scales.
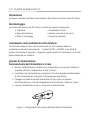
Unpacking
SD Series Bench Scale is shipped with the following components:
• Indicator • AC Power Adapter
• Scale Base • This Instruction Manual
• Mounting Brackets • Warranty Card
Leveling Scale Platform
The Scale Base should be placed on a level, stable surface before operation.
Models SD75L and SD200L are equipped with adjustable leveling feet. Adjust the
four leveling feet under the platform to level it.
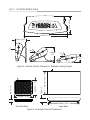
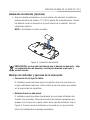
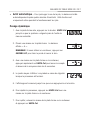
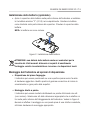
Power Options
AC Adapter Operation
• The AC Adapter (included) may be used to power the system when battery
power is not available.
• Check that the AC input power as marked on the Adapter matches the
available power source.
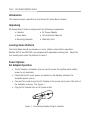
• Connect the round plug of the AC Adapter to the power input jack at the side of
the Indicator housing. See Figure 1.
• Plug the AC Adapter into an AC power outlet.
Figure 1. Connecting Adapter Plug to Indicator.

SD SERIES BENCH SCALE EN-3
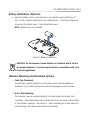
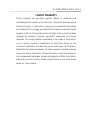
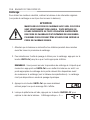
Battery Installation (Optional)
• Open the battery cover on the bottom of the Indicator and install three “C”
size (LR14) alkaline batteries into the compartment. Orient the batteries as
shown on the inside cover. Close the battery cover.
NOTE: Batteries are not included.
Figure 2. Battery Installation.
CAUTION: Do not dispose of used batteries in domestic waste. Follow
the proper disposal or recycling requirements in accordance with local
laws and regulations.
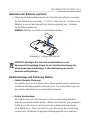
Indicator Mounting and Placement Options
• Table Top Placement:
The Indicator may be placed on a flat table surface without additional
hardware. Four rubber feet provide reduced slippage on most surfaces.
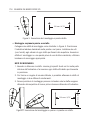
• Direct Wall Mounting:
The Indicator may be mounted directly to a wall using two screws (not
included). Select appropriate size screws that fit into the holes at the bottom
of the Indicator housing. See Figure 3. When mounting to a wall without a
solid backing, use appropriate anchoring hardware.

EN-4 SD SERIES BENCH SCALE
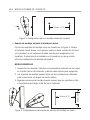
Figure 3. Direct Wall Mount Arrangement.
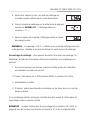
• Bracket Wall Mounting/Table Mounting:
Attach the two mounting brackets as shown in Figure 4. Position the
Indicator where desired on the wall or table. Install 2 screws (not supplied)
into the ends of each bracket to secure them to the surface. When mounting
to a wall without solid backing, use appropriate anchoring hardware.
MOUNTING NOTES:
1. When attaching brackets: Insert round pins into holes at bottom of
Indicator, slide each bracket back to lock in place.
2. Mounting brackets may be attached in two different orientations to provide
optimum viewing angle.
3. Some mounting positions may require that the brackets be attached to the
work surface before being attached to the indicator.
Figure 4. Bracket Wall & Table Mount Arrangements.
120mm / 4.72”
120mm / 4.72”
90mm / 3.54”

SD SERIES BENCH SCALE EN-5
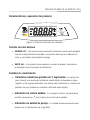
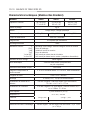
Product Features & Operation
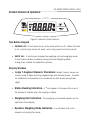
Figure 5. Indicator Panel Controls.
Two Button Keypad
• ON/ZERO
Off
: A short press turns on the scale when it is off. When the scale
is on, a short press zeroes the scale, and a long press turns the scale off.
• UNITS
Cal
: A short press changes the weighing unit and weighing mode.
A short press initiates countdown during Dynamic Weighing Mode.
A long press initiates the calibration process.
Display Window
• Large 7-Segment Numeric Characters: Weight (mass) values are
shown using 4 digits including negative sign and decimal places. Prompts
for calibration and possible error conditions are also shown using these
digits.
• Stable Reading Indication: A * will appear in the lower left corner of
the display to indicate when the reading is stable.
• Weighing Unit Indication: The weighing unit selected appears on the
right side of the display.
• Dynamic Weighing Mode Indication: A • will flash next to the
selected unit during this mode.
SD

EN-6 SD SERIES BENCH SCALE
• Low Battery Indication: The battery symbol on the left side of the
display indicates a low battery condition. When first displayed ,
approximately 12 hours of operation remain.
When the battery is fully
depleted, the scale will momentarily display “Lo bAt” and shut off.
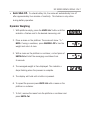
Operation
• Power Up Test: When the ON/ZERO
Off
button is pressed, the scale
is turned on, all display segments will appear for a short time, followed by
the software version. The display will then reset to zero.
• Zero Function: By pressing the ON/ZERO
Off
button, the scale display
returns to zero. When adding additional mass, the ON/ZERO
Off
button
may be used repeatedly until the full capacity of the scale is reached.
When a container is used, the ON/ZERO
Off
button may be used to
simulate a Tare function. Additional mass may then be added as a NET
weight. When removing both the sample and container from the scale, a
negative value may be displayed. Zero the scale again before subsequent
usage.
NOTE: The ON/ZERO
Off
button will perform a true zero setting function when
displayed values are within +2% of full capacity. Above 2%, the range is
limited to full capacity by subtraction.
• Negative Values: When a load is removed from the scale, any previously
zeroed value will be displayed as a negative number. To return to normal
operation, the negative value is cleared from the display by pressing the
ON/ZERO
Off
button
.
• Overload: If the applied load exceeds the capacity of the scale, an “E” is
displayed. Remove the load and the scale will return to normal operation.

SD SERIES BENCH SCALE EN-7
• Auto Shut-Off: To extend battery life, the scale will automatically turn off
after approximately four minutes of inactivity. This feature is only active
during battery operation.
Dynamic Weighing
1. With platform empty, press the UNITS
Cal
button until the
indicator • flashes next to the desired measuring unit.
2. Place a mass on the platform. The scale will show “-A-”.
NOTE: If using a container, press ON/ZERO
Off
to tare the
weight and return to zero.
3. With a mass on the platform or container, a short press of
UNITS
Cal
will start the averaging countdown from
5 seconds.
4. The averaged weight is then displayed. The indicator •
stops flashing when the process is complete.
5. The display will hold until a button is pressed.
6. To repeat the process press
UNITS
Cal
with a mass on the
platform or container.
7. To Exit, remove the mass from the platform or container and
press
UNITS
Cal.

EN-8 SD SERIES BENCH SCALE
Calibration
For best results, calibrate the scale at regular intervals. (Calibration weights are not
supplied with the scale.)
CAUTION
USE EXTREME CARE WHEN HANDLING CALIBRATION WEIGHTS
AS THEY ARE VERY HEAVY. IMPROPER LIFTING METHODS OR
MISUSE OF CALIBRATION WEIGHTS MAY RESULT IN PERSONAL
INJURY. MULTIPLE WEIGHTS MAY BE USED TO EQUAL THE
REQUIRED CALIBRATION WEIGHT.
1. Allow the scale to warm up and stabilize for a least two minutes before
commencing the calibration procedure.
2. To select the weighing unit to be used for calibration, press the UNITS
Cal
button until the correct unit is displayed.
NOTE: The calibration process can be stopped at any time by pressing the
UNITS
Cal
button or by turning the scale off. The correct span calibration
weights will need to be available before starting the calibration (see
specification table). Calibration is unavailable in Dynamic Weighing Mode.
3. Press and hold the UNITS
Cal
button until “CAL” is displayed.
4. With the platform empty, press the ON/ZERO
Off
button to
capture the scale zero. The display will show “-C-”

SD SERIES BENCH SCALE EN-9
5. After the zero is captured, the required span calibration
weight in the selected unit is displayed.
6. Place the calibration weight on the platform and press
ON/ZERO
Off
button. The display will again show “-C-”.
7. After span capture, the display will return to the normal
weighing mode.
NOTE: The message “CAL E” will appear if an incorrect calibration weight
was applied. Repeat the procedure using the correct calibration weight.
Calibration Locking: By use of an internal switch, the calibration function may be
locked (disabled), and unauthorized recalibration prevented.
1. With the scale powered off, remove the back housing section of the indicator
by unscrewing the four screws at the bottom.
2. Slide the switch on the PCB (marked SW3) to the position marked “CAL LOCK”.
3. Reassemble the housing.
4. If required, place tamper evident sealing labels over the screw holes or over
the housing edges.
If later recalibration is required, the housing will need to be reopened and the lock
switch returned to the original position.
NOTE: When the lock switch is set to the CAL LOCK position, the power-on zero
range is reduced to 10% of full capacity.

EN-10 SD SERIES BENCH SCALE
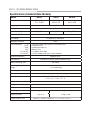
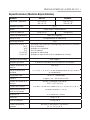
Model SD35 SD75 SD200
Capacity x Readability 35 x 0.02kg
77 x 0.05lb
75 x 0.05kg
165 x 0.1lb
200 x 0.1kg
440 x 0.2lb
Weighing Units kg, lb
Modes Simple Weighing, Dynamic Weighing
Calibration Weights 25kg/50lb 50kg/100lb 100kg/200lb
Stabilization Time Within 3 seconds
Zero Range To capacity by subtraction
Maximum Overload 150%
Error Indications: “E”
“CALE”
“UnSt”
“ErrE”
“Lo bat OFF”
“Lo Line OFF”
- Over load, Under load, Power on Over/Under load
- Calibration Error
- Unstable at Power on
- Memory Error
- Low battery shut down
- Low line voltage shut down (Power Adapter)
Underload Indication Negative value
Auto Shut-Off 4 minutes no activity (battery operation only)
Battery Operating Time 360 hours
Operating Temperature
Range
41° to 104° F / 5° to 40°C at 10% to 80% relative humidity,
non-condensing
Cable Length 1.8m / 72” (uncoiled)
Display 4 Digit, LCD, 0.8”/20mm high
Scale Base Size 316mm L x 280mm W x 45mm H /
12.4” x L x 11” W x 1.77” H
Indicator Size 210mm L x 91mm W x 39mm H / 8.27” L x 3.58” W x 1.54” H
Battery power requirements 3 “C” Alkaline batteries (LR14)
AC Adapter 9-12 Volt DC, 100mA
Net Weight
2.6kg / 5.8lb
3.3kg / 7.3lb
Shipping Weight
3.7kg / 8.1lb
4.3kg / 9.5lb
Shipping Carton Size
380mm L x 100mm W x 465mm H / 15” L x 3.94” W x 18.3” H
Specifications (Standard Base Models)

SD SERIES BENCH SCALE EN-11
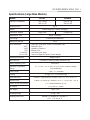
Model SD75L SD200L
Capacity x Readability 75 x 0.05kg
165 x 0.1lb
200 x 0.1kg
440 x 0.2lb
Weighing Units kg, lb
Modes Simple Weighing, Dynamic Weighing
Calibration Weights 50kg/100lb 100kg/200lb
Stabilization Time Within 3 seconds
Zero Range To capacity by subtraction
Maximum Overload 150%
Error Indications: “E”
“CALE”
“UnSt”
“ErrE”
“Lo bat OFF”
“Lo Line OFF”
- Over load, Under load, Power on Over/Under load
- Calibration Error
- Unstable at Power on
- Memory Error
- Low battery shut down
- Low line voltage shut down (Power Adapter)
Underload Indication Negative value
Auto Shut-Off 4 minutes no activity (battery operation only)
Battery Operating Time 360 hours
Operating Temperature
Range
41° to 104° F / 5° to 40°C at 10% to 80% relative humidity,
non-condensing
Cable Length 1.8m / 72” (uncoiled)
Display 4 Digit, LCD, 0.8”/20mm high
Scale Base Size 520mm L x 400 mm W x 75 mm H / 20.5” L x 15.7” W x 3” H
Indicator Size 210mm L x 91mm W x 39mm H / 8.27” L x 3.58” W x 1.54” H
Battery power requirements 3 “C” Alkaline batteries (LR14)
AC Adapter 9-12 Volt DC, 100mA
Net Weight 14kg / 31lb
Shipping Weight 15.5kg / 34lb
Shipping Carton Size
600mm L x 480mm W x 230mm H /
24” L x 19” W x 9” H
Specifications (Large Base Models)

EN-12 SD SERIES BENCH SCALE
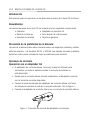
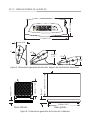
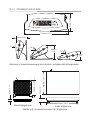
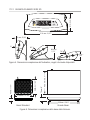
Figure 6. Scale Base Overall Dimensions.
53mm /2.09”
69mm /
2.72”
39mm /
1.54”
210mm / 8.27”
91mm / 3.58”
280mm / 11.02”
45mm / 1.77”
Figure 5. Indicator Overall Dimensions, Available Viewing Angles.
0º
50º
70º
Standard Base
Large Base
316mm / 12.44”
400 mm / 15.7”
520mm / 20.5”
75mm / 3”

SD SERIES BENCH SCALE EN-13
LIMITED WARRANTY
Ohaus products are warranted against defects in materials and
workmanship for duration of the warranty. During the warranty period
Ohaus will repair, or, at its option, replace any components) that proves
to be defective at no charge, provided that the product is returned, freight
prepaid, to Ohaus. This warranty does not apply if the product has been
damaged by accident or misuse, exposed to radioactive or corrosive
materials, has foreign material penetrating to the inside of the product,
or as a result of service or modification by other than Ohaus. In lieu
of product registration, the warranty period shall begin on the date of
shipment to the authorized dealer. No other express or implied warranty
is given by Ohaus Corporation. Ohaus Corporation shall not be liable for
any consequential damages. As warranty legislation differs from state to
state and country to country, please contact Ohaus or your local Ohaus
dealer for further details.
Page is loading ...
Page is loading ...
Page is loading ...
Page is loading ...
Page is loading ...
Page is loading ...
Page is loading ...
Page is loading ...
Page is loading ...
Page is loading ...
Page is loading ...
Page is loading ...
Page is loading ...
Page is loading ...
Page is loading ...
Page is loading ...
Page is loading ...
Page is loading ...
Page is loading ...
Page is loading ...
Page is loading ...
Page is loading ...
Page is loading ...
Page is loading ...
Page is loading ...
Page is loading ...
Page is loading ...
Page is loading ...
Page is loading ...
Page is loading ...
Page is loading ...
Page is loading ...
Page is loading ...
Page is loading ...
Page is loading ...
Page is loading ...
Page is loading ...
Page is loading ...
Page is loading ...
Page is loading ...
Page is loading ...
Page is loading ...
Page is loading ...
Page is loading ...
Page is loading ...
Page is loading ...
Page is loading ...
Page is loading ...
Page is loading ...
Page is loading ...
Page is loading ...
Page is loading ...

SD SERIES BENCH SCALE EN-i
Ohaus Corporation
19A Chapin Road
P.O. Box 2033
Pine Brook, NJ 07058-2033, USA
Tel: (973) 377-9000,
Fax: (973) 944-7177
With offices worldwide / Con oficinas alrededor del mundo / Avec des bureaux dans
le monde entier / Weltweite Geshäftsstellen / Con uffici in tutto il mondo.
www.ohaus.com
P/N 80120060 C ©2008 Ohaus Corporation, all rights reserved / todos los dere-
chos reservados / tous droits réservés / Alle Rechte vorbehalten / tutti i diritti riservati.
Printed in China / Impreso en la China / Imprimé en Chine / Gedruckt in China /
Stampato in Cina
*80120060*
-
 1
1
-
 2
2
-
 3
3
-
 4
4
-
 5
5
-
 6
6
-
 7
7
-
 8
8
-
 9
9
-
 10
10
-
 11
11
-
 12
12
-
 13
13
-
 14
14
-
 15
15
-
 16
16
-
 17
17
-
 18
18
-
 19
19
-
 20
20
-
 21
21
-
 22
22
-
 23
23
-
 24
24
-
 25
25
-
 26
26
-
 27
27
-
 28
28
-
 29
29
-
 30
30
-
 31
31
-
 32
32
-
 33
33
-
 34
34
-
 35
35
-
 36
36
-
 37
37
-
 38
38
-
 39
39
-
 40
40
-
 41
41
-
 42
42
-
 43
43
-
 44
44
-
 45
45
-
 46
46
-
 47
47
-
 48
48
-
 49
49
-
 50
50
-
 51
51
-
 52
52
-
 53
53
-
 54
54
-
 55
55
-
 56
56
-
 57
57
-
 58
58
-
 59
59
-
 60
60
-
 61
61
-
 62
62
-
 63
63
-
 64
64
-
 65
65
-
 66
66
-
 67
67
-
 68
68
-
 69
69
-
 70
70
-
 71
71
-
 72
72


Ohaus SD200 User manual
- Category
- Postal scales
- Type
- User manual
Ask a question and I''ll find the answer in the document
Finding information in a document is now easier with AI
in other languages
- italiano: Ohaus SD200 Manuale utente
- français: Ohaus SD200 Manuel utilisateur
- español: Ohaus SD200 Manual de usuario
- Deutsch: Ohaus SD200 Benutzerhandbuch
Related papers
Other documents
-
Blue Sea Systems 8280 Template
-
Vernier OHAUS Scout 420 g User manual
-
American Weigh Scales AMWSHIP-330 User manual
-
Taylor Scale TE22OS User manual
-
Taylor TE11FT User manual
-
Taylor 3852 User manual
-
Sammic L-EQ 4 Owner's manual
-
Optima Scale OP-931 User manual
-
VOLTCRAFT CST-10 Operating Instructions Manual
-
Taylor TE10T User manual