Page is loading ...

1) TURN OFF POWER.
IMPORTANT: Before you start, NEVER attempt any work
without shutting off the electricity until the work is done.
a) Go to the main fuse, or circuit breaker, box in your home.
Place the main power switch in the “OFF” position.
b) Unscrew the fuse(s), or switch “OFF” the circuit breaker
switch(s), that control the power to the fixture or room that
you are working on.
c) Place the wall switch in the “OFF” position. If the fixture to
be replaced has a switch or pull chain, place those in the
“OFF” position.
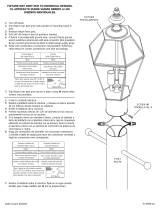
2) Slip fixture over post and mark position of mounting holes in
post.
3) Remove fixture from post.
4) Drill 3/16” dia holes in post at positions marked .
5) If fixture is provided with ground wire, connect fixture ground
wire to outlet box ground wire with wire connector. (Not provided).
Never connect ground wire to black or white power supply
wires.
6) Make wire connections (connectors not provided). Reference
chart below for correct connections and wire accordingly.
7) Slip fixture over post and secure in place using provided
screws. Screws should slip into holes drilled in post.
8) Insert recommended bulb.
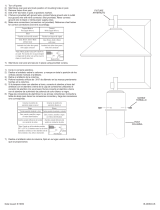
9) Lower cage down over socket and set cage on fixture base.
10) Thread screws up from underside of fixture base and into
cage. Tighten screws to secure cage to base.
1) APAGAR LA ALIMENTACIÓN DE ENERGIE ELÈTRICA.
IMPORTANTE: Antes de comenzar, NUNCA trate de trabajar sin
antes desconectar la corriente hasta que el trabajo se termine.
a) Vaya a la caja principal de fusibles, o interruptor o caja de
circuitos de su casa. Coloque el interruptor de la corriente
principal en posición de apagado “OFF”.
b) Desatornille el (los) fusible (s), o coloque el interruptor o
interruptores del breaker en posición de apagado “OFF”,
que controla (n) la corriente hacia el artefacto o habitación
donde está trabajando.
c) Coloque el interruptor de pared en posición de apagado
“OFF”.
Si el artefacto que se va a reemplazar tiene un interruptor o
cadena que se jala, colóquelos en la posición de apagado “OFF”.
2) Deslice el artefacto sobre la columna y marque en ésta la
posición de los orificios donde montará el artefacto.
3) Retire el artefacto de la columna.
4) Perfore haciendo orificios de 3/16” de diámetro en las marcas
previamente hechas en la columna.
5) Si la lampara viene con alambre a tierra, conecte el alambre a
tierra del artefacto con el alambre a tierra de la caja de
conexiones utilizando el conector de alambre (no se provee).
Nunca conecte el alambre a tierra con el alambre de suministro
de potencia de color blanco o negro.
Date Issued: 6/6/14 IS-49555-US
Connect Black or
Red Supply Wire to:
Connect
White Supply Wire to:
Black White
*Parallel cord (round & smooth) *Parallel cord (square & ridged)
Clear, Brown, Gold or Black
without tracer
Clear, Brown, Gold or Black
with tracer
Insulated wire (other than green)
with copper conductor
Insulated wire (other than green)
with silver conductor
*Note: When parallel wires (SPT I & SPT II)
are used. The neutral wire is square shaped
or ridged and the other wire will be round in
shape or smooth (see illus.)
Neutral Wire
Conectar el alambre de
suministro negro o rojo al
Conectar el alambre de
suministro blanco al
Negro Blanco
*Cordon paralelo (redondo y liso)
*Cordon paralelo (cuadrado y estriado)
Claro, marrón, amarillio o negro
sin hebra identificadora
Claro, marrón, amarillio o negro
con hebra identificadora
Alambre aislado (diferente del verde)
con conductor de cobre
Alambre aislado (diferente del
verde) con conductor de plata
*Nota: Cuando se utiliza alambre paralelo
(SPT I y SPT II). El alambre neutro es de forma
cuadrada o estriada y el otro alambre será de
forma redonda o lisa. (Vea la ilustracíón).
Hilo Neutral
SCREW
TORNILLO
6) Haga las conexiones de alambres (no se provee conectores).
Consulte la tabla de abajo para hacer las conexiones correctas
y haga las conexiones omo corresponda.
7) Deslice el artefacto sobre la columna, fíjelo en su lugar usando
los tornillos que se proporcionan. Los tornillos deben entrar
perfectamente en los orificios que previamente perforó en la
columna.
8) Inserte la lámpara recomendada.
9) Baje la jaula sobre el portalámparas y colóquela sobre la
base del artefacto.
10) Rosque los tornillos desde la parte interior de la base del
artefacto y dentro de la jaula. Apriete los tornillos a fin de
asegurar la jaula a la base.
FIXTURE BASE
BASE DEL ARTEFACTO
We’re here to help 866-558-5706
Hrs: M-F 9am to 5pm EST
SCREW
TORNILLO
CAGE
JAULA
SOCKET
PORTALÁMPARAS
/


