
JLBIOS641
User Manual
Oven

Contents
Safety information 3
Children and vulnerable people safety 3
General Safety 3
Safety instructions 5
Installation 5
Electrical connection 5
Use 6
Care and cleaning 6
Internal lighting 7
Service 7
Disposal 7
Product description 8
General overview 8
Accessories 8
Control panel 9
Retractable knobs 9
Sensor fields / Buttons 9
Display 9
Before first use 10
Before first use 10
Daily use 11
How to set: Heating function 11
Heating functions 11
Notes on: Moist Baking 12
Clock functions 13
Clock functions 13
How to set: Clock functions 13
Using the accessories 15
Inserting accessories 15
Trivet and Grill- / Roasting pan 16
Additional functions 17
Cooling fan 17
Hints and tips 18
Cooking recommendations 18
Baking 18
Tips on baking 18
Baking on one shelf level 19
Bakes and gratins 21
Multilevel Baking 21
Tips on Roasting 22
Roasting 22
Crispy baking with: Pizza Function 25
Grill 26
Frozen Foods 26
Defrost 27
Preserving 28
Dehydrating - True Fan Cooking 29
Moist Baking - recommended accessories 29
Moist Baking 29
Information for test institutes 30
Care and cleaning 33
Notes on cleaning 33
How to remove: Shelf supports 33
How to remove: Grill 34
How to remove and install: Door 35
How to replace: Lamp 36
Troubleshooting 37
What to do if... 37
Service data 37
Energy efficiency 38
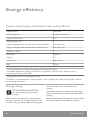
Product Information and Product Information
Sheet* 38
Energy saving 38
Repairs - after sales service 40
Oven User Manual
2

Safety information
Before the installation and use of the appliance, carefully read the
supplied instructions. The manufacturer is not responsible for any
injuries or damage that are the result of incorrect installation or usage.
Always keep the instructions in a safe and accessible location for
future reference.
Children and vulnerable people safety
• This appliance can be used by children aged from 8 years and above
and persons with reduced physical, sensory or mental capabilities
or lack of experience and knowledge if they have been given
supervision or instruction concerning the use of the appliance in a
safe way and understand the hazards involved.
• Children between 3 and 8 years of age and persons with very
extensive and complex disabilities shall be kept away from the
appliance unless continuously supervised.
• Children of less than 3 years of age should be kept away from the
appliance unless continuously supervised.
• Do not let children play with the appliance.
• Keep all packaging away from children and dispose of it
appropriately.
• Keep children and pets away from the appliance when it operates
or when it cools down. Accessible parts become hot during use.
• If the appliance has a child safety device, it should be activated.
• Children shall not carry out cleaning and user maintenance of the
appliance without supervision.
General Safety
• Only a qualified person must install this appliance and replace the
cable.
Oven User Manual
3

• WARNING: The appliance and its accessible parts become hot
during use. Care should be taken to avoid touching heating
elements.
• Always use oven gloves to remove or put in accessories or
ovenware.
• Before carrying out any maintenance, disconnect the appliance
from the power supply.
• WARNING: Ensure that the appliance is switched off before
replacing the lamp to avoid the possibility of electric shock.
• Do not use the appliance before installing it in the built-in structure.
• Do not use a steam cleaner to clean the appliance.
• Do not use harsh abrasive cleaners or sharp metal scrapers to clean
the glass door since they can scratch the surface, which may result
in shattering of the glass.
• If the mains power supply cable is damaged, it must be replaced by
the manufacturer, its Authorised Service Centre or similarly
qualified persons to avoid an electrical hazard.
• To remove the shelf supports first pull the front of the shelf support
and then the rear end away from the side walls. Install the shelf
supports in the opposite sequence.
• The means for disconnection must be incorporated in the fixed
wiring in accordance with the wiring rules.
Oven User Manual
4

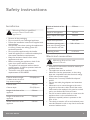
Safety instructions
Installation
Warning! Only a qualified
person must install this
appliance.
• Remove all the packaging.
• Do not install or use a damaged appliance.
• Follow the installation instructions supplied with
the appliance.
• Always take care when moving the appliance as
it is heavy. Always use safety gloves and
enclosed footwear.
• Do not pull the appliance by the handle.
• Install the appliance in a safe and suitable place
that meets installation requirements.
• Keep the minimum distance from other
appliances and units.
• Before mounting the appliance, check if the
oven door opens without restraint.
• The appliance is equipped with an electric
cooling system. It must be operated with the
electric power supply.
• The built-in unit must meet the stability
requirements of DIN 68930.
Cabinet minimum height
(Cabinet under the work-
top minimum height)
578 (600) mm
Cabinet width 560 mm
Cabinet depth 550 (550) mm
Height of the front of the
appliance
594 mm
Height of the back of the
appliance
576 mm
Width of the front of the
appliance
595 mm
Width of the back of the
appliance
559 mm
Depth of the appliance 567 mm
Built in depth of the appli-
ance
546 mm
Depth with open door 1027 mm
Ventilation opening mini-
mum size. Opening placed
on the bottom rear side
560 x 20 mm
Mounting screws 4 x 25 mm
Electrical connection
Warning! Risk of fire and
electric shock.
• All electrical connections should be made by a
qualified electrician.
• The appliance must be earthed.
• Make sure that the parameters on the rating
plate are compatible with the electrical ratings
of the mains power supply.
• Always use a correctly installed shockproof
socket.
• Do not use multi-plug adapters and extension
cables.
• Make sure not to cause damage to the mains
plug and to the mains cable. Should the mains
cable need to be replaced, this must be carried
out by our Authorised Service Centre.
• Do not let mains cables touch or come near the
appliance door or the niche below the
appliance, especially when it operates or the
door is hot.
• The shock protection of live and insulated parts
must be fastened in such a way that it cannot be
removed without tools.
Oven User Manual
5

• Connect the mains plug to the mains socket
only at the end of the installation. Make sure
that there is access to the mains plug after the
installation.
• If the mains socket is loose, do not connect the
mains plug.
• Do not pull the mains cable to disconnect the
appliance. Always pull the mains plug.
• Use only correct isolation devices: line
protecting cut-outs, fuses (screw type fuses
removed from the holder), earth leakage trips
and contactors.
• The electrical installation must have an isolation
device which lets you disconnect the appliance
from the mains at all poles. The isolation device
must have a contact opening width of minimum
3 mm.
• This appliance is supplied without a main plug
and a main cable.
Use
Warning! Risk of injury, burns
and electric shock or
explosion.
• This appliance is for household use only.
• Do not change the specification of this
appliance.
• Make sure that the ventilation openings are not
blocked.
• Do not let the appliance stay unattended during
operation.
• Deactivate the appliance after each use.
• Be careful when you open the appliance door
while the appliance is in operation. Hot air can
release.
• Do not operate the appliance with wet hands
or when it has contact with water.
• Do not apply pressure on the open door.
• Do not use the appliance as a work surface or
as a storage surface.
• Open the appliance door carefully. The use of
ingredients with alcohol can cause a mixture of
alcohol and air.
• Do not let sparks or open flames to come in
contact with the appliance when you open the
door.
• Do not put flammable products or items that
are wet with flammable products in, near or on
the appliance.
Warning! Risk of damage to
the appliance.
• To prevent damage or discoloration to the
enamel:
– do not put ovenware or other objects in
the appliance directly on the bottom.
– do not put aluminium foil directly on the
bottom of cavity of the appliance.
– do not put water directly into the hot
appliance.
– do not keep moist dishes and food in the
appliance after you finish the cooking.
– be careful when you remove or install the
accessories.
• Discoloration of the enamel or stainless steel
has no effect on the performance of the
appliance.
• Use a deep pan for moist cakes. Fruit juices
cause stains that can be permanent.
• This appliance is for cooking purposes only. It
must not be used for other purposes, for
example room heating.
• Always cook with the oven door closed.
• If the appliance is installed behind a furniture
panel (e.g. a door) make sure the door is never
closed when the appliance operates. Heat and
moisture can build up behind a closed furniture
panel and cause subsequent damage to the
appliance, the housing unit or the floor. Do not
close the furniture panel until the appliance has
cooled down completely after use.
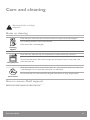
Care and cleaning
Warning! Risk of injury, fire,
or damage to the appliance.
• Before maintenance, deactivate the appliance
and disconnect the mains plug from the mains
socket.
• Make sure the appliance is cold. There is the
risk that the glass panels can break.
• Replace immediately the door glass panels
when they are damaged. Contact the
Authorised Service Centre.
• Be careful when you remove the door from the
appliance. The door is heavy!
Oven User Manual
6

• Clean regularly the appliance to prevent the
deterioration of the surface material.
• Clean the appliance with a moist soft cloth. Use
only neutral detergents. Do not use abrasive
products, abrasive cleaning pads, solvents or
metal objects.
• If you use an oven spray, follow the safety
instructions on its packaging.
Internal lighting
Warning! Risk of electric
shock.
• The type of light bulb or halogen lamp used for
this appliance is for household appliances only.
Do not use it for house lighting.
• Before replacing the lamp, disconnect the
appliance from the power supply.
• Use only lamps with the same specifications.
Service
• To repair the appliance contact the Authorised
Service Centre.
• Use original spare parts only.
Disposal
Warning! Risk of injury or
suffocation.
• Disconnect the appliance from the mains
supply.
• Cut off the mains electrical cable close to the
appliance and dispose of it.
• Remove the door catch to prevent children or
pets from becoming trapped in the appliance.
Oven User Manual
7

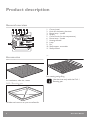
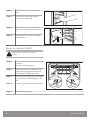
Product description
General overview
7
9
8
41 2 3 5 6
1
2
3
4
5
11
10
1. Control panel
2. Knob for the heating functions
3. Power lamp / symbol
4. Display
5. Control knob (for the temperature)
6. Power lamp / symbol
7. Heating element
8. Lamp
9. Fan
10. Shelf support, removable
11. Shelf positions
Accessories
Wire shelf
For cookware, cake tins, roasts.
Grill- / Roasting pan
To bake and roast or as a pan to collect fat.
Trivet
For roasting and grilling.
Use the trivet only with the Grill- /
Roasting pan.
Oven User Manual8

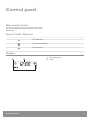
Control panel
Retractable knobs
To use the appliance press the knob. The knob
comes out.
Sensor fields / Buttons
To set the time.
To set a clock function.
To set the time.
Display
A B
A. Clock functions
B. Timer
Oven User Manual 9

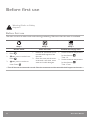
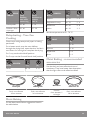
Before first use
Warning! Refer to Safety
chapters.
Before first use
The oven can emit an odour and smoke during preheating. Make sure that the room is ventilated.
Step 1 Step 2
Step 3
Set the clock Clean the oven Preheat the empty oven
1. Press: .
2. , - press to set the hour.
Press: .
3. , - press to set the mi-
nutes. Press: .
1. Remove all accessories and re-
movable shelf supports from
the oven.
2. Clean the oven and the acces-
sories with a soft cloth, warm
water and a mild detergent.
1. Set the maximum temperature
for the function: .
Time: 1 h.
2. Set the maximum temperature
for the function: .
Time: 15 min.
Turn off the oven and wait until it is cold. Place the accessories and the removable shelf supports in the oven.
Oven User Manual10

Daily use
Warning! Refer to Safety
chapters.
How to set: Heating function
Step 1
Turn the knob for the heating functions
to select a heating function.
Step 2
Turn the control knob to select the
temperature.
Step 3
When the cooking ends, turn the
knobs to the off position to turn off the
oven.
Heating functions
Oven function Application
Off position
The oven is off.
Light
To turn on the lamp.
True Fan Cooking
To bake on up to three shelf
positions at the same time and
to dry food.
Set the temperature 20 - 40 °C
lower than for Conventional
Cooking.
Pizza Function
To bake pizza. To make inten-
sive browning and a crispy bot-
tom.
Oven function Application
Conventional
Cooking
To bake and roast food on one
shelf position.
Bottom Heat
To bake cakes with crispy bot-
tom and to preserve food.
Defrost
To defrost food (vegetables and
fruit). The defrosting time de-
pends on the amount and size
of the frozen food.
Moist Baking
This function is designed to
save energy during cooking.
When you use this function, the
temperature in the cavity may
differ from the set temperature.
The heating power may be re-
duced. For more information
refer to "Daily Use" chapter,
Notes on: Moist Baking.
Fast Grilling
To grill thin pieces of food in
large quantities and to toast
bread.
Turbo Grilling
To roast large meat joints or
poultry with bones on one shelf
position. To make gratins and
to brown.
The lamp may turn off
automatically at a temperature
below 60 °C during some oven
functions.
Oven User Manual 11

Notes on: Moist Baking
This function was used to comply with the
energy efficiency class and ecodesign
requirements according to EU 65/2014 and EU
66/2014. Tests according to EN 60350-1.
The oven door should be closed during cooking
so that the function is not interrupted and the
oven operates with the highest energy efficiency
possible.
For the cooking instructions refer to "Hints and
tips" chapter, Moist Baking. For general energy
saving recommendations refer to "Energy
Efficiency" chapter, Energy Saving.
Oven User Manual
12

Clock functions
Clock functions
Clock function Application
Time of Day
To set, change or check the time of day.
Duration
To set how long the oven works.
Minute Minder
To set a countdown. This function has no effect on the operation of the
oven. You can set this function at any time, also when the oven is off.
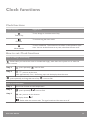
How to set: Clock functions
How to change: Time of Day
- flashes when you connect the oven to the electrical supply, when there was a power cut or when the
timer is not set.
Step 1
- press repeatedly. - starts to flash.
Step 2
, - press to set the time.
After approximately 5 sec., the flashing stops and the display shows the time.
- press repeatedly to change the time of day. - starts to flash.
How to set: Duration
Step 1
Set an oven function and the temperature.
Step 2
- press repeatedly. - starts to flash.
Step 3
, - press to set the duration.
The display shows: .
- flashes when the set time ends. The signal sounds and the oven turns off.
Oven User Manual 13

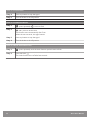
How to set: Duration
Step 4
Press any button to stop the signal.
Step 5
Turn the knobs to the off position.
How to set: Minute Minder
Step 1
- press repeatedly. - starts to flash.
Step 2
, - press to set the time.
The function starts automatically after 5 sec.
When the set time ends, the signal sounds.
Step 3
Press any button to stop the signal.
Step 4
Turn the knobs to the off position.
How to cancel: Clock functions
Step 1
- press repeatedly until the clock function symbol starts to flash.
Step 2
Press and hold: .
The clock function turns off after few seconds.
Oven User Manual14

Using the accessories
Warning! Refer to Safety
chapters.
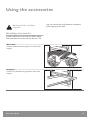
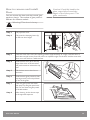
Inserting accessories
A small indentation at the top increases safety.
The indentations are also anti-tip devices. The
high rim around the shelf prevents cookware
from slipping of the shelf.
Wire shelf:
Push the shelf between the guide bars of the shelf
support.
Deep pan:
Push the tray between the guide bars of the shelf
support.
Oven User Manual 15

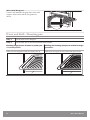
Wire shelf, Deep pan:
Push the tray between the guide bars of the shelf
support and the wire shelf on the guide bars
above.
Trivet and Grill- / Roasting pan
Step 1
Put the trivet into a deep pan.
Step 2
Put the deep pan on the recommended shelf position.
Roasting larger pieces of meat or poultry on
one shelf position.
Grilling and toasting thin pieces of food in large
quantities.
Make sure the supports of the wire shelf point up. Make sure the supports of the wire shelf point down.
Oven User Manual16

Additional functions
Cooling fan
When the oven operates, the cooling fan turns
on automatically to keep the surfaces of the
oven cool. If you turn off the oven, the cooling
fan can continue to operate until the oven cools
down.
Oven User Manual 17

Hints and tips
Warning! Refer to Safety
chapters.
Cooking recommendations
The temperature and cooking times in the tables are guidelines only. They depend on the recipes and the quality
and quantity of the ingredients used.
Your oven may bake or roast differently to the oven you had before. The tables below show recommended
settings for temperature, cooking time and shelf position for specific types of the food.
If you cannot find the settings for a special recipe, look for the similar one.
Baking
For the first baking, use the lower temperature.
You can extend the baking time by 10 – 15
minutes if you bake cakes on more than one
shelf position.
Cakes and pastries at different heights do not
always brown equally. There is no need to
change the temperature setting if an unequal
browning occurs. The differences equalize
during baking.
Trays in the oven can distort during baking.
When the trays are cold again, the distortions
disappear.
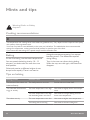
Tips on baking
Baking results Possible cause Remedy
The bottom of the cake is not
baked sufficiently.
The shelf position is incorrect. Put the cake on a lower shelf.
The cake sinks and becomes
soggy or streaky.
The oven temperature is too high. Next time set slightly lower oven temper-
ature.
The oven temperature is too high
and the baking time is too short.
Next time set a longer baking time and
lower oven temperature.
The cake is too dry. The oven temperature is too low. Next time set higher oven temperature.
The baking time is too long. Next time set shorter baking time.
Oven User Manual18

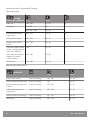
Baking results Possible cause Remedy
The cake bakes unevenly. The oven temperature is too high
and the baking time is too short.
Next time set a longer baking time and
lower oven temperature.
The cake batter is not evenly dis-
tributed.
Next time spread the cake batter evenly
on the baking tray.
The cake is not ready in the
baking time specified in a rec-
ipe.
The oven temperature is too low. Next time set a slightly higher oven tem-
perature.
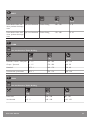
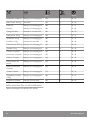
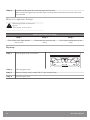
Baking on one shelf level
BAK-
ING IN TINS (°C) (min)
Flan base - short
pastry, preheat
the empty oven
True Fan Cooking 170 - 180 10 - 25 2
Flan base - sponge
cake mixture
True Fan Cooking 150 - 170 20 - 25 2
Ring cake / Brio-
che
True Fan Cooking 150 - 160 50 - 70 1
Madeira cake /
Fruit cakes
True Fan Cooking 140 - 160 70 - 90 1
Cheesecake Conventional Cooking 170 - 190 60 - 90 1
Use the third shelf position.
Use the function: True Fan Cooking.
Use a baking tray.
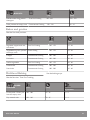
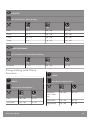
CAKES / PASTRIES / BREADS
(°C) (min)
Cake with crumble topping 150 - 160 20 - 40
Fruit flans (made of yeast dough / sponge cake mix-
ture), use a deep pan
150 35 - 55
Fruit flans made of short pastry 160 - 170 40 - 80
Preheat the empty oven.
Oven User Manual
19

Use the function: Conventional Cooking.
Use a baking tray.
CAKES /
PASTRIES / BREADS (°C) (min)
Swiss roll 180 - 200 10 - 20 3
Rye bread: first: 230 20 1
then: 160 - 180 30 - 60
Buttered almond cake /
Sugar cakes
190 - 210 20 - 30 3
Cream puffs / Eclairs 190 - 210 20 - 35 3
Plaited bread / Bread
crown
170 - 190 30 - 40 3
Fruit flans (made of yeast
dough / sponge cake mix-
ture), use a deep pan
170 35 - 55 3
Yeast cakes with delicate
toppings (e.g. quark,
cream, custard)
160 - 180 40 - 80 3
Christstollen 160 - 180 50 - 70 2
Use the third shelf position.
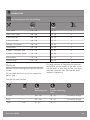
BISCUITS
(°C) (min)
Short pastry biscuits True Fan Cooking 150 - 160 10 - 20
Rolls, preheat the empty oven True Fan Cooking 160 10 - 25
Biscuits made of sponge cake
mixture
True Fan Cooking 150 - 160 15 - 20
Puff pastries, preheat the
empty oven
True Fan Cooking 170 - 180 20 - 30
Biscuits made of yeast dough True Fan Cooking 150 - 160 20 - 40
Macaroons True Fan Cooking 100 - 120 30 - 50
Oven User Manual20
Page is loading ...
Page is loading ...
Page is loading ...
Page is loading ...
Page is loading ...
Page is loading ...
Page is loading ...
Page is loading ...
Page is loading ...
Page is loading ...
Page is loading ...
Page is loading ...
Page is loading ...
Page is loading ...
Page is loading ...
Page is loading ...
Page is loading ...
Page is loading ...
Page is loading ...
Page is loading ...
Page is loading ...
Page is loading ...
Page is loading ...
Page is loading ...
-
 1
1
-
 2
2
-
 3
3
-
 4
4
-
 5
5
-
 6
6
-
 7
7
-
 8
8
-
 9
9
-
 10
10
-
 11
11
-
 12
12
-
 13
13
-
 14
14
-
 15
15
-
 16
16
-
 17
17
-
 18
18
-
 19
19
-
 20
20
-
 21
21
-
 22
22
-
 23
23
-
 24
24
-
 25
25
-
 26
26
-
 27
27
-
 28
28
-
 29
29
-
 30
30
-
 31
31
-
 32
32
-
 33
33
-
 34
34
-
 35
35
-
 36
36
-
 37
37
-
 38
38
-
 39
39
-
 40
40
-
 41
41
-
 42
42
-
 43
43
-
 44
44


