Page is loading ...

CONTROL PANEL
BKDW-515
INSTALLATION AND MAINTENANCE MANUAL
1st Edition (Revised 3)
DIGITAL VIDEOCASSETTE RECORDER
DVW-A500/1
DVW-500/1
DVW-A500P/1
DVW-500P/1

BKDW-515
! WARNING
This manual is intended for qualified service personnel only.
To reduce the risk of electric shock, fire or injury, do not perform any servicing other than that
contained in the operating instructions unless you are qualified to do so. Refer all servicing to
qualified service personnel.
! WARNUNG
Die Anleitung ist nur für qualifiziertes Fachpersonal bestimmt.
Alle Wartungsarbeiten dürfen nur von qualifiziertem Fachpersonal ausgeführt werden. Um die
Gefahr eines elektrischen Schlages, Feuergefahr und Verletzungen zu vermeiden, sind bei
Wartungsarbeiten strikt die Angaben in der Anleitung zu befolgen. Andere als die angegeben
Wartungsarbeiten dürfen nur von Personen ausgeführt werden, die eine spezielle Befähigung
dazu besitzen.
! AVERTISSEMENT
Ce manual est destiné uniquement aux personnes compétentes en charge de l’entretien. Afin
de réduire les risques de décharge électrique, d’incendie ou de blessure n’effectuer que les
réparations indiquées dans le mode d’emploi à moins d’être qualifié pour en effectuer d’autres.
Pour toute réparation faire appel à une personne compétente uniquement.
DVW-A500/1 Serial No. 50001 and Higher
DVW-500/1 Serial No. 50001 and Higher
DVW-A500P/1 Serial No. 50001 and Higher
DVW-500P/1 Serial No. 50001 and Higher
BKDW-515 Serial No. 10001 and Higher
BKDW-515

BKDW-515
CAUTION
Danger of explosion if battery is incorrectly
replaced.
Replace only with the same or equivalent type
recommended by the manufacturer.
Dispose of used batteries according to the
manufacturer's instructions.
Vorsicht!
Explosionsgefahr bei unsachgemäßem
Austausch der Batterie.
Ersatz nur durch denselben oder einen vom
Hersteller empfohlenen ähnlichen Typ.
Entsorgung gebrauchter Batterien nach Angaben
des Herstellers.
ATTENTION
Il y a danger d'explosion s'il y a remplacement
incorrect de la batterie.
Remplacer uniquement avec une batterie du
même type ou d'un type équivalent recommandé
par le constructeur.
Mettre au rebut les batteries usagées
conformément aux instructions du fabricant.
ADVARSEL!
Lithiumbatteri-Eksplosionsfare ved fejlagtig
håndtering.
Udskiftning må kun ske med batteri
af samme fabrikat og type.
Levér det brugte batteri tilbage til leverandøren.
Voor de klanten in Nederland
Dit apparaat bevat een (CF)n-Li batterij voor memory
back-up.
Raadpleeg uw leverancier over de verwijdering van de
batterij op het moment dat u het apparaat bij einde
levensduur afdankt.
Gooi de batterij niet weg. maar lever hem in als KCA.
Bij dit produkt zijn batterijen geleverd.
Wanneer deze leeg zijn, moet u ze niet
weggooien maar inleveren als KCA.


1
BKDW-515
Table of Contents
Manual Structure
Purpose of this manual .............................................................................................. 3
Contents ..................................................................................................................... 3
Relative manuals ....................................................................................................... 4
1. Installation
1-1. Installation of Control Panel .......................................................................1-1
1-2. SYS1, SYS2 ROM Versions.......................................................................1-2
1-3. Removal of Control Panel / Replacement of Arms.....................................1-2
1-4. Installation of Sub Panel Cover and Switch Cover .....................................1-3
1-5. Installation of Control Panel .......................................................................1-3
1-6. Installation Space ........................................................................................1-4
1-7. Full Reset of Control Panel .........................................................................1-5
1-8. Extension of Control Panel .........................................................................1-5
2. Service Information
2-1. Location and Function of Printed Circuit Boards .......................................2-1
2-2. Replacing the Battery for Memory Backup ................................................2-2
2-3. EL Panel Replacement ................................................................................2-3
2-4. Error Message .............................................................................................2-4
2-4-1. Operation when Checksum Error
of Current Setup Data Occurs ....................................................2-4
2-4-2. Correction when Checksum Error
of VTR Bank Data Occurs .........................................................2-4
2-4-3. Correction when Checksum Error
of Memory Card Data Occurs ....................................................2-4
3. Setup Menu
3-1. ITEM-F Series.............................................................................................3-1

2
BKDW-515
4. Maintenance Menu
4-1. ROM Version ..............................................................................................4-1
4-2. VTR Maintenance Menu.............................................................................4-1
4-3. Panel Maintenance Menu ............................................................................4-2
4-3-1. Card Interface Test .....................................................................4-2
4-3-2. Buzzer Test.................................................................................4-2
4-3-3. EL Panel Test .............................................................................4-3
4-3-4. Key Test .....................................................................................4-3
4-3-5. Dial Test .....................................................................................4-3
4-4. Error Logger................................................................................................4-4
5. Block Diagram
6. Spare Parts
6-1. Notes on Repair Parts..................................................................................6-1
6-2. Spare Parts List for VTR.............................................................................6-2
6-3. Packing Materials and Supplied Accessories List for VTR........................6-3
6-4. Spare Parts List for Control Panel...............................................................6-4
6-5 Packing Materials and Supplied Accessories List for BKDW-515 ............6-6

3
BKDW-515
Manual Structure
Purpose of this manual
This Manual describes the installation instructions for the digital videocassette
recorder DVW-A500/1, 500/1, A500P/1, 500P/1 and the Control panel BKDW-515.
This manual contains the information necessary when supplying and installing the
unit, assuming use by system/service engineers.
Contents
The sections covered in the manual are summarized below to give you a general
under standing of the manual.
Section 1 Installation
Explains the installation of the control panel.
Section 2 Service Overview
Explains replacement of the memory backup battery and EL panel.
Section 3 Setup Menu
Explains Setup menu of ITEM-F series only. As for ITEM-H00 to ITEM-900 series,
refer to Operation Manual.
Section 4 Maintenance Menu
Explains VTR Maintenance Menu and PANEL Maintenance menu.
Section 5 Block Diagram
Describes the overall block diagram.
Section 6 Spare parts
Describes the exploded views for the this unit, mounted boards list, packing list, and
standard accessories list.

4
BKDW-515
Relative manuals
Besides this “Installation and Maintenance Manual”, the following manuals are
available.
• Operation Manual (Supplied with the VTR or the BKDW-515)
This manual is necessary for application and operation of the VTR.
• Installation Manual (Supplied with the VTR)
This manual describes the items are required to install the VTR and its peripherals.
If the BKDW-514 control panel is used, refer to this manual.
• Maintenance Manual Part 1 (Supplied with the VTR)
This manual describes the periodic maintenance and servicing information
necessary for the principal block and board replacement.
• Maintenance Manual Part 2 (available on request)
These manuals describes detailed information necessary for general parts replace-
ment and includes alignments, schematic diagrams, board layouts, detailed parts
list, etc.
Please contact the Sony service organization to obtain a copy of the manuals.
• Protocol Manual (available on request)
PROTOCOL OF REMOTE-1 (9Pin) CONNECTOR
This Manual describes the protocol information necessary for controlling the VTR
via RS-422A (9-pin serial remote).

1-1
BKDW-515
n
The BKDW-515 cannot be installed in the BKDW-511
Control Panel Case.
for DVW-A500/1, DVW500/1,
DVW-A500P/1, DVW-500P/1
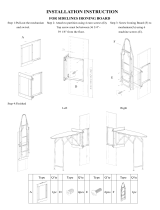
1-1. Installation of Control Panel
1. Fix a dummy panel for shipping use at 90 degrees.
2. Loosen the two black screws on the dummy panel.
(Loosen the screws until screw’s top are exposed from
the surface of the dummy panel.)
3. While pushing the loosened black screws in the
direction of the arrow, remove the dummy panel
assembly from the arms.
Section 1
Installation
4. Fix the both arms at 45 degrees.
5. Connect the harness of the control panel to the connec-
tor (CN580) on the system set-up panel.
6. Set the notches of the control panel to the claws of the
arms, and push the control panel until making a click
sound.
n
Push the head of the two screws when the hook does
not move smoothly and when the panel is difficult to
attach. This facilitates the attaching.
7. Then tighten the two screws.
Screw
(B3x12)
Dummy panel
Screw(B3x12)
CN580
Notches
Control panel
Screw
(B3x12)
Claws
Claws
Notches

1-2
BKDW-515
4. While pushing the loosened black screws in the
direction of the arrow, remove the lower control panel
assembly from the arms.
5. Remove the screws as shown in Figure, and remove
both side arms.
6. Install the arms supplied with BKDW-515.
SLIDER AD (R) ASSY: X-3678-375-
SLIDER AD (L) ASSY: X-3678-376-
for DVW-A500, DVW500,
DVW-A500P, DVW-500P
1-2. SYS1, SYS2 ROM Versions
The control panel BKDW-515 is applicable to the ROMs
on the SS-52 board with the following version.
SYS1: 4.0 and higher
SYS2: 4.0 and higher
If the ROMs with lower version than above are used,
please contact Sony’s service organization.
Make sure the ROM’s version through the maintenance
mode before replacement of the control panel.
1-3. Removal of Control Panel /
Replacement of Arms
1. Fix a lower control panel at 90 degrees.
2. Disconnect the connector (CN580) in the system set-
up panel.
3. Loosen the two black screws on the lower control
panel. (Loosen the screws until screw’s top are
exposed from the surface of the lower control panel.)
1-2. SYS1, SYS2 ROM Versions
1-3. Removal of Control Panel / Replacement of Arms
Lower control panel
Screw(B3
x12)
CN580
System setup
panel.
Screw
(
B3x12
)
Screw
(
B3x12
)
Lower control panel
Screws
(B3x6)
Screw
(B3x6)
Arm
Screws
(B3x6)
Screw
(B3x6)
Arm

1-3
BKDW-515
Sub panel cover
Screw
(BVTT3x6)
Screw
(BVTT3x6)
1-4. Installation of Sub Panel Cover and
Switch Cover
1. Install the sub panel cover supplied with BKDW-515
to sub control panel.
2. Install the switch cover supplied with BKDW-515 to
system set-up panel.
1-5. Installation of Control Panel
1. Fix the both arms at 45 degrees.
2. Connect the harness of the control panel to the connec-
tor (CN580) on the system set-up panel.
3. Set the notches of the control panel to the claws of the
arms, and push the control panel until making a click
sound.
n
Push the head of the two screws when the hook does
not move smoothly and when the panel is difficult to
attach. This facilitates the attaching.
4. Then tighten the two screws.
1-4. Installation of Sub Panel Cover and Switch Cover
1-5. Installation of Control Panel
Switch cover
Screw
(BVTT3x6)
Screw
(BVTT3x6)
CN580
Notches
Control panel
Screw
(B3x12)
Claws
Claws
Notches

1-4
BKDW-515
1-6. Installation Space
Notes on Installation on Cart Machine
. When the digital Betacam recorder is to be mounted on
the LMS, you can install not the control panel BKDW-
515 but the BKDW-514 to the recorder.
. When the digital Betacam recorder is to be mounted on
the FLEXICART, you can install both of BKDW-514/
515 to the recorder.
As for how to mount the unit in a rack, refer to the Installa-
tion Manual supplied with the DVW series.
364
427
31.5
166.5
33
11.5
457.5
568.5
18.3
218
19
427
434
553
112.5
377.4 23.3
177.680.4
424
118.5
51.7
45.5
22
9.6
16.3
46.2
93.4
26.5
BKDW-515
DVW-A500/1
500/1
A500P/1
500P/1
1-6. Installation Space

1-5
BKDW-515
1-8. Extension of Control Panel
To extend the BKDW-515, prepare the following BKDW-
510 (Control Panel Extension Kit), AC adapter and the
connector box.
Parts Required
. 10m Extension Cable (BKDW-510)
. AC Adapter
Sony Part No.: 1-473-822-11
. Connector Box
Sony Part No.: A-8277-618-A
n
The control panel BKDW-515 can not be installed to the
control panel case BKDW-511 (sold separately).
Connection
. AC100V and AC200V acceptable for AC adapter
. There is power switch on the connector box.
1. Connect the connector of the BKDW-515 to connector
of the connector box.
2. Connect the connector of an AC adapter to connector
CN3 of the connector box.
1-7. Full Reset of Control Panel
After installing the control panel in DVW-A500 and
DVW-500 (DVW-A500P and DVW-500P for PAL),
perform the full-reset operation of the control panel only
once before it is used.
m
. When the full-reset operation of the control panel is
performed, all settings of the current setup data and VTR
bank (1-8) stored on the control panel are reset to the
factory-setting value. The registration data in a PF1/2
menu is then reset to the key layout at the factory
corresponding to the VTR in which the control panel
was installed. Cue point data is also cleared.
. During installation of the control panel, the set value of
the current setup data and VTR bank can also be deliv-
ered directly. In this case, do not perform the full-reset
operation. However, if the function and option of the
VTR in which the control panel was installed differ
before and after installation, the key in a PF1/2 menu
that does not function by the VTR after installation is
deleted automatically. For the key in a PF1/2 menu that
has been deleted because it does not function by the
VTR before installation, assign it manually by the VTR
after installation as required.
1. Turn off the power switch.
2. Turn on the power switch while pressing and holding
the [SFT], [RCL], and [SETUP] keys on the control
panel. Maintain the state in which these keys were
pressed.
3. Release the three keys after confirming that message
“CONTROL PANEL FULL RESET” is displayed on
the EL panel.
AC Adaptor
BKDW-515
Power
switch
CN4
to DVW-500/1
Rear panel
CN3
Connector box
DC9V 10m Cable
AC100/200V
1-7. Full Reset of Control Panel
1-8. Extension of Control Panel

1-6
BKDW-515
1-8. Extension of Control Panel
Notes when connecting the two BKDW-515
. Setup Setting Data
The Current Setup setting data inside of the BKDW-515
is transferred to the VTR just after the communication
between the BKDW-515 and VTR are established. The
ALARM LED on the front panel blinks during the data
communication is incomplete.
When the two BKDW-515 are connected to a single
VTR, last setting data out of two is written over the
former data as the effective setting data.
If the two BKDW-515 with different data setting are
connected to a single VTR, and if the power is turned to
ON simultaneously, un-defined setting data will be sent
to the VTR. Therefore, first, connect either BKDW-515
to a single VTR for storing the Current Setup setting data
in bank memory of VTR or in the memory card before-
hand. After that, connect the two BKDW-515 to a single
VTR, turn on the power of both BKDW-515, then copy
the memorized data into Current Setup. The Current
Setup setting data among the two BKDW-515 and VTR
will be automatically renewed to keep the contents of
data identical.
. VTR Control
Control of VTR is set by an INT/EXT selection of the
System Setup Panel and ITEM 117 “CONTROL PAN-
EL SELECTION” of the setup menu.
Notes when connection the BKDW-514 and
BKDW-515 (Extender)
When connecting the BKDW-514 and BKDW-515
(Extender) to VTR, be sure to turn on the power of
BKDW-515 first. If the power of BKDW-515 is in off,
start up a menu system (SETUP MENU BANK 1/2/3/4:
BANK 4 is effective from SYS-V3.01 and later) of DVW-
500 series, therefore the contents set with BKDW-515 can
not be used. If MENU lamps 1, 2, and 3 on the indicator
section of VTR’s upper control panel are off, the contents
set with BKDW-515 can be used.
Pay attention when pressing the MENU button without
pressing the SET button after renewing the Setup setting
data with BKDW-514, because renewed data will be
validated if both BKDW-514 and BKDW-515 have been
connected regardless of SET button. However, renewed
data will be invalidated if the only BKDW-514 has been
connected.

2-1
BKDW-515
SW-749
CP-266
PTC-69
KY-330
Section 2
Service Information
2-1. Location and Function of Printed Circuit Boards
Board Name Circuit Function
CP-266 Panel Control CPU, EL Control, PIO, Memory Card I/F
KY-330 Editing Operation/Tape Transport Control Switches, Memory Card Connector
SW-749 Function Control Switches
PTC-69 JOG/Shuttle Dial Sensor

2-2
BKDW-515
BT1 inserted into a socket in IC113 (memory for storing
setup data and cue data) on the CP-266 board is a battery
for memory backup.
m
. Replace a battery for memory backup every seven years.
. Store all the setup data (cue data if necessary) in a
memory card before replacing the Battery for memory
backup. (For more details on storage, refer to the Opera-
tion Manual.)
1. Turn off the power switch.
2. Disconnect the connector CN580 on the system setup
panel and remove the control panel.
3. Remove the four screws, then remove the cover.
4. Insert the tip of a flatbladed screwdriver between
IC113 and BT1 to remove BT1.
5. Align a new battery for memory backup with the 1-pin
mark of IC113, then insert.
6. Assemble the control panel and install it in the unit.
7. Access the data in a memory card.
. BT1 : 1-767-156-11 M4T28-BR12SH1 (lithium battery)
2-2. Replacing the Battery for Memory Backup
2-2. Replacing the Battery for Memory Backup
Cover
Screw
(BVTT3x6)
IC113
Screw
(BVTT3x6)
Screws
(BVTT3x6)
BT1
IC113
Flatbladed screwdriver
CP-266
Mark
Mark

2-3
BKDW-515
Screws
(PSW3x10)
EL panel
CP266
CN7
Screws
(PSW3x10)
Cover
Screws(BVTT3
x
6)
SW-749
CN1
Screws
(BVTT3
x
6)
Screws
(BVTT3
x
6)
Screw
(BVTT3
x
6)
Screw
(BVTT3
x
6)
Screw
(BVTT3
x
6)
2-3. EL Panel Replacement
1. Turn off the power switch.
2. Disconnect CN580 on the system setup panel and
remove the control panel.
3. Remove the four screws, then remove the cover.
4. Remove the seven screws and disconnect connector
CN1 on the SW-749 board with the frame lifted from
the key panel sub-ass’y.
5. Disconnect connector CN7 on the CP-266 board and
remove the four screws, then remove the EL panel.
6. Confirm that no dust adheres on the panel and install
in the reverse order of steps 1 to 5.
2-3. EL Panel Replacement

2-4
BKDW-515
2-4. Error Message
2-4-1. Operation when Checksum Error of
Current Setup Data Occurs
If the power switch is turned on when the current setup
data on the control panel was destroyed for some trouble,
message “CURRENT setup DATA ERROR” is displayed
on the EL panel. The current setup data is automatically
reset to the factory-setting value at the same time.
2-4-2. Correction when Checksum Error of
VTR Bank Data Occurs
If the power switch is turned on when the VTR bank data
on the control panel was destroyed for some trouble,
message “VTR bank CHECKSUM ERROR” is displayed
on the EL panel. Confirm the type of the bank data to have
been destroyed in a VTR BANK menu or MEMORY
CARD menu and copy normal bank data. The title of the
destroyed bank data is displayed as “DAMAGED.”
2-4-3. Correction when Checksum Error of
Memory Card Data Occurs
If the memory card is inserted into the slot on the control
panel when the data of a memory card was destroyed for
some trouble, message “Data DAMAGED” is displayed on
the EL panel. Confirm the destroyed bank data or cue set
data and copy normal data. The title of the destroyed data
is displayed as “DAMAGED” (for only WRITE PRO-
TECT OFF in a memory card).
2-4. Error Message

3-1
BKDW-515
Section 3
Setup Menu
This section describes the menu ITEM-F series used during adjustment. For the operation and ITEM-H00
to ITEM-900 series, refer to the Operation Manual.
3-1. ITEM-F Series
Display the ITEM-F series according to the procedure below.
1. Press the SETUP key to enter the setup menu.
2. Press the F6 (VTR SETUP) key to enter the VTR SETUP menu.
3. Press the cursor key while pressing the PLAY button.
Item selection
Press the cursor key while pressing the PLAY button and adjust the cursor on the scroll screen to the
arbitrary item.
Data change
Press the F7 (CHANGE DATA) key to open the set change screen and select the data.
Data setting
Press the F10 (SAVE/EXIT) key.
n
These ITEM-F series are exclusively used for adjustment. After adjustment is completed, return data to
the factory setting.
ITEM DATA Description
No. ITEM No. DATA
F01 AUDIO NR IN 0 on This item is prepared exclusively for audio adjustment. After adjustment is
SP MODE 1 switch select completed, return to the factory setting ‘0 (on)’.
Select the type of control to turn Dolby noise reduction ON in the metal tape
playback.
0: Dolby NR is normally ON when mental tape is used.
1: Dolby NR is switched ON and OFF depending upon the DOLBY NR switch
setting on the sub control panel.
(NOTE)
When oxide tape is used, it is controlled depending upon the DOLBY NR switch
setting on the sub control panel, regardless of the setting of this menu item.
F02 EMERGENCY 0 enable This item is prepared exclusively for servo and mechanical adjustments. After
TAPE 1 disable adjustment is completed, return to the factory setting ‘0 (enable)’.
PROTECTION Select whether the emergency tape protection operation is enabled or not when
VTR detects error in tape transport mechanism.
0: Tape protection operation is enabled.
1: Tape protection operation is disabled.
F07 CONFI SELECT 0 disable Selects the playback by the confidence head enable or disable in the normal PB
IN PB MODE 1 enable mode of the digital mode.
0: Disables the playback by the confidence head in the normal PB mode.
1: Enables the playback by the confidence head when the CONFI mode is
entered (the CONFI lamp on the lower control panel lights) in the normal PB
mode.

3-2
BKDW-515
ITEM DATA Description
No. ITEM No. DATA
F13 TRACKING 0 off Select whether the tracking control operation with search dial is enabled or not
CONTROL VIA 1 on during DT head playback.
SEARCH DIAL This item is prepared exclusively for DT adjustment and tracking adjustments.
After adjustment is completed, return to the factory setting ‘0 (off)’.
0: Tracking control function is disabled during DT head playback.
1: Tracking control function is enabled by rotating the search dial during PLAY
mode.
F15 ANALOG TAPE 0 disable Enables LTC to be inserted in an analog tape (Betacam SP)
LTC INSERT 1 enable 0: Inhibits insertion of LTC in an analog tape (factory setting)
1: Enables LTC to be inserted in an analog tape
Note:
When set to “enable”, TC insert operation is executed even though the REC inhibit
tab of an analog tape used is set to REC INHIBIT.
F16 DEVICE TYPE 0000 0 Determines the response data for the 9 pin remote command
MODIFY:0H 0001 1 DEVICE TYPE REQUEST (00h, 11h).
| | 0000: Returns the original device type data of the DVW.
FFFF FFFF Except 0000: Returns the values numeric as it is.
The higher-order two digits are DATA-1.
The lower-order two digits are DATA-2.
Note:
The whole operations of the VTR including TTP is not influenced at all even if this
item is set to “0000” or “except 0000”.
For except DATA: 0000 (factory setting), the control from 9 pin is not guaranteed.
3-1. ITEM-F Series
/