JVC GV-LS1 U User manual

Category
Camcorders
Type
User manual

JVC GV-LS1 U is a live streaming camera that allows you to broadcast live video and audio directly to the internet. With its compact size and lightweight design, you can easily take it with you wherever you go. It features Full HD video recording, a built-in microphone, and support for external microphones and headphones. You can also connect it to your computer via USB to use it as a webcam.

JVC GV-LS1 U is a live streaming camera that allows you to broadcast live video and audio directly to the internet. With its compact size and lightweight design, you can easily take it with you wherever you go. It features Full HD video recording, a built-in microphone, and support for external microphones and headphones. You can also connect it to your computer via USB to use it as a webcam.

Live Streaming Camera
GV-LS1
U
Basic User Guide
Dear Customers
Thank you for purchasing this JVC product.
Before use, please read the Safety Precautions and Cautions on p.2 and p.4 to ensure
use of this product.
This product is provided with "Basic User Guide" (this manual) and "Detailed User
Guide". For more details on operating this product, please refer to the "Detailed User
Guide" at the following website.
http://manual3.jvckenwood.com/
Detailed User Guide
EN
LYT2498-001A-M
Safety Precautions ................................2
Cautions ................................................4
About drip-proof performance................6
Verifying the Accessories ......................7
Component Names and Functions ........8
Attaching/Removing Devices .................9
Preparation before Use........................10
Using the Camera ................................12
Specifi cations ......................................14
Contents
For Future Reference:
Enter the Model No. (located on the bottom
of the camera) and Serial No. (located on the
battery pack mount of the camera) below.
Model No.
Serial No.
ENGLISH
FRANÇAIS
ESPAÑOL
PORTUGUÊS
2
For more details, refer to the Detailed User Guide at http://manual3.jvckenwood.com/
Safety Precautions
NOTES:
• The rating plate and safety caution are on the
bottom and/or the back of the main unit.
• The serial number plate is on the battery pack
mount.
• The rating information and safety caution of the AC
adapter are on its upper and lower sides.
Make a backup of important recorded data
JVC will not be responsible for any lost data.
It is recommended to copy your important recorded
data to a disc or other recording media for storage
once every 3 months.
WARNING:
The battery pack and the camcorder with battery
installed should not be exposed to excessive heat
such as direct sunlight, fi re or the like.
When the equipment is installed in a cabinet or on
a shelf, make sure that it has suffi cient space on all
sides to allow for ventilation (10 cm (3-15/16") or
more on both sides, on top and at the rear).
Do not block the ventilation holes.
(If the ventilation holes are blocked by a newspaper,
or cloth etc. the heat may not be able to get out.)
No naked fl ame sources, such as lighted candles,
should be placed on the apparatus.
When discarding batteries, environmental problems
must be considered and the local rules or laws
governing the disposal of these batteries must be
followed strictly.
The apparatus shall not be exposed to dripping or
splashing.
Do not use this equipment in a bathroom or places
with water.
Also do not place any containers fi lled with water
or liquids (such as cosmetics or medicines, fl ower
vases, potted plants, cups etc.) on top of this unit. (If
water or liquid is allowed to enter this equipment, fi re
or electric shock may be caused.)
Do not point the lens directly into the sun. This
can cause eye injuries, as well as lead to the
malfunctioning of internal circuitry. There is also a risk
of fi re or electric shock.
CAUTION!
The following notes concern possible physical
damage to this unit and to the user.
Do not use a tripod on unsteady or unlevel surfaces.
It could tip over, causing serious damage to the unit.
CAUTION!
Connecting cables (Audio/Video, etc.) to this unit
and leaving it on top of the TV is not recommended,
as tripping on the cables will cause this unit to fall,
resulting in damage.
CAUTION:
The mains plug shall remain readily operable.
• Remove the mains plug immediately if the
camcorder functions abnormally.
CAUTION:
• Dispose of used batteries according to the
instructions.
• Risk of explosion if battery is replaced by an
incorrect type.
WARNING
For PLUGGABLE EQUIPMENT, the socket outlet
shall be installed near the equipment and shall be
easily accessible.
WARNING: TO PREVENT FIRE OR SHOCK
HAZARD, DO NOT EXPOSE THIS UNIT TO
RAIN OR MOISTURE.
The lightning fl ash with arrowhead symbol, within
an equilateral triangle, is intended to alert the user
to the presence of uninsulated "dangerous voltage"
within the product's enclosure that may be of
suffi cient magnitude to constitute a risk of electric
shock to persons.
The exclamation point within an equilateral triangle
is intended to alert the user to the presence of
important operating and maintenance (servicing)
instructions in the literature accompanying the
appliance.
For USA-California Only
This product contains a CR Coin Cell Lithium
Battery which contains Perchlorate Material
– special handling may apply.
See www.dtsc.ca.gov/hazardouswaste/perchlorate
3
For more details, refer to the Detailed User Guide at http://manual3.jvckenwood.com/
If this symbol is shown, it is only valid in
the European Union.
IMPORTANT SAFETY INSTRUCTIONS
1. Read these instructions.
2. Keep these instructions.
3. Heed all warnings.
4. Follow all instructions.
5. Do not use this apparatus near water.
6. Clean only with dry cloth.
7. Do not block any ventilation openings. Install in
accordance with the manufacturer' s instructions.
8. Do not install near any heat sources such as
radiators, heat registers, stoves, or other apparatus
(including amplifi ers) that produce heat.
9. Protect the power cord from being walked on
or pinched particularly at plugs, convenience
receptacles, and the point where they exit from the
apparatus.
10. Only use attachments/accessories specifi ed by the
manufacturer.
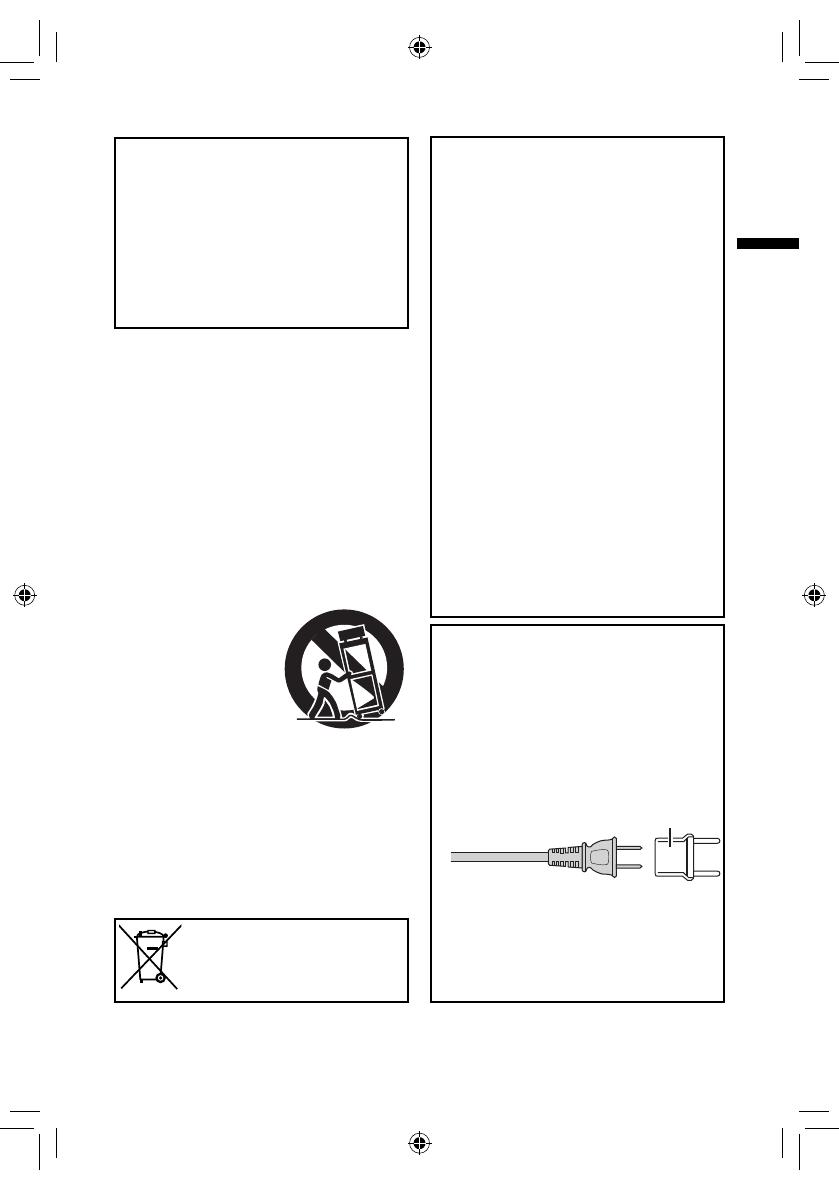
11. Use only with the cart,
stand, tripod, bracket,
or table specifi ed by the
manufacturer, or sold with
the apparatus.
When a cart is used, use
caution when moving the
cart/apparatus combination
to avoid injury from tip-over.
12. Unplug this apparatus during lightning storms or
when unused for long periods of time.
13. Refer all servicing to qualifi ed service personnel.
Servicing is required when the apparatus has been
damaged in any way, such as power-supply cord or
plug is damaged, liquid has been spilled or objects
have fallen into the apparatus, the apparatus has
been exposed to rain or moisture, does not operate
normally, or has been dropped.
Remember that this unit is intended for private
consumer use only.
Any commercial use without proper permission is
prohibited. (Even if you record an event such as a show,
performance or exhibition for personal enjoyment, it
is strongly recommended that you obtain permission
beforehand.)
Trademarks
AVCHD and AVCHD logo are trademarks of Panasonic
Corporation and Sony Corporation.
Manufactured under license from Dolby Laboratories.
Dolby and the double-D symbol are trademarks of Dolby
Laboratories.
Android™ is a trademark of Google Inc.
• Windows
®
is either registered trademark or trademark of
Microsoft Corporation in the United States and/or other
countries.
iPod, iPhone, iMovie and iPhoto are trademarks of
Apple Inc., registered in the U.S. and other countries.
Intel, Intel Core, and Pentium are trademarks or
registered trademarks of Intel Corporation or its
subsidiaries in the United States and other countries.
Wi-Fi, Wi-Fi logo, Wi-Fi CERTIFIED, Wi-Fi CERTIFIED
logo, WPA, and WPA2 are trademarks or registered
trademarks of Wi-Fi Alliance.
Other product and company names included in this
instruction manual are trademarks and/or registered
trademarks of their respective holders. Marks such as
™ and
®
have been omitted in this manual.
When using the AC adapter in areas other than
the USA
The provided AC adapter features automatic voltage
selection in the AC range from 110 V to 240 V.
USING HOUSEHOLD AC PLUG ADAPTER
In case of connecting the unit's power cord to an AC
wall outlet other than American National Standard C73
series type use an AC plug adapter, called a "Siemens
Plug", as shown.
For this AC plug adapter, consult your nearest JVC
dealer.
Remove the AC adapter from the AC wall outlet when
not in use.
Do not leave dust or metal objects adhered to the AC
wall outlet or AC adapter (power/DC plug).
Be sure to use the supplied AC adapter.
Do not use the supplied AC adapter with other
devices.
CAUTION:
To maintain compliance with FCC' s RF exposure
guidelines, use only the supplied antenna.
Unauthorized antenna, modifi cation, or attachments
could damage the transmitter and may violate FCC
regulations.
This device complies with Part 15 of the FCC Rules.
Operation is subject to the following two conditions:
(1) This device may not cause harmful interference.
(2) This device must accept any interference received,
including interference that may Cause undesired
operation.
Plug Adapter
4
For more details, refer to the Detailed User Guide at http://manual3.jvckenwood.com/
Cautions
Recording Medium
• Be sure to follow the guidelines below to
prevent corruption or damage to your recorded
data.
• Do not bend or drop the recording medium, or
subject it to strong pressure, jolts or vibrations.
• Do not splash the recording medium with water.
• Do not use, replace, or store the recording
medium in locations that are exposed to strong
static electricity or electrical noise.
• Do not turn off the camcorder power or remove
the battery or AC adapter during shooting,
playback, or when otherwise accessing the
recording medium.
Do not bring the recording medium near objects
that have a strong magnetic field or that emit
strong electromagnetic waves.
• Do not store the recording medium in locations
with high temperature or high humidity.
• Do not touch the metal parts.
• When formatting or erasing data using the
camcorder, only the file administration information
is changed. The data is not completely erased from
the recording medium.If you want to completely
erase all of the data, we recommend either using
commercially available software that is specially
designed for that purpose, or by physically
destroying the camcorder with a hammer etc.
Main Unit
For safety, DO NOT
... open the camcorder's chassis.
... disassemble or modify the unit.
... allow infl ammables, water or metallic objects to
enter the unit.
... remove the battery pack or disconnect the
power supply while the power is on.
... leave the battery pack attached when the
camcorder is not in use.
... place naked fl ame sources, such as lighted
candles, on the apparatus.
... expose the apparatus to dripping or splashing.
... leave dust or metal objects adhered to the
power plug or an AC wall outlet.
... insert any objects in the camcorder.
Avoid using the unit
... in places subject to excessive humidity or dust.
... in places subject to soot or steam such as near
a cooking stove.
... near appliances generating strong magnetic
or electric fi elds (speakers, broadcasting
antennas, etc.).
... in places subject to extremely high (over 40°C
or 104°F) or extremely low (under 0°C or 32°F)
temperatures.
DO NOT leave the unit
... in places of over 50°C (122°F).
... in places where humidity is extremely low
(below 35%) or extremely high (above 80%).
... in direct sunlight.
... in a closed car in summer.
... near a heater.
... in high places such as on a TV. Leaving the unit
in high places while a cable is connected may
result in a malfunction if the cable is caught and
the unit falls onto the fl oor.
To protect the unit, DO NOT
... allow it to become wet.
... drop the unit or strike it against hard objects.
... subject it to shock or excessive vibration during
transportation.
... keep the lens directed at extremely bright
objects for long periods.
... expose the lens to direct sunlight.
... swing it excessively when using the hand strap.
... swing the soft camcorder case excessively
when the camcorder is inside it.
... store the camcorder in a dusty or sandy area.
To prevent the unit from dropping,
• When using the camcorder with a tripod, attach
the camcorder to the tripod securely.
If the camcorder drops, you may be injured and the
camcorder may be damaged.
When a child uses the unit, there must be parental
guidance.
5
For more details, refer to the Detailed User Guide at http://manual3.jvckenwood.com/
Declaration of Conformity
Model Number : GV-LS1
Trade Name : JVC
Responsible party : JVC AMERICAS CORP.
Address : 1700 Valley Road Wayne, N. J. 07470
Telephone Number : 973-317-5000
This device complies with Part 15 of FCC
Rules. Operation is subject to the following
two conditions: (1) This device may not cause
harmful interference, and (2) this device must
accept any interference received, including
interference that may cause undesired operation.
Changes or modifi cations not approved by JVC
could void the user's authority to operate the
equipment. This equipment has been tested and
found to comply with the limits for a Class B digital
device, pursuant to Part 15 of the FCC Rules.
These limits are designed to provide reasonable
protection against harmful interference in a
residential installation. This equipment generates,
uses, and can radiate radio frequency energy
and, if not installed and used in accordance with
the instructions, may cause harmful interference
to radio communications. However, there is no
guarantee that interference will not occur in a
particular installation. If this equipment does cause
harmful interference to radio or television reception,
which can be determined by turning the equipment
off and on, the user is encouraged to try to correct
the interference by one or more of the following
measures: Reorient or relocate the receiving
antenna. Increase the separation between the
equipment and receiver.
Connect the equipment into an outlet on a
circuit different from that to which the receiver is
connected.
Consult the dealer or an experienced radio/TV
technician for help.
This Class B digital apparatus complies with
Canadian ICES-003.
Cet appareil numérique de la classe B est
conforme à la norme NMB-003 du Canada.
Battery Pack (optional)
The supplied battery pack is a
lithium-ion battery. Before using
the supplied battery pack or an
optional battery pack, be sure to
read the following cautions:
To avoid hazards
... do not burn.
... do not short-circuit the terminals. Keep it
away from metallic objects when not in use.
When transporting, carry the battery in a
plastic bag.
... do not modify or disassemble.
... do not expose the battery to temperatures
exceeding 60°C (140°F), as this may cause
the battery to overheat, explode or catch fi re.
... use only specifi ed chargers.
To prevent damage and prolong
service life
... do not subject to unnecessary shock.
... charge within the temperature range of 10°C
to 35°C (50°F to 95°F). Cooler temperatures
require longer charging time, or in some
cases stop charging at all.
Warmer temperatures prevent complete
charging, or in some cases stop charging at
all.
... store in a cool, dry place. Extended exposure
to high temperatures will increase natural
discharge and shorten service life.
... keep a 30% battery level ( ) if the battery
pack is not to be used for a long period of
time.
In addition, fully charge and then fully
discharge the battery pack every 6 months,
then continue to store it at a 30% battery
level ( ).
... remove from charger or powered unit when
not in use, as some machines use current
even when switched off.
... do not drop or subject to strong impact.
ATTENTION:
The product you have purchased
is powered by a rechargeable
battery that is recyclable.
Please call 1-800-8-BATTERY
for information on how to recycle
this battery.
(USA and Canada only)
Terminals
6
For more details, refer to the Detailed User Guide at http://manual3.jvckenwood.com/
About drip-proof performance
Read the following and use the unit properly.
Malfunctions caused by incorrect usage are not covered by the warranty.
You can use the unit in the rain without trouble.
To use the unit with drip-proof performance, you need the battery (sold separately).
When the unit is exposed to salt water,
wash the unit gently with a soft stream
of water.
Cautions
Do not use a hot dryer to dry the unit;
otherwise, the drip-proof performance
will be decreased.
Do not leave the unit in extremely low
temperature or in high temperature
over 40
˚
C
(in direct sunlight, inside a
car on a hot day, near a heater, etc.);
otherwise, the drip-proof performance
will be decreased.
Do not remove the rear cover or connect
cables while wet.
Note that JVC KENWOOD Corporation
bears no responsibility for any loss of
data by inundation.
We recommend changing the drip-
proof parts once a year to maintain
performance. Contact your nearest
dealer (charge basis).
Before use
1 Attach the battery (sold separately).
2 Attach the rear cover firmly.
Cautions
Do not remove the rear cover while wet.
Do not use the unit in water; otherwise
a malfunction may occur.
The unit is not water proof. Do not
pour water on the unit directory from a
faucet, shower, etc.
After use
Wipe drops of water with a soft cloth
and dry the unit in well ventilated place
avoiding direct sunlight.
Turn the unit upside down to drain water
around the microphone.
Wipe off the stains after removing any
sand, etc. so as not to scratch the unit.
Do not wipe the unit with chemicals,
soaps, neutral detergents,alcohol, etc.
7
For more details, refer to the Detailed User Guide at http://manual3.jvckenwood.com/
Verifying the Accessories
Purchase an SD card separately.
Operation confirmed with the following SD cards.
Manufacturer Panasonic
TOSHIBA
SanDisk
Video Class 4 or higher compatible SD card (2 GB)
Class 4 or higher compatible SDHC card (4 GB to 32 GB)
Class 4 or higher compatible SDXC card (48 GB to 64 GB)
(When recording with video quality "UXP", Class 6 or higher
is recommended.)
Using SD cards (including SDHC/SDXC cards) other than those specified above
may result in recording failure or data loss.
Not all SD card operations are guaranteed. Some operations may not be
performed due to specification changes, etc.
Do not touch the terminals of the SD card. Doing so may cause data loss.
When using the AC adapter overseas, use a commercially available
conversion plug appropriate for the country or region.
AC Adapter *
1
QAL1466-001
AC cord
Software CD-ROM Rear Cover
LAN Cable
Basic User Guide
(This manual)
*1 Use the supplied AC cord when connecting the AC adapter.
8
For more details, refer to the Detailed User Guide at http://manual3.jvckenwood.com/
DIRECT WLAN
RESET
LAN(OFF)
ETHERENT
DC
AV
MIC
PLUG IN POWER
Component Names and Functions
Camera
<Front>
2
!
1
3
6
7
4
=
-
<Top> <Bottom>
<Back>
@
#
$
5
~
80
9
User Guide."
0
SD card slot: For compatible cards,
see p.7.
-
[MIC] terminal: Connect an external
mic.
=
[DC] connector: Connect the
supplied AC adapter.
~
[AV] connector: Connect a separately
purchased AV cord.
!
Hot shoe: Mount camera accessories
or the like.
@
Shooting button: Starts recording. To
stop, press this button again.
#
[WPS] button: Press and hold to
connect wirelessly (Wi-Fi) in WPS
mode for the fi rst time.
$
[POWER] button: Press and hold to
power on. To power off, press and hold
this button again.
%
Tripod mounting hole: Mount a
separately purchased tripod.
1
Internal mic: Transmits/Records
sounds coming through this mic when
no external mic is connected.
2
Lens: Do not touch it directly.
3
LED light: Works as a light in dark
places.
4
Information lamp: Can be lit up to
indicate the recording status, etc.
5
Camera sensor: Adjusts the white
balance automatically.
6
[RESET] button: Resets the network
settings. Press and hold this button
with the tip of a paper clip or the like
when the AC adapter is connected.
7
LAN terminal: Connects to a
computer or router via a LAN cable.
8
Network mode switch: Switches the
network mode.
9
Battery terminal: Connect a
separately purchased battery pack.
(BN-VG139U)
For more details, refer to the "Detailed
%
9
For more details, refer to the Detailed User Guide at http://manual3.jvckenwood.com/
Attaching/Removing Devices
Inserting
Insert the card straight with the terminal
facing to the right.
Push the card in once, and pull it out
straight.
Turn off the power before inserting/removing the SD card.
Make sure that the write protect switch of the SD card is not set to LOCK (writing
protected).
Some cards need to be formatted with this unit. For details, refer to the "Detailed
User Guide".
Removing
Inserting/Removing an SD card
Insert a commercially available SD card before recording.
10
For more details, refer to the Detailed User Guide at http://manual3.jvckenwood.com/
Preparation before Use
Connecting the Camera to
Your Computer
To set up the camera, fi rst connect it to
your computer.
Required operating environment
Browser: Internet Explorer 9 or later
1 Attach the supplied LAN cable to
the camera.
DIRECT WLAN
RESET
LAN(OFF)
ETHERENT
BATT.
DC
AV
MIC
PLUG IN POWER
2 Connect the camera to your
computer via the LAN cable.
3 Set the network mode switch to
[LAN
OFF].
DIRECT WLAN
RESET
LAN(OFF)
ETHERENT
DC
AV
MIC
PLUG IN POWER
DIRECT WLAN LAN(OFF)
If the network mode switch is set to
[DIRECT] or [WLAN], the LAN terminal
cannot be used.
While the power is on, switching the
network mode switch does not change
the setting.
Do not use cables (AV cable,
microphone, etc.) with L-shaped
connecters.
For other ways of connecting, see
"Detailed User Guide".
Connecting the AC Adapter
Connect the supplied AC adapter to the
DC connector.
DIRECT WLAN
RESET
LAN(OFF)
ETHERENT
DC
AV
MIC
PLUG IN POWER
11
For more details, refer to the Detailed User Guide at http://manual3.jvckenwood.com/
Configuring the Camera Settings
Appropriate for Your Needs
Specify the video format, zoom, etc.
appropriate for your needs. Confi gure the
settings on a browser.
Logging in as an administrator
1 If the power is not turned on, press
and hold the [POWER] button to
power on.
The [POWER] button starts blinking.
Wait until it stops blinking and stays lit.
2 Set the Network Setting of the
computer as follows.
IP Address: 192.168.1.2 to
192.168.1.254 (except 192.168.1.100)
(example) 192.168.1.23
Subnet mask: 255.255.255.0
Make a note of the current network
settings before operation for resetting
the network setting.
3 Start Internet Explorer, and enter
"http://192.168.1.100:8000" in the
address bar.
4 Enter the user name and password
of the administrator.
Initial setting: USERNAME "root",
PASSWORD "password".
If login is successful, the setup screen
appears.
Changing the settings
Select "NETWORK", "CAMERA/PAN
TILTER", or "MANAGE" in the left window
of the screen to change the settings. Click
"+" on the left of each item to show the
sub categories.
"NETWORK"
• "WIRED NETWORK"
For establishing a wired connection.
• "WIRELESS NETWORK"
For connecting wirelessly.
"MONITORING SETTINGS"
For connecting via a network.
• "STREAM SETTINGS"
Format for transmitting/recording.
"CAMERA/PAN TILTER"
• "CAMERA SETTINGS"
Camera settings such as zoom.
• "PAN TILTER SETTINGS"
Pantilter settings. Pan/Tilt is available
when zooming is activated.
"MANAGE"
• "COMMON SETTINGS"
Change the password of the
administrator, set the clock, etc.
• "MEDIA MANAGEMENT"
Format the SD card.
"TURN OFF CAMERA"
Turn off the power of the camera.
* The power cannot be turned on via
the browser.
For details, refer to the "Detailed User
Guide".
12
For more details, refer to the Detailed User Guide at http://manual3.jvckenwood.com/
Using the Camera
Installing the Supplied Software
"JVC CAM Control" allows you to control
multiple cameras, change the angle, etc.
1 Insert the supplied software CD-
ROM into the CD/DVD drive of your
computer.
2 Follow the on-screen instructions
to finish the installation.
Viewing on a Browser
Access "http://192.168.1.100:80" by
Internet Explorer.
If you log in using the user name and
password of the administrator or those
set in "MONITORING SETTINGS" (p.11),
you can watch a video on a browser.
To watch a video via a network, the
"MONITORING SETTINGS" (p.11) are
required. Entering the user name and
password of our DDNS service allows
you quick access.
To acquire a DDNS service account,
visit our website
https://dd3.jvckenwood.com/user/
2
4
5
6
3
1
1
Tab: Switch the display. (Monitor:
Camera image and control panel,
File: Images on the SD card, Status:
Message history)
2
Control panel: Controls the camera/
pantilter.
3
Message Bar: Displays an error
message, etc.
4
Logout: Click this to log out.
5
Status: Indicates the current status
such as the remaining battery power.
6
Stream settings: Displays the stream
settings.
<Example of browser>
13
For more details, refer to the Detailed User Guide at http://manual3.jvckenwood.com/
Installing the Application for a
Mobile Terminal
You can pinch, drag, etc. on the touch
panel of a smartphone/tablet computer to
operate the camera intuitively. In addition,
the camera can be panned/tilted by
moving the tablet computer.
1 Download the software appropriate
for your environment.
Smartphone (Android OS 2.3 or later)
Download "JVC CAM Control Single"
from Google Play Store.
Android tablet (Android OS 2.3 or
later, Screen size: 7 inches or more,
Resolution: 1024 x 600 or more)
Download "JVC CAM Control Multi"
from Google Play Store.
iPhone/iPod/iPad touch (iOS 5.1.1 or
later)
Download "JVC CAM Control" from
App Store.
2 Follow the on-screen instructions
to finish the installation.
Streaming Images
Installing the supplied "Camera Driver"
allows you to use this unit as a web
camera. Use the distribution software
such as "Ustream Producer" (http://www.
ustream.tv/producer) or website for the
web camera to stream the images.
“Camera Driver” will be installed along
with “JVC CAM Control.
14
For more details, refer to the Detailed User Guide at http://manual3.jvckenwood.com/
Specifications
Camera
Power supply
Using the AC adapter: DC 5 V, Using a battery pack: DC 3.6 V
Power consumption
4.8 W
Dimensions (mm)
73 x 48 x 89 (2 7/8'' x 1 15/16'' x 3 9/16'') (W × H × D)
Mass Approx. 229
g
(0.51 lbs) (excluding the battery)
Operating
environment
Allowable operating temperature: 0˚
C,
to 40˚
C,
(32˚
F,
to 104˚
F
), Allowable stor-
age temperature: – 20˚
C,
to 50˚
C,
(− 4˚
F,
to 122˚
F
), Allowable relative humidity:
35 % to 80 %
Image element 1/2.3: 12.40 mil. pixels (BSI CMOS)
Image range 5.40 mil. to 2.07 mil. pixels (Image stabilization: OFF)
Lends
F1.2 to F2.8 f = 3.76 (3/16'') mm to 37.6 mm (1 1/2'')
Equivalent to 35 mm (1 7/16'') camera: 29.5 mm (1 3/16'') to 476 mm (18
3/4'')
Zoom Digital zoom: up to 20x
Video recording
method
AVCHD standard certifi ed, Video: AVC/H.264, Audio: Dolby Digital (2ch)
Media SD/SDHC/SDXC cards (not supplied)
Network standard
Wired: 10BASE-T/100BASE-TX, Wireless: IEEE 802.11b/g/n 2.4GHz band
only
Battery for the
clock
Secondary battery
Stream output format
Stream 1 Stream 2
Format 1
Video
JPEG (640x360)
None
Audio
LPCM 16 kHz 16 bit 1 ch
Format 2
System
MPEG-2 TS
Video
H.264 Main Profi le (720x480) JPEG (640x360)
Audio
AAC 48 kHz 16 bit 2 ch LPCM 16 kHz 16 bit 1 ch
Format 3
System
MPEG-2 TS
Video
H.264 High Profi le (1920x1080) JPEG (640x360)
Audio
AAC 48 kHz 16 bit 2 ch LPCM 16 kHz 16 bit 1 ch
AC adapter (QAL1446-001)
Power supply AC 100 V to 240 V, 50 Hz/60 Hz
Power consumption
DC 5 V, 2 A
Allowable operating
temperature
0
˚
C to 40
˚
C (32
˚
F to 104
˚
F) (10
˚
C to 35
˚
C (50
˚
F to 95
˚
F) at battery
charge)
Dimensions (mm)
44 x 29 x 96
(1 3/4'' x 1 3/16'' x 3 13/16'')
(W × H × D, excluding AC cord and AC
plug)
Mass Approx. 175
g
(0.39 lbs)
Specifications and appearance are subject to change without notice due to
product improvements.
15
For more details, refer to the Detailed User Guide at http://manual3.jvckenwood.com/
MEMO
©2012 JVC KENWOOD Corporation
0812HO-MW-VM
C2N
1 / 1

JVC GV-LS1 U User manual

Category
Camcorders
Type
User manual

JVC GV-LS1 U is a live streaming camera that allows you to broadcast live video and audio directly to the internet. With its compact size and lightweight design, you can easily take it with you wherever you go. It features Full HD video recording, a built-in microphone, and support for external microphones and headphones. You can also connect it to your computer via USB to use it as a webcam.

Ask a question and I''ll find the answer in the document

Finding information in a document is now easier with AI

Ask the document