Canon PIXMA TR7520 Owner's manual

Category
Ink cartridges
Type
Owner's manual

Canon PIXMA TR7520 is a multifunction printer that offers versatile printing, scanning, copying, and faxing capabilities. With its user-friendly interface and wireless connectivity options, it's designed for seamless integration into your home or small office. Print stunning photos and crisp documents, scan and save important files as digital copies, create high-quality copies, and send and receive faxes effortlessly. The TR7520 is a reliable and efficient all-in-one solution for your printing needs.

Canon PIXMA TR7520 is a multifunction printer that offers versatile printing, scanning, copying, and faxing capabilities. With its user-friendly interface and wireless connectivity options, it's designed for seamless integration into your home or small office. Print stunning photos and crisp documents, scan and save important files as digital copies, create high-quality copies, and send and receive faxes effortlessly. The TR7520 is a reliable and efficient all-in-one solution for your printing needs.

Guía de inicio
Lea primero Información de seguridad
e información importante (apéndice).
Getting Started
Read Safety and Important Information
(addendum) rst.
1
2
Instalación de la impresora.............................................página 1
Conexión con el ordenador y con el teléfono inteligente
o la tableta ......................................................................página 4
Cómo sujetar
la impresora
Películas explicativas
Installing the Printer ...........................................................page 1
Connecting with Computer and Smartphone/Tablet ..........page 4
How to Hold Printer Explanatory Movies
1
ENGLISH
1. Checking Included Items
Setup CD-ROM for
Windows PC
Power cord
Safety and Important Information
Modular cable
Ink tanks for setup
Getting Started (this manual)
2. Removing Packing
Materials / Turning on
Printer
1
Remove the packing materials (such as orange
tape and protective lm on the touch screen) from
outside the printer.
Using the printer with the protective lm attached
may cause malfunction.
2
aHook the hollows on the both sides of
the printer with your ngers and open the
scanning unit / cover.
bRemove the orange tape.
b
a
3
Close the scanning unit / cover.
4
Connect the power cord diagonally from the back.
Back
Do not connect any cables except the power cord
yet.
5
Lift the operation panel and press the ON button.
6
Drag the screen and tap the language to select.
7
If the following screen appears, tap your country or
region to select.
8
Read the messages and follow the on-screen
instructions.
For details about information that is sent to Canon,
refer to "Sending Data To Canon" in Safety and
Important Information.
9
Select OK.
2
3. Installing Ink Tank
1
Open the scanning unit / cover.
Do not touch the print head holder (A) until it
stops.
(A)
2
aCOMPLETELY remove the orange tape.
bRemove the protective wrap.
a
b
3
Hook the orange cap with your nger to remove it
GENTLY.
Do not push the both sides of the
ink tank with the Y-shape air hole
blocked.
Do not touch.
4
Insert the ink tank into the print head and push it
down rmly until it snaps into place.
The color of the ink tank that you set appears on
screen.
If the color is not displayed on the screen even
though you have installed the ink tank, the color
of the ink tank may be wrong or you may have
installed an ink tank, such as one with a different
model number, that is not supported by this printer.
Either install an ink tank for the correct color or use
the provided ink tank for setup.
5
Install all the ink tanks the same way as in step
4, and then conrm that all the colors appear on
screen.
6
Close the scanning unit / cover.
If an error message appears on the screen, make
sure the ink tanks are installed correctly.
4. Loading Paper / Aligning
Print Head
To obtain a better print result, print a pattern for Print Head
Alignment and scan it.
1
aPull out the cassette.
bRemove the cassette cover.
a
b
2
Open the paper guides, and then align the guide in
front with the mark of LTR.
3
ENGLISH
3
aLoad plain LTR size paper with the print side
facing down.
bSlide the right paper guide to align it with the
side of the paper stack.
cAlign the paper stack with the paper guide in
front.
a
b
c
4
Attach the cassette cover and insert the cassette.
5
aPull out the paper output tray.
bOpen the output tray extension.
a
b
6
If the following screen appears, select OK.
7
Make sure that a pattern is printed for Print Head
Alignment.
It takes about 2 minutes to nish printing.
8
aOpen the document cover.
bLoad the printed pattern on the platen glass.
a
b
9
After closing the document cover, select OK.
10
If the following screen appears, select OK.
4
6-A. Connecting to Computer
Mac OS
Windows
You need a connection setup for each computer. Proceed with the setup from step 1 for each computer.
1
Start the setup le for either method or method .
5. Preparing for Connection
In the following description, smartphones and tablet
devices are collectively described as smartphone.
1
Select Next.
2
Make sure that the following screen appears.
From here on, proceed to a step according to how you use
the printer.
Use Only Printer
aPress the Stop button on the printer.
bSelect Do not connect > Yes in this order.
The setup is now complete.
To continue fax setup, proceed to page 8.
aOpen a web browser ( etc.) on your computer.
bInput the following URL and access the Canon
website.
cSelect Set Up.
dInput the model name of your printer and click OK.
You can select a model name from the list.
eClick Setup.
The procedures for Windows and Mac OS are shown
below. If you are using a computer with an OS other
than Windows or Mac OS, such as a Chrome OS, do
the setup according to the on-screen instructions.
fClick Download and download the setup le.
gExecute the downloaded le.
Proceed to step on the next page to
continue.
Downloading from the Internet
To use the printer by connecting only to a computer or both to a computer and smartphone
"6-A. Connecting to Computer"
To use the printer by connecting only to a smartphone
"6-B. Connecting to Smartphone" on page 6
To use the printer without connecting to a computer or smartphone
"Use Only Printer"
5
ENGLISH
Using Setup CD-ROM (Windows Only)
aLoad the Setup CD-ROM in your computer.
When using Windows 10 or Windows 8.1:
bWhen the following message appears on the right
side of your computer screen, click it.
cIf the following screen appears, click Run
Msetup4.exe.
dIf the User Account Control dialog box appears,
click Yes.
When This Message Does Not Appear (or Has
Disappeared)
1. Click File Explorer on the taskbar.
or
2. Click This PC on the left side of the opened window.
3. Double-click the
CD-ROM icon on the right side of
the window.
If the contents of the CD-ROM appear, double-click
Msetup4.exe.
4. Proceed to step d.
When using Windows 7:
b When the AutoPlay screen appears, click Run
Msetup4.exe.
c If the User Account Control dialog box appears,
click Continue.
When AutoPlay Screen Does Not Appear
1. Click Computer from the start menu.
2. Double-click the
CD-ROM icon on the right side of
the opened window.
If the contents of the CD-ROM appear, double-click
Msetup4.exe.
Proceed to step to continue.
2
Click Start Setup.
The connection with your computer is now complete. You can print from your
computer.
To continue fax setup, proceed to page 8.
If the following screen appears, click Exit.
Follow the on-screen
instructions to proceed
with the setup.
6
6-B. Connecting to Smartphone
Android
iOS
You need a connection setup for each smartphone. Proceed with the setup from step 1 for each smartphone.
Preparation
Turn on Wi-Fi on your smartphone.
If you have a wireless router, connect your smartphone to the wireless router you want to connect to the printer.
* For operations, refer to manuals of your smartphone and the wireless router or contact those manufacturers.
1
Install the application software Canon PRINT Inkjet/SELPHY in your smartphone.
: Search "Canon PRINT" in App Store.
: Search "Canon PRINT" in Google Play.
Or access the Canon website by scanning the QR code.
* You may not connect your smartphone to the Internet wirelessly during connecting the printer to the smartphone directly.
In that case, you may be charged depending on the contract with your service provider.
* Up to 5 devices can be connected to the printer via wireless LAN connection directly.
2
Check the display on the printer.
The screen turns off when no operation is made for about 10 minutes. Press one of the buttons on the operation
panel (except for the ON button) to display the screen.
If the following screen appears:
Check the icon on the lower left, and then proceed
to
or .
If appears, the printer cannot communicate by wireless
LAN connection. For details, access "http://ij.start.canon"
to see Frequently Asked Questions.
If the following screen appears:
Proceed to
.
No (Proceed to
.)
YES
aTap the installed application
software.
bFollow the on-screen instructions to register the
printer.
cMake sure that the right
screen appears.
The connection with your smartphone is
now complete. You can print from your
smartphone.
To print photos, load photo paper. Proceed to "Loading
Photo Paper" on page 8.
To continue fax setup, proceed to page
8.
The following icon appears.
(The printer is connected to a network.)
7
ENGLISH
Procedures below vary depending on iOS or Android. Select your operating system and proceed to its
procedure.
aTap Settings on your smartphone's home screen,
and tap Canon_ij_XXXX in the Wi-Fi settings.
If Canon_ij_XXXX does not appear on the list,
see "Preparation for Printer" below to operate the
printer, and then repeat step a.
bTap the installed application software.
cFollow the on-screen instructions to register the
printer.
Follow the on-screen instructions to proceed
with the setup.
If you select Auto Select Conn. Method
(recommended) on the connection method
selecting screen, the appropriate connection
method is selected automatically depending on
your environment.
dMake sure that the right
screen appears.
aTap the installed application software.
bFollow the on-screen instructions to register the
printer.
If a message saying "Printer is not registered.
Perform printer setup?" does not appear, see
"Preparation for Printer" below to operate the
printer, and then wait for a while until the message
appears.
Follow the on-screen instructions to proceed
with the setup.
The appropriate connection method is selected
depending on your environment.
If two printer names appear on the Register
Printer screen as shown below, select A.
A) TR7500 series (xxx.xxx.xxx.xxx)
B) Direct-xxxx-TR7500series
cMake sure that the right
screen appears.
The connection with your smartphone is now complete. You can print from your
smartphone.
To print photos, load photo paper. Proceed to "Loading Photo Paper" on page 8.
To continue fax setup, proceed to page 8.
aPress the HOME button on the printer.
bSelect the icon on the lower left of the HOME
screen.
a
b
cIf the following screen appears, select No.
dSelect LAN settings > Wireless LAN > Wireless
LAN setup > Easy wireless connect in this order.
eSelect Yes.
fReturn to the operation of your smartphone.
Preparation for Printer
8
1
Open the rear tray cover and pull out the paper
support.
2
aOpen the feed slot cover.
bSlide the right paper guide to the end.
a
b
3
aLoad several sheets of photo paper with the
print side facing up.
bSlide the right paper guide to align it with the
side of the paper stack.
a
b
4
Close the feed slot cover.
Read the message on the printer's screen and
register the information of the loaded paper.
5
aPull out the paper output tray.
bOpen the output tray extension.
a
b
Opening from the website
aAccess the Canon website.
bSelect Set Up.
cWhen the screen for selecting a model appears, input
the model name of your printer.
dSelect Making Fax Ready for Use.
Opening from the manual installed into your computer
The following is an example using Windows 10.
aClick the Start button.
bClick All apps > Canon TR7500 series On-screen
Manual in this order, and then open the Basic
Manual.
cSelect Setting Up the FAX.
Loading Photo Paper
Using Fax Function
Before using the fax function, refer to Setting Up the FAX to set up the fax function of your printer. You can refer to
Setting Up the FAX by either of the following methods.
Load photo paper in the rear tray.
1
ESPAÑOL
1. Comprobación de los elementos
suministrados
CD-ROM de instalación
para Windows PC
Cable de alimentación
Información de seguridad
e información importante
Cable modular
Depósitos de tinta para conguración
Guía de inicio (este manual)
2.
Retirada de los materiales
de empaquetado /
Encendido de la impresora
1
Retire los materiales de empaquetado (como la
cinta naranja y la película protectora de la pantalla
táctil) del exterior de la impresora.
El uso de la impresora con la película protectora
podría provocar fallas en el funcionamiento.
2
aColoque sus dedos en las hendiduras
a ambos lados de la impresora y abra
la cubierta/unidad de escaneado.
bRetire la cinta naranja.
b
a
3
Cierre la cubierta/unidad de escaneado.
4
Conecte el cable de alimentación en sentido
diagonal desde la parte trasera.
Atrás
No conecte ningún cable excepto el de alimentación.
5
Levante el panel de control y pulse el botón
ACTIVADO (ON).
6
Arrastre la pantalla y puntee el idioma para
seleccionar.
7
Si aparece la siguiente pantalla, toque su país
o región para seleccionarlo.
8
Lea los mensajes y siga las instrucciones que
aparezcan en pantalla.
Si desea conocer qué información que se envía
a Canon, consulte "Envío de datos a Canon" en
Información de seguridad e información importante.
9
Seleccione OK.
2
3. Instalación del depósito
de tinta
1
Abra la cubierta/unidad de escaneado.
No toque el soporte del cabezal de impresión (A)
hasta que se detenga.
(A)
2
aRetire COMPLETAMENTE la cinta naranja.
bRetire el envoltorio protector.
a
b
3
Sujete la tapa naranja con su dedo para quitarla
SUAVEMENTE.
No empuje los lados del depósito
de tinta si el oricio de aire en
forma de Y está bloqueado.
No tocar.
4
Inserte el depósito de tinta en el cabezal de
impresión y empuje hacia abajo rmemente hasta
que encaje en su sitio.
El color del depósito de tinta que denió se muestra
en la pantalla.
Si no se muestra el color en pantalla a pesar de haber
instalado el depósito de tinta, es posible que el color del
depósito de tinta no sea correcto o que haya instalado un
depósito de tinta, por ejemplo, con un número de modelo
distinto que no sea compatible con esta impresora.
Instale un depósito de tinta para el color correcto o utilice
el depósito de tinta proporcionado para su instalación.
5
Instale todos los depósitos de tinta de la misma
forma que en el paso 4 y después conrme que
todos los colores se muestran en la pantalla.
6
Cierre la cubierta/unidad de escaneado.
Si aparece un mensaje de error en la pantalla, asegúrese
de que los depósitos de tinta estén instalados correctamente.
4. Carga de papel / Alineación
del cabezal de impresión
Para lograr mejores resultados de impresión, imprima
un patrón de Alineación de los cabezales de impresión
(Print Head Alignment) y escanéelo.
1
aExtraiga el cassette.
bRetire la cubierta del cassette.
a
b
2
Abra las guías del papel y después alinee la guía
de la parte delantera con la marca de LTR.
3
ESPAÑOL
3
aCargue papel normal de tamaño LTR con el
lado de impresión hacia abajo.
bDeslice la guía del papel derecha para
alinearla con el lado de la pila de papel.
cAlinee la pila de papel con la guía del papel
en primer plano.
a
b
c
4
Coloque la cubierta del cassette e inserte el cassette.
5
aExtraiga la bandeja de salida del papel.
bAbra la extensión de la bandeja de salida.
a
b
6
Si aparece la siguiente pantalla, seleccione OK.
7
Asegúrese de que se imprima un patrón para
Alineación de los cabezales de impresión
(Print Head Alignment).
La impresión tarda alrededor de 2 minutos
en completarse.
8
aAbra la cubierta de documentos.
b
Cargue el patrón impreso en el cristal de la platina.
a
b
9
Después de cerrar la cubierta de documentos,
seleccione OK.
10
Si aparece la siguiente pantalla, seleccione OK.
4
6-A. Conexión con el ordenador
Mac OS
Windows
Necesitará congurar una conexión para cada ordenador. Complete la conguración desde el paso 1 para cada ordenador.
1
Inicie el archivo de conguración del método o el método .
5. Preparación para la conexión
En la siguiente descripción, los teléfonos inteligentes y las
tabletas se describen en conjunto como teléfonos inteligentes.
1
Seleccione Siguiente (Next).
2
Asegúrese de que aparezca la siguiente pantalla.
A partir de aquí, continúe en el paso que corresponda
según su uso de la impresora.
Usar solo la impresora
aPulse el botón Parar (Stop) de la impresora.
bSeleccione No conectar (Do not connect) >
Sí (Yes) en este orden.
Ha nalizado la conguración.
Para continuar con la conguración del fax,
vaya a la página 8.
aAbra un navegador web ( , etc.) en su ordenador.
b
Escriba la URL siguiente y acceda al sitio web de Canon.
cSeleccione Congurar.
dEscriba el nombre del modelo de su impresora
y haga clic en Aceptar.
Puede seleccionar un nombre de modelo de la lista.
eHaga clic en Conguración.
Los procedimientos para Windows y Mac OS se describen
a continuación. Si el sistema operativo de su ordenador
no es Windows ni Mac OS (p. ej., Chrome OS), realice la
conguración siguiendo las instrucciones en pantalla.
fHaga clic en Descargar y descargue el archivo
de instalación.
gEjecute el archivo descargado.
Vaya al paso en la página siguiente
para continuar.
Descarga de Internet
Para usar la impresora conectándola solo a un ordenador o tanto a un ordenador como a un teléfono inteligente
"6-A. Conexión con un ordenador"
Para usar la impresora conectándola solo a un teléfono inteligente
"6-B. Conexión con un teléfono inteligente" en la página 6
Para usar la impresora sin conectarla a un ordenador o teléfono inteligente
"Usar solo la impresora"
5
ESPAÑOL
Uso del CD-ROM de instalación (solo para Windows)
aCargue el CD-ROM de instalación en su ordenador.
Si utiliza Windows 10 o Windows 8.1:
bCuando se muestre el mensaje siguiente en el lado
derecho de la pantalla del ordenador, haga clic en él.
c
Si aparece la siguiente pantalla, haga clic en Ejecutar
Msetup4.exe (Run Msetup4.exe).
dSi se muestra el cuadro de diálogo Control
de cuentas de usuario (User Account Control),
haga clic en Sí (Yes).
Si este mensaje no se muestra (o ya no aparece)
1. Haga clic en el Explorador de archivos
(File Explorer) de la barra de tareas.
o
2. Haga clic en Este equipo (This PC) en la parte
izquierda de la ventana que se abra.
3. Haga doble clic en el icono de CD-ROM
en el lado
derecho de la ventana.
Si se muestra el contenido del CD-ROM, haga doble
clic en Msetup4.exe.
4. Continúe en el paso d.
Si utiliza Windows 7:
b Cuando se muestre la pantalla Reproducción
automática (AutoPlay), haga clic en Ejecutar
Msetup4.exe (Run Msetup4.exe).
c Si se muestra el cuadro de diálogo Control
de cuentas de usuario (User Account Control),
haga clic en Continuar (Continue).
Si no se muestra la pantalla Reproducción automática
(AutoPlay)
1.
Haga clic en Equipo (Computer) en el menú de inicio.
2. Haga doble clic en el icono de CD-ROM en el lado
derecho de la ventana abierta.
Si se muestra el contenido del CD-ROM, haga doble
clic en Msetup4.exe.
Vaya al paso para continuar.
2
Haga clic en Iniciar conguración
(Start Setup).
La conexión con su ordenador se ha completado. Ahora puede imprimir desde su ordenador.
Para continuar con la conguración del fax, vaya a la página 8.
Si aparece la siguiente pantalla,
haga clic en Salir (Exit).
Siga las instrucciones
en pantalla para continuar
con la conguración.
6
6-B. Conexión con un teléfono inteligente
Android
iOS
Necesitará congurar una conexión para cada teléfono inteligente. Complete la conguración desde el paso 1 para cada teléfono inteligente.
Preparativos
Active la Wi-Fi en su teléfono inteligente.
Si dispone de un router inalámbrico, conecte su teléfono inteligente al router inalámbrico para conectar con la impresora.
* Por cuestiones del funcionamiento, consulte los manuales de su teléfono inteligente y del router inalámbrico o póngase en contacto con los fabricantes.
1
Instale el software de la aplicación Canon PRINT Inkjet/SELPHY en su teléfono inteligente.
: Busque "Canon PRINT" en App Store.
: Busque "Canon PRINT" en Google Play.
O acceda al sitio web de Canon escaneando el código QR.
* No puede conectar su teléfono inteligente a Internet de forma inalámbrica durante la conexión directa de la impresora con
su teléfono inteligente. En tal caso, es posible que tenga cargos en función del contrato con su proveedor de servicios.
* Se pueden conectar un máximo de 5 dispositivos directamente a la impresora mediante la conexión LAN inalámbrica.
2
Compruebe la pantalla en la impresora.
Cuando el equipo no se utiliza durante 10 minutos aproximadamente, la pantalla se apaga. Para mostrar la
pantalla, pulse cualquier botón en el panel de control (excepto el botón ACTIVADO (ON)).
Si aparece la siguiente pantalla:
Compruebe el icono en la parte inferior izquierda
y luego continúe con
o .
Si aparece , la impresora no puede comunicarse
mediante una conexión inalámbrica LAN. Para más
información, diríjase a "http://ij.start.canon" para ver
Preguntas más frecuentes.
Si aparece la pantalla siguiente:
Continúe a
.
No (Continúe a
.)
aPuntee el software de la
aplicación instalado.
bSiga las instrucciones en pantalla para registrar la
impresora.
cAsegúrese de que aparezca la
pantalla de la derecha.
La conexión con su teléfono inteligente
se ha completado. Ahora puede imprimir
desde su teléfono inteligente.
Para imprimir fotos, cargue papel fotográco. Diríjase
a la sección "Carga de papel fotográco" en la página 8.
Para continuar con la conguración del
fax, vaya a la página 8.
Aparece el siguiente icono.
(La impresora está conectada a una red.)
7
ESPAÑOL
Los procedimientos a continuación varían en función de iOS o Android. Seleccione su sistema operativo
y continúe con el procedimiento correspondiente.
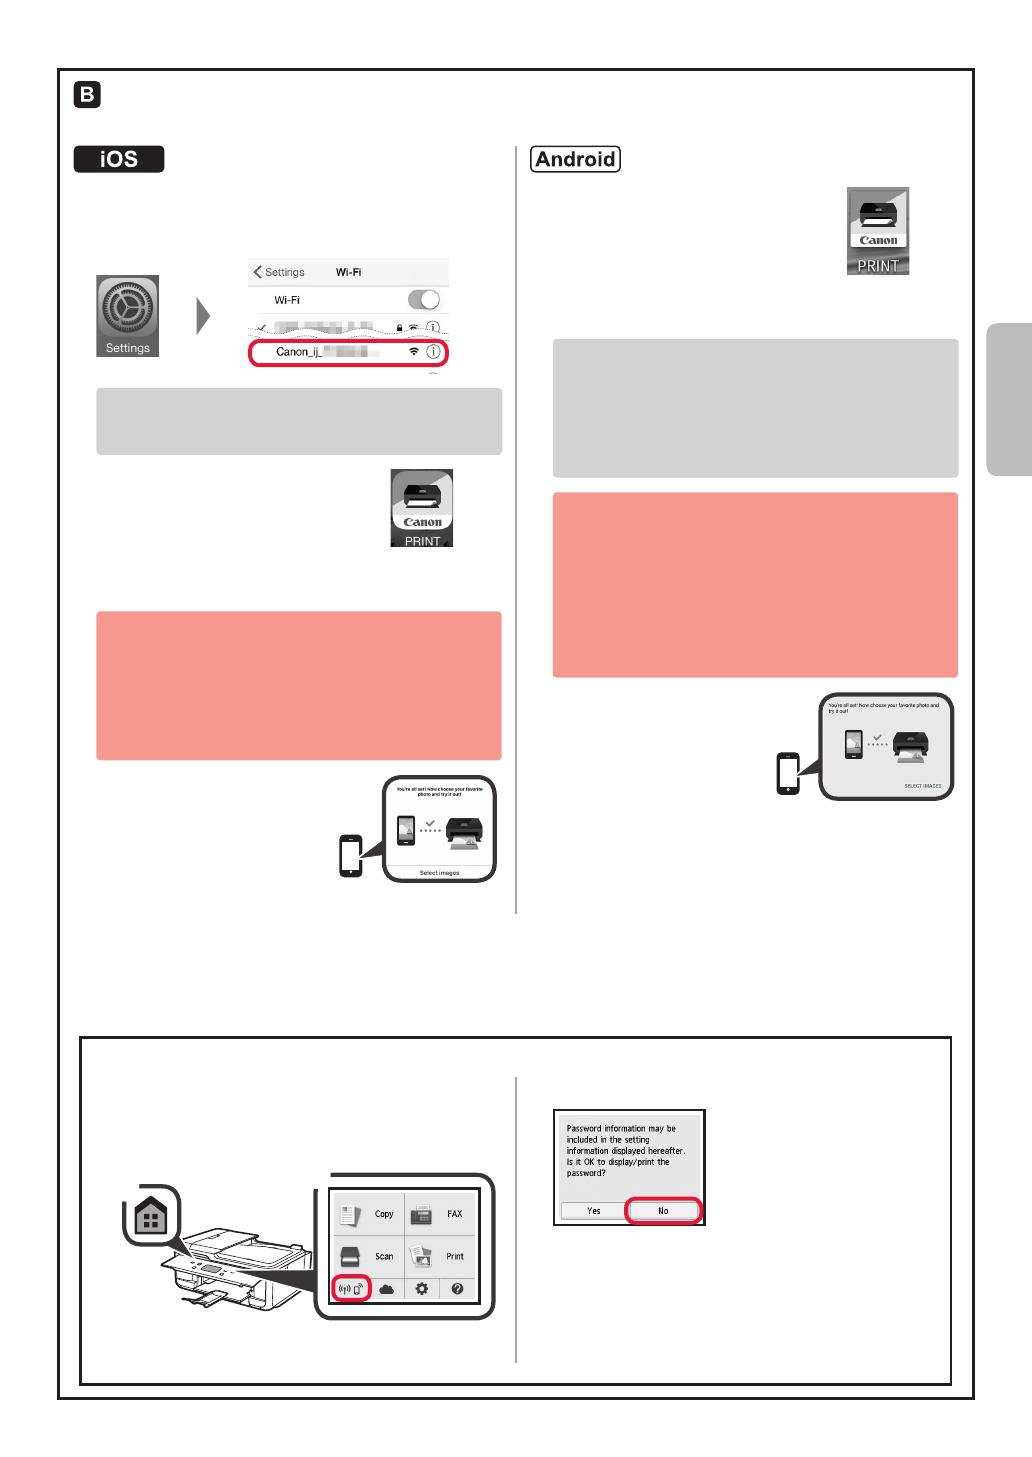
aToque Ajustes (Settings) en la pantalla de
inicio de su teléfono inteligente y después toque
Canon_ij_XXXX en los ajustes de Wi-Fi.
Si Canon_ij_XXXX no aparece en la lista, consulte la
sección "Preparación para la impresora" a continuación
para hacer funcionar la impresora y repita el paso a.
bPuntee el software de la aplicación
instalado.
cSiga las instrucciones en pantalla para registrar
la impresora.
Siga las instrucciones en pantalla para
continuar con la conguración.
Si seleccionó Selec. autom. método con.
(recomendado) (Auto Select Conn. Method
(recommended)) en la pantalla de selección del
método de conexión, se seleccionará el método de
conexión adecuado según su ambiente.
dAsegúrese de que aparezca la
pantalla de la derecha.
aPuntee el software de la aplicación
instalado.
bSiga las instrucciones en pantalla para registrar
la impresora.
Si no aparece un mensaje que dice "Impresora
no registrada. ¿Realizar preparación de
impresora? (Printer is not registered. Perform
printer setup?)", consulte la sección "Preparación
para la impresora" a continuación para hacer
funcionar la impresora y espere un momento hasta
que aparezca un mensaje.
Siga las instrucciones en pantalla para
continuar con la conguración.
El método de conexión adecuado se elige
en función de su ambiente.
Si aparecen dos nombres de impresora en la
pantalla Registrar impresora (Register Printer),
seleccione A.
A) TR7500 series (xxx.xxx.xxx.xxx)
B) Direct-xxxx-TR7500series
cAsegúrese de que aparezca
la pantalla de la derecha.
La conexión con su teléfono inteligente se ha completado. Ahora puede imprimir
desde su teléfono inteligente.
Para imprimir fotos, cargue papel fotográco. Diríjase a la sección "Carga de papel fotográco" en la página 8.
Para continuar con la conguración del fax, vaya a la página 8.
aPulse el botón INICIO (HOME) de la impresora.
bSeleccione el icono de la parte inferior izquierda
de la pantalla INICIO.
a
b
cSi aparece la siguiente pantalla, seleccione No.
d
Seleccione Conf. de LAN (LAN settings) >
LAN inalámbrica (Wireless LAN) > Congurac.
LAN inalámbrica (Wireless LAN setup) > Conexión
inalámbrica fácil (Easy wireless connect) en este orden.
eSeleccione Sí (Yes).
fRegrese a la operación de su teléfono inteligente.
Preparación para la impresora
8
1
Abra la cubierta de la bandeja posterior y retire
el soporte del papel.
2
aAbra la cubierta de la ranura de alimentación.
b
Deslice la guía del papel derecha hacia el nal.
a
b
3
aCargue varias hojas de papel fotográco
con el lado de impresión hacia arriba.
bDeslice la guía del papel derecha para
alinearla con el lado de la pila de papel.
a
b
4
Cierre la cubierta de la ranura de alimentación.
Lea el mensaje en la pantalla de la impresora y
registre la información del papel cargado.
5
aExtraiga la bandeja de salida del papel.
bAbra la extensión de la bandeja de salida.
a
b
Apertura desde el sitio web
aAcceda al sitio web de Canon.
bSeleccione Congurar.
cCuando aparezca la pantalla de selección de modelo,
escriba el nombre de modelo de su impresora.
dSeleccione Preparación del fax
para su uso.
Abrirlo desde el manual que está instalado en su equipo
El siguiente es un ejemplo en el que se usa Windows 10.
aHaga clic en el botón Inicio (Start).
bHaga clic en Todas las aplicaciones (All apps) >
Canon TR7500 series Manual en pantalla en este
orden, y abra el Manual básico.
cSeleccione Conguración del FAX.
Carga de papel fotográco
Usar la función de fax
Antes de usar la función de fax, consulte Conguración del FAX para congurar la función de fax en la impresora.
Puede consultar Conguración del FAX mediante uno de los siguientes métodos.
Cargue el papel fotográco en la bandeja posterior.
Videoteca sobre procedimientos
How-To Video Library
RMC (Regulatory Model Code): K10458
© CANON INC. 2017XXXXXXXX
Windows 10
Acceso al Manual en línea
Desde el sitio web
Desde el acceso directo
del escritorio
Access Online Manual
From Web site
From desktop shortcut
PRINTED IN XXXXXXXXQT6-2018-V01
1 / 1

Canon PIXMA TR7520 Owner's manual

Category
Ink cartridges
Type
Owner's manual

Canon PIXMA TR7520 is a multifunction printer that offers versatile printing, scanning, copying, and faxing capabilities. With its user-friendly interface and wireless connectivity options, it's designed for seamless integration into your home or small office. Print stunning photos and crisp documents, scan and save important files as digital copies, create high-quality copies, and send and receive faxes effortlessly. The TR7520 is a reliable and efficient all-in-one solution for your printing needs.

Ask a question and I''ll find the answer in the document

Finding information in a document is now easier with AI

Ask the document

in other languages