- 14 -
≥
Use this unit underwater at a depth of down to 10 m with the water
temperature between 0 oC and 35 oC.
Do not use this unit at a depth of over 10 m.
Use this unit underwater at a depth of down to 5 m with the water
temperature between 0 oC and 35 oC.
Do not use this unit at a depth of over 5 m.
≥ Do not use it in hot water over 35 oC (in a bath or hot spring).
≥
Do not use this unit underwater not longer than 60 minutes continuously.
≥ Do not open or close the rear door underwater.
≥ Do not apply shock to this unit underwater. (Waterproof performance
may not be maintained, and there is a chance of water leak.)
≥
Do not dive into the water holding this unit. Do not use this unit in a location
where the water will splash strongly, such as rapid flow or waterfall. (Strong
water pressure may be applied, and it may cause malfunction.)
≥ This unit will sink in the water. Take care not to drop this unit and lose it
underwater by securely placing the strap around your wrist or similar
measure.
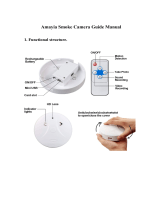
Using this unit underwater
Caring for this unit after using it underwater
Do not open or close the rear door until the sand and dust is
removed by rinsing this unit with water.
Make sure to clean this unit after using it.
≥ Thoroughly wipe off any water droplets, sand, and saline matter on
your hands, body, hair, etc.
≥ It is recommended to clean this unit indoors, avoiding places where
water spray or sand may fall.
Do not leave this unit uncared for longer than 60 minutes after
using it underwater.
≥ Leaving this unit with foreign objects or saline matter on it may
cause damage, discolouration, corrosion, unusual odour, or
deterioration of the waterproof performance.
HX-WA3