Aeg-Electrolux EHL4-4CN User manual

Category
Dishwashers
Type
User manual

This manual is also suitable for

FAVORIT OPTIMA AA
User manual Dishwasher
Thank you for choosing one of our high-quality products.
To ensure optimal and regular performance of your appliance please read this
instruction manual carefully. It will enable you to navigate all processes perfectly
and most efficiently. To refer to this manual any time you need to, we recommend
you to keep it in a safe place. And please pass it to any future owner of the appliance.
We wish you much joy with your new appliance.
Contents
Operating instructions 3
Safety information 3
Correct use 3
General safety 3
Child safety 3
Installation 4
Product description 4
Control panel 5
Function buttons 6
Setting mode 6
First use 7
Set the water softener 7
Setting manually 7
Setting electronically 8
Use of dishwasher salt 8
Use of rinse aid 9
Adjusting the dosage of rinse aid 10
Daily use 10
Load cutlery and dishes 11
The lower basket 12
The cutlery basket 12
The upper basket 13
Adjusting the height of the upper basket
14
Use of detergent 15
Fill with detergent 15
Multi-tab function 16
Activation/deactivation of the Multitab
function 17
Washing programmes 17
Select and start a washing programme 18
Unloading the dishwasher 19
Care and cleaning 20
Cleaning the filters 20
Cleaning the spray arms 21
External cleaning 21
Internal cleaning 21
Prolonged periods of non-operation 21
Frost precautions 21
Moving the machine 21
What to do if… 22
Technical data 23
Hints for test institutes 23
Installation instructions 26
Installation 26
Fitting under a counter (kitchen worktop or
sink) 26
Levelling 27
Water connection 27
Water supply connections 27
Water inlet hose with safety valve 27
Water outlet hose connection 28
Electrical connection 29
Environment concerns 29
Packaging material 29
Subject to change without notice
2
Contents
Operating instructions
Safety information
In the interest of your safety and to ensure the correct use, before installing and first using
the appliance, read this user manual carefully, including its hints and warnings. To avoid
unnecessary mistakes and accidents, it is important to ensure that all people using the
appliance are thoroughly familiar with its operation and safety features. Save these in-
structions and make sure that they remain with the appliance if it is moved or sold, so that
everyone using it through its life will be properly informed on appliance use and safety.
Correct use
This dishwasher is only intended for washing household utensils suitable for machine
washing.
Do not put any solvents in the dishwasher. This could cause an explosion.
Knives and other items with sharp points must be loaded in the cutlery basket with their
points down or placed in a horizontal position in the upper basket.
Only use products (detergent, salt and rinse aid) suitable for dishwashers.
Avoid opening the door whilst the appliance is in operation, hot steam may escape.
Do not take any dishes out of the dishwasher before the end of the dishwashing cycle.
After use, isolate the appliance from the power supply and turn off the water supply.
This product should be serviced only by an authorised service engineer, and only genuine
spare parts should be used.
Under no circumstances should you attempt to repair the machine yourself. Repairs
carried out by inexperienced persons will cause injury or serious malfunctioning. Contact
your local Service Force Centre. Always insist on genuine spare parts.
General safety
Dishwasher detergents can cause chemical burns to eyes, mouth and throat. Could en-
danger life! Comply with the safety instructions of the dishwasher detergent manufac-
turer.
The water in your dishwasher is not for drinking. Detergent residues may still be present
in your machine.
Ensure that the door of the dishwasher is always closed when it is not being loaded or
unloaded. In this way you will avoid anybody tripping over the open door and hurting
themselves.
Do not sit or stand on the open door.
Child safety
This appliance is designed to be operated by adults. Don’t allow children to use the
dishwasher unsupervised.
Keep all packaging well away from children. There is risk of suffocation.
Keep all detergents in a safe place out of children’s reach.
Keep children well away from the dishwasher when the door is open.
Safety information
3
Installation
Check your dishwasher for any transport damage. Never connect a damaged machine.
If your dishwasher is damaged contact your supplier.
All packaging must be removed before use.
Any electrical and plumbing work required to install this appliance must be carried out
by a qualified and competent person.
For safety reasons it is dangerous to alter the specifications or attempt to modify this
product in any way.
Never use the dishwasher if the electrical supply cable and water hoses are damaged; or
if the control panel, work top or plinth area are damaged such that the inside of the
appliance is freely accessible. Contact your local Service Force centre, in order to avoid
hazard.
All sides of the dishwasher must never be drilled to prevent damage to hydraulic and
electric components.
WARNING!
For electrical and water connection carefully follow the instructions given in specific para-
graphs.
Product description
1 Upper basket
2 Water hardness dial
3 Salt container
4 Detergent dispenser
5 Rinse aid dispenser
4
Product description
6 Rating plate
7 Filters
8 Lower spray arm
9 Upper spray arm
10 Worktop
Control panel
1 2
5
3 4
6
A
B
C
1 Programme selection buttons
2 3 in 1 (Multitab) button
3 Indicator lights
4 On/off button
5 Delay start button
6 Function buttons
Indicator lights
Wash
1)
Illuminates when the washing and rinsing pha-
ses are running.
Dry
1)
Illuminates when the drying phase is running.
Control panel
5
Indicator lights
End of programme
Illuminates when the washing programme has
ended.
It also has added functions of visual signalling
as:
the setting of the water softener,
activation/deactivation of the rinse aid dis-
penser,
intervention of an alarm due to the malfunc-
tion of the machine.
Salt refilling
2)
Illuminates when special salt needs to be filled.
It can remain illuminated several hours after the
salt has been filled.
Rinse aid
2)
Illuminates when rinse aid needs to be filled.
1) As soon as you select a washing programme, the phase indicator lights for that programme will start flashing.
As the programme starts, the phase indicator lights turn off except for the indicator light of the phase in
progress which will remain lit with a static light.
2) The salt and rinse aid indicator lights are never illuminated while a washing programme is running even if filling
with salt and rinse aid is necessary.
Function buttons
The following functions can be set with the help of these buttons:
setting of the water softener,
cancel a washing programme or a delay start in progress,
activation/deactivation of the rinse aid dispenser when Multi-tab function is active.
Setting mode
The appliance is in setting mode when all programme lights are illuminated.
Always remember that when performing operations such as:
selecting a washing programme
setting the water softener
activating/deactivating the MULTITAB function
activating/deactivating the rinse aid dispenser
the appliance MUST be in setting mode.
If a programme light is illuminated, the last performed programme is still set.
In this case, to return to setting mode, the programme has to be cancelled.
To cancel a set programme or a programme in progress: Simultaneously press and hold
the two RESET buttons (B and C) until all the programme button lights illuminate. The
programme has been cancelled and the machine is now in setting mode.
6
Control panel
First use
Before using your dishwasher for the first time:
Ensure that the electrical and water connections comply with the installation instruc-
tions
Remove all packaging from inside the appliance
Set the water softener
Pour 1 litre of water inside the salt container and then fill with dishwasher salt
Fill the rinse aid dispenser
If you want to use combi detergent tablets such as: "3 in 1", "4 in 1", "5 in 1" etc... set the
Multi-tab function (see "Multi-tab function").
Set the water softener
The dishwasher is equipped with a water softener designed to remove minerals and salts
from the water supply, which would have a detrimental or adverse effect on the operation
of the appliance.
The higher the content of these minerals and salts, the harder your water is. Water hardness
is measured in equivalent scales, German degrees (°dH), French degrees (°TH) and mmol/l
(millimol per litre - international unit for the hardness of water).
The softener should be adjusted according to the hardness of the water in your area. Your
local Water Authority can advise you on the hardness of the water in your area.
The water softener must be set in both ways: manually, using the water hardness dial and
electronically.
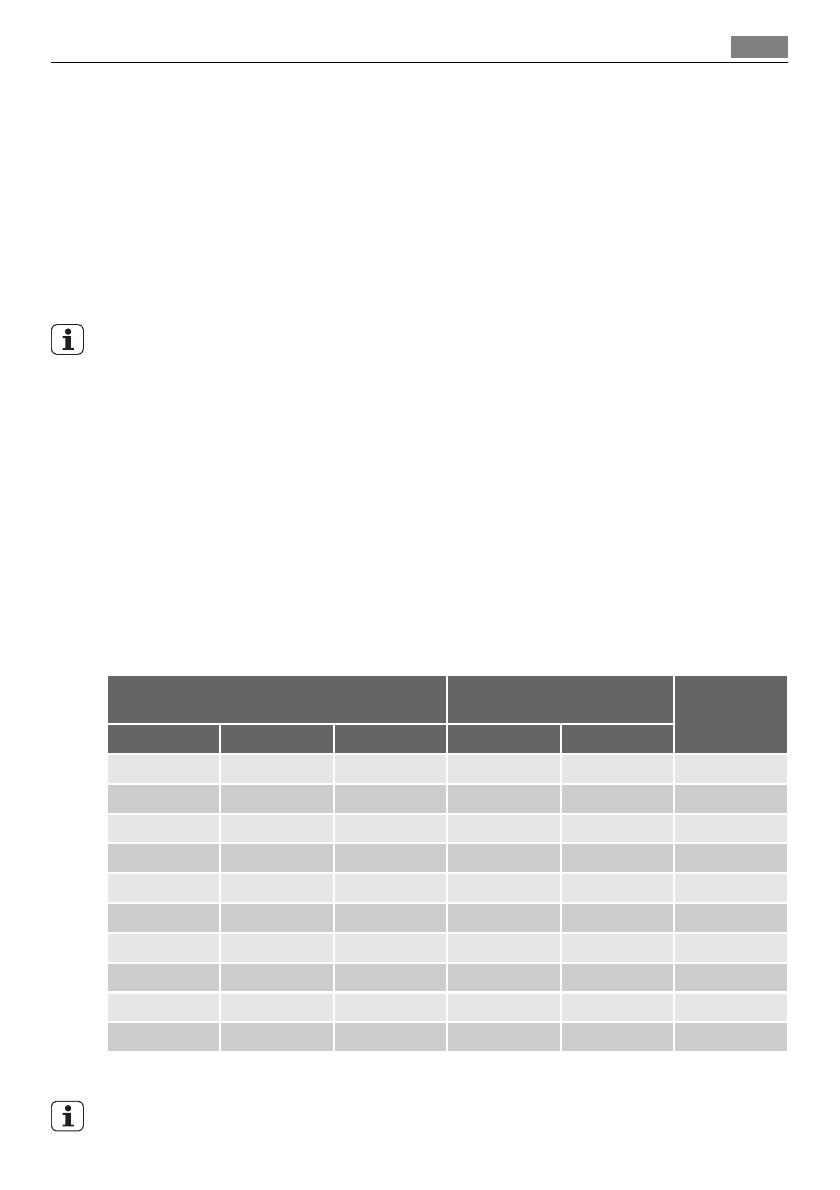
Water hardness Adjusting the water hardness
setting
Use of salt
°dH °TH mmol/l manually electronically
51 - 70 91 - 125 9,1 - 12,5 2 level 10 yes
43 - 50 76 - 90 7,6 - 8,9 2 level 9 yes
37 - 42 65 - 75 6,5 - 7,5 2 level 8 yes
29 - 36 51 - 64 5,1 - 6,4 2 level 7 yes
23 - 28 40 - 50 4,0 - 5,0 2 level 6 yes
19 - 22 33 - 39 3,3 - 3,9 2 level 5 yes
15 - 18 26 - 32 2,6 - 3,2 1 level 4 yes
11 - 14 19 - 25 1,9 - 2,5 1 level 3 yes
4 - 10 7 - 18 0,7 - 1,8 1 level 2 yes
< 4 < 7 < 0,7 1 level 1 no
Setting manually
The dishwasher is factory set at position 2.
First use
7
1. Open the dishwasher door.
2. Remove the lower basket from the dish-
washer.
3. Turn the water hardness dial to position 1
or 2 (see table).
4. Replace the lower basket.
Setting electronically
The dishwasher is factory set at level 5.
1. Press the On/Off button. The dishwasher must be in setting mode.
2.
Press simultaneously and keep pressed buttons B and C, until the lights of buttons A,
B and C start flashing.
3.
Press button A, the lights of buttons B and C turn off while the light of button A goes
on flashing. At the same time the End of programme indicator light starts flashing.
The current level is indicated by the number of flashes of the End of programme
indicator light, (see chart) and a pause of few seconds.
Examples:
5 flashes, pause, 5 flashes, pause = level 5
4.
To change the level, press button A. Each time the button is pressed the level changes.
(For the selection of the new level see the chart).
Examples: if the current level is 5, by pressing button A once, level 6 is selected. if the
current level is 10, by pressing button A once, level 1 is selected.
5. To memorise the operation, switch off the dishwasher by pressing the On/Off button.
Use of dishwasher salt
WARNING!
Only use salt specifically designed for use in dishwashers. All other types of salt not spe-
cifically designed for use in a dishwasher, especially table salt, will damage the water
softener. Only fill with salt just before starting one of the complete washing programmes.
This will prevent any grains of salt or salty water, which may have been spilt, remaining on
the bottom of the machine for any period of time, which may cause corrosion.
To fill:
1. Open the door, remove the lower basket and unscrew the cap of the salt container by
turning it anticlockwise.
2.
Pour 1 litre of water inside the container (this is necessary only before filling with
salt for the first time) .
8
Use of dishwasher salt
3. Using the funnel provided, pour in the salt
until the container is full.
4. Replace the cap making sure that there is
no trace of salt on the screw thread or on
the gasket.
5. Replace the cap tightly turning it clock-
wise until it stops with a click.
Do not worry if water overflows from the unit
when filling with salt, this is quite normal.
The salt indicator light on the control panel can remain illuminated for 2-6 hours after the
salt has been replenished, assuming the dishwasher remains switched on. If you are using
salts that take longer to dissolve then this can take longer. The function of the machine is
not affected.
Use of rinse aid
WARNING!
Only use branded rinse aid for dishwashers.
Never fill the rinse aid dispenser with any other substances (e.g. dishwasher cleaning agent,
liquid detergent). This would damage the appliance.
Rinse aid ensures thorough rinsing, and spot and streak free drying.
Rinse aid is automatically added during the last rinse.
1. Open the container by pressing the release
button (A).
Use of rinse aid
9
2. Add the rinse aid in the container. The
maximum level for filling is indicated by
"max".
The dispenser holds about 110 ml of rinse
aid, which is sufficient for between 16 and
40 dishwashing cycles, depending upon
the dosage setting.
3. Ensure that the lid is closed after every re-
fill.
Clean up any rinse aid spilt during filling with
an absorbent cloth to avoid excess foaming
during the next wash.
Adjusting the dosage of rinse aid
According to the finish and drying results obtained, adjust the dose of rinse aid by means
of the 6 position selector (position 1= minimum dosage, position 6= maximum dosage).
The dose is factory set in position 4.
Increase the dose if there are drops of water or lime
spots on the dishes after washing.
Reduce it if there are sticky whitish streaks on the
dishes or a bluish film on glassware or knife blades.
Daily use
Check if it's necessary to refill with dishwasher salt or rinse aid.
Load cutlery and dishes into the dishwasher.
Fill with dishwasher detergent.
Select a wash programme suitable for the cutlery and dishes.
Start the wash programme.
10
Daily use
Load cutlery and dishes
Sponges, household cloths and any object that can absorb water may not be washed in the
dishwasher.
Before loading the dishes, you should:
Remove all left over food and debris.
Soften remnants of burnt food in pans
When loading the dishes and cutlery, please note:
Dishes and cutlery must not impede the rotation of the spray arms.
Load hollow items such as cups, glasses, pans, etc. with the opening downwards so
that water cannot collect in the container or a deep base.
Dishes and items of cutlery must not lie inside one another, or cover each other.
To avoid damage to glasses, they must not touch.
Lay small objects in the cutlery basket.
Plastic items and pans with non stick coatings have a tendency to retain water drops;
these items will not dry as well as porcelain and steel items.
Light items (plastic bowls etc.) must be loaded in the upper basket and arranged so they
do not move.
For washing in the dishwasher the following cutlery and dishes
are not suitable: are of limited suitability:
Cutlery with wooden, horn, china or mother-
of-pearls handles.
Plastic items that are not heat resistant.
Older cutlery with glued parts that are not
temperature resistant.
Bonded cutlery items or dishes.
Pewter or copper items.
Lead crystal glass.
Steel items prone to rusting.
Wooden platters.
Items made from synthetics fibres.
Only wash stoneware in the dishwasher if it
is specially marked as being dishwasher-safe
by the manufacturer.
Glazed patterns may fade if machine washed
frequently.
Silver and aluminium parts have a tendency
to discolour during washing: Residues, e.g.
egg white, egg yolk and mustard often cause
discolouring and staining on silver. Therefore
always clean left-overs from silver immedi-
ately, if it is not to be washed straight after
use.
Open the door and slide out the baskets to load the dishes.
Load cutlery and dishes
11
The lower basket
The lower basket is designed to take saucepan, lids,
plates, salad bowls, cutlery ect.
Service dishes and large lids should be arranged
around the edge of the basket, ensuring that the
spray arms can turn freely.
The cutlery basket
WARNING!
Long bladed knives stored in an upright position are a potential hazard.
Long and/or sharp items of cutlery such as carving
knives must be positioned horizontally in the re-
movable lnife basket, which is positioned at the
rear of the upper basket. Take care when loading
or unloading sharp items such as knives.
To ensure that all items of cutlery in the cutlery
basket can be reached by the water, you should:
12
Load cutlery and dishes
1. Place the grid insert on the cutlery basket.
2. Place forks and spoon in the cutlery basket
with their handles pointing downwards.
For larger utensils, such as whisks, leave off
one half of the cutlery grid.
The upper basket
The upper basket is designed for plates (dessert plates, saucers, dinner plates of up to 24
cm in diameter), salad bowls, cups and glasses
Arrange items on and underneath the cup racks so that water can reach all surfaces.
Glasses with long stems can be placed upside down in the cup racks. For taller items, the
cup racks can be folded upwards.
Glasses with long stems can be placed upside down in the cup racks.
For taller items, the cup racks can be folded upwards.
Light items ( plastic bowls etc.) must be loaded in the upper basket and arranged so they
do not move.
Load cutlery and dishes
13
In case that plates are loaded in the upper basket, load them starting from the rear positions
of the basket, tilting them slightly forwards and avoiding the front positions near the door.
Before closing the door, ensured that the
spray arms can rotate freely.
Adjusting the height of the upper basket
If washing very large plates you can load them in the lower basket after moving the upper
basket to the higher position.
Maximum height of the dishes in:
the upper basket the lower basket
With upper basket raised 20 cm 31 cm
With upper basket lowered 24 cm 27 cm
To move to the higher position proceed as follows:
14
Load cutlery and dishes
1. Move the front runner stops (A) of the up-
per basket outwards and slide the basket
out.
2. Refit the basket in the higher position and
replace the stops (A) in their original po-
sition.
When the upper basket is raised you will not
be able to use the cup racks.
WARNING!
After loading your machine always close the
door, as an open door can be a hazard.
Use of detergent
Only use detergents specifically designed for use in dishwashers.
Please observe the manufacturer's dosing and storage recommendations as stated on the
detergent packaging.
Using no more than the correct amount of detergent contributes to reducing pollution.
Fill with detergent
1. Open the lid.
Use of detergent
15
2. Fill the detergent dispenser (1) with deter-
gent. The marking indicates the dosing
levels:
20 = approximately 20 g of detergent
30 = approximately 30 g of detergent.
3. All programmes with prewash need an ad-
ditional detergent dose (5/10 g) that must
be placed in the prewash detergent cham-
ber (2).
This detergent will take effect during the
prewash phase.
4. When using detergent tablets, place the
tablet in compartment (1)
5. Close the lid and press until it locks in
place.
Detergent tablets
Detergent tablets from different manufac-
tures dissolve at different rates. For this reason,
some detergent tablets do not attain their full
cleaning power during short washing pro-
grammes. Therefore, please use long washing
programmes when using detergent tablets, to
ensure the complete removal of detergent re-
siduals.
Multi-tab function
This appliance is equipped with the "Multitab function", that allows the use of the "Multitab"
combi detergent tablets.
These products are detergents with a combined cleaning, rinsing and salt functions. They
can also contain other different agents depending on which kind of tablets you choose ("3
in 1", "4 in 1", "5 in 1" etc...).
Check whether these detergents are suitable for your water hardness. See the manufac-
turers instructions.
This function can be selected with all washing programmes. With the selection of this
function the inflow of rinse aid and salt from each respective supply container is auto-
matically deactivated and also the indicator lights for salt and rinse aid are deactivated.
Select the "Multitab function " before the start of a washing programme.
Once this function is selected (indicator light illuminated) it will remain active also for the
following washing programmes.
With the use of the "Multitab function", the cycle durations may change.
16
Multi-tab function
Once the programme is running, the "Multitab function " can NO longer be changed. If you
want to exclude the "Multitab function " you have to cancel the programme setting and
then deactivate the "Multitab function ".
In this case you have to set a washing programme (and desired options) again.
Activation/deactivation of the Multitab function
Press the Multitab button: the corresponding indicator light illuminates. This means that
the function is active.
To deactivate the function press the Multitab button again: the indicator light turns off.
If the drying results are not satisfactory we suggest that you:
1. Fill up the rinse aid dispenser with rinse aid.
2. Activate the rinse aid dispenser.
3. Set the rinse aid dosage to position 2.
The activation/deactivation of the rinse aid dispenser can only be possible with the
"Multitab function" active.
Activation/deactivation of the rinse aid dispenser
1. Press the On/Off button. The dishwasher must be in setting mode.
2.
Press simultaneously buttons B and C, until the lights of buttons A , B, and C start
flashing.
3.
Press button B, the lights of buttons A and C turn off while the light of button B goes
on flashing: the end of programme indicator light illuminates, indicating that the rinse
aid dispenser has been activated.
4.
To change the setting, press button B again until the end of programme indicator light
turns off.
5. To memorise the operation, switch off the dishwasher by pressing the On/Off button.
If you decide to turn back to the use of standard detergent system we advise that you:
1. Deactivate the "Multitab function".
2. Fill up the salt container and the rinse aid dispenser again.
3. Adjust the water hardness setting to the highest setting and perform 1 normal washing
programme without loading any dishes.
4. Adjust the water hardness setting according to the hardness of the water in your area.
5. Adjust the rinse aid dosage.
Washing programmes
Washing programmes
17
Programme Degree of
soil
Type of
load
Programme description Consumption val-
ues
1)
Prewash
Main wash
Intermediate rinse
Final rinse
Drying
Duration (minutes)
Energy (kWh)
Water (litres)
INTENSIV 70° Heavy soil Crockery,
cutlery,
pots and
pans
2x
80 - 90
1,6 -1,8
22- 24
NORMAL 65° Normal
soil
Crockery,
cutlery,
pots and
pans
90 - 100
1,4 - 1,6
18 - 20
30 MIN
2)
Light soil Crockery
and cutlery
30
0,9
9
ECO 50°
3)
Normal
soil
Crockery
and cutlery
150 - 160
1,0 - 1,1
14 - 16
1) The consumption values are intended as a guide and depends on the pressure and the temperature of the water
and also by the variations of the power supply and the amount of dishes.
2) Ideal for washing a partially loaded dishwasher. This is the perfect daily programme, made to meet the needs
of a family of 4 persons who only wish to load breakfast and dinner crockery and cutlery.
3) Test programme for test institutes.
Select and start a washing programme
Select the washing programme and delay start with the door slightly opened. The start of
the programme or the countdown of the delay start will occur only after the closure of the
door. Until then it is possible to modify the settings.
1. Check that the baskets have been loaded correctly and that the spray arms are free to
rotate .
2. Check that the water tap is opened.
3. Press the On/Off button: all the programme lights illuminate (setting mode).
4. Press the button corresponding to the required programme (see "Washing programmes"
chart). The light corresponding to the selected programme will illuminate.
Close the dishwasher's door, the programme starts automatically.
Setting and starting the programme with "delay start"
1. After having selected the washing programme, press the delay start button until the
light corresponding to the chosen hours flashes (3h, 6h or 9h).
2. Close the dishwasher's door, the countdown starts automatically.
3. The countdown will decrease with steps of 3 hours.
18
Select and start a washing programme
4. The opening of the door will interrupt the countdown.
5. Once the delay start has elapsed the programme will start automatically.
The selection of the washing programme and delay start can also occur with the door closed.
Keep in mind that in this way, once a washing programme button is pressed you have ONLY
3 seconds in which you can choose another programme or select a delay start, after which
the selected programme will start automatically.
Cancelling the "delay start" and / or a washing programme
To cancel a delay start in progress you have to reset the dishwasher.
Cancelling a delay start involves also the cancelling of the washing programme set. In
this case you have to set the washing programme again. If a new washing programme
is to be selected, check that there is detergent in the detergent dispenser.
WARNING!
Interrupt or cancel a washing programme in progress ONLY if it's absolutely necessary.
Attention! Hot steam may escape when the door is opened. Open the door carefully.
Interrupt a washing programme in progress:
Open the dishwasher door; the programme will stop. Close the door; the programme will
start from the point at which it was interrupted.
Press the On/Off button, all lights will turn off. Press the On/Off button again; the pro-
gramme will start from the point at which it was interrupted.
End of the washing programme
The dishwasher will automatically stop.
The end of programme indicator light will illuminate.
The light of the programme just ended will remain on.
1. Switch off the dishwasher by pressing the On/Off button.
2. Open the dishwasher door, leave it ajar and wait a few minutes before removing the
dishes; in this way they will be cooler and the drying will be improved.
Unloading the dishwasher
Hot dishes are sensitive to knocks.
The dishes should therefore be allowed to cool down before removing from the appliance.
Empty the lower basket first and then the upper one; this will avoid water dripping from
the upper basket onto the dishes in the lower one.
Water may appear on the sides and the door of the dishwasher as the stainless steel will
eventually become cooler than the dishes.
CAUTION!
When the washing programme has finished, it is recommended that the dishwasher is
unplugged and the water tap turned off.
Unloading the dishwasher
19
Care and cleaning
Cleaning the filters
The filters must be checked and cleaned from time to time. Dirty filters will degrade the
washing result.
WARNING!
Before cleaning the filters ensure that the machine is switched off.
1. Open the door, remove the lower basket.
2. The dishwasher filter system comprises a
coarse filter (A), a microfilter (B) and a flat
filter. Unlock the filter system using the
handle on the microfilter.
3. Turn the handle about 1/4 a turn anti-
clockwise and remove the filter system.
4.
Take hold of the coarse filter (A) by the
handle with the hole and remove from the
microfilter (B).
5. Clean all filters thoroughly under running
water.
6. Remove the flat filter from the base of the
washing compartment and clean both
faces thoroughly.
7. Put the flat filter back in the base of the
washing compartment and ensure that it
fits perfectly under the two guides (C).
8.
Place the coarse filter (A) in the microfilter
(B) and press together.
20
Care and cleaning
  • Page 1 1
  • Page 2 2
  • Page 3 3
  • Page 4 4
  • Page 5 5
  • Page 6 6
  • Page 7 7
  • Page 8 8
  • Page 9 9
  • Page 10 10
  • Page 11 11
  • Page 12 12
  • Page 13 13
  • Page 14 14
  • Page 15 15
  • Page 16 16
  • Page 17 17
  • Page 18 18
  • Page 19 19
  • Page 20 20
  • Page 21 21
  • Page 22 22
  • Page 23 23
  • Page 24 24
  • Page 25 25
  • Page 26 26
  • Page 27 27
  • Page 28 28
  • Page 29 29
  • Page 30 30
  • Page 31 31
  • Page 32 32

Aeg-Electrolux EHL4-4CN User manual

Category
Dishwashers
Type
User manual
This manual is also suitable for

Ask a question and I''ll find the answer in the document

Finding information in a document is now easier with AI