Page is loading ...

VideoXpert OpsCenter
v 3.1 Operations Manual
Document number:C5669M-L
Publication date:12/18

VideoXpert OpsCenter v 3.1 Operations Manual
C5669M-L | 12/18 2
Table of Contents
Installing and Configuring VxOpsCenter 5
Installing VxOpsCenter (VideoXpert Enterprise only) 5
Running the Application for the First Time 5
Setting Up Your Workstation 6
Configuring Monitors for VideoXpert Workstations (VideoXpert Enterprise Only) 7
Configuring VX System Connections 8
Enabling or Disabling Multi-System Access (Simultaneous Server Connections) 9
Adding Servers to VxOpsCenter 10
Editing a System Connection 11
Deleting a System Connection 11
Understanding System Streaming Performance Settings 12
Configuring Shared Display Mode 12
Configuring VxOpsCenter Kiosk Mode (Optional) 14
Logging In 15
Understanding User Account Types 15
Setting Your Display Language 15
Changing Your Workstation Account Password 16
Using the VxOpsCenter Interface 17
Adding Quick Access Icons to Mission Control 18
Using Context Menus 18
Using Tooltips 19
Using Watched By 20
Setting User Preferences 20
Updating General Settings 20
Updating Mission Control Settings 21
Updating Cells Settings 21
Updating Popups and Dialogs Settings 22
Using Tabs and Workspaces 23
Using Tab View Options and Modes 23
Configuring Tab View Options 23
Changing Tab Modes 24
Creating a New Tab 24
Opening a Saved Tab 25
Updating an Existing Tab 25
Changing Tab Layouts 25
Editing the Metadata of an Existing Tab 26
Creating a New Workspace 26
Opening a Saved Workspace 26
Updating a Saved Workspace 27
Edit the Metadata of an Existing Workspace 27
Deleting a Saved Tab from the System 27
Deleting a Workspace from the System 28
Viewing a Monitor Wall 29
Sending Views to Workstations or Shared Displays 30
Using View Launcher to Send Views to Workstations or Shared Displays 30
Using Quick Launch to Send Cells to Workstations or Shared Displays 31

VideoXpert OpsCenter v 3.1 Operations Manual
C5669M-L | 12/18 3
Watching Video 32
Understanding Cell Borders 32
Responding to an Alarm in a Cell 32
Rotating the Camera 33
Viewing Analytics Overlays 33
Enabling and Disabling Audio 34
Expanding a Cell to Full-Screen 34
Watching Recorded Video With VideoXpert 34
Watching Recorded Video with Edge Storage 35
Using Pixel Search (VideoXpert Professional Only) 35
Creating Bookmarks 36
Finding and Recalling Bookmarks 36
Editing, Unlocking, and Deleting Bookmarks 37
Synchronizing Video Playback 37
Creating a Live Sequence Mode 37
Creating an Alarm Sequence Mode 38
Editing Sequences 39
Pausing and Resuming Sequences 39
Setting up Snapshots 40
Taking Snapshots 40
Displaying Statistics 40
Viewing and Filtering Sources 40
Managing Tags 41
Viewing Tags in the Selected Camera(s) Panel 41
Creating and Assigning Tags in the Selected Camera(s) Panel 41
Deleting Tags in the System Panel 42
Creating Folders in the Folders Panel 42
Renaming a Folder in the Folders Panel 43
Deleting a Folder in the Folders Panel 43
Playback Controls 43
Controlling Cameras (PTZ) 44
Click-to-Center PTZ 45
Executing PTZ Presets and Patterns 45
Creating Presets 46
Editing Presets 46
Deleting Presets 46
Using Investigation Mode 48
Entering Investigation Mode 48
Creating Clips 48
Creating a Playlist 48
Previewing and Editing Playlists 49
Exporting a Playlist 49
Encrypting Export Files 50
Using the Export Archive 51
Downloading Exports 51
Editing an Export Name 51
Deleting One or More Exports 52
Using Investigation to View Video Stored on a Camera's Local Storage 53

VideoXpert OpsCenter v 3.1 Operations Manual
C5669M-L | 12/18 4
Pushing Video From the Camera to Storage 53
Playing Back Video After Moving it to Storage 54
Working with Plugins 55
Installing Plugins 55
Adding a Plugin to Your Workstation 55
Using the Event Viewer Plugin 55
Using the Image Viewer Plugin 56
Using the VxMaps Plugin 57
Understanding VxMaps Permissions 57
Launching the VxMaps Plugin 57
Selecting a Map File 57
Working In a Map 57
Setting User Preferences for VxMaps (VxEnterprise Only) 58
Using the Mapping Plugin 59
Understanding Mapping Permissions (VideoXpert Enterprise Only) 59
Launching the Mapping Plugin 59
Configuring the Mapping Plugin 59
Selecting a Map File 59
Adding Cameras to a Map 60
Managing Available Maps 60
Setting User Preferences for Mapping 61
Viewing a Map 61
Using the Web Browser Plugin 62
Using the Access Control System Viewer Plugin (Optional) 62
Launching the Access Control System Viewer Plugin 62
Filtering the Events in the Access Control System Viewer 63
Configuring Access Control 63
Adding, Editing, and Deleting Access Control Servers 63
Filtering on Access Points 64
Filtering on Access Control Users 64
Using the AccessControl System Viewer Event Window 65
Closing a Plugin 65
Responding to Events 66
Using the Event Viewer 66
Using the Event Notifications Dialog Box 66
Logging Out 68
Closing the Application 69

VideoXpert OpsCenter v 3.1 Operations Manual
C5669M-L | 12/18 5
Installing and Configuring VxOpsCenter
On VideoXpert Enterprise systems you must install VxOpsCenter. On both VideoXpert Enterprise and
VideoXpert Professional systems, you must configure VxOpsCenter before use.
Installing VxOpsCenter (VideoXpert Enterprise only)
Your system must meet the minimum requirements and have Microsoft®.NET 4.6.1 or later installed
before you can install the VxOpsCenter Client application.
1. Run the VxOpsCenter EXE installer.
2. Read and accept the terms of the End User License Agreement, and then click Next.
3. Click Begin Installation.
4. Follow the instructions in the Installation Wizard to complete the installation.
5. Click Close.
Running the Application for the First Time
When you run the application for the first time, you will create your user account, configure basic
VxOpsCenter and video behaviors, and, most importantly, point VxOpsCenter to the VideoXpert system(s)
you want to use. Some steps in initial setup are optional; you only need to access these options if your
workstation and network differ from default settings. The general work flow is as follows:
1. If VxToolbox is open, close it.
Note:Do not run VxToolbox and VxOpsCenter at the same time. Doing so might cause
memory-related issues.
2. Run VxOpsCenter.
3. Create your Workstation Configuration account.
l This account is local to the workstation and preserves your configuration and your VideoXpert
system credentials from other users who might access your workstation.
l Your workstation configuration account credentials may be the same as your VideoXpert user
credentials, though you may want to use different credentials for your workstation configuration
account to maximize security.
4. Configure your workstation, including your monitor layout. See the section titled Setting Up Your
Workstation.
5. Configure System Server Connections. See the section titled Configuring VX System Connections.
6. Indicate whether or not to allow multi-system access. See the section titled Enabling or Disabling
Multi-System Access (Simultaneous Server Connections).
7. Login to VideoXpert with your standard credentials (not the Workstation Configuration credentials)
to begin using VideoXpert.

VideoXpert OpsCenter v 3.1 Operations Manual
C5669M-L | 12/18 6
Setting Up Your Workstation
Workstation settings determine the basic behavior of the system. You can re-configure the workstation at
any time.
1. In the VxOpsCenter Login window, from the Connect to System drop-down menu, select None -
Configure Workstation; enter values in the Username and Password fields; and then click Log In.
2. If the Workstation Configuration dialog box does not open, or to update the configuration later,
launch the Workstation Configuration dialog box: In Mission Control, click the User Menu icon ( ) ,
and then select Configure Workstation.
3. Enter a Workstation Name. This is the name by which VxCore will recognize the workstation and
the name by which other users will recognize the workstation when sending video, responding to
workstation-related events, etc.
4. Enter values in the Username and Password fields under Vx Workstation Account.
5. Under, Workstation Mode, select Normal or Shared Display mode. Shared Display mode provides
monitor-wall functionality for a workstation operating a single monitor. See the section titled
Configuring Shared Display Mode for more information about Shared Display mode.
6. For VideoXpert Enterprise systems only, if your workstation will support multiple monitors through
VxDecoder, click the Configure Monitors icon ( ) to the right of Configure Monitors to open the
Configure Monitors window for the workstation. See the section titled Configuring Monitors for
VideoXpert Workstations (VideoXpert Enterprise Only) to learn more about monitor configuration.
7. In the NTP Server for Enhanced Decoder area, do one of the following:
8. Click to select the radio button for Use Windows Time Service time server ( time.windows.com ).

VideoXpert OpsCenter v 3.1 Operations Manual
C5669M-L | 12/18 7
9. Click to select the radio button for Manually specify a time server, and then enter your NTP Server
Address.
10. (Optional) click the checkbox to select or deselect Enable hardware acceleration. Hardware
acceleration is enabled by default and should only be disabled if your workstation uses an
unsupported graphics chipset, or if you need to troubleshoot graphics issues that may result from
your graphics drivers and chipset.
11. Click Apply, OK, or VX System Connections to save your workstation configuration settings. If
you clicked VX System Connections, see the section titled Configuring VX System Connections.
Configuring Monitors for VideoXpert Workstations (VideoXpert Enterprise Only)
The VxOpsCenter supports monitors connected directly or monitors connected through Enhanced
Decoders over the network for VideoXpert Enterprise workstations. For best performance, it is
recommended that you run Windows® 8 or later on workstations operating decoder-driven monitors.
For workstations using multiple monitors driven by Enhanced Decoders, TightVNC server mirrors
Windows elements on the monitors that are driven by Enhanced Decoders over the network. Video
decoding processes are handled by the decoders driving each monitor, but the user experiences what
appears to be a single, unified Windows desktop.
1. Log in using the Workstation Configuration Account.
2.
In Mission Control, click the User Menu icon ( ) , and then select Configure Workstation.
3. Select Configure Monitors. If you have already performed initial configuration for the system, log
in as the VxOpsCenter local administrator first, and then select Configure Monitors.
4. For each monitor:
a. Click to select the monitor.
b. Click to select the radio button for either Direct or Decoder.
c. If you selected Decoder, enter the IP address of the decoder, and then click Connect.

VideoXpert OpsCenter v 3.1 Operations Manual
C5669M-L | 12/18 8
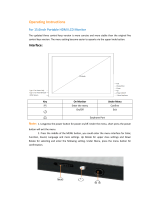
Figure 1: Connecting Monitors to Enhanced Decoders
d. The example above shows the assigned monitor number (32) in the lower right corner of the
monitor.
e. (Optional) If you are going to send video to a monitor remotely, assign a number to the monitor.
To do so: enter a number in the VxSystem Monitor Number field, and then click to select or
deselect the checkbox for Auto-accept all shared video streams and views. When Auto-accept
all shared video streams and views is selected, the monitor will automatically accept video
streams and views that have been sent by another workstation or shared display; when it is not
selected, a user must manually accept shared video streams and views on the monitor.
Note: Pelco recommends that you only assign a unique number to a monitor (workstation
or shared display) if you will send video to it remotely. If you set a monitor number, every
change made to that window will be sent to the server. This is an unnecessary load if you
are not using the monitor as part of a monitor wall.
5. When you have configured all monitors, click Done.
Configuring VX System Connections
The list of VX System Connections determines the VideoXpert environments to which your VxOpsCenter
can connect. When users log in with their VideoXpert system credentials, VxOpsCenter will connect them
to relevant VideoXpert environments. If a server is not in the list of system server connections, users will
not be able to connect to it using VxOpsCenter.
Only the Workstation Configuration account can define system server connections. When you add
systems using the Workstation Configuration account, and you are working in MSA mode, you can elect to

VideoXpert OpsCenter v 3.1 Operations Manual
C5669M-L | 12/18 9
provide credentials. If you add credentials for systems, then your Workstation Configuration account will
also immediately connect you with your systems. If you do not provide credentials, then you must
manually enter credentials for each system after you log in as the workstation configuration user. If you are
using Single Server Access mode (non-MSA mode), you must always provide the credentials when logging
in.
When setting up a connection to a server, you can determine streaming performance to the system. By
default, system connections use the best possible streaming options, but you may need to disable settings
or adjust your connection speed to account for the network between the workstation and the system to
which you will connect. See the section titled Understanding System Streaming Performance Settings.
Note: To optimize decoder performance in Windows 7, download and install the DFMirage mirror
driver. Do not install the DFMirage driver if running a version of Windows other than Windows 7.
Enabling or Disabling Multi-System Access (Simultaneous Server Connections)
Multi-system access allows you to access multiple VideoXpert environments simultaneously using your
Workstation Configuration account. When enabled, your Workstation Configuration account will store
credentials for your VX systems, acting like a master key for VideoXpert (on this workstation). When you
log in with your Workstation Configuration account, you will be able to select and access video from all of
your VX systems without having to provide credentials for each of your systems.
Note:The multi-system access option takes effect whether or not you have configured the
workstation to connect to multiple systems.
To enable multi-system access:
1. Select the system to which you will connect; to log in as the Workstation Configuration User, you
must select None - Configure Workstation.
2. Log into VxOpsCenter with the Workstation Configuration credentials.
3.
In Mission Control, click the User Menu icon ( ), and then select Configure Workstation
4. Click VX System Connections.
5. Click to select or deselect the checkbox for Enable simultaneous access to multiple systems.
When you select this checkbox, the Multi-System Access Login dialog box opens. Click OK to
acknowledge the information and close the dialog box.
With multi-system access enabled, the Systems section is available within VxOpsCenter. You can select
or deselect systems to show or hide sources belonging to your various systems.
If the Enable simultaneous access to multiple systems setting is disabled, before you log in, you must
select the system to which you will connect; to log in with the Workstation Configuration credentials, you
must select None - Configure Workstation.

VideoXpert OpsCenter v 3.1 Operations Manual
C5669M-L | 12/18 10
Figure 2: Login prompt with simultaneous system access disabled
Adding Servers to VxOpsCenter
1. Log into VxOpsCenter with the Workstation Configuration Account.
2.
In Mission Control, click the User Menu icon ( ), and then select Configure Workstation.
3. Click VX System Connections.
4. If there is an existing system list, import it.
a.
Click the menu icon ( ) at the lower left of the Workstation Configuration window.
b. Click Import System List.
c. Click Browse, and then select the appropriate file.
d. Review the information in the Import System List window, and do one of the following:
l Click to select the radio button for Replace List.
l Click to select the radio button for Merge Lists, and then click to select the checkboxes for
each system that you want to replace with the imported information.
e. Click Import.
5. To add another server:
a.
Click the Add System Connection icon ( ) at the lower right of the Workstation Configuration
window.
b. (Optional) Provide notes about the server. The notes are only available to the Workstation
Configuration account.
c. Provide the IP of the server in the Server Address field, and adjust the HTTPS Port value if
different from the default.
d. (Optional) Adjust System Streaming Performance settings. See the section titled
Understanding System Streaming Performance Settings
e. (Optional) Click to select or deselect the checkbox for Validate SSL/TLS Certificate...
f. (Optional) Type values in the Username and Password fields.

VideoXpert OpsCenter v 3.1 Operations Manual
C5669M-L | 12/18 11
g. Click Test Connection to verify that you have provided the correct server address; testing the
connection will require you to provide credentials to the server.
h. Click Save.
6. If you want to export the System List:
a.
Click the menu icon ( ) at the lower left of the Workstation Configuration window.
b. Click Export System List.
c. In the Export System List window, enter a value in the System List File Name field,
d. In the To Location field, click Browse and browse to the location to which the file will be saved.
e. (Optional) Click to select Include Username & Password for each System.
f. Click Save.
7. When you have added all appropriate connections, click OK.
8. If the Log Out Required dialog box opens, click OK. You will be logged out. The configuration
changes are applied when you log back in.
Editing a System Connection
1. Log into VxOpsCenter with the Workstation Configuration Account.
2.
In Mission Control, click the User Menu icon ( ), and then select Configure Workstation.
3. Click VX System Connections.
4. Click to select the system connection to be edited.
5.
Click the Edit System Connection icon ( ) at the lower right of the Workstation Configuration
dialog box.
6. In the Configure System Connection dialog box, make all necessary updates, and then click Save.
7. In the Workstation Configuration dialog box, click OK to save the settings.
8. If the Log Out Required dialog box opens, click OK. You will be logged out. The configuration
changes are applied when you log back in.
Deleting a System Connection
l 1. Log into VxOpsCenter with the Workstation Configuration Account.
2.
In Mission Control, click the User Menu icon ( ), and then select Configure Workstation.
3. Click VX System Connections.
4. Click to select the system connection to be deleted.
5.
Click the Delete System Connection icon ( ) at the lower right of the window to delete the
connection to the server.
6. In the Delete System Server Connection dialog box, click OK to confirm the deletion.
7. In the Workstation Configuration window, click OK to save the settings.
8. If the Log Out Required dialog box opens, click OK. You will be logged out. The configuration
changes are applied when you log back in.

VideoXpert OpsCenter v 3.1 Operations Manual
C5669M-L | 12/18 12
Understanding System Streaming Performance Settings
System streaming performance settings determine the quality of streams you receive or, in some cases,
whether you receive a stream at all from a particular system. These settings affect frame rate and latency
of video, typically for the better with each subsequent setting. However, these options may not be available
for your network. VxOpsCenter uses the deepest selected option that is provided by the server.
If you deselect all Streaming Performance options, you will engage JPEG Pull streaming. JPEG Pull
streaming is always available and works on virtually all network types (anywhere a TCP connection is
available). It works even on slow connections, in part because of its lower quality (low frame rate and high
latency).
To set the System Streaming Performance, log in with the Workstation Configuration account and add or
edit a system.
l Allow RTSP/RTP is recommended for most system configurations. Select this to enable RTSP
streaming over TCP (or Unicast or Multicast UDP, depending on subsequent settings). This option
provides a higher quality stream than JPEG Pull on all but the slowest networks.
l Allow UDP is recommended for most LAN configurations. This setting enables Unicast streaming
over UDP. Streaming over UDP is more efficient and has lower latency than streaming over TCP.
However, UDP traffic is blocked by some WAN networks, and by fewer LAN networks. If you
encounter streaming problems, try deselecting it.
l Allow Multicast is recommended for most enterprise-level networks whose switches allow
multicast traffic. This setting enables Multicast streaming over UDP. Multicast UDP streaming is
even more efficient than unicast UDP streaming. However, multicast traffic is blocked by most
WAN networks, and by some LAN networks.
l Connection Speed determines the type and resolution of video available to you; at slower
connection speeds, you will receive video transcoded into lower resolutions. When streaming
JPEGs, your connection speed determines the compression of JPEG images (the lower the speed,
the greater the compression).
– 512k restricts you to JPEG streaming.
– 1 Mbps restricts video to CIF resolution (352 x 240) or smaller.
– 5 Mbps restricts video to D1 resolution (720 x 480) or smaller.
– 10 Mbps restricts video to secondary streams when available.
– Connection speeds greater than 10 Mbps can access full resolution video. Options are 50
Mbps, 100 Mbps, 1 Gbps, and 10 Gbps.
Configuring Shared Display Mode
A Shared Display is a single-monitor workstation that provides monitor wall functionality within
VideoXpert. In this mode, local controls are disabled; you will not control the application locally. Rather,
you and other users will send tabs and video to the shared display and control the shared display remotely.
Your workstation must have only one, locally-connected monitor to support Shared Display mode. (If more
than one monitor is connected to the workstation, you will be unable to put the workstation into Shared
Display mode.) Putting the VxOpsCenter in Shared Display mode causes the VxOpsCenter application to
start and log-in automatically when Windows starts. Because the workstation is intended to start without
user interaction, it is recommended that you configure Windows to start and log-in automatically for shared
displays.
The user account you provide when setting up Shared Display mode must have the Setup Edge Devices
permission. The account should also have rights to view and control any cameras you send to the monitor;

VideoXpert OpsCenter v 3.1 Operations Manual
C5669M-L | 12/18 13
the shared display cannot display cameras it does not have permission to access, even if the user sending
something to the shared display has permission to view those cameras.
Note:Shared display is not available if multi-system access is enabled.
To configure an VxOpsCenter for Shared Display mode:
1. If you have not already done so access the Configure Workstation window:
a. Log into VxOpsCenter with the Workstation Configuration account.
b.
In Mission Control, click the User Menu icon ( ), and then select Configure Workstation.
2. Click the Workstation Settings tab.
3. In the Workstation Mode section of the window, click to select the checkbox for Shared Display.
4. Provide a number for the monitor. The number will allow you to set rules to send video to your shared
display, or to send video to the shared display by number.
5. (Optional) Enter or select a VX System to create a VideoXpert Connection. Selecting this option
opens a dialog to configure system server connections. See the section titled Configuring VX
System Connections.
6. Provide the user name and password of an account with credentials to view video; the account
provided must have access to cameras and functions you want to use through the shared monitor.

VideoXpert OpsCenter v 3.1 Operations Manual
C5669M-L | 12/18 14
7. (Optional) Click the checkbox to select or deselect Show camera names and timestamps in video
cells. Whether the user sharing video has names and timestamps enabled, the shared display uses
this preference to determine whether or not to display overlays.
8. (Optional) Click the checkbox to select or deselect the Show Shared Display title bar.
9. In the Aspect Ratio area, click to select the radio button to either Maintain video aspect ratios or
Stretch video to fill the cells. If you select Stretch video to fill the cells, an option appears that allows
you to collapse space between cells.
10. Click Save.
Configuring VxOpsCenter Kiosk Mode (Optional)
You can run VxOpsCenter in kiosk mode, so that only VxOpsCenter Client will be run without access to
any other Windows applications.
l The launcher and script are not included in the default installer of VxOpsCenter.
l To run in kiosk mode, install VxOpsCenter on a machine with Windows 10 operating system using
VxOpsCenter 2.5 or later.
Note:If not done properly, this process might result in a loss of critical data. In addition, the process
has several complex steps that, if not done properly, might result in unforeseen results. Before
beginning this process, ensure that all important data is backed up. If you are uncertain of this
process or are unfamiliar with the requirements, contact Product Support Services for assistance.
To install and configure VxOpsCenter to run in kiosk mode:
1. Install VxOpsCenter v 2.5 or later on a Windows 10 PC.
2. Download OpsCenterLauncher.zip and kiosk_mode_script_v2.ps1.
3. Unzip OpsCenterLauncher.zip and copy the files to the VxOpsCenter directory at c:\Program
Files\Pelco\VideoXpert\VxOpsCenter.
Note:The path must be the same as the path specified in kiosk_mode_script_v2.ps1.
Note:If the OpcCenter Client kiosk mode is updated to a newer version, copy the contents of
OpsCenterLauncher.zip to the folder again.
4. Create a local standard user account called “Operator”.
Note:The account must be the same as the account specified in kiosk_mode_script_v2.ps1.
5. Run kiosk_mode_script_v2.ps1 as the Windows Administrator.

VideoXpert OpsCenter v 3.1 Operations Manual
C5669M-L | 12/18 15
Logging In
Open the VxOpsCenter application.
1. Enter your credentials.
2. (Optional) If VxOpsCenter is configured to connect to a single system at a time, select the system
you want to access. See the section titled Understanding User Account Types.
3. Click Log In.
Understanding User Account Types
VxOpsCenter supports two types of users:
l The Workstation Configuration account provides access to VxOpsCenter settings and allows you to
configure connections to VX systems. The configuration account should be reserved for
administrators, especially if multiple users will share the same workstation.
l Logging in as a standard VX system user provides access to standard VX features - viewing video,
controlling cameras, etc.
Note: If multi-system access is enabled, only Workstation Configuration accounts are supported.
If your user account is both the Workstation Configuration account and a VX system user, VxOpsCenter
will log you into applicable VX systems and allow access to workstation configuration settings.
When you log in as a standard VX system user, the system will only populate sources and options you
have permissions to see (determined by the roles assigned to your user account). If a system or camera
does not appear when you log in, then the system or camera might be offline, or you might lack the
appropriate permissions.
Setting Your Display Language
The localization presented by the VxOpsCenter client is based on the Region and Language settings within
Windows.
Note:You must have the appropriate Windows language pack to expose display languages in the
VxOpsCenter Client.
To set or change your VxOpsCenter display language:
1. Close the VxOpsCenter software if it is already running.
2. Click Start (if necessary), and then search for and click to open Region & language settings.
3. In the Languages area, if the appropriate language is not present, click Add a language. Follow the
prompts to add the appropriate language.
4. In the Languages area, click on the appropriate language, then click Set as default.
5. Close the Settings window.
6. Run the VxOpsCenter Client.

VideoXpert OpsCenter v 3.1 Operations Manual
C5669M-L | 12/18 16
Changing Your Workstation Account Password
Log into VxOpsCenter with the Workstation Configuration Account.
1.
In Mission Control, click the User Menu icon ( ), and then select Configure Workstation
2. Click Workstation Settings.
3. In the VX Workstation Account area, in the Password field, enter a new password.
4. Click Apply.
5. Click OK.

VideoXpert OpsCenter v 3.1 Operations Manual
C5669M-L | 12/18 17
Using the VxOpsCenter Interface
1 Mission Control contains settings, and all the items with which you may populate workspaces.
2 The Views panel provides access to New Tabs, Saved Tabs, and Workspaces. Your workspace
consists of tabs and monitors populated with cameras or plug-ins. You may have one active
workspace at a time containing some number of tabs (typically one tab per monitor, but that is not a
limitation); each tab contains some number of video streams or plug-ins.
3 The Systems panel enables you to add or edit system connections. This is available only when
running in multi-system access (MSA)mode.
4 The Content panel provides access to the Sources tab, whichshows all the video sources that the
current user can access. Use the filters in the panel to sort the list in real time. It also provides
access to the Plugins tab, which contains content and overlay plugins. Content plug-ins consume a
cell, like the Mapping or Image Viewer plugins. Overlay plugins operate in the same cell as video,
providing additional information about the video in question.
5 The Bookmarks panel shows clips of video that you or other users have bookmarked. Use the filters
in the panel to sort the list in real time.
6 The Select Grid Layout controls or the New Tabs panel determine the number of cells in a tab.
7 A Tab is a window of the VxOpsCenter containing cells.

VideoXpert OpsCenter v 3.1 Operations Manual
C5669M-L | 12/18 18
8 A Cell displays a single camera or plug-in within VideoXpert. Cell highlights determine whether a cell
is selected, playing-back video, or is in PTZ mode.
9 Playback Controls and the timeline in a selected cell applies to that cell only.
10 Playback Controls and the timeline at the bottom of the tab applies to all synchronized cells within
the tab.
11 Synchronous Play enables you to select cells for which playback is synchronized.
12 Tooltips show additional information about your video sources. Hover over entries in the Sources
and Bookmarks panels to reveal tooltips.
13 The User Menu contains preferences and controls specific to the current user. Through this menu,
you can reach application Preferences, the Export Archive, the View Launcher, and other user
options.
14 The Event Counter shows how many active events that require response from you or someone with
similar permissions.
15
The Undock Mission Control icon ( ) undocks Mission Control from its current location. When it
is undocked, the Dock Mission Control icon ( ) docks it to any tab in the workspace.
16
The Move Mission Control to the Left ( ) icon is visible when Mission Control is in the default
position--the right panel, and moves it to the left panel. The Move Mission Control to the Right icon (
) is visible when Mission Control is the left panel, and moves it to the right panel.
17 Quick access to frequently used tools are provided in Mission Control, just above the Views panel.
Click the corresponding symbol to get to New Tabs ( ), Plugins ( ), Saved Tabs ( ), and
Workspaces ( ).
Adding Quick Access Icons to Mission Control
Quick access to frequently used tools are provided in Mission Control, just above the Views panel. They
can be added and removed. To add or remove the quick access icons:
1. In Mission Control, right-click in the space above Views.
2. Click to select (to add) or deselect (to remove) a tools icon.
3. Repeat these steps to add or remove another tools icon.
Using Context Menus
You can right-click entries in the source list or cameras in your active workspace to reveal additional
options available to your user and the devices you want to use. VxOpsCenter provides users with only the
options available to you at any given time; availability may be limited by factors including your user
permissions, the types of cameras you use, and whether or not PTZ mode is engaged. Options include the
following.
l Send To enables you to choose a view to send (a saved tab, saved investigation, or workspace), a
destination for the view, and whether to force acceptance of the sent view. See the section titled
Sending Views to Users, Workstations, or Shared Displays.
l Edit Source enables you to assign the selected source a new name or number. See the section
titled Editing the Name or Number of a Source.

VideoXpert OpsCenter v 3.1 Operations Manual
C5669M-L | 12/18 19
l Manage Tags shows you what tags are assigned to the selected camera(s), system, and folders;
and lets you filter which tags to show. See the section titled Managing Tags.
l Open Camera Configuration in Browser opens the camera Web UI, and enables you to login and
make changes to the camera configuration. Refer to the camera operations manual.
l Open in VxToolbox opens VxToolbox to the corresponding system, and highlights the source in
the Devices (center) panel. Refer to the current version of the VxToolbox User Guide (for
VideoXpert Enterprise systems) or to the VxToolbox section of the VideoXpert Professional User
Guide.
l Rotate lets you select the default rotation, 180 degrees, or plus or minus 90 degrees. See the
section titled Rotating the Camera.
l Diagnostics and Analytics lets you toggle:
– Show Statistics to display or hide camera statistics including such things as bitrates, mode,
source, and call-up time. See the section titled Displaying Statistics.
– Show Simple-Motion Data or Show Analytics Drawing Data to display or hide analytics
overlays on some Pelco cameras. See the section titled Using Analytics Overlays.
l Relays to activate or deactivate a relay on the device.
l Home Preset returns the camera to the home position. See the section titled Executing PTZ
Presets and Patterns.
l Presets lets you select an existing preset position, edit an existing preset position, and create a new
preset position. See the section titled Executing PTZ Presets and Patterns.
l Pattern enables you to run an existing pattern. Patterns must be created on the camera. Refer to the
camera operations manual.
l Refresh Presets and Patterns retrieves the list of presets and patterns from the camera. It does
not overwrite or delete any patterns created from VxOpsCenter.
l Send Preset Number will send a preset to a specified cell in a specified monitor; and can display
the data source, jump to a specified time, and trigger a preset. See the section titled Sending Cells
to Shared Displays.
l Search Recordings for Motion (Pixel Search) is available in VideoXpert Professional only, and
allows you to quickly find search for motion in a camera recording. See the section titled Using Pixel
Search.
Using Tooltips
Hover over any bookmark in a cell or in the Bookmarks panel to reveal additional information about the
bookmark. This information might include:
l The name of the bookmark
l The name of the device
l The date and time at the middle of the bookmark recording time
l An image from the recorded bookmark
Hover over the device symbol on any source in the Sources panel to reveal additional information about the
source, including:
l The name of the source
l The current image of the source (if enabled)
l Whether or not the camera is Online, On Screen, and Recording, and whether PTZ is locked (if the
camera has PTZ).

VideoXpert OpsCenter v 3.1 Operations Manual
C5669M-L | 12/18 20
l Watched by information
l Tags associated with the source (if any)
l Technical Details such as: whether or not there is camera storage, the IP address, the camera ID,
the target location for recording (if any), the camera model, the camera serial number, and the
camera software version
Click on View to display the source in a cell.
Using Watched By
If you have the “Multiview” permission, you will see a Watched by field in tooltips throughout the
VxOpsCenter interface. The Watched by field shows users watching live video from a particular video
source; the Watched by field does not show users playing back video recorded from a video source.
If the users listed in the Watched by field are viewing video from a different site than you, the tooltip will
also attempt to indicate the site from which other users are watching video. If users are watching video
from an aggregated site, the tooltip will state the site name in parenthesis. If you are watching video from
an aggregated site, and the users listed in the Watched by field are accessing VideoXpert from the
Aggregation (parent) site, then the tooltip will simply list parent site.
Setting User Preferences
When logged in to VideoXpert, you can set some basic preferences for behaviors within the VxOpsCenter
application.To access the Preferences window:
1.
In Mission Control, click the User Menu icon ( ).
2. Click Preferences.
The Preferences window opens.
Updating General Settings
1.
In Mission Control, click the User Menu icon ( ).
2. Click Preferences.
3. In the Preferences window, click General.
4. (Optional) Click Reset Tips and Warnings, and then click OK in the Reset Warnings confirmation
window.
5. (Optional) Click to select the checkbox to enable Display system time and date in the window
footer.
6. Click Done to exit the Preferences window.
/