Jenn-Air JF42SEFXDB01 Owner's manual

Category
Fridges
Type
Owner's manual
JENN-AIR_BOTTOMMOUNTBUILT-INREFRIGERATOR
REFRIGERADOREMPOTRADO
CON MONTAJEINFERIORJENN-AIR_
RI_FRIGI_RATEURENCASTRI_AVEC
CONGI_LA'EURENDESSOUSJENN-AII_
USE& CAREGUIDE
For questions about features, operation/performance, parts, accessories, or service, call:
1-800-JENNAIR (1-800-536-6247) or visit our website at www.jennair.com.
In Canada, call: 1-800-807-6777, or visit our website at www.jennair.ca.
MANUAL DEUSOY CUIDADO
Si tiene preguntas respecto alas caracteristicas, funcionamiento, rendimiento, partes, accesorios o servicio tecnico, Ilame al:
1-800-JENNAIR (1-800-536-6247) o visite nuestro sitio de internet: www.jennair.com.
En CanadA, Ilame al: 1-800-807-6777, o visite nuestro sitio de internet: www.jennair.ca.
GUIDE D'UTILISATIONETD'ENTRETIEN
Au Canada, pour assistance, installation ou service, composez le 1-800-807-6777 ou visitez notre site web www.jennair.ca.
Table of Contents/[ndice/Table des matieres ...................................................................................... 2
_°JENN-AIRo
W10183787A
TABLEOF CONTENTS
ASSISTANCE OR SERVICE ........................................................................ 3
ACCESSORIES ............................................................................................ 3
REFRIGERATOR SAFETY ........................................................................... 3
Proper Disposal of Your Old Refrigerator ................................................. 4
BEFORE USE ............................................................................................... 4
REFRIGERATOR USE ................................................................................. 4
Power On/Off Switch ................................................................................ 4
Water Supply Requirements ..................................................................... 5
Water System Preparation ........................................................................ 5
Using the Controls .................................................................................... 6
Dell and Crisper Pans ............................................................................... 7
Water Filter Indicator ................................................................................. 8
Water Filtration System ........................................................................... 8
Ice Maker and Storage Bin ....................................................................... 9
REFRIGERATOR CARE .............................................................................. 9
Cleaning .................................................................................................... 9
Changing the Light Bulbs ....................................................................... 10
Power Interruptions ................................................................................ 10
Vacation Care ......................................................................................... 10
TROUBLESHOOTING ............................................................................... 11
Refrigerator Operation ............................................................................ 11
Temperature and Moisture ..................................................................... 12
Ice and Water .......................................................................................... 12
WATER FILTER CERTIFICATIONS .......................................................... 13
PERFORMANCE DATA SHEETS ............................................................. 14
WARRANTY ............................................................................................... 16
[NDICE
AYUDA O SERVICIO TI_CNICO ................................................................ 17
ACCESORIOS ............................................................................................ 17
SEGURIDAD DEL REFRIGERADOR ........................................................ 17
C6mo deshacerse adecuadamente de su refrigerador viejo ................. 18
ANTES DE USAR ....................................................................................... 18
USO DE SU REFRIGERADOR .................................................................. 19
Interruptor de encendido/apagado ........................................................ 19
Requisitos del suministro de agua ......................................................... 19
Preparaci6n del sistema de agua ........................................................... 20
Uso de los controles ............................................................................... 20
Cajones para carnes frias y verduras ..................................................... 22
Indicador del filtro de agua ..................................................................... 23
Sistema de filtraci6n de agua ................................................................. 23
F&brica de hielo y dep6sito .................................................................... 24
CUIDADO DE SU REFRIGERADOR ........................................................ 24
Limpieza .................................................................................................. 24
C6mo cambiar los focos ........................................................................ 25
Cortes de corriente ................................................................................. 25
Cuidado durante las vacaciones ............................................................ 25
SOLUClON DE PROBLEMAS ................................................................... 26
Funcionamiento del refrigerador ............................................................ 26
Temperatura y humedad ........................................................................ 27
Hielo y agua ............................................................................................ 27
HOJA DE DATOS DEL RENDIMIENTO ................................................... 28
GARANTIA ................................................................................................. 30
TABLEDESMATIERES
ASSISTANCE OU SERVICE ...................................................................... 31
ACCESSOIRES .......................................................................................... 31
SI_CURITI_ DU RI_FRIGI_RATEUR ........................................................... 31
Mise au rebut de votre vieux refrig_rateur ............................................. 32
AVANT L UTILISATION ............................................................................. 32
UTILISATION DU RleFRIGleRATEUR ....................................................... 33
Commutateur marche/arr6t .................................................................... 33
Specifications de I'alimentation en eau.................................................. 33
Preparation du syst_me d'eau ................................................................ 34
Utilisation des commandes .................................................................... 34
Bac pour specialit_s alimentaires et bac & legumes .............................. 36
Indicateur du filtre &eau ......................................................................... 36
Syst_me de filtration d'eau ..................................................................... 37
Machine &glagons et bac d'entreposage .............................................. 38
ENTRETIEN DU RI_FRIGI_RATEUR ......................................................... 38
Nettoyage ............................................................................................... 38
Remplacement des ampoules d'eclairage ............................................. 39
Pannes de courant .................................................................................. 39
Entretien avant les vacances .................................................................. 39
DlePANNAGE ............................................................................................. 40
Fonctionnement du refrig6rateur ............................................................ 40
Temperature et humidit6 ........................................................................ 41
Glagons et eau ........................................................................................ 41
FEUlLLES DE DONNleES SUR LA PERFORMANCE ............................. 42
GARANTIE .................................................................................................. 44
2
AssistanceorService
If you need assistance or service, first see the "Troubleshooting"
section. Additional help is available. Call us at 1-800-JENNAIR
(1-800-536-6247} from anywhere in the U.S.A., or write:
Jenn-Air Brand Home Appliances
Customer experience Center
553 Benson Road
Benton Harbor, MI 49022-2692
Information may also be obtained by visiting our website at
www.jennair.com.
In Canada, for assistance, installation or service, call us at
1-800-807-6777, or write:
Jenn-Air Brand Home Appliances
Customer eXperience Centre
1901 Minnesota Court
Mississauga, Ontario L5N 3A7
In Canada, visit www.jennair.ca.
Please include a daytime phone number in your correspondence.
Keep this book and your sales slip together for future
reference. You must provide proof of purchase or installation
date for in-warranty service.
Write down the following information about your appliance to help
you obtain assistance or service if you ever need it. You will need
to know your complete model number and serial number. You can
find this information on the model and serial number label, located
on the inside wall of the refrigerator compartment.
Dealer name
Serial number
Address
Phone number
Model number
Purchase date
To order replacement filters, call 1-800-JENNAIR
(1-800-536-6247) and ask for the part number listed below or
contact your authorized Jenn-Air dealer. In Canada, call
1-800-807-6777.
Replacement Water Filter Cartridge:
Order Part #4396841 (T2RFWG2)
REFRIGERATORSAFETY
Your safety and the safety of others are very important.
We have provided many important safety messages in this manual and on your appliance. Always read and obey all safety
messages.
This is the safety alert symbol.
This symbol alerts you to potential hazards that can kill or hurt you and others.
All safety messages will follow the safety alert symbol and either the word "DANGER" or "WARNING."
These words mean:
You can be killed or seriously injured if you don't immediately
follow instructions.
You can be killed or seriously injured if you don't follow
instructions.
All safety messages will tell you what the potential hazard is, tell you how to reduce the chance of injury, and tell you what can
happen if the instructions are not followed.
IMPORTANT SAFETY INSTRUCTIONS
WARNING; To reduce the risk of fire, electric shock, or injury when using your refrigerator, follow these basic precautions:
[] Plug into a grounded 3 prong outlet.
[] Do not remove ground prong.
[] Do not use an adapter.
[] Do not use an extension cord.
[] Disconnect power before servicing.
[] Replace all parts and panels before operating.
[] Remove doors from your old refrigerator.
[] Use nonflammable cleaner.
[] Keep flammable materials and vapors, such as gasoline,
away from refrigerator.
[] Use two or more people to move and install refrigerator.
[] Disconnect power before installing ice maker (on ice maker
kit ready models only).
[] Use a sturdy glass when dispensing ice (on some models).
SAVE THESE INSTRUCTIONS
Proper Disposal of Your Old Refrigerator
Suffocation Hazard
Remove doors from your old refrigerator.
Failure to do so can result in death or brain damage.
Before You Throw Away Your Old Refrigerator or Freezer:
Takeoff the doors.
Leave the shelves in place so that children may not easily
climb inside.
IMPORTANT: Child entrapment and suffocation are not problems
of the past. Junked or abandoned refrigerators are still dangerous
- even if they will sit for "just a few days." Ifyou are getting rid of
your old refrigerator, please follow these instructions to help
prevent accidents.
\
BEFOREUSE
Remove the Packaging
Clean Before Using
Remove tape and glue residue from surfaces before turning
on the refrigerator. Rub a small amount of liquid dish soap
over the adhesive with your fingers. Wipe with warm water
and dry.
Do not use sharp instruments, rubbing alcohol, flammable
fluids, or abrasive cleaners to remove tape or glue. These
products can damage the surface of your refrigerator. For
more information, see "Refrigerator Safety."
Dispose of/recycle all packaging materials.
After you remove all of the packaging materials, clean the inside of
your refrigerator before using it. See the cleaning instructions in
"Refrigerator Care."
Important information to know about glass shelves
and covers:
Do not clean glass shelves or covers with warm water when
they are cold. Shelves and covers may break if exposed to
sudden temperature changes or impact, such as bumping.
For your protection, tempered glass is designed to shatter
into many small, pebble-size pieces. This is normal. Glass
shelves and covers are heavy. Use special care when
removing them to avoid impact from dropping.
REFRIGERATORUSE
Electrical Shock Hazard
Plug into a grounded 3 prong outlet.
Do not remove ground prong.
Do not use an adapter.
Do not use an extension cord.
Failure to follow these instructions can result in death,
fire, or electrical shock.
Explosion Hazard
Keep flammable materials and vapors, such as
gasoline, away from refrigerator.
Failure to do so can result in death, explosion, or fire.
On,/ Swk:s:h
If you need to turn the power to your refrigerator On or Off, you
must remove the top grille assembly to access the power switch.
Turn the power to the refrigerator Off when cleaning your
refrigerator or changing light bulbs.
To Remove Top Grille:
1. Grasp both ends of the top grille.
2=
Push the top grille straight up, then pull straight out. Lay the
grille on a soft surface.
B A B
A. Top grille
B. Cabinet side trims
To Replace Top Grille:
1. Insert top grille hooks (located on the back of the top grille)
onto mounting bolts on the side trim.
2. Pull grille down slightly to lock into place.
Turn Power On or Off:
1. Remove top grille.
2. Press power switch to the On or Off position.
3. Replace top grille.
IMPORTANT: Be sure the power switch is set to the On position
after cleaning refrigerator or changing light bulbs.
.... A
A. Power switch
Read all directions before you begin.
IMPORTANT:
When your refrigerator was installed, the water connection
from the water source should have been connected to your
refrigerator. If your refrigerator is not connected to a water
source, see "Connect to Water Line" in the Installation
Instructions. Ifyou have any questions about your water
connection, see "Troubleshooting" or call a licensed, qualified
plumber.
If you turn the refrigerator on before the water line is
connected, turn the ice maker OFE See "Ice Maker and
Storage Bin."
All installations must meet local plumbing code requirements.
Wa_rPmssum
A cold water supply with water pressure between 30 and 120 psi
(207 and 827 kPa) is required to operate the water dispenser and
ice maker. If you have questions about your water pressure, see
"Troubleshooting" or call a licensed, qualified plumber.
Reverse Osmosis Water Supply
IMPORTANT: The pressure of the water supply coming out of a
reverse osmosis system going to the water inlet valve of the
refrigerator needs to be between 30 and 120 psi (207 and
827 kPa).
If a reverse osmosis water filtration system is connected to your
cold water supply, the water pressure to the reverse osmosis
system needs to be a minimum of 40 psi (276 kPa).
If the water pressure to the reverse osmosis system is less than
40 psi (276 kPa):
Check to see whether the sediment filter in the reverse
osmosis system is blocked. Replace the filter if necessary.
Allow the storagetank on thereverse osmosis system to refill
_ter heavy usage.
If your refrigerator has a water filter, it may further reduce the
water pressure when used in conjunction with a reverse
osmosis system. Remove the water filter. See "Water Filtration
System."
If you have questions about your water pressure, call a licensed,
qualified plumber.
Please read before using the water system.
Immediately after installation, follow the steps below to make sure
that the water system is properly cleaned.
1. Turn off the ice maker. Slide the ice maker On/Oft control,
located on the left-hand side of the ice bin, to the OFF (down)
position as shown.
d
A i
A. On/Off control
NOTE: Ifyour model has a base grille filter system, make sure the
base grille filter is properly installed.
Do not use with water that is microbiologically unsafe or of
unknown quality without adequate disinfection before or
after the system.
2= Turn on the ice maker. Slide the ice maker On/Off control,
located on the left-hand side of the ice bin, to the ON (up)
position. Please refer to "Ice Maker and Storage Bin" for
further instructions on the operation of your ice maker.
Allow 24 hours to produce the first batch of ice.
Discard the first three batches of ice produced.
IM PORTANT:
The refrigerator control adjusts the refrigerator compartment
temperature. The freezer control adjusts the freezer
compartment temperature.
Wait 24 hours after you turn on the refrigerator before you put
food into it. If you add food before the refrigerator has cooled
completely, your food may spoil.
NOTE: Adjusting the refrigerator and freezer controls to a
lower (colder) setting will not cool the compartments any
faster.
If the temperature is too warm or too cold in the refrigerator or
freezer, first check the air vents to be sure they are not
blocked before adjusting the controls.
The preset settings should be correct for normal household
usage. The controls are set correctly when milk or juice is as
cold as you like and when ice cream is firm.
The actual temperature may differ from the display when a
door is open for an extended period of time.
NOTE: The factory recommended set points are 0°F (-18°C) for
the freezer and 37°F (3°C) for the refrigerator.
Turning Refrigerator On and Viewing Set Points
Press the Cooling (ON/OFF)touch pad.
NOTES:
After the refrigerator is turned on, the Over Temperature audio
alarm and indicator light may activate every 11/2hours until the
refrigerator and freezer temperatures are below 48°F (9°C) and
15°F (-9°C), respectively, or until the alarm is turned off. To
turn off the audio alarm and indicator light, see "Master Alarm
Reset."
The ON/OFF touch pad on the control panel shuts down
refrigerator functions such as cooling, lighting, fans and
compressors. To turn the power off completely, use the power
ON/OFF switch located behind the top grille. See "Power On/
Off Switch."
Press the "Set to Recommended" touch pad to reset the set
points to the factory recommended temperatures.
NOTE: The set point range for the freezer is -5°F to 5°F
(-21 °C to -15°C). The set point range for the refrigerator is
33°F to 45°F (0°C to 7°C).
CONDITION/REASON: TEMPERATURE
ADJUSTMENT:
REFRIGERATOR too cold REFRIGERATOR Control
Not set correctly for conditions 1° higher
REFRIGERATOR too warm REFRIGERATOR Control
High use or room very warm 1° lower
FREEZER too cold FREEZER Control
Not set correctly for conditions 1° higher
FREEZER too warm/too little ice FREEZER Control
High use or heavy ice use 1° lower
Water Filter Indicator & Reset
See "Water Filter Indicator."
Max Cold
The Max Cold feature assists with periods of heavy ice usage, full
grocery loads, or temporarily warm room temperatures.
Press MAX COLD to turn on the Max Cold feature. The Max
Cold indicator light will remain on for 24 hours unless manually
turned off.
NOTE: The temperature display will remain at 34°F (1°C) and -5°F
(-21 °C) for the refrigerator and freezer compartments,
respectively, while the Max Cold feature is enabled. After
24 hours, the refrigerator returns to the previous temperature set
points.
Rest Mode
Viewing the Celsius Temperatures
Press F/C touch pad. To redisplay degrees Fahrenheit, press
F/C again.
NOTE: If the freezer temperature is below zero, the negative sign
next to the freezer display will light up. This is normal.
Adjusting Controls
The Rest Mode feature is designed for the traveler or for those
whose religious observances require turning off the lights and ice
maker. By selecting this feature, the temperature set points and
Deli Pan settings remain unchanged, the ice maker will be
disabled and the interior lights will turn off. For most efficient
refrigerator operation, it is recommended to exit the Rest Mode
when it is no longer required.
Press REST MODE to turn on the Rest Mode feature. This
feature will remain on until Rest Mode is pressed again.
NOTE: Wait at least 24 hours between adjustments. Recheck the
temperatures before other adjustments are made.
To Adjust Set Point Temperatures:
Press the refrigerator or freezer PLUS (+) or MINUS (-) touch
pad until the desired temperature is reached.
FROZEN FOOD
Set to Recommended 37_F ]_C
FRESH FOOD @
NOTE: If the Max Cold feature has been selected prior to turning
on the Rest Mode feature, then the set points will remain at 34°F
(1°C) and -5°F (-21 °C) for the refrigerator and freezer
compartments, respectively, until the Max Cold feature times out.
The refrigerator will then return to the previous temperature set
points chosen prior to the selection of the Max Cold feature, but
the lights and ice maker will remain off until the Rest Mode is
pressed again.
6
Energy Saver Feature (42" Bottom Mount Only)
The Energy Saver feature controls the heaters located inside the
hinged seal between the refrigerator doors. The heaters help keep
external moisture from forming on the hinged seal.
Press ENERGY SAVER to turn on this feature for low humidity
conditions. The ring around the control will be lit when Energy
Saver is on. If moisture begins to collect on the hinged seal
between the doors, press ENERGY SAVER again to turn off
this feature.
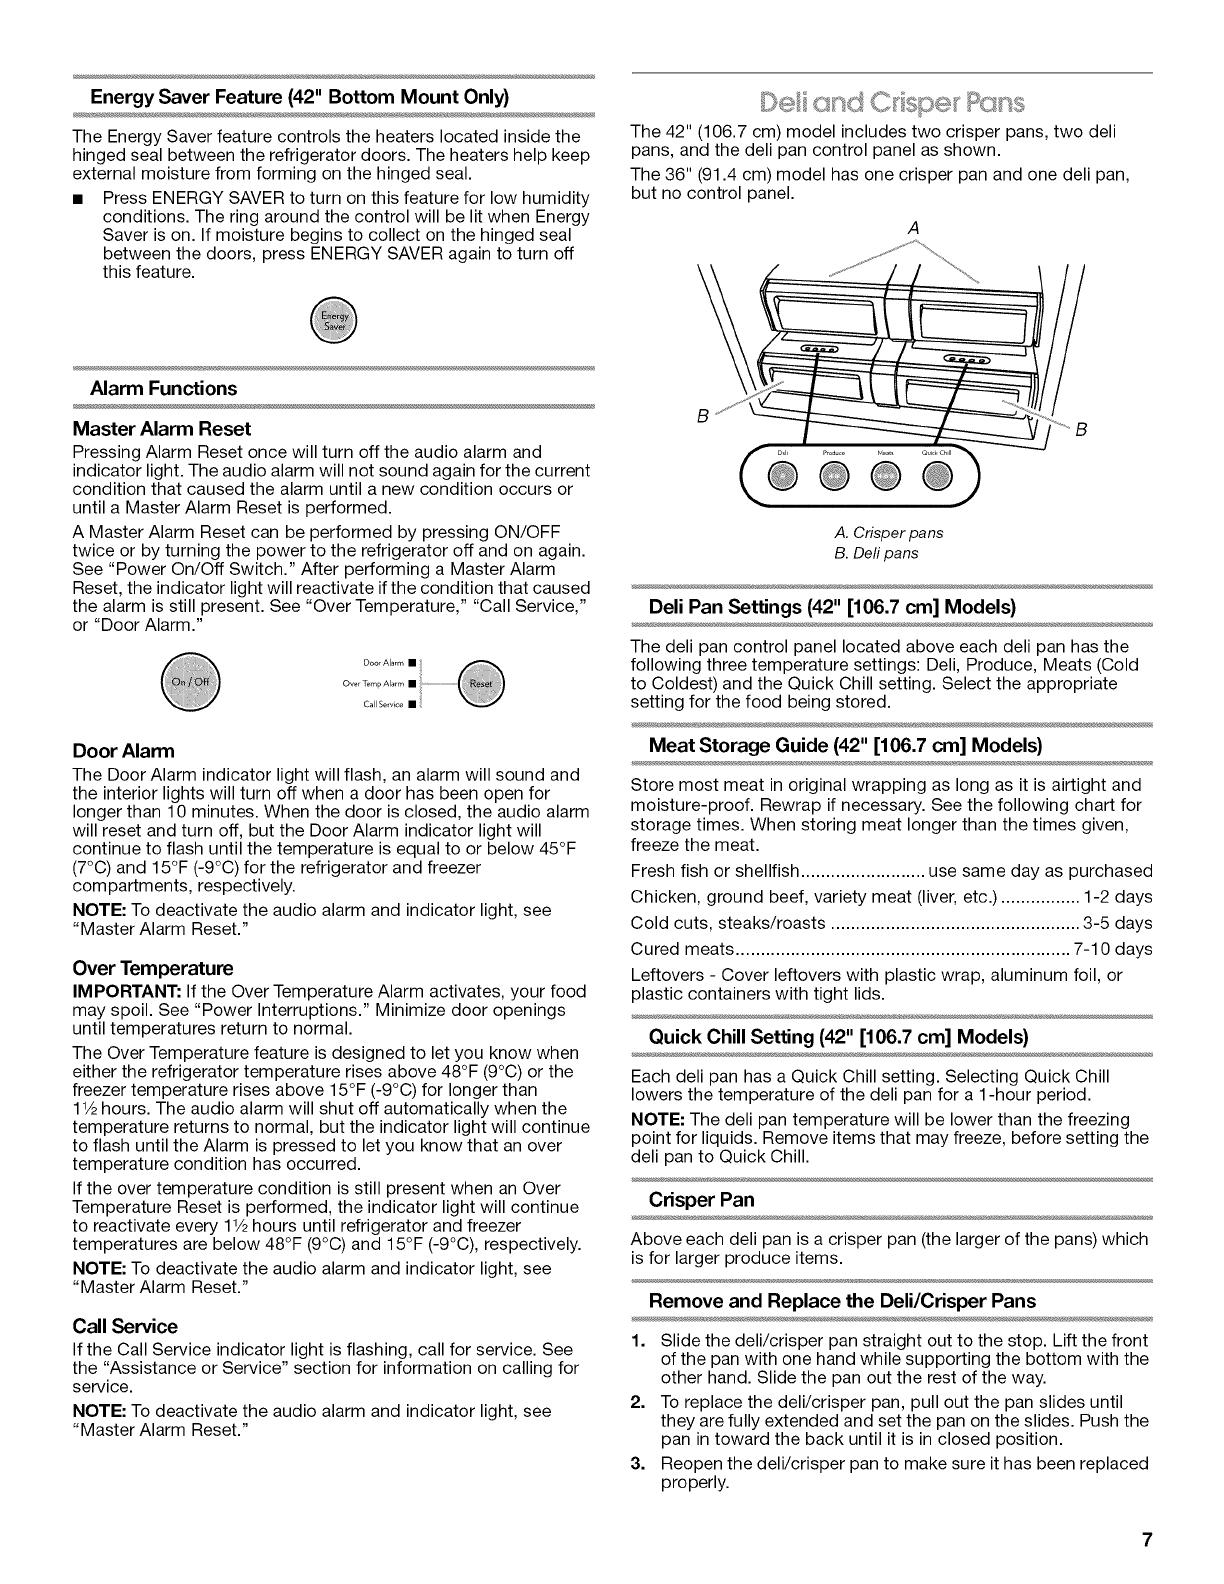
The 42" (106.7 cm) model includes two crisper pans, two deli
pans, and the deli pan control panel as shown.
The 36" (91.4 cm) model has one crisper pan and one deli pan,
but no control panel.
Alarm Functions
Master Alarm Reset
Pressing Alarm Reset once will turn off the audio alarm and
indicator light. The audio alarm will not sound again for the current
condition that caused the alarm until a new condition occurs or
until a Master Alarm Reset is performed.
A Master Alarm Reset can be performed by pressing ON/OFF
twice or by turning the power to the refrigerator off and on again.
See "Power On/Off Switch." After performing a Master Alarm
Reset, the indicator light will reactivate if the condition that caused
the alarm is still present. See "Over Temperature," "Call Service,"
or "Door Alarm."
Door Alarm
Over [emp Alarm
Call Service
Door Alarm
The Door Alarm indicator light will flash, an alarm will sound and
the interior lights will turn off when a door has been open for
longer than 10 minutes. When the door is closed, the audio alarm
will reset and turn off, but the Door Alarm indicator light will
continue to flash until the temperature is equal to or below 45°F
(7°C) and 15°F (-9°C) for the refrigerator and freezer
compartments, respectively.
NOTE: To deactivate the audio alarm and indicator light, see
"Master Alarm Reset."
Over Temperature
IMPORTANT: If the Over Temperature Alarm activates, your food
may spoil. See "Power Interruptions." Minimize door openings
until temperatures return to normal.
The Over Temperature feature is designed to let you know when
either the refrigerator temperature rises above 48°F (9°C) or the
freezer temperature rises above 15°F (-9°C) for longer than
11/2hours. The audio alarm will shut off automatically when the
temperature returns to normal, but the indicator light will continue
to flash until the Alarm is pressed to let you know that an over
temperature condition has occurred.
If the over temperature condition is still present when an Over
Temperature Reset is performed, the indicator light will continue
to reactivate every 11/2hours until refrigerator and freezer
temperatures are below 48°F (9°C) and 15°F (-9°C), respectively.
NOTE: To deactivate the audio alarm and indicator light, see
"Master Alarm Reset."
Call Service
If the Call Service indicator light is flashing, call for service. See
the "Assistance or Service" section for information on calling for
service.
NOTE: To deactivate the audio alarm and indicator light, see
"Master Alarm Reset."
A. Crisper pans
B. Deli pans
Deli Pan Settings (42" [106.7 cm] Models)
The deli pan control panel located above each deli pan has the
following three temperature settings: Deli, Produce, Meats (Cold
to Coldest) and the Quick Chill setting. Select the appropriate
setting for the food being stored.
Meat Storage Guide (42" [106.7 cm] Models)
Store most meat in original wrapping as long as it is airtight and
moisture-proof. Rewrap if necessary. See the following chart for
storage times. When storing meat longer than the times given,
freeze the meat.
Fresh fish or shellfish ......................... use same day as purchased
Chicken, ground beef, variety meat (liver, etc.) ................ 1-2 days
Cold cuts, steaks/roasts .................................................. 3-5 days
Cured meats ................................................................... 7-10 days
Leftovers - Cover leftovers with plastic wrap, aluminum foil, or
plastic containers with tight lids.
Quick Chill Setting (42" [106.7 cm] Models)
Each deli pan has a Quick Chill setting. Selecting Quick Chill
lowers the temperature of the deli pan for a 1-hour period.
NOTE: The deli pan temperature will be lower than the freezing
point for liquids. Remove items that may freeze, before setting the
deli pan to Quick Chill.
Crisper Pan
Above each deli pan is a crisper pan (the larger of the pans) which
is for larger produce items.
Remove and Replace the Deli/Crisper Pans
1. Slide the deli/crisper pan straight out to the stop. Lift the front
of the pan with one hand while supporting the bottom with the
other hand. Slide the pan out the rest of the way.
2. To replace the deli/crisper pan, pull out the pan slides until
they are fully extended and set the pan on the slides. Push the
pan in toward the back until it is in closed position.
3. Reopen the deli/crisper pan to make sure it has been replaced
properly.
e d c s! ot
(ot:t some modes}
The water filter indicator, located on the control panel, will help
you know when to change the water filter.
A new water filter should display a reading of 99%. The reading in
the display will decrease as the filter life is used. A replacement
water filter should be ordered when "Order Filter" is displayed. It is
recommended that you replace the filter when "Change Filter" is
displayed or when water flow to your water dispenser and/or
icemaker decreases noticeably. See "Changing the Water Filter"
later in this section.
% Remaining
Reset
After changing the water filter, press and hold RESET for
2 seconds until the status display changes to 99%.
Do not use with water that is microbiologically unsafe or of
unknown quality without adequate disinfection before or
after the system.
Changing the Water Filter
The water filter is located in the base grille below the freezer
compartment door. It is not necessary to remove the base grille to
remove the filter.
1. Remove the filter by pressing the eject button and pulling
straight out on the filter cap.
NOTES:
Avoid twisting the cap when removing the filter because
this could cause the cap to come off. If this occurs,
replace the cap and pull the filter straight out.
There will be water in the filter. Some spilling may occur.
A
2=
A Eject button
B. Filter cap
Remove the cap by turning it counterclockwise until it stops.
IMPORTANT: Do not discard the cap. It is part of your
refrigerator. Keep the cap to use with the replacement filter.
3=
Align the ridge on the cap with the arrow on the new filter and
turn the cap until it snaps into place.
A. Cover
B. O-rings
4. Remove the covers from the O-rings. Be sure the O-rings are
still in place after the covers are removed.
5. Place the cap (removed in Step 2) on the new filter. Align the
ridge on the cap with the arrow on the filter. Turn the cap
clockwise until it snaps into place.
A. Eject button
B. Arrow on filter
C. Ridge on cap
6. Push the new filter into the opening in the base grille. As the
filter is inserted, the eject button will depress. The eject button
will pop back out when the filter is fully engaged.
7. Pull gently on the cap to check that the filter is securely in
place.
8. Discard the first three batches of ice produced after replacing
the filter.
Using the Ice Maker Without a Water Filter
You can operate the ice maker without a water filter. Your ice will
not be filtered.
1. Remove the filter by pressing the eject button and pulling on
the cap. See "Changing the Water Filter" earlier in this section.
2. Remove the cap by turning it counterclockwise until it stops.
IMPORTANT: Do not discard the cap. It is part of your
refrigerator. Keep the cap to use with the replacement filter.
3=
With the cap in a horizontal position, insert the cap into the
base grille until it stops.
4=
Turn the cap counterclockwise until the cap slips into the
attachment slot. Then, turn the cap clockwise until it is in a
horizontal position.
NOTE: The cap will not be even with the base grille.
8
Turn the Ice Maker On/Off
The ice maker On/Off control is located on the left-hand side of
the ice bin.
1=
2.
Toturn on the ice maker, slide the ice maker On/Off control to
the ON (up) position.
NOTE: Your ice maker has an automatic shutoff. As ice is
made, the ice cubes will fill the ice storage bin. The ice maker
sensors will automatically stop ice production, but the ice
maker control will remain in the ON (up) position.
To manually turn off the ice maker, slide the ice maker On/Off
control to the OFF (down) position as shown.
A. On/Off control
Ice Storage Bin Care
1=
2.
3.
Slide the ice bin out of the freezer and lift up and out.
Empty the ice bin. Use warm water to melt the ice if
necessary.
NOTE: Do not use anything sharp to break up the ice in the
bin. This can cause damage to the ice container and the
dispenser mechanism.
Wash ice bin with warm water and a mild detergent, rinse well
and dry thoroughly. Do not use harsh or abrasive cleaners or
solvents.
REMEMBER:
Allow 24 hours to produce the first batch of ice.
Discard the first three batches of ice produced to avoid
impurities that may be flushed out of the system.
It may take 3 to 4 days for the ice bin to completely fill, if no
ice is used.
The quality of your ice will be only as good asthe quality of the
water supplied to your ice maker.
Avoid connecting the ice maker to a softened water supply.
Water softener chemicals (such as salt) can damage parts of
the ice maker and lead to poor quality ice. If asoftened water
supply cannot be avoided, make sure the water softener is
operating properly and is well maintained.
It is normal for the ice cubes to be attached at the corners.
They will break apart easily.
Do not store anything inside the ice bin.
REFRIGERATORCARE
Explosion Hazard
Use nonflammable cleaner.
Failure to do so can result in death, explosion, or fire.
Both the refrigerator and freezer sections defrost automatically.
However, clean both sections about once a month to avoid
buildup of odors. Wipe up spills immediately.
To Clean Your Refrigerator:
1. Remove the top grille. See "Power On/Off Switch."
2. Press power switch to OFF.
3. Remove all removable parts from inside, such as shelves,
crispers, etc.
4. Hand wash, rinse, and dry removable parts and interior
surfaces thoroughly. Use a clean sponge or soft cloth and a
mild detergent in warm water.
Do not use abrasive or harsh cleaners such as window
sprays, scouring cleansers, flammable fluids, cleaning
waxes, concentrated detergents, bleaches or cleansers
containing petroleum products on plastic parts, interior
and door liners or gaskets. Do not use paper towels,
scouring pads, or other harsh cleaning tools. These can
scratch or damage materials.
5=
To help remove odors, you can wash interior walls with a
mixture of warm water and baking soda (2 tbs to 1 qt
[26 g to 0.95 L] of water).
Wash stainless steel and painted metal exteriors with a clean
sponge or soft cloth and a mild detergent in warm water. Do
not use abrasive or harsh cleaners, or cleaners containing
chlorine. Dry thoroughly with a soft cloth. For additional
protection against damage to painted metal exteriors, apply
appliance wax (or auto paste wax) with a clean, soft cloth. Do
not wax plastic parts.
NOTE: To keep your Stainless Steel refrigerator looking like
new and to remove minor scuffs or marks, it is suggested that
you use the manufacturer's approved Stainless Steel Cleaner
and Polish.
IMPORTANT: This cleaner is for Stainless Steel parts only!
Do not allow the Stainless Steel Cleaner and Polish to come
into contact with any plastic parts such as the trim pieces,
dispenser covers or door gaskets. If unintentional contact
does occur, clean plastic part with a sponge and mild
detergent in warm water. Dry thoroughly with a soft cloth. To
order the cleaner, see "Accessories."
6. Press the power switch to ON.
7. Replace the top grille. See "Power On/Off Switch."
.........."5 he ghlB
NOTE: Not all appliance bulbs will fit your refrigerator. Be sure to
replace the bulb with one of the same size and shape. The lights
require a 40-watt maximum appliance bulb. Replacement bulbs
are available from your dealer.
Refrigerator Lights
There are three light bulbs located in the top front of the
refrigerator compartment behind a light shield.
1. Remove the top grille. See "Power On/Off Switch."
2. Press power switch to the Off position.
3. Open the light shield. Grasp the light shield by the openings.
Gently push back and pull down, as shown, to access the
light bulbs.
A. Light shield
4. Remove the light bulb and replace it with one of the same
size, shape and wattage.
5. Close the light shield by raising it up into place.
NOTE: If needed, clean the light shield with a damp soft cloth.
6. Press the power switch to the On position.
7. Replace the top grille. See "Power On/Off Switch."
Freezer Lights
There are two light bulbs located in the top of the freezer
compartment. One bulb is over the ice bin, and the other bulb is
over the freezer pan.
1. Slide open the ice bin or freezer pan to access the light bulb.
2. Remove the light bulb and replace it with one of the same
size, shape and wattage.
A
A.L_htbu_s
If the power will be out for 24 hours or less, keep the door or
doors closed (depending on your model) to help food stay cold
and frozen.
If the power will be out for more than 24 hours, do one of the
following:
Remove all frozen food and store it in a frozen food locker.
Place 2 Ibs (907 g) of dry ice in the freezer for every cubic foot
(28 L) of freezer space. This will keep the food frozen for 2 to
4 days.
If neither a food locker nor dry ice is available, consume or can
perishable food at once.
REMEMBER: A full freezer stays cold longer than a partially filled
one. A freezer full of meat stays cold longer than a freezer full of
baked goods. If you see that food contains ice crystals, it may be
refrozen, although the quality and flavor may be affected. If the
condition of the food is poor, dispose of it.
Your refrigerator is equipped with the Rest Mode feature, which is
designed for the traveler who wishes to turn off the lights and ice
maker. By selecting this feature, the temperature set points remain
unchanged, the ice maker will be disabled and the interior lights
will turn off. For most efficient refrigerator operation, it is
recommended to exit the Rest Mode when it is no longer required.
If You Choose to Leave the Refrigerator On
While You're Away:
1. Use up any perishables and freeze other items.
2. Press REST MODE pad.
3. If your refrigerator has an automatic ice maker, shut off the
water supply to the ice maker.
4. Empty the ice bin.
5. When you return from vacation, press REST MODE to return
to normal operation.
If You Choose to Turn the Refrigerator Off
Before You Leave:
1. Remove all food from the refrigerator.
2. If your refrigerator has an automatic ice maker:
Turn off the water supply to the ice maker at least one day
ahead of time.
When the last load of ice drops, slide the ice maker control
to the OFF (down) position.
3. Depending on your model, turn the Thermostat Control
(or Refrigerator Control) to OFF. See "Using the Controls."
4. Clean refrigerator, wipe it, and dry well.
5. Tape rubber or wood blocks to the tops of all doors to prop
them open far enough for air to get in. This stops odor and
mold from building up.
10
TROUBLESHOOTING
Try the solutions suggested here first in order to avoid the cost of an unnecessary service call.
The refrigerator will not operate
Electrical Shock Hazard
Plug into a grounded 3 prong outlet.
Do not remove ground prong.
Do not use an adapter.
Do not use an extension cord.
Failure to follow these instructions can result in death,
fire, or electrical shock.
Power cord unplugged? Plug into a grounded 3 prong outlet.
Is outlet working? Plug in a lamp to see ifthe outlet is
working.
Household fuse blown or circuit breaker tripped? Replace
the fuse or reset the circuit breaker. If the problem continues,
call an electrician.
Are controls on? Make sure the refrigerator controls are on.
See "Using Controls."
Is refrigerator defrosting? Your refrigerator will regularly run
an automatic defrost cycle. Recheck in 30 minutes to see if it
is operating.
New installation? Allow 24 hours following installation for the
refrigerator to cool completely.
NOTE: Adjusting the temperature controls to coldest setting
will not cool either compartment more quickly.
The motor seems to run too much
Your new refrigerator may run longer than your old one due to its
high-efficiency compressor and fans. The unit may run even
longer if the room is warm, a large food load is added, doors are
opened often, or if the doors have been left open.
The refrigerator is noisy
Refrigerator noise has been reduced over the years. Due to this
reduction, you may hear intermittent noises from your new
refrigerator that you did not notice from your old model. Below are
listed some normal sounds with an explanation.
Buzzing - heard when the water valve opens to fill the ice
maker
Pulsating - fans/compressor adjusting to optimize
performance
Rattling - flow of refrigerant, water line, or from items placed
on top of the refrigerator
Sizzling/Gurgling - water dripping on the heater during
defrost cycle
Popping - contraction/expansion of inside walls, especially
during initial cool-down
Water running - may be heard when ice melts during the
defrost cycle and water runs into the drain pan
Creaking/Cracking - occurs as ice is being ejected from the
ice maker mold.
The doors will not close completely
Door blocked open? Move food packages away from door.
Bin or shelf in the way? Push bin or shelf back in the correct
position.
The doors are difficult to open
Explosion Hazard
Use nonflammable cleaner.
Failure to do so can result in death, explosion, or fire.
Are the gaskets dirty or sticky? Clean gaskets with mild
soap and warm water.
11
The lights do not work
Is a light bulb loose in the socket or burned out? See
"Changing the Light Bulbs."
Is the refrigerator in Rest Mode? See "Rest Mode."
Has the door been open more than 10 minutes? See "Door
Alarm" in "Using the Controls."
Temperature is too warm
New installation? Allow 24 hours following installation for the
refrigerator to cool completely.
Door(s) opened often or left open? Allows warm air to enter
refrigerator. Minimize door openings and keep doors fully
closed.
Large load of food added? Allow several hours for
refrigerator to return to normal temperature.
Controls set correctly for the surrounding conditions?
Adjust the controls a setting colder. Check temperature in
24 hours. See "Using Controls."
Refrigerator not cooling? For models with digital controls,
turn the refrigerator OFF and then ON to reset. If this does not
correct the problem, call for service.
Air vents blocked? Remove any item from in front of the air
vents.
There is interior moisture buildup
NOTE: Some moisture buildup is normal.
Humid room? Contributes to moisture buildup.
Door(s) opened often or left open? Allows humid air to enter
refrigerator. Minimize door openings and keep doors fully
closed.
The ice maker is not producing ice or not enough ice
Refrigerator connected to a water supply and the supply
shutoff valve turned on? Connect refrigerator to water
supply and turn water shutoff valve fully open.
Kink in the water source line? A kink in the line can reduce
water flow. Straighten the water source line.
Ice maker turned on? Make sure wire shutoff arm or switch
(depending on model) is in the ON position.
New installation? Wait 24 hours after ice maker installation
for ice production to begin. Wait 72 hours for full ice
production.
Large amount of ice recently removed? Allow 24 hours for
ice maker to produce more ice.
Ice cube jammed in the ice maker ejector arm?
Remove ice from the ejector arm with a plastic utensil.
Reverse osmosis water filtration system connected to
your cold water supply? This can decrease water pressure.
See "Water Supply Requirements" in either the Installation
Instruction booklet or the Use & Care Guide.
The ice cubes are hollow or small
NOTE: This is an indication of low water pressure.
Water shutoff valve not fully open? Turn the water shutoff
valve fully open.
Kink in the water source line? A kink in the line can reduce
water flow. Straighten the water source line.
Reverse osmosis water filtration system connected to
your cold water supply? This can decrease water pressure.
See "Water Supply Requirements."
Questions remain regarding water pressure? Call a
licensed, qualified plumber.
Off-taste, odor or gray color in the ice
New plumbing connections? New plumbing connections
can cause discolored or off-flavored ice.
Ice stored too long? Discard ice. Wash ice bin. Allow
24 hours for ice maker to make new ice.
Odor transfer from food? Use airtight, moisture proof
packaging to store food.
Are there minerals (such as sulfur) in the water? A water
filter may need to be installed to remove the minerals.
Is there a water filter installed on the refrigerator? Gray or
dark discoloration in ice indicates that the water filtration
system needs additional flushing.
12
WATERFILTERCERTIFICATIONS
State of California
Department of Health Services
Water Treatment Device
Certificate Number
05- 1703
t)a{e lssued: ApriI 6, 2005
Date Revised: September 7, 2005
Tr ademar k/Modet Designation Reolacement Elements
Whirlpool Deluxe T2WG2 ......
Whirlpool
Trademark/Model Designation
Whlrlp 1ot Deluxe T1WG2
Slate of Calilbmia
Department of Health Services
Water Treatment Device
Certificate Number
05 - 1702
Date Issued: Aprd 6, 21X)5
Date Revised: Septenlber 7, 21}05
Reptacenlent Elenlent_
T2RFW(i2
Manuthetureri
to Section
Organic Contanlinaats
Rated Service Capacity: 2/XI gals Rated Service Flow: 085 gpm
Conditions of Certification:
Do not use with waler that is microbio]ogically unsate or of unknowl_ quality, without adequa_ disinlL, ction beR_re or
after tile syslcnl
Rated Service Capacity: 200 gals Rated Service Flow: 05 gpm
Conditions of Certification:
Do not use with water _hat is microbiologically unsal_ or of tmknown quality, without adequate disinfection be{bre ol
after tile system
13
PERFORMANCEDATA SHEETS
Base Grille Water Filtration System
Model T2WG2L/T2RFWG2 Capacity 200 Gallons (758 Liters)
Model T2WG2/T2RFWG2 Capacity 200 Gallons (758 Liters)
System tested and certified by NSF International against NSF/ANSI
Standard 42 for the reduction of Chlorine Taste and Odor, Particulate
Class I1";and against NSF/ANSI Standard 53 for the reduction of Mercury,
Benzene, Toxaphene, O-dichlorobenzene, and Carbofuran.
This system has been tested according to NSF/ANSI Standards 42 and 53 for the reduction of the substances listed below. The
concentration of the indicated substances in water entering the system was reduced to a concentration less than or equal to the
permissible limit for water leaving the system, as specified in NSF/ANSI Standards 42 and 53.
Substance Reduction
Aesthetic Effects
Chlorine Taste/Odor
Particulate Class I1"
Contaminant
Reduction
Lead: @ pH 6.5***
Lead: @ pH 8.5***
Mercury: @ pH 6.5
Mercury: @ pH 8.5
Benzene
O-Dichlorobenzene
Toxaphene
Carbofuran
NSF Reduction
Requirements
50% reduction
85% reduction
NSF Reduction
Requirements
0.010 mg/L
0.010 mg/L
0.002 mg/L
0.002 mg/L
0.005 mg/L
0.6 mg/L
0.003 mg/L
0.04 mg/L
Average
Influent
2.0182 mg/L
1333333 #/mL
Average
Influent
0.1533 mg/L
0.1400 mg/L
0.0058 mg/L
0.0059 mg/L
0.0154 mg/L
1.7571 mg/L
0.015 mg/L
0.0819 mg/L
Influent Challenge Maximum Average
Concentration Effluent Effluent
2.0 mg/L + 10% 0.06 mg/L ** 0.0536 mg/L
At east 10,000 part c es/mL 6600 #/mL 2325 #/mL
Influent Challenge
Concentration
0.15 mg/L_+ 10%
0.15 mg/L_+ 10%
0.006 mg/L _+10%
0.006 mg/L _+10%
0.015 mg/L _+10%
1.8 mg/L _+10%
0.015 mg/L _+10%
0.08 mg/L _+10%
Maximum
Effluent
0.0005 mg/L
0.0007 mg/L
0.0002 mg/L
0.0005 mg/L
0.0012 mg/L
0.0250 mg/L
0.001 mg/L
0.0400 mg/L
Average
Effluent
0.0005 mg/L
0.0006 mg/L
0.0002 mg/L
0.0003 mg/L
0.0006 mg/L
0.0066 mg/L
0.001 mg/L
0.0213 mg/L
Minimum %
Reduction
97.03
99.51
Minimum %
Reduction
99.67
99.50
96.54
91.57
92.22
98.58
93.33
51.13
Average %
Reduction
97.34
99.83
Average %
Reduction
99.67
99.57
96.54
94.92
96.34
99.63
93.33
74.00
Test Parameters: pH = 7.5 + 0.5 unless otherwise noted.
Temp. = 68°F to 71.6°F (20°C to 22°C).
It is essential that operational, maintenance, and filter
replacement requirements be carried out for the product to
perform as advertised.
Flow = 0.85 gpm (3.2 Lpm). Pressure = 60 psig (413.7 kPa).
Use replacement filter T2RFWG2, part #4396841. In Canada,
use replacement filter T2RFWG2, part #4396841 B.
2008 suggested retail price of $39.99 U.S.A./S49.99 Canada.
Prices are subject to change without notice.
Model T2WG2L: Style 1 - Press FILTER to check the status
of your water filter. If the filter indicator light is yellow, order a
new filter. If the filter indicator light is red, it is recommended
that you replace the filter.
Style 2 - When the filter indicator reads 10%, order a new
filter. When the filter indicator reads 0%, it is recommended
that you replace the filter.
Style 3 - When the water filter status display changes from
"GOOD" to "ORDER," order a new filter. When the filter
indicator reads "REPLACE," it is recommended that you
replace the filter.
Model T2WG2: Change the water filter every 6 months
depending upon your usage. If the water flow to the water
dispenser or ice maker decreases noticeably before 6 months
have passed, replace the water filter more often.
These contaminants are not necessarily in your water supply.
While testing was performed under standard laboratory
conditions, actual performance may vary.
The product is for cold water use only.
Do not use with water that is microbiologically unsafe or of
unknown quality without adequate disinfection before or after
the system.
Refer to the "Assistance or Service" section for the
Manufacturer's name, address and telephone number.
Refer to the "Warranty" section for the Manufacturer's limited
warranty.
Application Guidelines/Water Supply Parameters
Water Supply City or Well
Water Pressure 30 - 120 psi (207 - 827 kPa)
Water Temperature 33° - 100°F (0.6° - 37.8°C)
Service Flow Rate 0.85 gpm (3.2 Lpm) @ 60 psi
*Class II particle size: 1 um to <5 um
**Test requirement is at least 100,000 particles/mL of AC Fine Test Dust.
***Compliant for Lead reduction requirements under NSF/ANSl Standard 53 as tested by Pace Analytical Services, Inc.
® NSF is a registered trademark of NSF International.
14
Base Grille Water Filtration System
Model TIWG2L/T2RFWG2 Capacity 200 Gallons (758 Liters)
Model TIWG2/T2RFWG2 Capacity 200 Gallons (758 Liters)
System tested and certified by NSF International against NSF/ANSI
Standard 42 for the reduction of Chlorine Taste and Odor, Particulate
Class I1"; and against NSF/ANSI Standard 53 for the reduction of
Mercury, Benzene, Toxaphene, O-dichlorobenzene, and Carbofuran.
This system has been tested according to NSF/ANSI 42/53 for the reduction of the substances listed below. The concentration of the
indicated substances in water entering the system was reduced to a concentration less than or equal to the permissible limit for water
leaving the system, as specified in NSF/ANSI 42/53.
Substance Reduction
Aesthetic Effects
Chlorine Taste/Odor
Particulate Class I1"
Contaminant
Reduction
Lead: @ pH 6.5***
Lead: @ pH 8.5***
Mercury: @ pH 6.5
Mercury: @ pH 8.5
Benzene
O-Dichlorobenzene
Toxaphene
Carbofuran
NSF Reduction
Requirements
50% reduction
85% reduction
NSF Reduction
Requirements
0.010 mg/L
0.010 mg/L
0.002 mg/L
0.002 mg/L
0.005 mg/L
0.6 mg/L
0.003 mg/L
0.04 mg/L
Average Influent Challenge Maximum Average Minimum %
Influent Concentration Effluent Effluent Reduction
2.0182 mg/L 2.0 mg/L + 10% 0.06 mg/L ** 0.0536 mg/L 97.03
1333333 #/mL At east 10,000 part c es/mL 6600 #/mL 2325 #/mL 99.51
Average Influent Challenge Maximum Average Minimum %
Influent Concentration Effluent Effluent Reduction
0.1533 mg/L
0.1400 mg/L
0.0058 mg/L
0.0059 mg/L
0.0154 mg/L
1.7571 mg/L
O.O15 mg/L
0.0819 mg/L
0.15 mg/L + 10%
0.15 mg/L_+ 10%
0.006 mg/L + 10%
0.006 mg/L _+10%
0.015 mg/L _+10%
1.8 mg/L _+10%
0.015 mg/L _+10%
0.08 mg/L _+10%
0.0005 mg/L
0.0007 mg/L
0.0002 mg/L
0.0005 mg/L
0.0012 mg/L
0.0250 mg/L
0.001 mg/L
0.0400 mg/L
0.0005 mg/L
0.0006 mg/L
0.0002 mg/L
0.0003 mg/L
0.0006 mg/L
0.0066 mg/L
0.001 mg/L
0.0213 mg/L
99.67
99.50
96.54
91.57
92.22
98.58
93.33
51.13
Average %
Reduction
97.34
99.83
Average %
Reduction
99.67
99.57
96.54
94.92
96.34
99.63
93.33
74.00
Test Parameters: pH = 7.5 + 0.5 unless otherwise noted.
Temp. = 68°F to 71.6°F (20°C to 22°C).
It is essential that operational, maintenance, and filter
replacement requirements be carried out for the product to
perform as advertised.
Flow = 0.5 gpm (1.9 Lpm). Pressure = 60 psig (413.7 kPa).
Use replacement filter T2RFWG2, part #4396841. In Canada,
use replacement filter T2RFWG2, part #4396841 B.
2008 suggested retail price of $39.99 U.S.A./S49.99 Canada.
Prices are subject to change without notice.
Model TlWG2L: Style 1 - Press FILTER to check the status
of your water filter. If the filter indicator light is yellow, order a
new filter. If the filter indicator light is red, it is recommended
that you replace the filter.
Style 2 - When the filter indicator reads 10%, order a new
filter. When the filter indicator reads 0%, it is recommended
that you replace the filter.
Style 3 - When the water filter status display changes from
"GOOD" to "ORDER," order a new filter. When the filter
indicator reads "REPLACE," it is recommended that you
replace the filter.
Model TlWG2: Change the water filter every 6 months
depending upon your usage. If the water flow to the water
dispenser or ice maker decreases noticeably before 6 months
have passed, replace the water filter more often.
These contaminants are not necessarily in your water supply.
While testing was performed under standard laboratory
conditions, actual performance may vary.
The product is for cold water use only.
Do not use with water that is microbiologically unsafe or of
unknown quality without adequate disinfection before or after
the system.
Refer to the "Assistance or Service" section for the
Manufacturer's name, address and telephone number.
Refer to the "Warranty" section for the Manufacturer's limited
warranty.
Application Guidelines/Water Supply Parameters
Water Supply City or Well
Water Pressure 30 - 120 psi (207 - 827 kPa)
Water Temperature 33° - 100°F (0.6° - 37.8°C)
Service Flow Rate 0.5 gpm (1.9 Lpm) @60 psi
*Class II particle size: 1 um to <5 um
**Test requirement is at least 100,000 particles/mL of AC Fine Test Dust.
***Compliant for Lead reduction requirements under NSF/ANSl Standard 53 as tested by Pace Analytical Services, Inc.
® NSF is a registered trademark of NSF International.
15
JENN-AII REFRIGERATORWARRANTY
ONE YEAR LIMITED WARRANTY
For one year from the date of purchase, when this major appliance is operated and maintained according to instructions attached to or
furnished with the product, Jenn-Air brand of Maytag Corporation or Maytag Limited (hereafter "Jenn-Air") will pay for factory specified
replacement parts and repair labor to correct defects in materials or workmanship. Service must be provided by a Jenn-Air designated
service company. This limited warranty applies only when the major appliance is used in the country in which it is purchased.
On models with a water filter: 30 day limited warranty on water filter. For 30 days from the date of purchase, when this filter is operated
and maintained according to instructions attached to or furnished with the product, Jenn-Air will pay for replacement parts to correct
defects in materials and workmanship.
SECOND THROUGH FIFTH YEAR LIMITED WARRANTY ON CAVITY LINER AND SEALED REFRIGERATION SYSTEM PARTS
In the second through fifth years from the date of purchase, when this major appliance is operated and maintained according to
instructions attached to or furnished with the product, Jenn-Air will pay for replacement or repair of the refrigerator/freezer cavity liner
(including labor costs) if the part cracks due to defective materials or workmanship. Also, in the second through fifth years from the date
of purchase, Jenn-Air will pay for factory specified parts and labor to correct defects in materials or workmanship in the sealed
refrigeration system. These parts are: compressor, evaporator, condenser, dryer, and connecting tubing. Service must be provided by a
Jenn-Air designated service company.
ITEMS JENN-AIR WILL NOT PAY FOR
1. Service calls to correct the installation of your major appliance, to instruct you how to use your major appliance, to replace or repair
house fuses or to correct house wiring or plumbing.
2. Service calls to repair or replace appliance light bulbs, air filters or water filters. Those consumable parts are excluded from warranty
coverage.
3. Repairs when your major appliance is used for other than normal, single-family household use.
4. Damage resulting from accident, alteration, misuse, abuse, fire, flood, acts of God, improper installation, installation not in
accordance with electrical or plumbing codes, or use of products not approved by Jenn-Air.
5. Any food loss due to refrigerator or freezer product failures.
6. Replacement parts or repair labor costs for units operated outside the United States or Canada.
7. Pickup and delivery. This major appliance is designed to be repaired in the home.
8. Repairs to parts or systems resulting from unauthorized modifications made to the appliance.
9. Expenses for travel and transportation for product service in remote locations.
10. The removal and reinstallation of your appliance if it is installed in an inaccessible location or is not installed in accordance with
published installation instructions.
11. Replacement parts or repair labor costs when the major appliance is used in a country other than the country in which it was
purchased.
DISCLAIMER OF IMPLIED WARRANTIES; LIMITATION OF REMEDIES
CUSTOMER'S SOLE AND EXCLUSIVE REMEDY UNDER THIS LIMITED WARRANTY SHALL BE PRODUCT REPAIR AS PROVIDED
HEREIN. IMPLIED WARRANTIES, INCLUDING WARRANTIES OF MERCHANTABILITY OR FITNESS FOR A PARTICULAR PURPOSE,
ARE LIMITED TO ONE YEAR OR THE SHORTEST PERIOD ALLOWED BY LAW. JENN-AIR SHALL NOT BE LIABLE FOR INCIDENTAL
OR CONSEQUENTIAL DAMAGES. SOME STATES AND PROVINCES DO NOT ALLOW THE EXCLUSION OR LIMITATION OF
INCIDENTAL OR CONSEQUENTIAL DAMAGES, OR LIMITATIONS ON THE DURATION OF IMPLIED WARRANTIES OF
MERCHANTABILITY OR FITNESS, SO THESE EXCLUSIONS OR LIMITATIONS MAY NOT APPLY TO YOU. THIS WARRANTY GIVES
YOU SPECIFIC LEGAL RIGHTS AND YOU MAY ALSO HAVE OTHER RIGHTS, WHICH VARY FROM STATE TO STATE OR PROVINCE
TO PROVINCE.
Outside the 50 United States and Canada, this warranty does not apply. Contact your authorized Jenn-Air dealer to determine if another
warranty applies.
If you need service, first see the "Troubleshooting" section of the Use & Care Guide. After checking "Troubleshooting," additional help
can be found by checking the "Assistance or Service" section or by calling Jenn-Air. In the U.S.A., call 1-800-JENNAIR
(1-800-536-6247}. In Canada, call 1-800-807-6777. 3/07
16
  • Page 1 1
  • Page 2 2
  • Page 3 3
  • Page 4 4
  • Page 5 5
  • Page 6 6
  • Page 7 7
  • Page 8 8
  • Page 9 9
  • Page 10 10
  • Page 11 11
  • Page 12 12
  • Page 13 13
  • Page 14 14
  • Page 15 15
  • Page 16 16
  • Page 17 17
  • Page 18 18
  • Page 19 19
  • Page 20 20
  • Page 21 21
  • Page 22 22
  • Page 23 23
  • Page 24 24
  • Page 25 25
  • Page 26 26
  • Page 27 27
  • Page 28 28
  • Page 29 29
  • Page 30 30
  • Page 31 31
  • Page 32 32
  • Page 33 33
  • Page 34 34
  • Page 35 35
  • Page 36 36
  • Page 37 37
  • Page 38 38
  • Page 39 39
  • Page 40 40
  • Page 41 41
  • Page 42 42
  • Page 43 43
  • Page 44 44

Jenn-Air JF42SEFXDB01 Owner's manual

Category
Fridges
Type
Owner's manual

Ask a question and I''ll find the answer in the document

Finding information in a document is now easier with AI