Page is loading ...

WARRANTY
DO NOT RETURN YOUR PRODUCT TO THE STORE. PLEASE CONTACT BABY TREND
FOR REPLACEMENT PARTS, SERVICE AND REPAIR.
The Baby Trend
®
warranty covers workmanship defects within the rst 180 days of purchase.
Any product which has been subjected to misuse, abuse, abnormal use, excessive wear
and tear, improper assembly, negligence, environmental exposure, alteration or accident, or
has had its serial number altered or removed invalidates all claims against the manufacturer.
Any damage to property during installation is the sole responsibility of the end user. The
Customer Service Department can be contacted at 1-800-328-7363 Monday through Friday
between 8:00am and 4:30 pm (PST). Return Authorizations are required prior to returning
product(s) to Baby Trend
®
. Warranty only valid in North America.
GARANTIA
NO DEVUELVA SU PRODUCTO A LA TIENDA. POR FAVOR CONTACTE A BABY TREND
PARA PIEZAS DE REPUESTO, SERVICIO Y REPARACION.
La garantía de Baby Trend
®
cubre defectos de fábrica dentro de los primeros 180 días de
la compra.Cualquier producto que haya sido sometido a uso indebido, abuso, uso anormal,
desgaste excesivo, montaje incorrecto, negligencia, exposición ambiental, alteración
o accidente, o que ha tenido su número de serie alterado o removido anula todos los
reclamos contra el fabricante. Cualquier daño a la propiedad durante la instalación es de la
exclusiva responsabilidad del usuario nal. El Departamento de Servicio al Cliente puede ser
contactado a 1 800 328-7363 Lunes a viernes entre 8:00 am y 4:30 pm (PST).Un numero de
autorizacion es requerido antes de la devolución de los producto(s) a Baby Trend®. Garantia
válida sólo en América del Norte.
GARANTIE
NE PAS RETOURNER VOTRE PRODUIT AU MAGASIN. VEUILLEZ CONTACTER BABY
TREND POUR DES PIÈCES DE RECHANGE, ENTRETIEN ET RÉPARATION.
La garantie Baby Trend
®
couvre les vices de fabrication dans les 180 jours suivant l'achat du
produit. Tout produit qui a été soumis à un usage abusif, une utilisation anormale, une usure
excessive, un montage incorrect, de la négligence, de l'exposition environnementale, de la
modication ou un accident, ou a eu son numéro de série modié ou supprimé annule toutes
les réclamations contre le fabricant. Tout dommage à la propriété lors de l'installation est de
la seule responsabilité de l'utilisateur nal. Le service client peut être contacté au 1-800-328-
7363 du lundi au vendredi 8 h – 16 h 30 (PST). Une autorisation sera nécessaire avant de
retourner le produit à Baby Trend
®
. Garantie valable uniquement en Amérique du Nord.
1-800-328-7363
(8:00am ~ 4:30pm PST)
www.babytrend.com
Baby Trend, Inc.
13048 Valley Blvd.
Fontana CA 92335
Read all instructions BEFORE assembly and USE of product.
KEEP INSTRUCTIONS FOR FUTURE USE.
Lea todas las instrucciones ANTES de armar y USAR el producto.
CONSERVE LAS INSTRUCCIONES PARA USO FUTURO.
Lisez toutes les instructions du manuel AVANT l’assemblage
ou L’UTILISATION de ce produit. CONSERVEZ CES
INSTRUCTIONS POUR RÉFÉRENCE ULTÉRIEURE.
www.babytrend.com
BA04XXXA
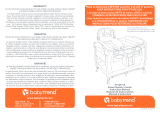
Quick Fold 2-In-1 Rocking Bassinet
Instruction Manual
Manual de Instrucciones
Manuel d’instruction
BA04xxxA_3L_060220

WARNING WARNING
1 2
Copyright © 2020, Baby Trend Inc., All Rights Reserved. Todos los derechos reservados. Tous droits réservés. Copyright © 2020, Baby Trend Inc., All Rights Reserved. Todos los derechos reservados. Tous droits réservés.
QUICK FOLD BASSINET WARNINGS:
WARNING: Failure to follow these warnings and
the instructions could result in serious injury or death.
WARNING FALL HAZARD: To help
prevent falls, do not use this product when the infant
begins to push up on hands and knees or has reached
the height of 30 in. (762 mm), weight of 20 lbs. (9 kgs)
or 5 months old, whichever comes rst.
• ALWAYS check that the bassinet is securely locked on
before each use.
• Child’s activity can move bassinet. NEVER place
bassinet on counter tops, tables, or any other elevated
surface. Only use on level ground.
SUFFOCATION HAZARD:
Infants have suffocated:
• In gaps between extra padding and side of the
bassinet, and on soft bedding, use only the pad
provided by Baby Trend®. NEVER add a pillow,
comforter, or another mattress for padding.
• Strings can cause strangulation! DO NOT place items
with a string around a child's neck such as hood
strings or pacier cords. DO NOT suspend strings over
the bassinet or attach strings to toys.
• NEVER use plastic shipping bags or other plastic lm
as mattress covers not sold and intended for that
purpose. They can cause suffocation.
• NEVER place a child under the Quick Fold Bassinet.
• The bassinet must be fully assembled and installed
before using.
• The bassinet, including side rails, must be fully erected
prior to use. Make sure each latch is secure.
• Discontinue use of the Quick Fold Bassinet when child
begins to push up on hands and knees or has reached
the height of 30 in. (762 mm), weight of 20 lbs. (9 kgs)
or 5 months old, whichever comes rst.
• Only one child can use the bassinet at any time.
• To reduce the risk of SIDS, pediatricians recommend
healthy infants be placed on their back to sleep, unless
otherwise advised by your physician.
• ALWAYS place child on back to sleep.
• ALWAYS provide the supervision necessary for the
continued safety of your child. NEVER leave children
unattended.
• If a sheet is used with the mattress/pad, use only the
one provided by Baby Trend® or one specically
designed to t the dimension of the bassinet mattress.
• Child can become entrapped and die when improvised
netting or covers are placed on top of a bassinet.
Never add such items to conne child in bassinet.
• The maximum weight that can be carried in the storage
basket is 5 lb (2.2 kg).
WASHING INSTRUCTIONS FOR MATTRESS COVER ONLY:
Use the zippers to open the mattress cover, remove the board and
sponge before washing. Do not wash it with other fabrics.
Machine wash cold, hang dry.
Do not bleach.
Do not tumble dry.
Do not iron.
Do not dry clean.
MAINTENANCE AND CLEANING INSTRUCTIONS FOR OTHER
PARTS:
Use only household mild soap and warm water.
DO NOT USE BLEACH.
DO NOT MACHINE WASH.

ASSEMBLY MONTAJE ASSEMBLAGE
8
Copyright © 2020, Baby Trend Inc., All Rights Reserved. Todos los derechos reservados. Tous droits réservés.
PARTS PIEZAS PIÈCES
7
Copyright © 2020, Baby Trend Inc., All Rights Reserved. Todos los derechos reservados. Tous droits réservés.
Crib Frame
Marco de Cuna
Cadre de Berceau
Travel Bag
Bolsa de Viaje
Sac de Voyage
Mattress
Colchón
Matelas
Check that you have all the below parts for this model before assembling the bassinet.
Antes de armar el corralito, verique que tenga todas las piezas siguientes de moisés.
Vériez que vous avez toutes les pièces de ce modèle avant d’assembler le berceau.
*Type may vary / *El tipo puede variar / *Peut varier selon le modèle
IMPORTANT! To ensure safe operation of your quick fold bassinet,
please follow these instructions carefully. Please keep these instructions for future
reference.
IMPORTANT! Before assembly and each use, inspect this product for
damaged hardware, loose joints, missing parts or sharp edges. NEVER use if any
parts are missing or broken.
IMPORTANT! Adult assembly is required.
¡IMPORTANTE! Para asegurar el funcionamiento seguro de de la cuna
plegable rápida, siga estas instrucciones cuidadosamente. Por favor, conserve
estas instrucciones para referencia futura.
¡IMPORTANTE! Antes de armar y cada vez que vaya a usar este
producto, revise que no tenga piezas de metal dañadas, uniones ojas, piezas
ausentes o bordes puntiagudos. NUNCA utilice la silla con piezas ausentes o rotas.
¡IMPORTANTE! Se requiere el montaje por parte de un adulto.
IMPORTANT ! An d’assurer l’utilisation sécuritaire le berceau á pliage
rapide suivre ces instructions soigneusement. Conservez ces instructions pour
référence ultérieure.
IMPORTANT ! Avant chaque utilisation ou assemblage inspectez ce
produit à la recherche de matériel endommagé, des joints lâches, des pièces
manquantes ou des bords pointus. NE PAS utiliser le produit si une pièce manque
ou est brisée.
IMPORTANT ! L’assemblage par un adulte est nécessaire.

ASSEMBLY MONTAJE ASSEMBLAGE ASSEMBLY MONTAJE ASSEMBLAGE
10
Copyright © 2020, Baby Trend Inc., All Rights Reserved. Todos los derechos reservados. Tous droits réservés. Copyright © 2020, Baby Trend Inc., All Rights Reserved. Todos los derechos reservados. Tous droits réservés.
9
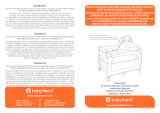
1) • Use the two sides of the frame as handles.
Simultaneously pull both sides up sharply
(Fig. 1a).
• Extend legs to lock bassinet in place
(Fig. 1b).
• To use the rocking feature, rotate both
legs of the bassinet with the screws facing
upward (Fig. 1c).
NOTE: Gently rock the bassinet when the
legs are in this position.
• To undo the rocking feature, rotate both
legs at an angle with the screws facing
away from each other, for a steady position
(Fig. 1d).
• Use los dos lados del marco como mani-
jas. Simultáneamente, tire de ambos lados
hacia arriba bruscamente (Fig. 1a).
• Extienda las patas para bloquear la cuna
en su lugar (Fig. 1b).
• Para usar la función de balanceo, gire am-
bas patas de la cuna con los tornillos hacia
arriba (Fig. 1c).
NOTA: Mueva suavemente el moisés cu-
ando las piernas están en esta posición.
Fig. 1a
Fig. 1c
Fig. 1d
Fig. 1b
• Para deshacer la función de balanceo, gire
ambas patas en ángulo con el tornillo hacia
afuera, para una posición estable (Fig. 1d).
• Utilisez les deux côtés du cadre comme poi-
gnées. Tirez simultanément les deux côtés
vers le haut (Fig. 1a).
• Allongez les pieds pour verrouiller le berceau
en place (Fig. 1b).
• Pour utiliser la fonction de bascule, tournez
les deux pieds du berceau avec les vis
orientées vers le haut (Fig. 1c).
REMARQUE: Secouez doucement le
berceau lorsque le les jambes sont dans
cette position.
• Pour annuler la fonction de bascule, faites
pivoter les deux pieds à un angle avec la
vis dans le sens opposé, pour une position
stable (Fig. 1d).
TO ASSEMBLE BASSINET
PARA MONTAR DE MOISÉS
POUR ASSEMBLER LE BERCEAU
ATTENTION: Bassinet must be fully assembled and securely
locked before installing or using other accessories.
ATENCIÓN: Moisés debe estar totalmente armado y trabado de
manera segura antes de instalar o usar otros accesorios.
ATTENTION: Berceau doit être totalement monté et verrouillé
avant d’installer ou d’utiliser d’autres accessoires.

ASSEMBLY MONTAJE ASSEMBLAGE ASSEMBLY MONTAJE ASSEMBLAGE
12
Copyright © 2020, Baby Trend Inc., All Rights Reserved. Todos los derechos reservados. Tous droits réservés. Copyright © 2020, Baby Trend Inc., All Rights Reserved. Todos los derechos reservados. Tous droits réservés.
11
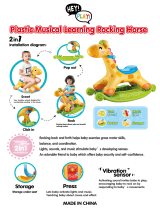
MATTRESS
COLCHÓN
MATELAS
2) • Insert the mattress into the bassinet with the
attachment side facing downward and align
all attachments (Fig. 2a).
• Press down on the mattress to be sure it is
securely attached underneath the padding
(Fig. 2b).
• Inserte el colchón en la cuna con el lado del
accesorio hacia abajo y alinee todos los
accesorios (Fig. 2a).
• Presione el colchón hacia abajo para
asegurarse de que esté bien sujeto debajo
del acolchado (Fig. 2b).
• Insérez le matelas dans le berceau avec le
côté de xation vers le bas et alignez tous les
accessoires (Fig. 2a).
• Appuyez sur le matelas pour vous
assurer qu’il est bien xé sous le matelas
rembourrage (Fig. 2b).
Fig. 3a
Fig. 3b
Fig. 3c
TO FOLD THE BASSINET
PARA PLEGAR DE MOISÉS
POUR PLIER LE BERCEAU
3) • Flip open the mattress to locate the handle
strap (Fig. 3a).
• Pull upward on the handle strap sharply until
the bassinet collapses completely (Fig. 3b).
NOTE: Mattress can be left inside the
bassinet when folded.
• For a compact fold, ensure the end frames of
the bassinet are tightly pushed in and insert
the bassinet into the bag (Fig. 3c).
• Ensure all parts of the bassinet are in the bag
(Fig. 3d).
• Abra el colchón para ubicar la correa del
mango (Fig. 3a).
• Tire de la correa del asa hacia arriba con
fuerza hasta que la cuna se colapse por
completo (Fig. 3b).
NOTA: El colchón se puede dejar dentro
del moisés cuando está doblado.
• Para un pliegue compacto, asegúrese de que
los marcos nales de la cuna estén bien apre-
tados e inserte la cuna en la bolsa (Fig. 3c).
• Asegúrese de que todas las partes de la cuna
estén en la bolsa (Fig. 3d).
• Ouvrez le matelas pour localiser la
poignée (Fig. 3a).
• Tirez fortement vers le haut sur la sangle de la
poignée jusqu’à ce que le berceau s’effondre
complètement (Fig. 3b).
REMARQUE: Le matelas peut être
laissé à l’intérieur du berceau une fois plié.
Fig. 2a
Fig. 2b

13 14
MAINTENANCE MANTENIMIENTO D’ENTRETIEN MAINTENANCE MANTENIMIENTO D’ENTRETIEN
Copyright © 2020, Baby Trend Inc., All Rights Reserved. Todos los derechos reservados. Tous droits réservés. Copyright © 2020, Baby Trend Inc., All Rights Reserved. Todos los derechos reservados. Tous droits réservés.
TO REATTACH THE BASKET
PARA VOLVER A ALCANZAR
POUR REJOINDRE LE PANIER
5) • To detach the basket, unbutton the
horizontal ap and unhook the short
straps on the side railing (Fig. 5a).
Repeat for the other side.
• To reattach the basket, button the
horizontal ap. For the side railing,
use the hook and loop method to
attach the short straps (Fig. 5b).
Repeat for the other side.
• Para separar la canasta de red,
desabroche la aleta horizontal y
desenganche las tiras cortas en la
barandilla lateral (Fig. 5a). Repite
por el otro lado.
• Para volver a colocar la canasta,
abroche la aleta horizontal. Para la
baranda lateral, utilice el método de
gancho y bucle para unir las correas
cortas (Fig. 5b). Repite por el
otro lado.
• Pour détacher le panier de let,
déboutonner le rabat horizontal et
décrocher les sangles courtes sur la
rampe latérale (Fig. 5a). Répétez pour
l’autre côté.
• Pour réinstaller le panier, boutonnez
le rabat horizontal. Pour la rampe
latérale, utilisez la méthode du
crochet et de la boucle pour attacher
les sangles courtes (Fig. 5b). Répétez
pour l’autre côté.
Fig. 5a
Fig. 5b
• Pour un pliage compact, assurez-vous
que les cadres d’extrémité du berceau sont
bien enfoncés et insérez le berceau
dans le sac (Fig. 3c).
• Assurez-vous que toutes les parties du
berceau sont dans le sac (Fig. 3d).
TO REMOVE THE MATTRESS
PARA RETIRAR EL COLCHON
POUR ENLEVER LE MATELAS
4) • Remove the mattress by pulling it out
of the bassinet completly, by unattaching it
from the fabric (Fig. 4a).
• Retire el colchón tirando de él de la cuna
completamente, desatándola de la tela
(Fig. 4a).
• Retirez le matelas en le tirant du berceau
complètement, en le détachant du tissu
(Fig. 4a).
Fig. 4a
Fig. 3d

15 16
MAINTENANCE MANTENIMIENTO D’ENTRETIEN MAINTENANCE MANTENIMIENTO D’ENTRETIEN
Copyright © 2020, Baby Trend Inc., All Rights Reserved. Todos los derechos reservados. Tous droits réservés. Copyright © 2020, Baby Trend Inc., All Rights Reserved. Todos los derechos reservados. Tous droits réservés.
TO REATTACH THE FABRIC
PARA REATACAR LA TELA
POUR REATTACHER LE TISSU
6) • On the side of the bassinet railing, unbuckle the
handle strap and release it through the fabric
tunnel underneath the bassinet (Fig. 6a).
• By ipping over the mattress, remove the
handle strap through the two holes on the
fabric (Fig. 6b).
• Pull out the handle strap completely from the
other fabric tunnel (Fig. 6c).
• To remove the fabric: Unzip both sides of the
frames (Fig. 6d).
• Underneath the fabric, unbutton the fabric
from both sides (Fig. 6e).
• Unscrew the buttons on the rectangular fabric
on both sides with a screw driver before
removing the fabric from the bassinet (Fig. 6f).
• To reattach the fabric: Pull over both sides
of the fabric tightly over each frame. Align the
rectangular fabric to screw in place. Repeat for
the other side (Fig. 6g).
• Button the fabric on both sides (Fig. 6h).
• Zip both sides of the frames (Fig. 6i).
• Reattach the handle strap: The side of the
bassinet that has the long buckle strap, insert
the strap through the fabric tunnel underneath
the bassinet fabric (Fig. 6j).
• Insert the handle strap through the two holes
located underneath the mattress (Fig. 6k).
• Pull the handle strap through the other side of
the fabric tunnel and buckle both straps (Fig. 6l).
• En el lado de la baranda del moisés,
desabroche la correa del asa y suéltela a
través del túnel de tela debajo del moisés
(Fig. 6a).
• Al voltear el colchón, retire la correa del
mango a través de los dos agujeros en la tela
(Fig. 6b).
• Extraiga completamente la correa del asa del
otro túnel de tela (Fig. 6c).
• Para quitar la tela: Descomprima ambos
lados de los marcos (Fig. 6d).
• Debajo de la tela, desabroche la tela de
ambos lados (Fig. 6e).
• Desatornille los botones de la tela rectangular
en ambos lados con un destornillador antes
de quitar la tela de la cuna (Fig. 6f).
• Para volver a colocar la tela: Tire de ambos
lados de la tela con fuerza sobre cada marco.
Alinee la tela rectangular para atornillarla.
Repita para el otro lado (Fig. 6g).
• Abotone la tela en ambos lados (Fig. 6h).
• Cierre con cremallera ambos lados de los
marcos (Fig. 6i).
• Vuelva a colocar la correa del asa: el lado
de la cuna que tiene la correa de hebilla larga,
inserte la correa a través del túnel de tela
debajo de la tela de la cuna (Fig. 6j).
• Inserte la correa del mango a través de los
dos oricios ubicados debajo del colchón
(Fig. 6k).
• Tire de la correa del asa por el otro lado del
túnel de tela y abroche ambas correas
(Fig. 6l).
Fig. 6d
Fig. 6a
Fig. 6b
Fig. 6c
Fig. 6g
Fig. 6h
Fig. 6e
Fig. 6f

17 18
MAINTENANCE MANTENIMIENTO D’ENTRETIEN MAINTENANCE MANTENIMIENTO D’ENTRETIEN
Copyright © 2020, Baby Trend Inc., All Rights Reserved. Todos los derechos reservados. Tous droits réservés. Copyright © 2020, Baby Trend Inc., All Rights Reserved. Todos los derechos reservados. Tous droits réservés.
BABY TREND® CUSTOMER SERVICE
The Customer Service Department can be contacted
at 1 (800) 328-7363 Monday through Friday between
8:00am and 4:30pm (PST). Return Authorizations are
required prior to returning product(s) to Baby Trend®.
Warranty only valid in North America.
BABY TREND® SERVICIO AL CLIENTE
El Departamento de Servicio al Cliente puede ser
contactado a 1 (800) 328-7363 Lunes a viernes entre
8:00am y 4:30pm (PST).Un numero de autorizacion es
requerido antes de la devolución de los producto(s) a
Baby Trend®. Garantia válida sólo en América del Norte.
BABY TREND® SERVICE CLIENT
Le service client peut être contacté au 1 (800) 328-7363
du lundi au vendredi 8 h – 16 h 30 (PST). Une autorisation
sera nécessaire avant de retourner le produit à Baby
Trend®. Garantie valable uniquement en
Amérique du Nord.
Fig. 6k
Fig. 6l
Fig. 6j
Fig. 6i
• Du côté de la balustrade du berceau,
déboucler la sangle de la poignée et la
libérer à travers le tunnel de tissu sous le
berceau (Fig. 6a).
• En retournant le matelas, retirez la sangle
de la poignée à travers les deux trous sur le
tissu (Fig. 6b).
• Retirez complètement la sangle de la
poignée de l’autre tunnel en tissu (Fig. 6c).
• Pour retirer le tissu: Décompressez les
deux côtés des cadres (Fig. 6d).
• Sous le tissu, déboutonnez le tissu des
deux côtés (Fig. 6e).
• Dévissez les boutons du tissu rectangulaire
des deux côtés avec un tournevis avant de
retirer le tissu du berceau (Fig. 6f).
• Pour rattacher le tissu: Tirez fermement
sur les deux côtés du tissu sur chaque
cadre. Alignez le tissu rectangulaire à visser
en place. Répétez l’opération pour l’autre
côté (Fig. 6g).
• Boutonner le tissu des deux côtés (Fig. 6h).
• Glissez les deux côtés des cadres (Fig. 6i).
• Rattachez la sangle de la poignée: du
côté du coufn qui a la longue sangle de
boucle, insérez la sangle dans le tunnel de
tissu sous le tissu du coufn (Fig. 6j).
• Insérez la sangle de la poignée dans les
deux trous situés sous le matelas (Fig. 6k).
• Tirez la sangle de la poignée de l’autre
côté du tunnel en tissu et bouclez les deux
sangles (Fig. 6l).
/